


Aperture Priority Mode: When to Use Av Mode Instead of Manual
Nov 26, 2025
Darlene Lleno
Darlene Lleno brings a unique perspective to DIY Photography as someone who grew up surrounded by camera gear but chose words over lenses. With five years of writing experience, she specializes in photography content that’s both technically informed and genuinely passionate. Growing up with a photographer twin brother meant camera talk was everyday conversation in her household. While he mastered capturing moments, Darlene discovered she preferred being the subject and the storyteller behind the scenes. As a travel enthusiast and mother of two, she understands the importance of preserving life’s precious moments. When not exploring new destinations or writing for DIY Photography, you’ll find her reading or tending to her garden. Her approach to photography writing is refreshingly authentic, she may not be behind the camera, but she knows exactly what it takes to help others capture the shots that matter most.
Share:

Aperture priority mode gives you control over depth of field while your camera picks the shutter speed. This semi-automatic setting sits between full manual and program auto. It’s a powerful tool when timing matters more than total control.
Most photographers think manual mode makes them look professional. That mindset costs them missed shots. The truth? Professional photographers pick camera modes based on the situation, not their ego.
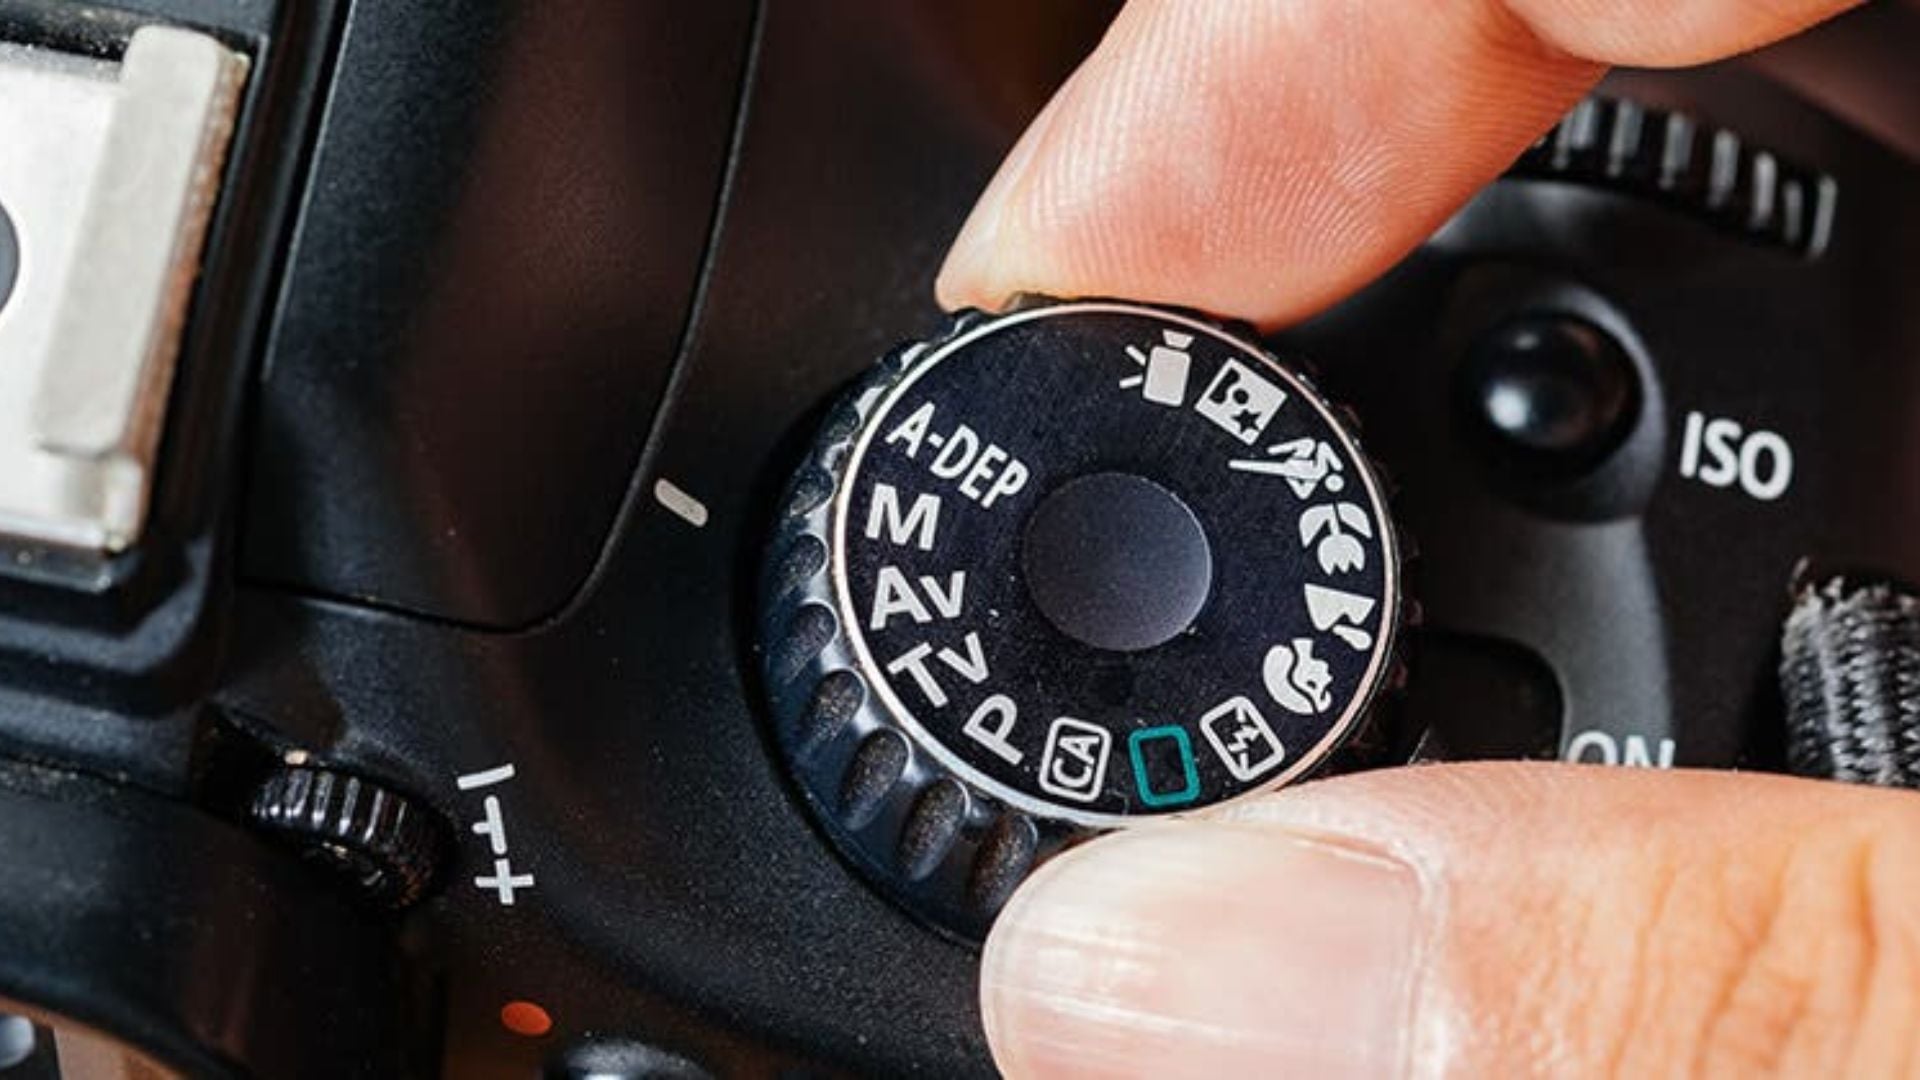
Understanding Aperture Priority Mode
Aperture priority mode works simply. You set the aperture, and your camera calculates the shutter speed for proper exposure. Canon calls it Av mode (Aperture value). Nikon uses A mode. The function stays the same across all brands.
You control the f-stop. This determines how much light enters through your lens opening. The camera measures the scene and picks a shutter speed. This creates a balanced exposure based on your chosen ISO setting. This partnership between you and your camera creates faster workflow without sacrificing creative vision.

How Av Mode Actually Works
Your camera’s light meter constantly reads the scene in front of you. When you adjust the aperture, the camera recalculates the shutter speed in real time. Press the shutter button halfway. You’ll see the shutter speed your camera selected.
Modern cameras make these calculations in milliseconds. They account for the light falling on your subject. They factor in the ISO sensitivity you’ve chosen. They use the aperture setting you’ve dialed in. The result? A properly exposed image without manual trial and error.
Your camera uses internal algorithms to pick the best shutter speed. Most systems aim for middle gray, which represents 18% reflectance. According to Cambridge in Colour, the meter tries to make your scene average out to this middle tone.
When Aperture Priority Beats Manual Mode
Aperture priority reduces your workload significantly. Manual mode forces you to adjust three settings separately. Aperture priority mode cuts that to two variables you actively manage. The time savings add up fast in dynamic shooting situations.
Portrait Photography Sessions
Portrait photography demands consistent depth of field control. You want your subject’s eyes sharp while the background melts away. Set your aperture to f/1.8 or f/2.8. The camera adjusts shutter speed as clouds move across the sun.
Moving between shade and sunlight happens constantly during outdoor sessions. Manual mode requires stopping to check your exposure after each location change. Aperture priority mode adapts automatically. It keeps your depth of field constant while maintaining proper exposure.
Your working distance changes throughout a session. Getting closer or stepping back affects the light entering your lens. In Av mode, these adjustments happen without breaking your creative flow. You keep shooting while your camera handles the technical stuff.
Wedding Photography Demands
Wedding photographers shoot in constantly changing light. Churches have dark interiors with bright windows. Reception halls switch from natural daylight to colored DJ lights. Aperture priority mode handles these transitions while you focus on capturing moments.
Ceremonies move fast. The officiant speaks, the couple exchanges rings, and family members react. You can’t pause to adjust manual settings when the bride laughs. Av mode keeps your chosen depth of field while adapting to light changes.
Reception photography presents even bigger challenges. Dance floor lighting shifts from bright overheads to dim mood lighting in seconds. Your aperture stays constant for consistent background blur. Meanwhile, shutter speed adjusts to maintain exposure across different lighting zones.
Street Photography Speed
Street scenes change every second. A person walks from shadow into sunlight. A car passes and blocks the light. An interesting moment happens and disappears fast.
Street photography rewards quick reactions over technical perfection. Aperture priority mode lets you choose your depth of field once. Then you shoot freely as opportunities appear. Your focus shifts to composition and timing instead of exposure calculations.
The best street photographers shoot with both eyes open. One eye looks through the viewfinder. The other watches the scene unfold. This technique works best when you’re not constantly checking exposure settings.
Depth of Field Control Mastery
Depth of field separates amateur photos from professional images. The area of acceptable sharpness in your frame tells your visual story. Understanding how aperture affects this element transforms your photography completely.
Creating Background Separation
Wide apertures like f/1.4 or f/2 create thin slices of focus. Your subject stands sharp against a creamy, blurred background. This effect works perfectly for portraits where you want to isolate people from distracting environments.
Product photography benefits from the same shallow depth of field technique. A watch sitting on a table gains importance when the background fades. The viewer’s eye goes exactly where you want it. This separation makes your subject pop from the frame.
Telephoto lenses amplify background blur at wider apertures. A 200mm lens at f/2.8 creates more separation than a 50mm at the same aperture. Combined with aperture priority mode, this setup maintains consistent blur. Your camera adjusts for varying light automatically.

Maximizing Scene Sharpness
Landscape photography requires everything in focus from foreground to horizon. Close your aperture to f/11 or f/16. The camera selects a slower shutter speed to compensate for less light. Your entire scene stays sharp from front to back.
Group photos need similar treatment. Position people in multiple rows, and you need enough depth of field. Everyone needs to stay sharp. Aperture priority mode maintains your chosen f-stop. It automatically adjusts shutter speed as you recompose your shot.
Architecture shots demand front-to-back sharpness. Buildings have details from the entrance steps to the roof line. Select f/11 in Av mode and shoot freely. You won’t worry whether your exposure will darken as you tilt upward.
Lighting Situations Perfect for Av Mode
Different lighting scenarios favor aperture priority mode over manual control. Recognizing these situations improves your success rate and keeps you shooting instead of adjusting settings.
Overcast Day Photography
Cloudy skies create soft, even light that changes gradually. You might think manual mode works fine here. But cloud thickness varies constantly. One moment you have bright overcast. The next, a thicker cloud passes overhead and reduces light.
Aperture priority mode tracks these subtle changes. Your depth of field stays consistent while the camera adjusts shutter speed. Each variation in light intensity gets compensated automatically. The results show even exposure across your entire photo session.
Window light behaves similarly indoors. Clouds moving outside change the intensity of light streaming through windows. Set your aperture for the depth of field you want. Let the camera handle the fluctuations in brightness without intervention.
Golden Hour Transitions
The hour after sunrise and before sunset provides beautiful warm light. It also features the fastest lighting changes of any time of day. The sun moves closer to the horizon, reducing light levels constantly.
Golden hour photography works best when you concentrate on composition rather than technical adjustments. Aperture priority mode maintains your creative choices. It automatically compensates for decreasing light as the sun drops lower.
Shooting into the sun during golden hour creates exposure challenges. Bright sunlight and dark shadows exist in the same frame. Your camera’s meter might struggle, but adjusting exposure compensation in Av mode proves faster. You make one adjustment rather than changing multiple manual settings.
Indoor Event Photography
Events happen in mixed lighting conditions. Some venues combine window light with tungsten bulbs and LED strips. The light falling on subjects varies as they move around the space. This creates constant exposure challenges that slow down manual shooters.
Manual mode requires constant attention to changing light levels. Aperture priority mode adapts as people walk from bright areas to dim corners. You maintain control over depth of field while the camera handles exposure variations. Your shooting stays fluid and responsive.
Concert photography presents extreme lighting challenges. Stage lights change color and intensity throughout performances. Your chosen aperture determines how much background you include. Shutter speed adjusts for different lighting cues automatically.

Controlling Background Blur Precisely
Background blur matters more than most technical aspects of photography. The visual separation between subject and environment guides viewer attention naturally. Mastering this element elevates your work significantly.
Bokeh Quality Management
Lens aperture affects bokeh quality beyond simple blur amount. Many lenses perform best between f/2 and f/5.6. They produce smooth, round bokeh balls from out-of-focus highlights in this range.
Aperture priority mode lets you experiment with different f-stops quickly. Shoot the same scene at f/2, f/2.8, and f/4. You’ll see how bokeh character changes with each adjustment. The camera maintains proper exposure for each variation without manual calculations.
Background blur also depends on distance between your subject and background. Move your subject farther from the background, and blur increases. This happens even at smaller apertures. Av mode lets you focus on positioning rather than exposure math.
Foreground Elements
Creative photographers use foreground blur to add depth and frame subjects. Shoot through leaves, flowers, or architectural elements with a wide aperture. The foreground melts into abstract shapes while your subject stays sharp. This technique adds professional polish to your images.
This approach requires precise aperture control combined with fast shooting. Aperture priority mode provides both advantages simultaneously. Set f/1.8 or f/2, then experiment with different foreground elements. You won’t stop to adjust exposure between attempts.
Leading lines work better with controlled blur. A fence or pathway in the foreground can guide the eye toward your subject. The right aperture makes these elements recognizable but not distracting. They support your composition without overwhelming it.
Weather and Environmental Challenges
Photography happens in imperfect conditions. Weather changes, dust fills the air, and unexpected situations arise constantly. Aperture priority mode handles many of these challenges better than manual mode in real-world shooting.

Rapidly Changing Conditions
Storm photography features dramatic light that changes second by second. Clouds break apart, revealing bright patches of sky. Rain starts and stops, altering the scene’s reflectivity. Manual mode can’t keep pace with these rapid shifts in exposure.
Set your aperture based on the depth of field you want. Then shoot through changing conditions without hesitation. The camera adjusts shutter speed as light levels fluctuate wildly. You capture the decisive moment instead of fiddling with settings and missing opportunities.
Snow and rain introduce another variable. White snowflakes or rain streaks affect how your camera meters light. Exposure compensation in Av mode requires one adjustment. You don’t need to change multiple manual settings separately.
Dust and Fog Conditions
Atmospheric conditions scatter light unpredictably. Fog reflects light differently than clear air does. Dust from dirt roads creates haze that changes exposure requirements. These conditions confuse even experienced photographers shooting manual.
Your camera’s meter handles these variations when you use aperture priority mode. The depth of field you selected stays constant. Shutter speed adjusts for atmospheric conditions automatically. You maintain creative consistency throughout changing environments.
Backlit fog or dust creates particularly tricky exposure situations. Light levels vary dramatically between clear and hazy areas of your frame. Manual mode requires constant adjustment as you recompose. Av mode adapts as you move your camera.
Limitations of Aperture Priority Mode
Every camera mode has weaknesses. Understanding when aperture priority mode falls short helps you make better decisions. Knowing these limitations prevents frustration and missed shots in specific situations.
Motion Blur Concerns
Aperture priority mode doesn’t care about motion blur. The camera picks whatever shutter speed produces correct exposure. Sometimes that speed is too slow to freeze action properly.
Sports and wildlife photography often require minimum shutter speeds. Birds in flight need 1/1000s or faster. Fast-moving athletes demand similar speeds. In Av mode, your camera might select 1/60s in lower light. This results in blurry subjects that ruin your shots.
The solution involves setting a minimum ISO that prevents shutter speed from dropping too low. Modern mirrorless cameras in 2025 handle ISO 12800 or even 25600 exceptionally well. Enable Auto ISO with a minimum shutter speed. This makes aperture priority mode viable for action photography.
Creative Shutter Speed Effects
Motion blur can be a creative choice rather than a technical failure. Panning shots, intentional movement, and long exposures require specific shutter speeds. Aperture priority mode won’t select these speeds automatically.
Waterfall photography benefits from shutter speeds between 1/4s and 2 seconds. The camera won’t choose these speeds in normal lighting conditions. Manual mode or shutter priority mode works better for these specific situations.
Light painting and star trails need extremely long exposures. These techniques fall outside aperture priority mode’s capabilities. Switch to manual mode or bulb mode for complete control. You need direct control over shutter duration for these specialized techniques.
Exposure Compensation Needs
Cameras meter scenes for middle gray. Snow appears too dark, and coal appears too bright in default metering. According to Digital Photography School, aperture priority mode requires exposure compensation adjustments for these extreme situations.
The compensation dial becomes your second most important control in Av mode. Add exposure (+1 or +2 stops) for snow scenes. Reduce exposure (-1 or -2 stops) for dark subjects against dark backgrounds. This adjustment corrects for your camera’s middle gray target.
Learning exposure compensation takes practice. You develop an intuition for how much adjustment different scenes need. This skill proves valuable even when shooting in other modes. It’s worth the time investment.
Professional Applications and Workflows
Professional photographers choose tools that maximize efficiency without compromising quality. Aperture priority mode fits specific professional workflows better than manual mode in many commercial situations.
Commercial Product Photography
Product photographers work in controlled studio environments with consistent lighting. Aperture priority mode might seem unnecessary here. But efficiency matters when shooting hundreds of products daily. Speed directly impacts profitability in commercial work.
Set up your lighting, choose your aperture for desired depth of field, and shoot. Small adjustments to product positioning or styling happen constantly. The camera maintains correct exposure while you focus on each product. You move faster without sacrificing quality.
E-commerce photography demands speed and consistency above all else. Aperture priority mode delivers both advantages simultaneously. Your depth of field stays constant across an entire product line. This creates a cohesive look that strengthens brand presentation.
Documentary Photography
Documentary work happens in unpredictable environments. You can’t control natural light or ask subjects to wait. Real moments unfold in real time. Your camera settings need to keep pace.
Aperture priority mode keeps you ready to shoot. Your chosen depth of field supports your storytelling approach consistently. Deep focus captures environmental context. Shallow focus isolates emotion on faces. You decide the creative direction.
Travel photography combines many documentary elements successfully. You move between bright streets and dim interiors quickly. Markets, temples, and alleyways each present different lighting challenges. Aperture priority mode handles these transitions smoothly without interrupting your workflow.
Real Estate Photography
Real estate photography requires maximum sharpness throughout the frame. Set your aperture to f/8 or f/11 for optimal lens performance. This provides sufficient depth of field for sharp images wall to wall.
Rooms vary in brightness from space to space. Windows create challenging exposure situations. Aperture priority mode adjusts for these variations automatically. It maintains the depth of field necessary for consistently sharp images.
Exterior shots benefit from the same approach. You maintain consistent depth of field while the camera compensates for changing cloud cover. Your images show properties accurately without exposure inconsistencies between shots.
Making the Switch Work for You
Transitioning from manual mode to aperture priority mode requires understanding your camera’s metering system. You also need to master exposure compensation controls. These two elements work together to give you consistent results.
Understanding Your Light Meter
Your camera’s meter has different modes available. Evaluative, center-weighted, and spot metering each measure light differently. This affects how aperture priority mode selects shutter speed in various situations.
Evaluative metering reads the entire frame. It makes exposure decisions based on complex algorithms. This mode works well for general photography where lighting is relatively even across your scene.
Spot metering reads only a small area in your frame’s center. Use this mode when your subject is lit differently than the background. The camera exposes correctly for the spot you’ve selected. Everything else falls where it may.
Setting Auto ISO Parameters
Modern cameras offer Auto ISO with customizable parameters. Set a maximum ISO limit and minimum shutter speed. The camera uses these constraints when operating in aperture priority mode. This prevents unwanted results.
A minimum shutter speed of 1/125s prevents motion blur in most situations. The camera increases ISO to maintain this speed in lower light. Your aperture stays constant, giving you predictable depth of field every time.
Maximum ISO limits prevent noise from becoming objectionable in your images. Most cameras in 2025 produce excellent results up to ISO 12800. High-end models push clean files to ISO 25600 or higher. Set your limit based on your camera’s performance. Consider your personal tolerance for grain in the final image.

Mastering Exposure Compensation
Exposure compensation adjusts your camera’s metering interpretation. Your camera thinks every scene should average to middle gray. Reality includes bright scenes and dark scenes that need different exposure targets. You need to override your camera’s assumptions.
Reading the Histogram
The histogram shows the distribution of tones in your image. A properly exposed photo has information spread across the graph. It shouldn’t clip highlights or shadows at either end.
Aperture priority mode with exposure compensation lets you adjust exposure. You maintain your creative aperture choice throughout. Check the histogram after each shot. Then dial in compensation for the next frame based on what you see.
Bright scenes need positive compensation. Dark scenes need negative compensation. The amount varies based on how extreme the scene deviates from middle gray. Snow might need +2 stops while a black cat needs -1.5 stops.
Building Confidence with Aperture Priority
Experience teaches you how much compensation different scenes require. Snow scenes typically need +1.5 to +2 stops of compensation. Dark subjects on dark backgrounds need -1 to -1.5 stops. These patterns become second nature with practice.
Practice exposure compensation in various situations actively. Your intuition develops faster when you experiment rather than relying on automatic metering alone. Review your results and adjust your approach based on what works.
The combination of aperture priority mode and exposure compensation gives you speed and control. You maintain creative vision while the camera handles technical calculations. This happens seamlessly in changing light without interrupting your shooting flow.
Aperture priority mode serves photographers who value efficiency without sacrificing creative control. Manual mode stays relevant for specific techniques requiring precise shutter speeds. Understanding when to use each mode makes you more effective. You become a better photographer by choosing the right tool for each situation.

Darlene Lleno
Darlene Lleno brings a unique perspective to DIY Photography as someone who grew up surrounded by camera gear but chose words over lenses. With five years of writing experience, she specializes in photography content that’s both technically informed and genuinely passionate. Growing up with a photographer twin brother meant camera talk was everyday conversation in her household. While he mastered capturing moments, Darlene discovered she preferred being the subject and the storyteller behind the scenes. As a travel enthusiast and mother of two, she understands the importance of preserving life’s precious moments. When not exploring new destinations or writing for DIY Photography, you’ll find her reading or tending to her garden. Her approach to photography writing is refreshingly authentic, she may not be behind the camera, but she knows exactly what it takes to help others capture the shots that matter most.


Join the Discussion
DIYP Comment Policy
Be nice, be on-topic, no personal information or flames.