


Aerial Photography Without A Drone – Hands On Review of the Seaport Digital MegaMast
Share:

The single biggest challenge I face as a photographer is finding ways to create images that are noticeably different than everyone else’s.
The vast majority of photographs that have ever been taken (or ever will be) are captured from about 5 feet above the ground – eye height for the average human.
One different perspective that I find particularly interesting is overhead and aerial photography.
There are several (very complicated and expensive) ways to get a camera overhead, but I recently had the opportunity to review a product that makes taking overhead and aerial style photos very easy – and the results are spectacular.
Hit the link to continue reading my hands on review of the Seaport Digital MegaMast. (If you do decide to get one, use code mega10 on checkout to get 10% off during the following week)
What is a Seaport Digital MegaMast?
Pretty much exactly what it sounds like…
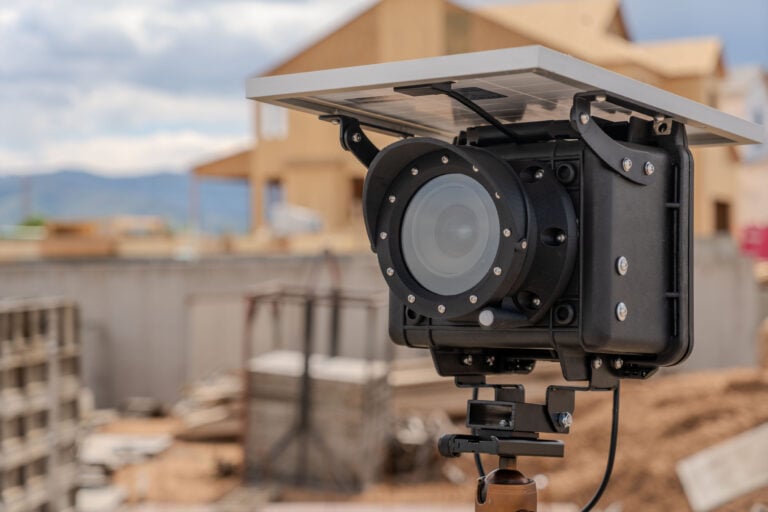
The Seaport Digital MegaMast is essentially a giant camera stand – a camera stand that can raise your camera nearly three stories into the air!
The design of the mast is very similar to a typical light stand that we’re all familiar with – just megasized.
With a maximum extension of 27.5 feet (8.4m) the MegaMast has enough reach to go from just slightly overhead to full aerial perspective.
(At first, 27.5 feet might not seem that high – but if you think about it, its essentially the view you would get looking out of a third story window – and the change in perspective you get from even 10 or 15 feet is surprising.)

The best part is that the MegaMast has a maximum load of 6 lbs (2.72 kg) so its sturdy enough to carry a full size DSLR and lens combination (impossible with all but the largest drones – more on that later).
Build Quality
The MegaMast is constructed out of a telescoping carbon fiber center tube and aluminum legs. The build quality is excellent for all components.
For pure portability, it would have been nice if the legs were carbon fiber too – but I suspect that this would add substantial manufacturing costs, so the use of aluminum legs is a bit of a compromise.
Here is a link to the product details from Seaport Digital.
One slight issue I had with my sample mast is that the riser clamps were not quite snug enough – the risers would randomly slip a little when I tightened the stability system.
It was a simple fix to slightly tighten the riser clamps, but I had to make sure not to over-do it – if the riser clamps are set too tight you would risk damaging the carbon fiber pole.

Portability
With a collapsed length of 64.25″ (163 cm) and a weight of 13.5 lb (6.1 kg) the MegaMast isn’t exactly super portable.
However, the use of carbon fiber for the main structural elements drastically cuts down on the weight, and I feel like the MegaMast could certainly be hiked into remote locations without too much effort.
I packed my MegaMast in a 6″ diameter cardboard tube for the flight to Cuba with no issues.

Setup and Takedown
Setting up the MegaMast is best done with assistance from another person – one person to do all the work and one person to look pretty while keeping a hand on the mast just in case.
Because of the height of the mast, its also necessary to set up on relatively level ground – although with suitable anchorage it should also be possible to set it up on an angle.
On a totally calm day, the mast would likely be stable at full extension without any additional supports. However, I wasn’t willing to take a chance of the MegaMast falling over with my camera on top, so I fitted my mast with three guy wires that I made out of a few lengths of 550 Paracord and some steel tent pegs.
I also used the optional Stabilization Spreader Kit. Using the stabilization kit made setup a little more complicated, but I found that with just a GoPro on top, the mast had quite a bit of sway in only a light breeze. The Stabilization Spreader Kit firms everything up and gives you a much more stable platform.

To set up the MegaMast, I found the following procedure to be the easiest, fastest and safest way to get my camera into place:
1. Set up MegaMast in desired position and extend to desired height (without the camera attached).
2. Snug down the three stabilization spreader ropes.
3. With an assistant holding onto the mast, peg down the guy wires. (At this point, the mast is now stable – without any risk to my camera.)
4. Lower the mast and attach the camera.
5. Raise the mast back up (to the same position it was before with all the stabilization and guy wires already in place) and start shooting.
Composition and Camera Control
With your camera potentially three stories up in the air, you need to either pre-visualize your images and plan your shots in advance, or use a method of remotely controlling your camera and seeing your composition.
You will also need a way to remotely trigger the shutter release.

I thought that it also might be handy to use a pan / tilt head to be able to remotely change the composition.
I tried the following three methods of shooting with the MegaMast.
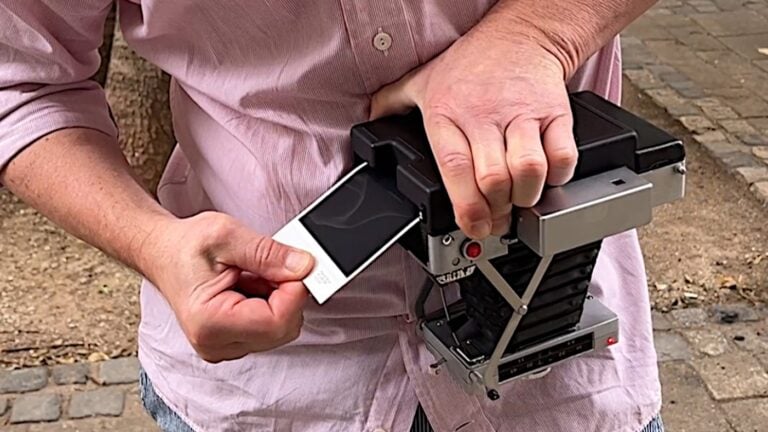
Option 1: Manual Composition and Remote Shutter Release
With a little practice, I found that it wasn’t actually that difficult to plan my compositions on the ground and then trigger the camera with a wireless shutter release. (You can see the wireless shutter release in my right hand.)

To manually plan the composition, I estimated the camera’s field of view on the ground and then marked out the approximate extents of the frame for reference (I was at a beach, so I just drew a few lines in the sand).
Although the perspective that you get when the camera is on top of the mast is very different than at ground level, the extents of the field of view don’t change that much – so with a little practice you can make a pretty good educated guess as to what will be in your image.
I also set the camera settings on the ground. Because I didn’t want to worry about raising and lowering the mast to change camera settings, and because I was shooting mainly at sunrise and sunset I used aperture priority and full automatic focus.
Then I used a Vello Wireless ShutterBoss to focus and trigger the shutter.
If you are mainly shooting landscape or architectural photography, I think this approach would work perfectly fine.
In fact, I used this approach for the majority of the images in this article (more on that in a moment).
However, I was trying to photograph moving people as well, and I found that without being able to see what the camera was seeing in real time, it was very difficult to fine tune my compositions.

Option 2: Live View and Remote Camera Control
There are a number of options for live view and remote camera control.
Several modern cameras offer built in wifi and a live view / remote control app. There are also wireless wifi adapters (like these units from Nikon).
Another option would be the CamRanger system.
I decided to go a little more DIY and for $30 used the DSLR Controller App and a TP-LINK TL-MR3040 router. (Follow this link for full details on this setup).
One other option for live view that is a bit of a hack would be to attach a GoPro or similar to your DSLR and use the GoPro’s built in wifi and live view app to estimate your compositions.

For shooting moving subjects with the MegaMast, I found that it was extremely helpful to use remote live view to compose my images and to judge when to trigger the shutter.
For example, there was no way I would have been able to perfectly frame this image to two jogging models without being able to remotely see what the camera was seeing.

Using remote live view also took a lot of uncertainty out of the process so that I could concentrate on creating an interesting photograph, rather than trying to guess at what was in the frame – and I didn’t have to keep pulling the mast down to check what I was getting.
Using remote camera control also gave me the opportunity to tweak my camera settings as needed.
However, I did have one major problem with my DSLR Controller App and a TP-LINK TL-MR3040 setup (this is completely unrelated to the MegaMast – but a good lesson on having multiple ways to do the same thing).
For some reason, my Android phone (a Samsung Galaxy Note 3) would not identify the wifi network from the TP-Link.
(Or the wifi from my GoPro either for that matter – which I had planned to use as a backup live view option.)
I believe that this is a problem with Android not being able to identify a wifi network in an area with no mobile data or wifi internet (I was in Cuba) because my wife’s Android phone had the exact same issue – but my laptop computer could connect to both wifi networks (TP-Link or GoPro) no problem.
The worst part was that because I had no way to access the internet, I couldn’t even Google a solution to the problem!
To make a long story short, I was able to use DSLR Controller for live view and remote camera control for one evening session (after turning my phone off and on many times and some yelling, it randomly connected) – which was great – but for the rest of the time, I had to use Option 1: Manual Composition and Remote Shutter Release.

Option 3: Remote Pan and Tilt Control
Besides live view and remote camera control I though that it would be very helpful to be able to control the composition of my image remotely using a robotic pan and tilt head.
I use an eMotimo TB3 robotic pan and tilt head for time lapse photography and since it has a wireless remote, I though that it would be perfect for controlling the position of my camera on top of the mast.
The problem I had was that the TB3’s remote only had a range of about half the height of the mast – so I couldn’t use it at full extension.

But even at half height, I basically came to the conclusion that using a remote pan / tilt head was largely unnecessary and just complicated the setup (another item to carry, another battery and charger, another remote, another thing to assemble…).
What it came down to was that it actually wasn’t that difficult to set the vertical angle of view on the ground (the direction up or down the camera is looking). It also wasn’t that difficult to occasionally lower the mast to change the camera’s vertical orientation. Then when the camera was at the top of the mast, using remote live view to see what the camera was seeing, I just loosened one of the riser clamps so that I could rotate the direction the camera was looking.

Surface-To-Air Anti-Drone Tower of Power
So why not just use a drone anyway?
Yes, unmanned aerial vehicles (UAVs) are all the rage with the cool kids these days – and as an ex-RC airplane hobbyist, you’d think that a UAV would be my obvious choice for aerial photography. Obviously there are advantages to using a UAV for actual aerial photography – such as the ability to fly over terrain inaccessible on the ground and the ability to fly higher than 30 feet.
However, there are a few major issues with the practicality of using UAVs:
1. The commercial use of UAVs is (almost) universally illegal.
Flying a UAV, there is a pretty decent chance that sooner or later you are going to have a run in with an overzealous authority figure, or an enraged bystander, and if you’re flying commercially (and pretty much everything is commercial use), you can be really screwed.
2. UAVs are too expensive and unreliable.
Really, the only affordable type of UAVs available right now are DJI Phantom type models that can carry a GoPro or similar mini-camera.
If you want something that can lift a real camera – a DSLR or even a mirrorless, you’re talking a very sizable investment.
Add to that the time it takes you to learn how to operate that flying money trap and the fact that you’re one mistake or malfunction away from several thousand dollars worth of FUBAR UAV and camera gear – the risk just isn’t worth it.
3. There are too many photographic restrictions with UAVs.
UAVs are great for video, but you can’t shoot any type of long exposures – such as at night, or using neutral density filters etc. You definitely can’t film a time-lapse sequence. Its very difficult to repeat a shot from the exact same location and you have a very limited timeframe to keep the thing in the air.
Add to that the hassle of all the extra batteries, cases, chargers, components and support gear needed – flying a UAV is a lot of work.

Conclusion
It’s rare that I receive a product to review that really exceeds my expectations in every way – but the artistic possibilities that the MegaMast opens up, and the build quality of the MegaMast itself are both excellent.
Seaport Digital markets the MegaMast mainly towards real estate and event photographers.
While I think that the MegaMast would be an amazing asset for real estate and event photographers (the potential is obvious) by the sample images in this post I think that it should also be apparent that the artistic potential of aerial style photography with the MegaMast extends far beyond real estate and events.
In fact, I’ve already got a whole pile of other potential MegaMast photography projects in mind that I’m really excited about.
With a purchase price of $699.95 for the MegaMast and another $49.95 for the Stabilization Spreader Kit (highly recommended), this is a relatively large gear investment.
The intended use of the mast is also a pretty niche genre of photography – you don’t necessarily want to take aerial photos of everything, so this isn’t a piece of gear that you’re likely going to use everyday. However, I see the MegaMast as a one time purchase – this is a quality piece of gear that you should never have to replace.
When compared to UAV’s the MegaMast is substantially cheaper up front – and after you crash, get charged by the FAA (or get yourself tasered and thrown in jail), way cheaper in the long run.
As you can tell, I would definitely recommend the MegaMast to a friend – I don’t know of anything else like this on the market and I am really excited about all of the new artistic options it has opened up for me.
However, this isn’t just a giant selfie pole – the MegaMast is really for a specialized form of photography and like any gear purchase, you should have a pretty firm idea as to how you will incorporate the MegaMast into your work before making a purchase.
 What Do You Think?
Is the Seaport Digital MegaMast a product that you would like to incorporate into your photography?
Do you think a UAV is still a better option for aerial photography?
Are you surprised that you can get an aerial photography look from a ground mounted camera platform?
What do you think would be the best use for a product like this?
Leave a comment and let us know!

JP Danko
JP Danko is a commercial photographer based in Toronto, Canada. JP can change a lens mid-rappel, swap a memory card while treading water, or use a camel as a light stand.
Related Posts
 Canadian Regulation of Aerial Drone Photography – DIYP Interviews Transport Canada and the Office of the Privacy Commissioner of Canada
 FAA proposes an industry record $1.9 million fine against aerial photography drone company
 Gorgeous Aerial Drone Photos That Would Be Totally Illegal Today
 No drone? This is how to fake aerial shots with your phone
Join the Discussion
DIYP Comment Policy
Be nice, be on-topic, no personal information or flames.
7 responses to “Aerial Photography Without A Drone – Hands On Review of the Seaport Digital MegaMast”
megamast construction should be a counterweighted collapsible triangle section boom on a pan-head tripod.
Nice article JP.
I use something a little smaller but a little more high tech.
An Autopole…
http://www.bhphotovideo.com/c/product/546453-REG/Manfrotto_032B_032B_Single_Autopole_Black.html
in a set of legs…
http://www.bhphotovideo.com/c/product/546707-REG/Manfrotto_032BASEB_032BASEB_Single_Base.html
On top of which I have mounted a MPT1100-SS pan and tilt system from ServoCity…
https://www.servocity.com/html/mpt1100-ss_pan___tilt_system.html#.VVhthJOqpBc
I am running a Nikon D4 with a WT-5 Wifi dongle, so I can compose and shoot from the ground.
I’ve also added a third motor so That I can wind zoom lenses in and out from the remote.
Here is a sample panorama shot from a couple of weeks ago…
https://www.facebook.com/photo.php?fbid=10153260997922558&set=a.10150565941207558.409755.839697557&type=1&theater
And a VR shot I did recently…
http://www.chriscameron.co.nz/cc/volvo-ocean-race-village-panorama/
Nice work – great example of two applications where a UAV wouldn’t work. BTW, love to get on board one of those boats – crazy tight racing with a one-design fleet!
This seems like something that would make a great DIY project that could be done at a fraction of the price. Ref: http://www.mgs4u.com/fiberglass-push-up-mast.htm#telescoping and http://www.mgs4u.com/additional-push-up-mast-photo-3.htm
I totally agree – in fact I started building a DIY version using composite hockey sticks for the legs and a similar telescoping fiberglass pole – but after starting work I realized that it would end up being quite a bit bigger and bulkier than the MegaMast. For my use – a lot of the locations I go to are not accessible by mororized vehicles – so I wanted something a bit more portable. But if anyone has put together a DIY version, we’d love to see it!
This does the same thing at a fraction of the price..
http://www.canontrainingvideo.com/index.php?main_page=product_info&cPath=6&products_id=72
I know this is an old article, but did you ever shoot long exposures with the megamast? How tall and how long? Do you have any samples?
Thanks
Mdr