


White Water Kayaking Photos – Surprisingly More Difficult Than You Might Think
Share:
I can’t believe that its late August and summer is almost over. It seems that every year I have a list of summer time photo sessions that I never get around to.
One thing I have had on my list for a while now is white water kayaking photos.
There is a world class white water course just down the road from one of the cottages we spend time at every summer, yet somehow I never end up with enough time to get out and photograph the kayakers.
Well, this summer I finally made time for it – and as it turns out, white water kayaking photos are surprisingly much more difficult than you might think!
In this article, I will share the thought process, camera settings and post production behind this series white water kayaking photos.
White Water Kayaking Photos That Don’t Look Like Everyone Else’s White Water Kayaking Photos
The first major challenge I had, I didn’t even realize that I would be facing until I got to the river.
As it turned out, white water kayaking is a surprisingly popular photographic subject for the well heeled cottage hobby photographer crowd. I definitely did not expect that I would be jostling with other photographers for prime shooting locations.
Nor did I expect to see the array of late model, top of the line DSLR’s and pro level glass that these guys were sporting!
(For the record I was shooting with a Nikon SB-800 and a 70-200 f/2.8, so at least I fit in.)
To make matters worse, over the entire white water course, one of the bigger rapids had a large standing wave at the bottom that the kayakers spent quite a bit of time playing around in. It was by far the best location to shoot from and all the best spots were already staked out.
I have never had such a cold reception from other photographers – you’d think we were shooting the Superbowl or something!
But, the situation also presented me with an opportunity – incentive to create white water kayaking photos that looked different than everyone else’s.
So the first thing I did was set up a light stand with a Nikon SB-800, a CTO gel and Cactus V6 radio triggers on the riverbank about 10 feet upstream from where the gaggle of grumpy photogs was shooting from. At this point, they were all looking at me like I had two heads – as natural light photographers often will when you pull out one of those mysterious strobe thingies.
Seriously, they were looking at my lightstand and strobe how I might look at a crocodile. Kind of interesting and cool – but not to be trusted, and certain death if you turn your back on it.
Lighting Concept
At this point I should explain my lighting concept, and why I was bothering to use an off camera flash.
The white water river is in a valley with pretty heavy tree cover. So that means that no matter what time of day, I would be shooting in shade. Shade is fine for portraits, but for sports photography, action shots taken in the shade often look flat and boring.
So first of all, I wanted the strobe to add some extra texture and detail to my images and especially a little extra sparkle and definition in the water splashes.
Secondly, I arrived at the river relatively late in the afternoon on purpose. Late enough that the ambient daylight level was low enough that I could use a slower shutter speed to get some motion blur in the water, but with the flash at full power I could freeze the action in the water splashes and motion of the kayakers.
Camera Settings

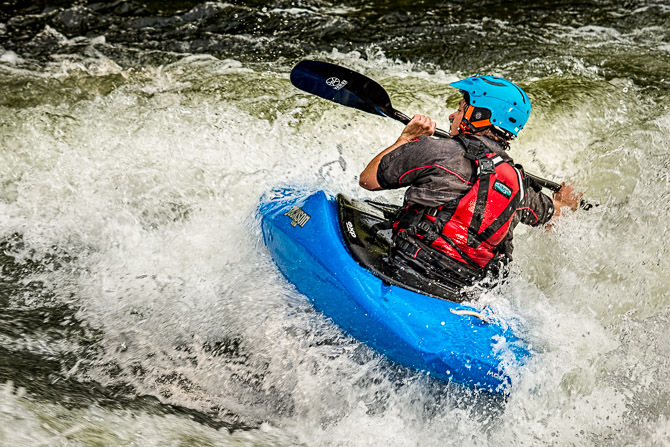
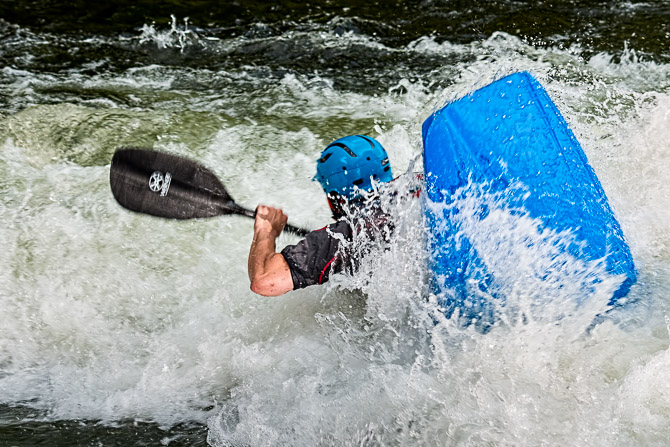
In this image, my camera is set to 1/30th second shutter speed, f/11 and ISO100. The focus mode was set to autofocus continuous (AF-C). My flash is about 15 feet upstream of my shooting position and firing at full power with the camera set to rear curtain sync. At f/11, my flash is not quite powerful enough to stop the motion in the photo, but it still adds detail and texture. Ideally, I would have liked a much more powerful strobe positioned across the river to back light the water – but unfortunately that was not possible (but is something to definitely consider for next time).
I also found that shooting with a flash was a lot more restrictive than I am used to.
Because I had to wait for recycle times, I couldn’t just spray and pray – I had to carefully time individual shots – which turned out to be a lot more difficult than I was expecting!
Between the position of the kayaker, their gesture and body position and the random splashes and quick movements it was a tough challenge to time my shots well. But with practice, it didn’t take too long before I knew I had a few really nice shots.

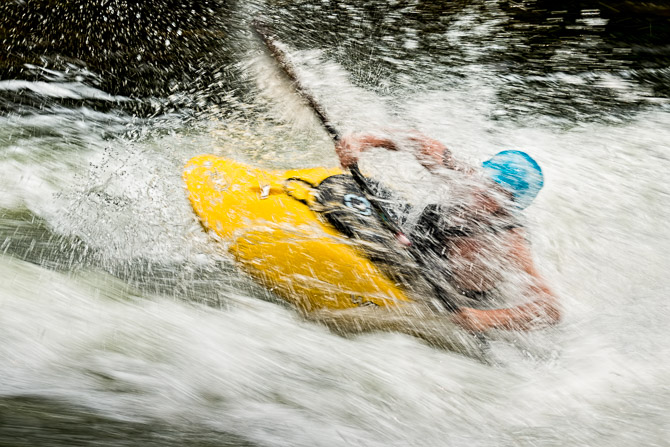
For this photo, I increased the shutter speed to 1/250th of a second (my camera’s maximum sync speed) and changed the aperture to f/5.6. The ISO was still 100 and the flash trigger set to rear curtain sync. With a bigger aperture, I had to drop the flash power down to 1/2 power – which also gave me a much quicker recycle time.
The frozen action in this photo probably looks similar to images that the other guys were taking – except again, using an off camera flash just adds an extra level of detail and texture that isn’t possible with only the ambient light.
Post Processing
All of these white water kayaking photos were processed in Lightroom. Here is a screen capture of my Lightroom adjustment panel:
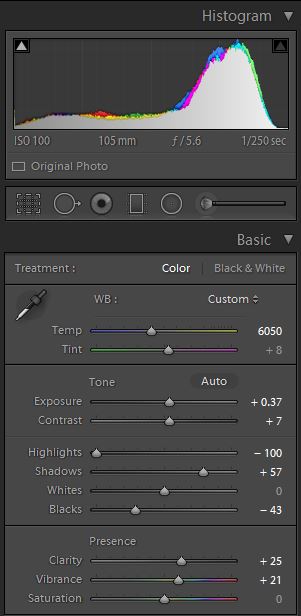
I also applied a lens profile correction in Lightroom.
Once I had my basic adjustments done in Lightroom, I brought the images over to Photoshop for a few finishing touches.
First I applied Topaz DeNoise using the RAW – Light preset, and then Topaz Detail using the Overall Detail Medium I preset. Even though I was shooting at ISO100, I still find that it is helpful to apply a small amount of noise reduction to get rid of some of that high frequency schmutz that would otherwise be amplified with an aggressive detail enhancement.
Have You Ever Had To Battle Other Photographers for Images?
Have you ever been in a position where you were competing with a crowd of other photographers?
What did you do to come away with photos that were different than theirs?
Leave a comment below and let us know!

JP Danko
JP Danko is a commercial photographer based in Toronto, Canada. JP can change a lens mid-rappel, swap a memory card while treading water, or use a camel as a light stand.
Related Posts
 Use A Toilet Flange For Elevated Video While Kayaking
 Wedding Photographer Fail: Falls Into Water Water Fountain While Taking Photos
 Can a $600 Godox AD600 compete with a $2,100 Profoto B1? Surprisingly yes
 Photographer captures portraits of people in water droplets to emphasize importance of clean water
Join the Discussion
DIYP Comment Policy
Be nice, be on-topic, no personal information or flames.
5 responses to “White Water Kayaking Photos – Surprisingly More Difficult Than You Might Think”
Wait till you go back next year, there will be a row of light stands with studio flash and power packs competing for space on the bank
I wouldn’t be surprised!
Yes, especially at college football games. You might have 5 photographers battling for the corner of the endzone. Don’t take life too seriously guys… Great post!
I have shot whitewater kayaking for both editorial and commercial clients for many years on rivers in Eastern Canada and the north eastern US. You have made some great points and tips about capturing the action, one tip I can offer is to get off the river bank and travel down the river, there will be less of a crowd at the different features competing to shoot along side you. I carry my gear in Pelican cases and usually paddle my Shredder. Samples of my kayaking imagery can viewed here:
http://www.holeriders.com/galleries/adventure/whitewater-kayaking/
White water is incredibly difficult to photograph. Often we kayak in canyons with extremely high contrast ratios, so more often than not I am thankful for the shade! Here are some photos I took at the recent Sickline event. Most are in the shade and a flash wasn’t an option due to distance. With white water kayaking it is usually best to position yourself based on the sun. Although I got some interesting back lit photos from the event at one point.
https://simonwyndham.smugmug.com/Sports/Kayaking/Sickline-2015-part-1/