


Tethered Shooting – From Camera To Computer To 60″ IPS Panel
Nov 25, 2015
Stefan Kohler
Stefan Kohler is a full-time retoucher. He’s from Germany and likes bacon. In the last years, he built up a broad community around his retouching classes at the Infinite tool’s website.
Share:

This article will take you through a journey to the perfect tethering solution. It is a curvy path, but the end is very fine tuned.
Before we even start, I would like to stress out three things:
- The camera screen is scrap
- Memory cards are prone to errors
- This article only contains information, no colorful photos :)
So, you want to connect the camera to a computer and view the photos directly on a (hopefully calibrated) screen. This is called tethering or tethered shooting.
Fortunately, all (mid-level) cameras support tethered shooting and camera that do not support tethering are slowly vanishing from the market. This is true especially with the top dogs – Canon and Nikon – putting some effort into this and removing most glitches and problems with their newer models.
But why would you want to look at a computer in the first place?
Of course, the biggest advantage is the monitor. You can calibrate a computer screen much better than a camera LCD + it has significantly more space. This is why it’s easier to control (out of camera) sharpness and colors. And if you have more than one person on the set (models, photographer, make-up artist, customer) looking at the LCD quickly becomes tiring.
Here is what a typical discussion looks like:
Photographer asks the model “Want to see again?”
Make-up artist: “Let me see something. I think the forehead is shining a bit, right?”
Customer: “A shiny forehead?!?!?! we cannot have this!!!! (grabs the camera)
Make-up artist to the customer: “I must useWe have some powder. Let me put some on so we take a decent picture”
* click *
Customer leans to photographers: “Is it better now?”
The model is probably fell asleep by now…
It took us a while to refine our workflow but now we are pretty streamlined and have already tested it in several shoots. Our philosophy is that the photographer needs to have utter focus on the creative aspect of the shoot: focusing, composition, model direction. This is why the tethering application has 100% control over camera settings. Further, the application also automatically backs up everything, so even if a computer fails, we still have all the photos secured.
From our experience we noticed that:
- The software which comes in the camera box on a little disc is usually crap.
- We’ve never seen a piece of standard software that we could work with for an entire session without any hiccups and crushes.
Our Requirements
First of all, we stopped and thought: What do we need, anyway?
- Independent representation on multiple devices:
We always have a team of several people attending our shoots. This means there is a model, a photographer, a makeup artist and a light-setting engineer on the set. Sometimes one or more clients too - Each of those – we call them “employees” – should have the ability to view images in real time on iPads, the need to be able to zoom into the images and also to put labels and ratings.
- Backup images:
The image should be copied from the camera directly to a computer. From there you can get on our NAS and archived immediately - Application of Image Styles
We take very flat pictures, ie with relatively little contrast. The customer is on location but yet to see a developed image. So we want to apply a style so he can see what the image will look like and not have to re-explain that contrast and a specific look will be added. - Large display for workshops, escorts and clients
We often have a requirement that images should be displayed big time. Whether it’s done to keep the fun in a workshop; to explain something to a group; or simply to have the customers watch a bigger screen. - Control over the camera settings
Our workflow is divided in a way that the photographer has two tasks: dealing with the model and setting the focus. Once we have a concept, the lighting and their matching camera settings are controlled by our lighting engineers. The display on the camera is turned off, because that only distracts from the “flow”. This means that camera settings must also be controlled via software. Aperture, ISO, shutter speed are all controlled by the same person who would change a settings on a flash or get a light stand closer or further away.
Why this setup works for us?
This means that the photographer is distractions-free and does not fumble with camera settings at all. All his attention is directed at the model
The make-up artist can use the iPad at 100% zoom and see where the models has stray hairs, makeup is cracked, eye lashes are not perfectly glued and so on.
The lighting dude can tune the setup precisely and match the camera settings accordingly without harassing the photographer.
The customer can view the images on the iPad directly, pick out his highlights and direct the shooting immediately in a different direction, if necessary – even if he’s not in the studio while shooting.
Accompanying persons may participate in the action from a safe distance and also see what’s going on.
Models have super-fast feedback on the mood in the image and it’s easier for them to take on their roll
Here is how our setup works:
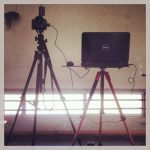
Camera
Not every camera fits for tethered shooting. The popular tethering fit, unfortunately, just the popular Olympus bridge cameras are totally out. But all the newer Canon, Nikon and Sony cameras are ideal for this kind of setup. We have previously worked with the Canon 5D series and the lower ended Canon 550D both of which worked great (with DSLR Assistant). After switching to Nikon we were first sweating pretty hard. This is because Nikon’s proprietary software is even worse than Canon’s. The D800 fortunately unfortunately produces massive data which is quite slow to transfer to the computer. And we want our previews fast!
Connection
At Some Point we discovered CamRanger. CamRanger is a little battery powered wireless router that comes with its own special firmware and an iPad app. You can create a similar device with a TPlink 3040 and some open source software at about tenth of the price, but it’s not working quite as well as the original CamRanger. Not to mention the awesome user interface (see this link for installation instructions).
When we were using CamRanger, we found it best to shoot at “small JPG + RAW”. This way the images get to the computer fast while also having a full RAW file in place. This works, of course, until you accidentally press that button that moves quality to “small”. Yes, that happened to me. Once. And that was the last time I ever used the CamRanger until I need to put the camera into fire or access it remote …
But then we were back to using cables again. When we moved to the D800 we were faced with 40MB+ files. USB 3.0 moves those fast enough but we needed a nice long cable. We are using the bright orange USB 3.0 cable from TetherTools. Normally, the images take about 1 second to download. Here is my take on cables: There are many manufacturers and many brands, most are not as expensive as TetherTools, at the end though, they are the best option. They are not cheap and bright orange, but if you have a 5D Mark3 with a 2.8 70-200 you want that bright. You want everyone to see that cable and not trip over it. Come to think about it, compared to the camera and lens, it is not such a costly cable. That specific cable is 4.6 meters long and it is long enough for some spontaneous “around the model” movement.
Software
There are many, MANY options for Tethering software. Almost all manufacturers have something out of the box. We have worked with Helicon Remote, DSLR Assistant, Lightroom, EOS Utility, and a few others. (there is a comparison chart here, albeit a bit old). After checking them all we stuck with Capture One – the possibilities, stability and compatibility of this software is enormous. Incidentally, Capture One is also the best RAW Converter on the market (so we think) and it even beats Adobe Camera Raw and Lightroom.
We talked to the ladies and gentlemen of C1 and have smooth but sent us a 10% coupon code. This is “AMBUDI”. Great! (Though the coupon name is a bit weird)
Capture One provides great tools, presets for export and is absolutely hammer proof: The color editor. This really can conjure up beautiful skin tones. We will certainly bring an extra post for C1.
Of course, Capture One also brings an image database, similar to Lightroom. Images can be marked and tagged. But unlike Lightroom, it all happens in private, physical folders. Those folders can be shifted to external hard drives or moved to other computers and be opened there. Easy.
Computer
The requirements form a tethering computer are very straight forward: USB3.0 port, more than 4GB of RAM and ideally an SSD drive. We always use a MacBook Pro for the job. It is beautiful; you can go and eat out after the shoot, throw the laptop in the backpack and pull it out at later at night to click through the pictures for culling.

Screen
Capture One also has the option to open a viewer. The viewer can then be pushed to an external screen so you can also use a screen which is slightly bigger than the 15″ laptop monitor. Say a 60″ LG IPS panel TV. We opted for the LG because it has color calibration, and the mac has no problem to hold calibration for several screens. (not really sure about windows, but we will find out soon). If you are working with an LG please, PLEASE turn off all automatic settings from “living picture”, “Mega Contrast”, “Perfect Color”, “sharpening” and “Noise Reduction”. This can be a bit frustration because sometimes disabled is represented by 100, sometimes 50, sometimes 0, and sometimes something completely different. Just keep tweaking it until everything works.
Stay away from 4K displays, unless you really have some extra cash to spare. FullHD is good enough, especially if there are also other displays on set.

iPads
Another great discovery that we made is Capture Pilot. Capture Pilot is Capture One’s app for iPad, and they play beautifully together. One click starts the server on the application side, and a second later any new image is displayed on the iPad. So a client can browse through images and zoom in endlessly. (yes, even with the massive 36 megapixel monsters of the D800 you can zoom in to 100%). What’s even better, you can use the app to rate photos. The rating is then duplicated into other iPads and as well the main computer / (and giant screen). Everything syncs. Wow. We absolutely love this!
There is also a small, In-App purchase then trigger the camera and change most settings (aperture, speed, and ISO), though we would never give this power to a client. You can simply turn it off in Capture One. Brilliant.
WIFI
All those iPads are running over WiFi. Since both the MacBook and the iPads support fast 5GHz WIFI, we got a 5GHz router. An advantage of this wavelength is that is still under-used so you are less likely to have other interfering networks. The transmission speed for us was faster by about 70% over the 2.4GHz network.
NAS Integration
This is the last part of the article, but it is crucial, a good shoot will go horribly wrong if you lose all the photos. Trust me. In the Big Book of NAS, the first rule is that a NAS should only be used for NAS. And we use a Synology DS414 server as our NAS, and love it. (We do break the rules here, however, and we use our Synology station for many-many things, like VPN and such). In the Synology we have four 4TB disks installed and a RAID5 configuration for some redundancy. This While this is not the most fail-safe system, it provides 12TB of and has a good balance between price and safety.
The MacBook runs Hazel (a cool software that monitors folders and can apply automation on them) which automatically copies the files to the raid server for an Extra backup.
Conclusion
This all sounds pretty expensive, I guess, right? It does cost some money, but a) it has grown over the years and b) it is very versatile:
- We only use the big screen in the studio; on location we “only” do laptops and iPads. (the MacBook can provide its own WIFI network)
- When we opened our studio, we made a small configuration change and tied the shutter to a big button, and replaced the TV with an overhead projector. TADA instant photo booth!
- For product photography we don’t even need to touch the camera (aside the initial composition) and we can do everything via the laptop, including previews and any photoshop needed.
- Capture One also provides the ability to overlay images with live view. We used this feature extensively in our stop-motion filming, for cover shots (you simply overlay the cover) and in our more complex composting works.
We’ve tested a lot over several years to get to this setup, and maybe a better title would have been: “our journey to perfect tether“, or “tethering market survey” but our last few months got the setup pretty tight and we don’t see anything changing…. for now.
Your Turn
Are you shooting tethered? please share your experience and tips with us in the comments.

Stefan Kohler
Stefan Kohler is a full-time retoucher. He’s from Germany and likes bacon. In the last years, he built up a broad community around his retouching classes at the Infinite tool’s website.
Related Posts
 The SmallHD Focus 7 and 702 Touch monitors have super bright IPS screens for daylight use
 The Sony A7RIII is the fastest camera out there for tethered shooting, moving photos in under a second
 Introduction To Tethered Shooting
 Make your own DIY Jerk Stopper for tethered shooting with a humble rubber band
Join the Discussion
DIYP Comment Policy
Be nice, be on-topic, no personal information or flames.
8 responses to “Tethered Shooting – From Camera To Computer To 60″ IPS Panel”
If tethered Shooting would work with anything else but Nikon and Canon (e.g. with Leica, Panasonic, Olympus, …) it would actually be useful.
tethering works (as far as I know) with Canon, Nikon, Sony and (of course) all the Phase one digital Backs.
exactly
I much prefer to use a Surface Pro, I can shoot to it and it will back up to the NAS on the fly. The NAS can then dish out the files to the clients on another Surface Pro or whatever device they provide. The reason I prefer using tablets is because they’re smaller, lighter and easier to mount on the tripod if I need it. Like the MacBook it can cull the images when there is a break. The other advantage is that I can use the wired network if I have to for large data dumps through a dock.
The other advantages are: I only have to buy one set of software and avoid IAPs. I don’t have to buy additonal hardware (laptop+iPad) and so on. The Surface Pro can also do Miracast so I can stream the media to a TV that supports this again saving time or to a Miracast adaptor if they don’t and I use this at clients homes or locations where I need to do a presentation. The final advantage, at least for me, is that the SP4 has one of the best rated displays of any mobile tablet or even laptops.
Canon in my experience is generally better for tethered work than Nikon, they’ve have had it longer on more of their bodies. These days it’s pretty much a wash but Lr can still give headaches with Nikon bodies. The best cameras I’ve used for tethered work was the P1 cameras.
Final bit of advice, it’s better to use Synology’s own file system as it makes it easier to upgrade your drives especially if you use mis-matched sizes.
what software do you use to push the files about?, im a hobbiest with sony camera so i have capture one cheap :D, and multiple computers and tablets running windows and/or android.
fyi you can get usb to network adapters, and a good usb3 one (if working to potential) would give you fast speeds on surface pro, :), think theres some with inbuilt hubs and things
I use Bvckup2 to sync the capture folder, on the workstation it just pulls the files down as it need Through Bridge. Main advice about the software ensure you have an offline back up,
I have a USB 3 Dock which can provide display, network and a hub if I need it however when tethering I prefer to minimise the amount of cables or I’ll have to lay cable guides to prevent trips.
Hi Stefan my requirements are much simpler and I’ve searched the net and this post is the closest to describing what we need. I run a Photography teaching business for teenagers in London – teaching between 200-300 students a week in afterschool clubs and supporting exam level photography. Occasionally we run large assemblies and every day we teach using whiteboards. I’d like a tethering solution that is wireless but will just plug into the classroom pc’s – to demonstrate some of the lessons on the big screen in real time. I just want to shoot a picture and see it pop up on the big whiteboard. We’ll have to connect physically to a usb port as there is never a wifi setup in our schools. We use Canon 1300D’s and I also have a 5d mk 3 and a a 1Dx. Is the camranger the way to do this or is there a simpler and cheaper solution. I don’t want to be physically tethered and because we’d only be using it occasionally – I don’t want to spend thousands. Any help or advice very gratefully received.
Is there a way to shoot and view from your camera to Mac book or iPad with out light room or capture. Just a basic viewing program i worked with Lightroom today and it was very slow and I would prefer not to spend money one capture one right now as the types
Of jobs I get that require viewing are infrequent. I have a canon mark iii and mark iv