


The Power Of Color and Color Harmonies In Composition
Nov 9, 2015
Stefan Kohler
Stefan Kohler is a full-time retoucher. He’s from Germany and likes bacon. In the last years, he built up a broad community around his retouching classes at the Infinite tool’s website.
Share:

About two weeks ago, we hosted a workshop with the amazing Natalia Taffarel. Now, I am back at the studio and I am having some mixed feelings. Mixed because I’m highly motivated to do a change in my retouching workflow in a crazy way, and because I am overfilled with new input. On the other hand I do not want to see my previous portfolio ever again.
All things considered, I think that this is a positive outcome.Whatever I lacked on my previous work, I am going to add now… After I finished digesting this huge information load.
The first day of the workshop was an eye-opening experience and this is what I would like to focus on today. Mostly, because it fits well with what I repeatedly say: “Retouch only what bothers you most, dont Zoom in to 400% and start to retouch like crazy. Retouch the five things that bother you most. Then retouch the next five.”
At the end of the workshop, I am going to change my workflow. I think it would be right to say that it will be a “Colors and Look” workflow. And I am going to make this change full throttle. This is going to be a key factor behind the photos I retouch. Why? I’ll explain in more detail in the next few weeks – it is a long and interesting process.
Natalia works with color harmonies. Honestly speaking, she is probably the queen of colors. Here is what I mean. You can not go and tell Natalia: “This is red,” without getting a reply like “Yes, but there is also quite a lot of blue there” (Note to self: Never go on the “I see something that you do not see” route with her – this can only lead to trouble).
Here is one of Natalia’s examples, that shows the power of color oriented workflow. This change was done solely by color matching (no retouching – only changing colors).:


Retoucher: Natalia Taffarel © Javiera Eyzaguirre ESTUDIOFE CHILE 2015
Color harmonies
Keep in mind: This method is only used for changing the hue – not the saturation or brightness of colors.
Different colors have very different effects on people (as discovered by advertisers everywhere). The images surrounding us serve a very specific purpose (at least per the the successful advertising agencies): They should arouse an emotion.
This is best achieved through color harmonies, the interaction between colors.
How do Color Harmonies Work?
The theory behind Color Harmonies is quite simple: You look for a color harmony (here is a tool), then everything else will take care of itself (assuming you know how to work it, which you shall). Here are a few different models for harmonies.
This means that in your photo, you should strive for balance and you achieve this balance by complying with a harmony. So when you tone an image, the weights, saturations and relative sizes of colors should be similar to a harmonized palette.
Mono

Everything in the picture follows the same toning. (here: red)
Complementary

Two complementary shades can be found in the picture equally or with weighting 75% – 25%. (here: red and green)
Split Complementary

In this model, the complementary color is split at the same angle. (here was green in cyan and a yellowish green split). The weighting is 50% – 25% – 25%.
Double-Complementary

Two complementary colors couples that can be moved up or down. The weighting is here 40% – 20% – 20% – 20%
Analogous

Three very similar colors, in the weights of 50% – 25% – 25%. The two “spin colors” can be rotated up to 90 °, but remain symmetrical to the dominant color.
Accented Analogic

Here we have a “flare” that is set, complementary to the main color. Weighting here is about 40% – 20% – 20% – 20%
Colors in the Composition
What determines the weight of each color? There are three factors, and if we add on one of them we need to compensate with one of the others (or both). Just don’t change the hue, as hue does not affect weight:
- The size of the area
- The saturation
- The brightness
In a large area, colors must either be made light or desaturated to obtain the same optical weight. You can think about the example of the bright red poppy in the green grass. Here are some examples to show you how weights can be determined:


Remember when I said it was simple, I lied…. Of course it is not that simple. not quite so simple, because position and shape of the color plays a role when setting a color’s weight. Here’s an example:


The Image, or rather the distribution of the elements in the image, has a significant influence on the weight of each color. I only touched on this to get your appetite going, I will talk about composition and weight more in the next posts.
Edit Ranges
For editor this means that we tone different areas in the image areas according to the specification of the selected harmony. as soon as all the masks are done, you can adjust the colors for each part. the fabrics, the skin, the hairs. Interestingly, about 40% of retouching work consists of masking and channel selection.

Once the masks are created, they provide the different fields in the image that needs to be toned. The tools you use to actually do the toning part (Curves, Hue / Saturation / Selective Color Correction) is irrelevant, as long as you adjust the Hue properly. (And by properly, I do not mean that you go around adding “some random blue” ot the colors, I mean “all the blues in the photo may only have toning from your selected harmony“.
At the end of the color correction, the weights and colors in the photo should have consistent brightness and saturation according to your selected harmony. And that is (sadly) a matter of practice. There are no shortcuts to it. If you really want to work with and understand colors, prepare for a long and steep learning curve. Just like with Dodge & Burn, you can train the eye to see the subtle nuances and to detect the components of a color rather quickly. It’s a brain muscle.
If you see a workshop out there that promises a silver bullet, you run away from that because the instructor is most likely a charlatan.
So, after feeding you with those bad news, let me get back to the photo at the top of this post that was retouched by Natalia. This is what the same photo looks like after “dodge and burn retouching” vs the original color retouch.


This image was created from shooting to printing in 3hrs in the pixelovers conference with Natalia.
Harmonies and Skin Tones
But how do skin tones come into play when looking through the color prism? We asked Natalia itself:
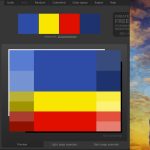
To conclude this article here is another example of me using a “right” color palette to explain the workflow (complete with masking and all, it took approx 3h)


I’ve chosen the yellow as the strongest hue for this image, but still needed the purple for the floral hat. AND I wanted a nice skin tone. So, I looked at my palette:

Yellow for the dress, purple for the headdress, orange for the skin and then some blue was in the background. There were no other colors in the picture. sounds quite simple, right?

Stefan Kohler
Stefan Kohler is a full-time retoucher. He’s from Germany and likes bacon. In the last years, he built up a broad community around his retouching classes at the Infinite tool’s website.
Related Posts
 How I work with Color Harmonies to improve my photos
 Use Color Burn and Color Dodge to quickly add color and contrast to your photos
 Use The Power Of Look Up Tables To Tone, Grade and Color Correct Your Photos
 This Color Wheels add on for Photoshop lets you color correct and grade photos as easily as video
Join the Discussion
DIYP Comment Policy
Be nice, be on-topic, no personal information or flames.
15 responses to “The Power Of Color and Color Harmonies In Composition”
Alexander Froi :O
A tad more than “burn and dodge” retouching. :) But very informative post about color. Still a mystery to me. :)
Great article.
Thanks so much! And thanks Natalia for exist!!!
Great article however I don’t understand it.
Could you tell me how you adjust hue of the colors? I have checked your image, copied palette and changed blending mode to hue to check does it match with image colors. There is a shift in hue, only one color matches.
There is no need to adjust hue precisely? Please tell me what I’m understanding wrong. I have attached an image to visualize what’s a “problem”.
Great article however I don’t understand it.
Could you tell me
how you adjust hue of the colors? I have checked your image, copied
palette and changed blending mode to hue to check does it match with
image colors. There is a shift in hue, only one color matches.
There
is no need to adjust hue precisely? Please tell me what I’m
understanding wrong. I have attached an image to visualize what’s a
“problem”.
Thanks
You better use this not as “perfect” example, because this technique is fairly new to me and I am afraid my color palette is probably not 100% accurate.
To answer your question: Yes, it’s important to adjust the hue precisely.
I am learning and improving and that process will probably take a few years…
The example is just to show another image (even if its not perfect).
Thanks for your reply. Yes it’s something new but fortunately it looks like we will find out more about this soon as there is more and more interest about this …
Good luck with this any enjoy learning path :)
btw: there is no way to “proof” color, because your color perception is based on the harmonies. What you did: You tried to create a help layer without looking at the whole image. That doesn’t work… Sorry.
Wonderful article! Just watched the Video twice :D
One thing i couldn’t figure out though… How do i get a colour palete into my picture? (The actual rectangle with colours in it)
I managed to get one into the library over adobe colors but not into the picture :(
You set up masks for every part you want to “tone” (have a look at my other article: https://www.diyphotography.net/using-masks-channels-object-extraction/) and then you adjust the colors until they match your palette and composition.
Sounds simple, is probably a long-term-thing to learn :D
This type of article is exactly what I live for. It takes some of the voodoo mystery out of good photography. But it also slows the editing process down because now I’ve got to start looking for ‘real’ color balance, instead of what I think is balanced but just isn’t. Good news is practice will make this easier.
Thank you for the article. It’s a real gem. And that color matching tool is amazing. You can make swatches and import them directly into Ps. Perfect!
10/10
Thanks a million for this article. Are there any other suggested reading material (articles and books) you would recommend for a beginner that talks more about this subject?
Thanks for this article, and Natalia being what she is (a true master of the art) talks about the real way to choose color. Else most of these fake retouching course teach you how to dodge and burn for 3 days, which basically is a 5 min technique to learn and more of practice job to perfect, and skillfully avoid the topics of color toning. If you are teaching, teach like Natalia, or better DONT TEACH. I know many of these famous retocuhers hate Natalia as she says them over the face that you are hogwash. She deserves much more recognition and respect. She is one rock star and a true teacher!
great, thanks for the article! To me, the hardest thing to do is to choose the proper palette… I hope with time it´ll get easier..