


Use The Power Of Look Up Tables To Tone, Grade and Color Correct Your Photos
Feb 3, 2016
Udi Tirosh
Udi Tirosh is an entrepreneur, photography inventor, journalist, educator, and writer based in Israel. With over 25 years of experience in the photo-video industry, Udi has built and sold several photography-related brands. Udi has a double degree in mass media communications and computer science.
Share:

Everyone loves a good look. Lightroom makes it really easy to apply looks with presets, but if you want your look inside Photoshop, you are looking at one of two options: Apply a look in lightroom after the final export or take the time and effort to apply the look in Photoshop. Sadly, what only takes a click or two in Lightroom is world of pain in Photoshop.*
But Photoshop as a very powerful tool call Look Up Tables (or LUT for short – here is our collection) that you can apply as an adjustment layer. Those LUTs are similar to presets in the sense that they apply a look. But they are far stronger because unlike presets, they almost cause no quality loss.
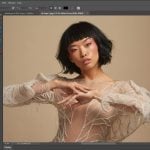
We made a collection of LUT files with three uses in mind: color correction, skin tones (which you see above), and looks.
Color Correction – these include a set of 30 LUTs that can color correct a certain luminocity in a photo. Say add magenta to the shadows or Cyan to the highlights. The cool thing is that the files include all 6 basic and secondary colors, so you don’t have to add and subtract colors yourself.
Skin Tones – This is a collection of 18 looks that are dedicated to making skin look good. You can of course apply those for the entire image, not just the skin and get a “look”. Here is a link to a bigger version of the file above if you want to check up close.
Brownz Collection – Peter “Brownz” Braunschmid is a one of our favorite Photoshop artists and he contributed 34 different looks to the package.
Here is a quick before/after of applying (nothing but) the pale fashion skin LUT on a photo:


So head over and get our awesome LUT package and go play. Let us know how you used them
*I would not be surprised if Adobe will add LUT support to Lightroom or Preset support as an adjustment layer to PS in one of the coming versions, but until that happens, we are stuck.

Udi Tirosh
Udi Tirosh is an entrepreneur, photography inventor, journalist, educator, and writer based in Israel. With over 25 years of experience in the photo-video industry, Udi has built and sold several photography-related brands. Udi has a double degree in mass media communications and computer science.
Related Posts
 This Color Wheels add on for Photoshop lets you color correct and grade photos as easily as video
 How To Create and Use Color Lookup Tables in Photoshop
 Know The Difference Between Correct Exposure And Creatively Correct Exposure
 How to color grade in Photoshop using only Solid Color Adjustment Layers
Join the Discussion
DIYP Comment Policy
Be nice, be on-topic, no personal information or flames.
One response to “Use The Power Of Look Up Tables To Tone, Grade and Color Correct Your Photos”
i like before better