


White Balance Photography: Custom White Balance Setup for Accurate Colors
Nov 28, 2025
Darlene Lleno
Darlene Lleno brings a unique perspective to DIY Photography as someone who grew up surrounded by camera gear but chose words over lenses. With five years of writing experience, she specializes in photography content that’s both technically informed and genuinely passionate. Growing up with a photographer twin brother meant camera talk was everyday conversation in her household. While he mastered capturing moments, Darlene discovered she preferred being the subject and the storyteller behind the scenes. As a travel enthusiast and mother of two, she understands the importance of preserving life’s precious moments. When not exploring new destinations or writing for DIY Photography, you’ll find her reading or tending to her garden. Her approach to photography writing is refreshingly authentic, she may not be behind the camera, but she knows exactly what it takes to help others capture the shots that matter most.
Share:
White balance photography changes how your images look. Getting it right means your colors appear natural instead of too warm or too cool. Most photographers stick with auto white balance and wonder why their shots look weird. Learning custom white balance setup fixes your color problems and cuts your editing time in half.
Your camera doesn’t see light like you do. Your eyes adjust automatically to different lighting. You walk from sunlight into a room with regular bulbs and everything looks fine. Cameras can’t do this on their own. They need your help to get colors right under different lights.
What Color Temperature Means for Your Photos
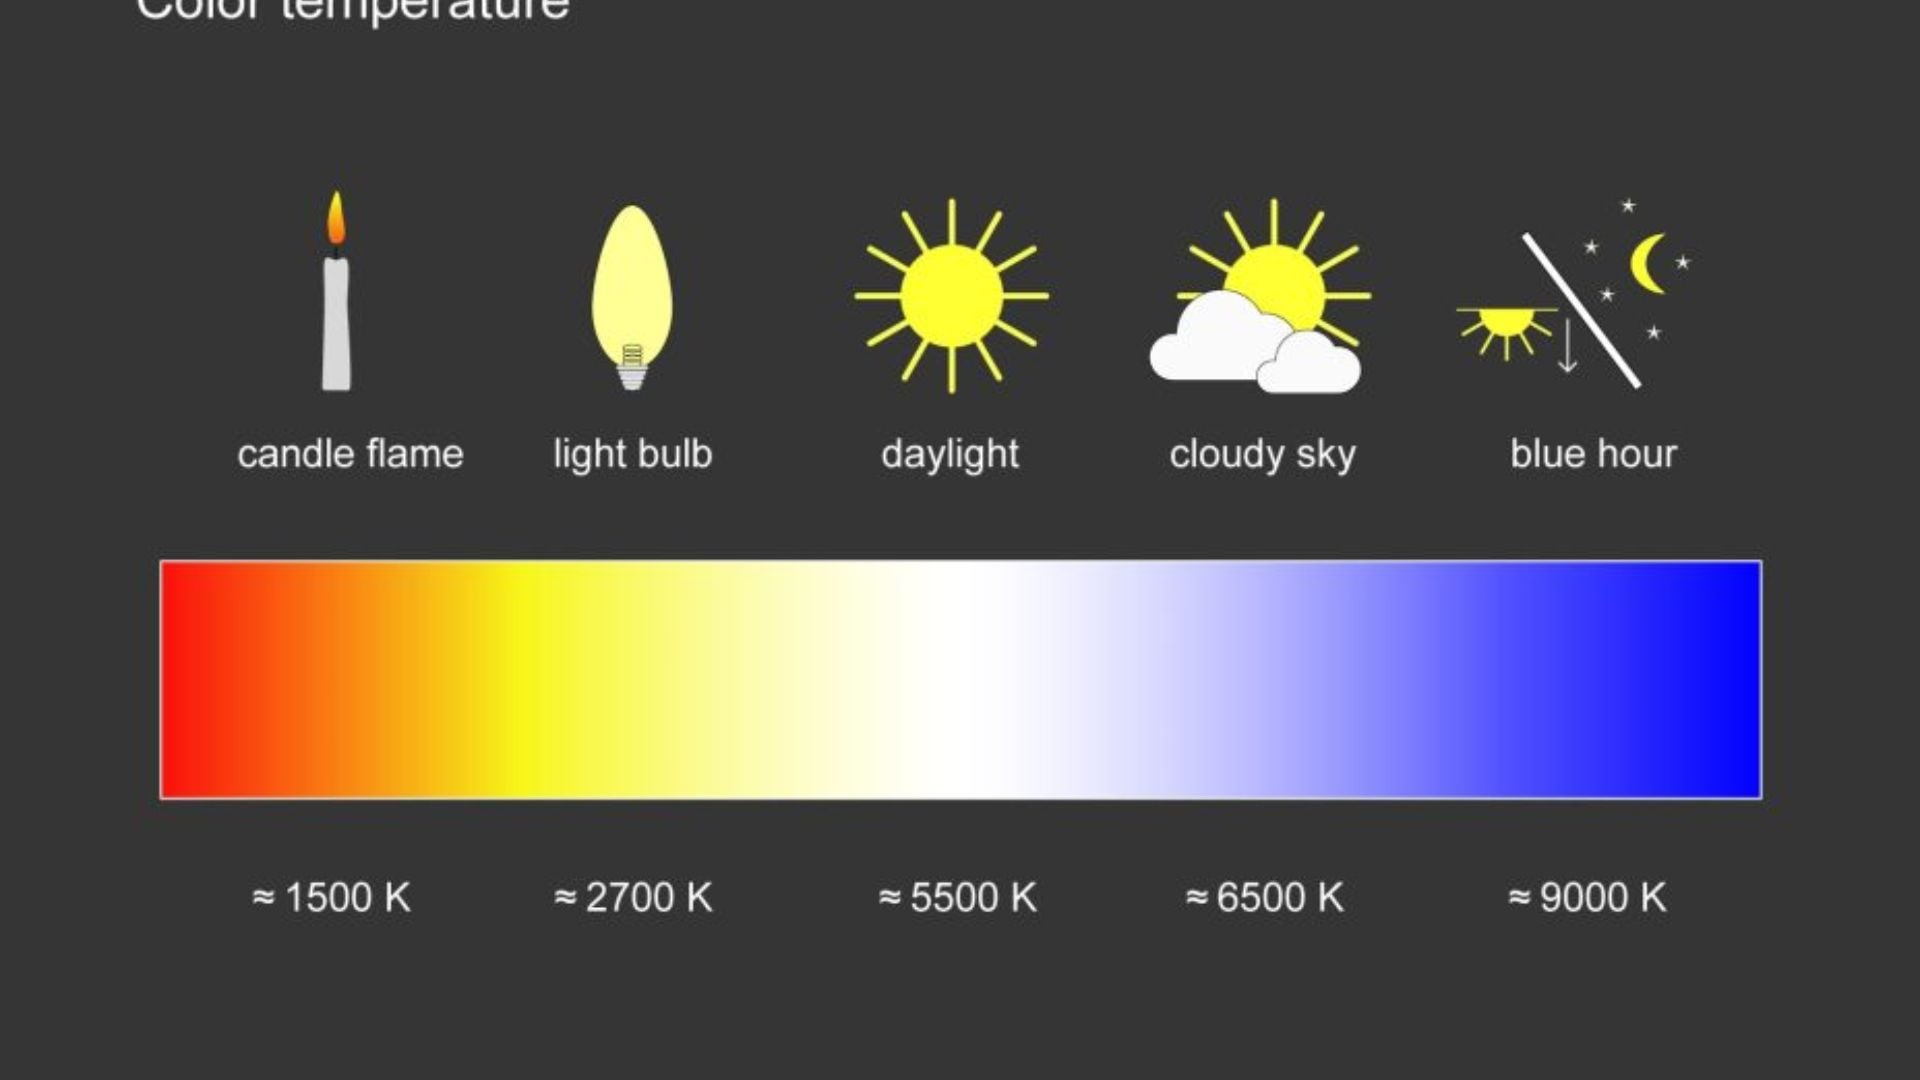
Light sources create different color temperatures. We measure these in Kelvin. Candles burn around 1,800K with deep orange tones. Regular house bulbs hit about 2,700K to 3,000K. Daylight sits between 5,500K and 6,500K. Cloudy days push past 7,000K with cooler blue tones. Your white balance setting tells your camera how to read these different lights.
The exposure triangle works with white balance to make good photos. ISO, aperture, and shutter speed control how much light hits your sensor. White balance makes sure that light gets the right color values. You need both the right amount of light and the right color.
Photographers using studio lighting often mix different light sources. LED panels might output 5,600K while tungsten lights burn at 3,200K. Mix these without fixing white balance and your photos get nasty color casts. Custom white balance fixes this problem when you shoot, not later.
Camera Presets Don’t Always Cut It
Your camera has several white balance presets built in. Daylight, cloudy, shade, tungsten, fluorescent, and flash modes help with common situations. These work okay for general shooting. But they’re just averages, not exact readings of your actual lighting.
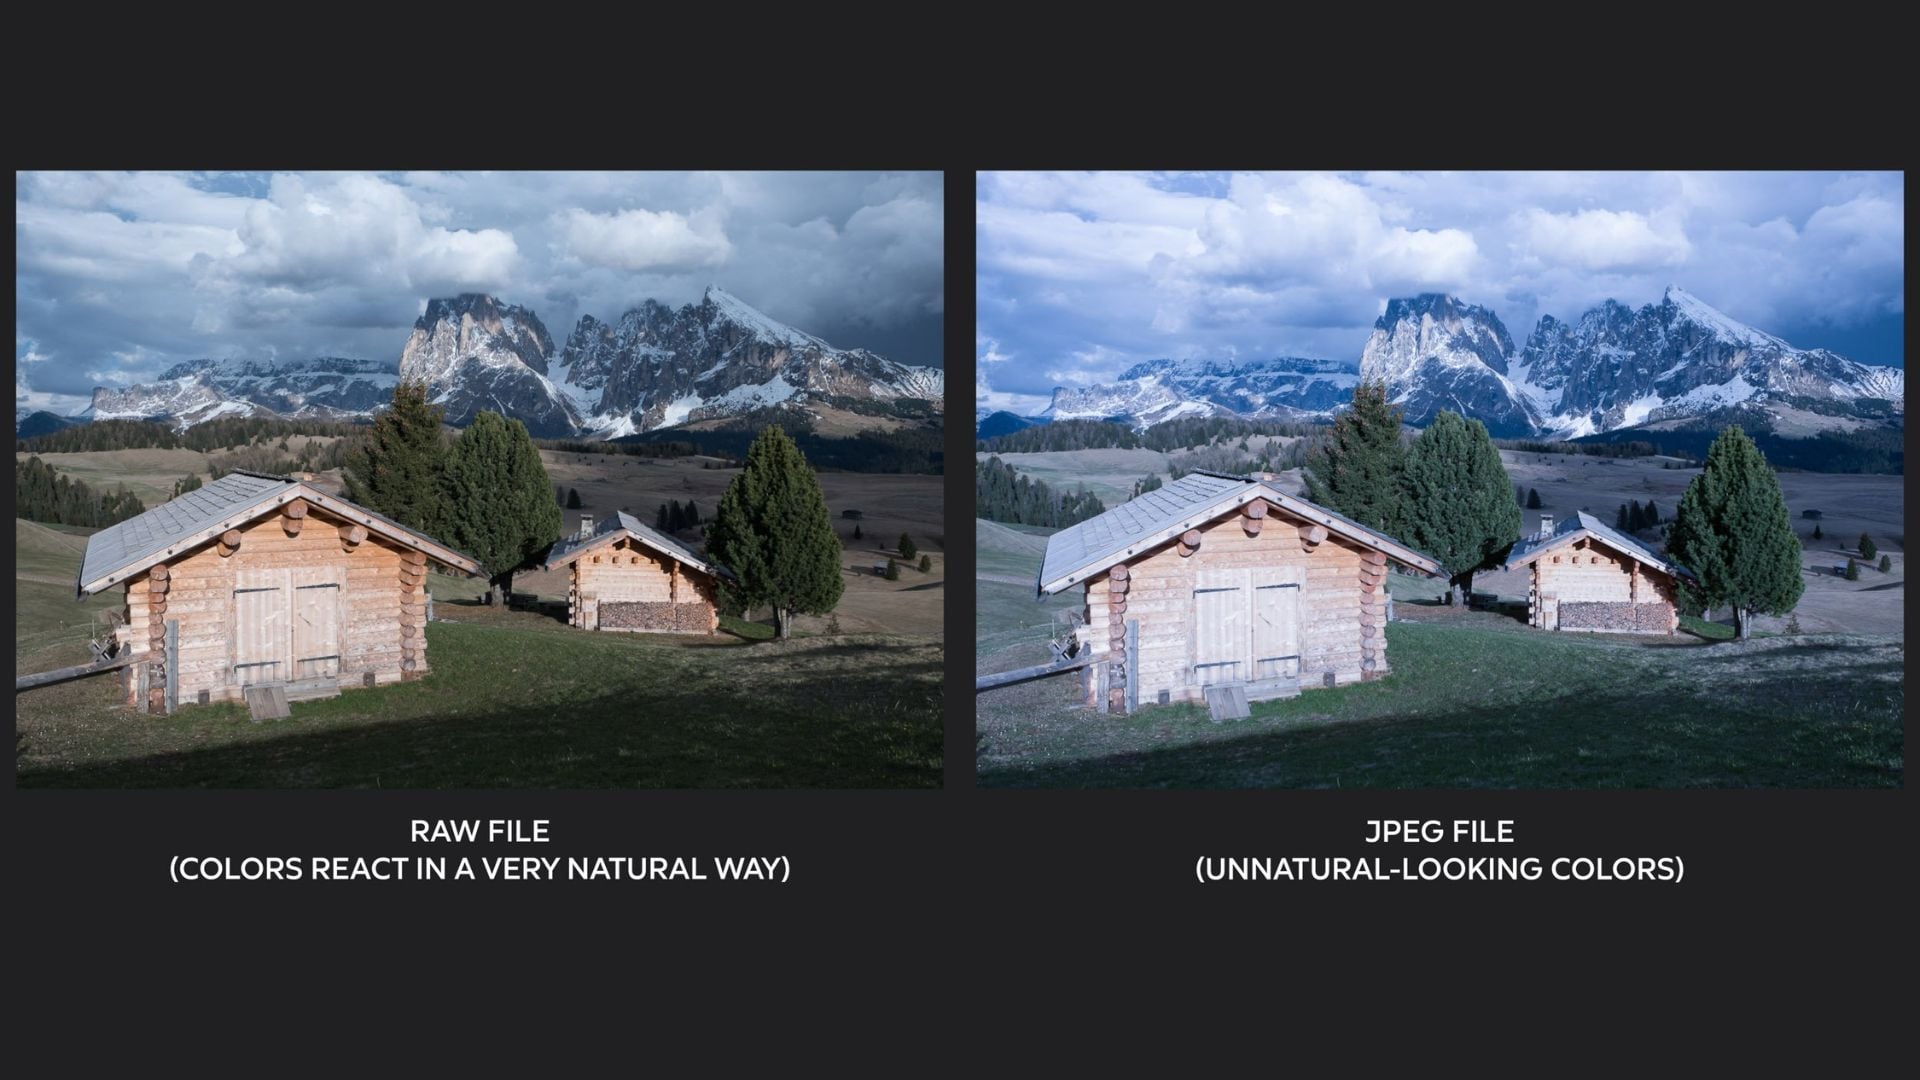
Auto white balance got way better in newer cameras. Smart software looks at your scene and guesses the right color balance. But auto white balance still fails with mixed lighting or weird color schemes. Your camera might see a beautiful sunset and “fix” those warm tones into boring grays.
Fixing colors later in post-processing wastes your shooting time. RAW files let you change white balance without losing quality. Still, getting color right in camera works better. Your preview shows true colors. You make better choices on location instead of guessing at your computer.
How to Set Custom White Balance
Setting custom white balance needs a neutral reference target. Photography gray cards work perfectly for this. These cards reflect 18% of light no matter what color temperature hits them. White balance cards, dome diffusers, or clean white paper also work when needed.
Put your reference target in the same light hitting your subject. This part really matters. A gray card near your camera under different light than your subject gives wrong white balance. Place it exactly where your subject stands, getting the same light quality.
Fill your camera frame with the reference target. Most cameras need the target covering the center focus area completely. Check your manual for what your camera needs. Some want the target filling the whole frame while others need less.
Here’s the basic setup process:
- Find your custom white balance option in the camera menu
- Take a photo of your gray card or white target
- Make sure the shot shows clear detail without blown highlights
- Select that photo as your white balance reference
- Your camera now uses those values as neutral
Different camera brands put this feature in different spots. Canon users find it under Custom White Balance in the shooting menu. Nikon cameras usually have a PRE option in white balance settings. Sony and Fuji cameras vary by model, so check your manual.

Making Custom White Balance Work Better
Professional photographers shoot multiple white balance references during long sessions. Light changes as clouds move or the sun shifts angles. Studio lights warm up over time. Update your custom white balance every 30 to 60 minutes. This keeps your colors consistent throughout the shoot.
Take a reference shot with your gray card visible in the first frame. This helps your editing workflow later. You can match colors across multiple images precisely. Remove the card for other shots but keep the lighting identical.
Some photographers use ExpoDisc or similar dome diffusers for custom white balance. These fit over your lens like a filter. Point your camera toward the light source, not your subject. The diffuser averages all light hitting your lens for a balanced reading.
Check your camera histogram to verify white balance accuracy. A properly balanced gray card shows matching RGB values in all three channels. If red, green, or blue channels peak differently, your white balance needs work.
Mistakes That Ruin Your White Balance
Setting custom white balance in different lighting than your shooting spot causes problems. Taking a reference indoors then shooting outdoors creates color casts. Your images inherit indoor lighting traits even though you shot in daylight.
Forgetting to reset custom white balance between locations messes up your colors. That perfect setting from morning portraits looks terrible for sunset landscapes. Set a reminder to check white balance when you move to new spots.
Dirty or damaged gray cards wreck white balance accuracy. Cards collect fingerprints, dust, and stains over time. These add color casts to your reference measurements. Replace gray cards yearly or when they look worn.
Mixed lighting creates tough situations even for experienced photographers. Think about someone standing near a window with fluorescent lights overhead. One side gets cool daylight while the other gets greenish fluorescent light. Custom white balance only fixes one light source. You can control your light by turning off competing sources or embrace mixed lighting as a creative choice.
Using White Balance Creatively
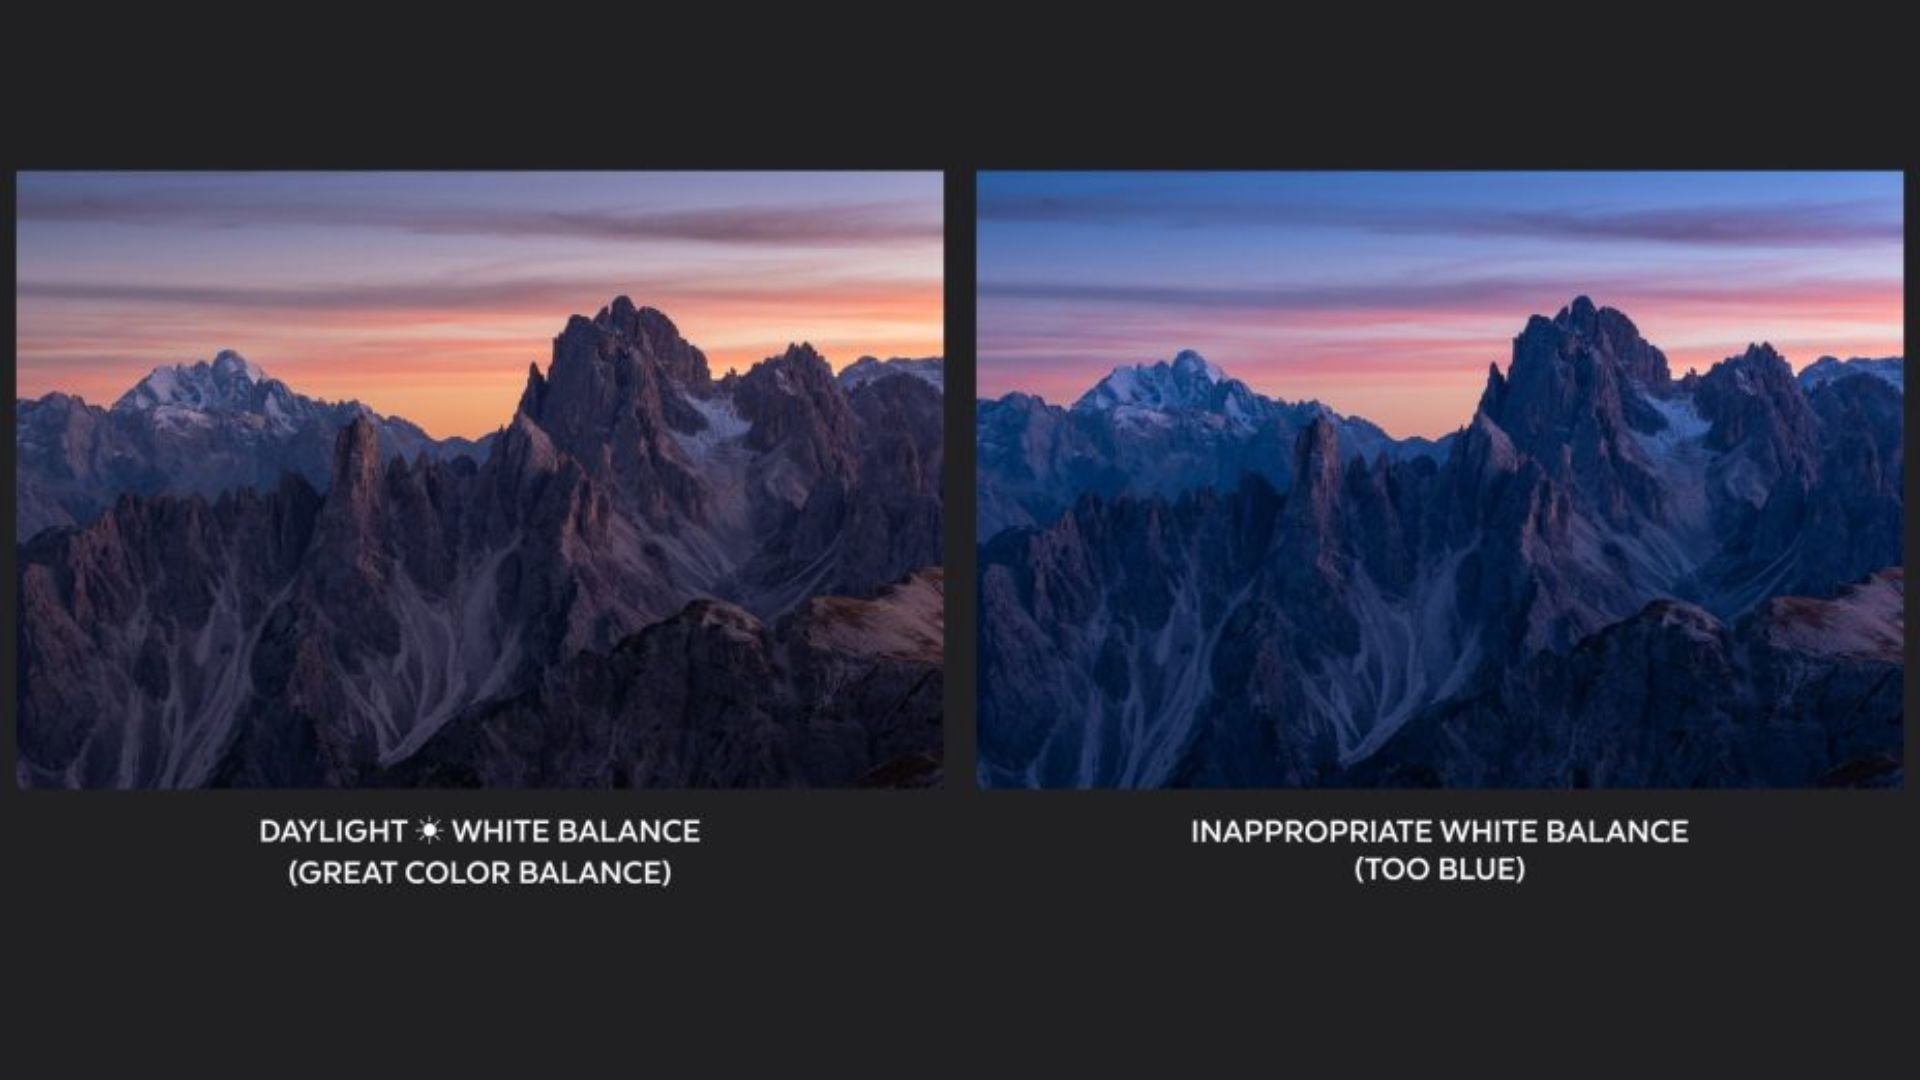
Accurate colors matter for many jobs, but creative white balance creates specific moods. Warming your white balance by 500K to 1,000K above neutral makes golden, inviting tones. Cooling it produces crisp, clean looks popular in modern commercial work.
Portrait photographers sometimes warm their white balance slightly on purpose. Skin tones look healthier and more appealing with subtle warmth. This works great for natural light portraits where beauty matters more than technical perfection.
Landscape photographers often cool their white balance for drama. Mountains, water, and buildings can benefit from slight blue shifts. Just be careful not to make images feel artificially cold.
Understanding how lights affect white balance helps your creative decisions. Tungsten lights create warm, intimate feelings. Fluorescent tubes look commercial and clinical. LED panels offer consistency but can feel sterile. Mix these qualities intentionally instead of by accident.
White Balance Tips for Different Photography Types
Product photographers need perfect color accuracy. Customers return items when colors don’t match product photos. This costs stores millions every year. Custom white balance with controlled studio lighting ensures accurate colors. Many commercial photographers shoot color checker targets with products for proof.
Wedding photographers face constantly changing light. Ceremonies happen in churches with mixed lighting. Receptions move from daylight cocktails to evening dancing under colored lights. Set custom white balance multiple times throughout the day. This maintains consistent, professional results according to Cambridge in Colour’s white balance guide.
Food photographers rely heavily on white balance accuracy. Restaurant dishes must look delicious in menus and marketing. Proper food photography combines controlled lighting with precise white balance. Wrong colors make even tasty food look gross.
Architectural photographers shoot at different times to capture buildings in various light. Morning light differs massively from afternoon or twilight. Custom white balance for each session keeps building materials true. This matters especially for stone, brick, or colored glass.
RAW Files and White Balance Flexibility
Shooting RAW format gives you white balance flexibility JPEG files can’t match. RAW files store all sensor data with minimal processing. You can adjust white balance later with virtually no quality loss. This safety net doesn’t excuse sloppy camera work though.
Getting white balance right during capture still matters with RAW files. Your camera LCD shows the embedded JPEG preview using your current white balance. Wrong white balance makes judging exposure and composition difficult while shooting. You can’t evaluate images well when colors look wrong.
JPEG shooters have less white balance room for error. Camera processing bakes white balance into JPEG files. Big adjustments hurt image quality, causing banding and color shifts. Proper camera settings including accurate white balance become essential for JPEG shooting.
Many pros shoot RAW and JPEG together. JPEG files give quick previews with accurate colors for client review. RAW files offer maximum editing flexibility if adjustments become necessary. This workflow combines convenience with insurance.
Keeping Colors Consistent Across Projects
Professional photographers create custom white balance presets for locations they shoot often. Studios with consistent lighting benefit from saved settings. Load your preset before each session and confirm with a gray card. Your colors will match previous work perfectly.
Creating color profiles for specific cameras and lighting keeps things consistent across equipment. Photographers using multiple camera bodies need matching white balance settings. Without consistency, images from different cameras need tons of post work to match.
Some photographers keep lighting diagrams noting color temperatures of their gear. This removes guesswork from complex setups. Knowing your key light runs at 5,600K while your fill operates at 4,800K helps predict results.
Fixing Common White Balance Problems
Strange color casts despite setting custom white balance usually mean problems with your target or technique. Check that your gray card looks neutral under the shooting light. Hold it at different angles checking for reflections or color bounce from nearby colored surfaces.
Colors that vary across a series might mean changing light conditions. Clouds moving across the sun alter daylight color temperature by hundreds of Kelvin in minutes. Time-lapse photographers need to monitor and adjust white balance regularly as explained by Digital Photography School.
Purple or magenta shifts in shadows often indicate mixed lighting rather than white balance issues. Separate light sources with different color temperatures create these tough situations. Sometimes accepting mixed lighting or controlling your light sources works better than fighting white balance adjustments.

Putting White Balance Into Practice
White balance photography forms the foundation for accurate colors in all shooting conditions. Custom white balance setup takes minutes to learn but affects every image you make. Whether you shoot portraits, products, or landscapes, proper white balance ensures your vision translates accurately.
Time spent understanding color temperature and mastering custom white balance pays off throughout your career. Your images develop professional consistency clients notice. Post-processing becomes faster and more fun. Most importantly, you gain creative control over photography’s fundamental elements.
Start practicing custom white balance with a simple gray card on your next shoot. The immediate color accuracy improvement will convince you this technique deserves a permanent spot in your workflow. Your images will thank you for it.

Darlene Lleno
Darlene Lleno brings a unique perspective to DIY Photography as someone who grew up surrounded by camera gear but chose words over lenses. With five years of writing experience, she specializes in photography content that’s both technically informed and genuinely passionate. Growing up with a photographer twin brother meant camera talk was everyday conversation in her household. While he mastered capturing moments, Darlene discovered she preferred being the subject and the storyteller behind the scenes. As a travel enthusiast and mother of two, she understands the importance of preserving life’s precious moments. When not exploring new destinations or writing for DIY Photography, you’ll find her reading or tending to her garden. Her approach to photography writing is refreshingly authentic, she may not be behind the camera, but she knows exactly what it takes to help others capture the shots that matter most.


Join the Discussion
DIYP Comment Policy
Be nice, be on-topic, no personal information or flames.