


Stylized portrait, right out of the camera – The Lighting Series #9
Jan 12, 2019
Stefan Kohler
Stefan Kohler is a full-time retoucher. He’s from Germany and likes bacon. In the last years, he built up a broad community around his retouching classes at the Infinite tool’s website.
Share:

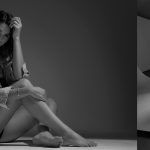
In some portraits, you just want to be beautiful, not after retouching, but when you’re taking them, right out of the camera. That’s how this one goes.

The lighting series is a comprehensive lighting guide. We talk about flash photography, lighting, posing, color, and walk you through a series of lighting setups. Some will be simple, some complex, but in the end, they are all tools to add to your photography toolbox. Here is a complete list of the lighting tutorials.
Lighting gear
- 150cm Octabox on a 1000Ws Monoblock
- Normal reflector on a 500Ws Monoblock
Lighting setup
It’s actually not that hard.
You don’t always need 27 softboxes, reflectors, and gels. Sometimes, a perfect portrait is simple to create.
In this example, a very soft light source was used to completely illuminate the model’s face. Of course, you don’t want completely flat light; you want shade and for the light to come from a definite point.
The model’s hair is balanced against the main light with its own light and a normal reflector.
The main light produces a lot of stray light, but this is used to illuminate the background. Position the model far enough from the background so that the background receives enough light without any shadows from the model.
Positioning

Too low
If the light source is positioned too low, which can happen quite easily because of the size of the stand or because having it at eye-level is more convenient, you end up illuminating your model’s nostrils and with too large a shadow from her nose spreading up her face. Not what you want.

Just right
When the height is right, the nasal edge is well-formed and the shadow from the nose drops slightly. This kind of light is perceived as “natural”. The viewer doesn’t question it and it doesn’t detract from the scene.

Too high
Position the light source too high and you will cast deep shadows. Here, the shadows fall almost to the upper lip.The light here is natural, but it is more of a design element and it divides the face. Not forgetting that the eye sockets are in shadow and the eyes aren’t lit well enough.

Downloads
For the pictures in the article, we used the light simulation Set.A.Light 3D. You can download the lighting setup and try everything for yourself. You can also download this series as a free ebook.
If you’ve never worked with Set.a.Light before, you should give it a try! There is also a free demo version on the website, which you can use to open these setups.
Filed Under:
Tagged With:

Stefan Kohler
Stefan Kohler is a full-time retoucher. He’s from Germany and likes bacon. In the last years, he built up a broad community around his retouching classes at the Infinite tool’s website.


Join the Discussion
DIYP Comment Policy
Be nice, be on-topic, no personal information or flames.