DIY Photography

Hacking Photography - one Picture at a time

  • News
  • Inspiration
  • Reviews
  • Tutorials
  • DIY
  • Gear
Search

 
@diyphotography

Telegram Me

Instagram

Submit A Story

How to create a low key boudoir – The Lighting Series #1

Share
Tweet
December 1, 2018 by Stefan Kohler 1 Comment

Nikon D800, 50mm f1.4 @4,5, ISO 100, 1/100s

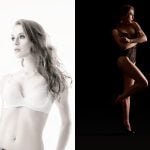
In this chapter of the Lighting Series, we are looking at a simple low-key portrait. Here, the skill lies in precise lighting and the posing of your model.

Equipment

  • 1x Striplight 140cm x 30cm on 500Ws Monoblock
  • Black Molton background

Setup

This setup uses a light source next to or just behind the model. A striplight works best here so that there’s a clean edge drawn across the model.

In order to maintain a really dark black background – and so as not to have to darken it later in Photoshop – use a black cloth. This will absorb a lot of the incidental light.

What’s exciting about this setup is the clear shapes that it produces, and the expanse of negative space around the model.

I prefer to position the light source slightly higher, meaning that the light comes from a more natural direction with the shadows falling downwards. We automatically query shadows that fall overhead so I try to avoid them.

The more harmonious and realistic the picture looks, the fewer questions it will provoke in the viewer.

Important: the edge of the light shouldn’t be broken. This may require some posing instructions for your model to keep the line clean.

Positioning

If the strip light is placed too far forward, the light becomes too flat and we lose a lot of depth

If the light is well positioned, there is a clearly visible edge to it. At the same time, it creates shadows that give depth to the picture

The model sinks in the shadows when the light source is too far back


Downloads

For the pictures in the article, we used the light simulation Set.A.Light 3D. You can download the lighting setup and try everything for yourself.

If you’ve never worked with Set.a.Light before, you should give it a try! There is also a free demo version on the website, which you can use to open our set.

Share
Tweet

Related posts:

How to color backgrounds with light – The Lighting Series #2 How to mimic sunlight in the studio – The Lighting Series #3 Multiple lights, Multiple colors setup – The Lighting Series #8 Stylized portrait, right out of camera – The Lighting Series #9

Filed Under: Tutorials Tagged With: lighting diagram, strobist, studio lighting, The Lighting Series

About Stefan Kohler

Stefan Kohler is a full time retoucher. He's from Germany and likes bacon. In the last years he built up a broad community around his retouching classes at RAWexchange. You can follow his work at his portfolio.

« Here are five lighting tricks you can do with a smartphone flashlight
The Sony A7SIII will shoot 8K at 60fps and 4K at 480fps according to leaked data sheet »
  • rifki syahputra

    yes, good simple setup.. you can add some mask or color gel to the light to add some effect
    the set.a.light is cool btw 🙂

Popular on DIYP

  • This unexpected Lightroom slider helps making perfect black and white conversions
  • This epic 81-megapixel moon photo was stacked from 50,000 images
  • Tamron to launch wide angle 17-28mm f/2.8 Zoom for Sony FE
  • These are the 10 best cameras for video under $300
  • Apple makes a Bokeh commercial, uses “bokeh” as a verb and pronounces it wrong
  • This guy bought a new Sony A6400 in an A6300 body
  • This viral video is the result of an angry Broadacres woman for shooting on public property
  • 2019 World Press Photo contest nominees will give you chills [NSFW]
  • Bowens really is back – and they’re made by Godox
  • Original raw Star Wars footage highlights the impact of good sound design – Also, Han totally shot first

Recent Comments


Previous Polls

Dunja Djudjic is a writer and photographer from Novi Sad, Serbia. You can see her work on Flickr, Behance and her Facebook page.

John Aldred is based in Scotland and photographs animals in the studio and people in the wild.

You can find out more about John on his website and follow his adventures on YouTube and Facebook.

JP Danko is a commercial photographer based in Toronto, Canada. JP
can change a lens mid-rappel, swap a memory card while treading water, or use a camel as a light stand.

To see more of his work please visit his studio website blurMEDIAphotography, or follow him on Twitter, 500px, Google Plus or YouTube.

JP’s photography is available for licensing at Stocksy United.

Clinton Lofthouse is a Photographer, Retoucher and Digital Artist based in the United Kingdom, who specialises in creative retouching and composites. Proud 80's baby, reader of graphic novels and movie geek!
Find my work on My website or follow me on Facebook or My page

Recent Posts

  • This 4.9mm Hyperfisheye prototype lens is so wide it can see behind itself
  • Adobe confused as to what a Nikon looks like – uses Fuji X-T20 to promote faster Nikon tethering
  • Soon you can use your Profoto modifiers on the Godox AD200 with the new AD-P adapter
  • Tamron’s 17-28mm f/2.8 E for Sony is official, also 35mm f/1.4 and 35-150mm f/2.8-4 lenses for full frame DLSRs
  • This guy bought a new Sony A6400 in an A6300 body

Copyright © DIYPhotography 2006 - 2019 | About | Contact | Advertise | Write for DIYP | Full Disclosure | Privacy Policy