


How I made a timelapse of total solar eclipse while still being able to celebrate with my family
Aug 28, 2017
Elijah Parker

We love it when our readers get in touch with us to share their stories. This article was contributed to DIYP by a member of our community. If you would like to contribute an article, please contact us here.
Share:

I’m happy to say the VIEW Intervalometer performed very well for the eclipse, allowing me to enjoy the experience with my family while it managed the pre-planned exposures and motion tracking on the telephoto.
I traveled with my wife and three boys (ages 5, 3 and 1) to Emigrant, MT (since everywhere else was too expensive). We logged a total of 2945 miles over the 6-day trip, which was probably too much, but we made lots of stops and had a fun adventure.
We left at 2am Monday morning to drive down to the path of totality. I was planning to meet up with Ron Risman at an awesome spot East of Jackson, but the main road through Yellowstone in our area was closed overnight for construction. After a bit of offline research the night before (I didn’t have data or wifi available!), we decided to go up and around through Bozeman and ended up in the pleasant little town of Driggs, Idaho, which turned out to be a wonderful spot that wasn’t too crowded.

I setup two cameras, a wide-angle fixed on a tripod (Canon 5DIII with a 16-35 f/2.8L) and a telephoto (Canon 7D with a 300mm f/4L, 480mm equivalent) on the Sapphire pan/tilt head by Dynamic Perception. For the telephoto, I used the sun tracking feature I just added to the VIEW for following the sun, since without it the sun would leave the frame within a few minutes. This worked surprisingly well, keeping the sun nearly centered over the entire two and a half hours, so I didn’t even need to use the correction feature I had added.

I had designed a filter holder for the telephoto but the week before leaving on the trip, my 3D printer hot end broke, so I ordered a new one but was too busy to replace it so I ended up making one out of cardboard and gaffer’s tape. I was worried the sun would heat the tape and cause it to detach, but it worked great, and made a nice shade for the camera to help keep it cool as well. Still, I was surprised by the amount of sensor noise I had even at ISO100.
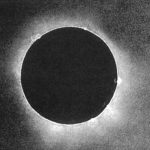
Since I had expected to have more internet access during the trip, I hadn’t completely planned my exposure settings before hand, and was planning to do more research. I ended up taking more of a guess, and in the end my exposure choices were not quite ideal, specifically for totality. I thought totality would be a bit darker than it was — I think the part that surprised me was the dynamic range involved, since even while parts of the sky were very dark, the corona as well as horizon (where the shadow didn’t reach) were relatively very bright.
For the telephoto during totality, I did a 5-frame bracket covering a total of 10 stops, but I didn’t quite get the center right, so the brightest image was too bright, meaning I could have moved the center of the bracket 3-4 stops lower. Still, since it was a wide range, I managed to capture a lot. Photoshop wouldn’t automatically align the images, and once I manually aligned them as layers, I found out it wouldn’t perform the HDR conversion on layers…so I manually used this technique.

With the wide angle, I did a 2-frame bracket during the partial phases, 2 stops apart, which was actually not nearly enough. I should have done the darker frame 6 stops under in order at least capture some of what was happening with the sun. During totality, I had a fixed exposure with a short interval to capture the movement of the shadow, which worked pretty well although somewhat overexposed (I should have exposed lower and brought back the shadows in post, since the most interesting things were happening at the top end of the dynamic range). Additionally, I could have done better on the timing of Baily’s Beads (I was distracted and didn’t remove the solar filter in time).

While there are things I could have done better, I’m very happy overall and have a wonderful set of footage for my first total eclipse. Here’s a time-lapse from the telephoto camera. I edited it in Lightroom with the Timelapse Workflow plugin, then put it together and stabilized it with Apple Motion, rendered in with TLDF (for frame blending and noise reduction), and finally assembled the video, music and text in Final Cut Pro.
And thanks to the calculations provided by Xavier Jubier, the VIEW was able to fully automate the exposures and timing for the eclipse, so the only intervention I had to do was to remove the solar filter during totality. This allowed me to be able to enjoy the experience with my family rather than just focus on the camera during the event. Now that it’s been tested with the real thing, I’ll improve the eclipse interface for the VIEW so that it’s ready and even easier to use for future eclipses.

Observations from the eclipse
It was awesome! The speed at which totality approaches is incredible and surreal.
It wasn’t as dark during totality as I expected, but it was still very significant and there was an impressive temperature drop (I went from being uncomfortably warm to too cold)
Shadow bands were fascinating and much more apparent than I had expected, clearly visible across the dirt road and moving rapidly. I had my iPhone video camera running on a tripod to capture this, but for some reason it stopped right before totality and I didn’t realize it.

Now that I’m back I’ve got a lot to catch up on — being without internet for a while really set me back on email. Next up I’ve got a few more orders to ship out, wrap up firmware version 1.8, and create more documentation and videos on motion control.
While completely exhausting, it was a fun family trip and very memorable, especially for our 5-year-old, who loved the eclipse. After the eclipse, we drove over the pass to Jackson and on up through the Tetons and Yellowstone, wrapping up a very long day. I’m very thankful for the support of my wife on this crazy and exhausting trip! Here we are at a stop on the way back up after the eclipse.

About the Author
Elijah Parker is a photographer and a man behind Timelapse+ intervalometers. You can see more of his work on his website and Vimeo, and follow Timelapse+ on Twitter. If you’re interested in buying prints of the eclipse images, check out the gallery here. This article was also published here and shared with permission.
We love it when our readers get in touch with us to share their stories. This article was contributed to DIYP by a member of our community. If you would like to contribute an article, please contact us here.
Related Posts
 This is the first ever photo of a total solar eclipse
 This video of the total solar eclipse was captured from stratospheric balloon
 This photographer captured total solar eclipse from a commercial airplane at 39,000 feet
 It took seven cameras and two years to create this stunning video of total solar eclipse
Join the Discussion
DIYP Comment Policy
Be nice, be on-topic, no personal information or flames.