


Dancer Shoot Anatomy – The Workout
Jul 1, 2012
Udi Tirosh
Udi Tirosh is an entrepreneur, photography inventor, journalist, educator, and writer based in Israel. With over 25 years of experience in the photo-video industry, Udi has built and sold several photography-related brands. Udi has a double degree in mass media communications and computer science.
Share:

I’m Antoine Willaeys, I’m a French 25 years old photographer & retoucher from France. I am, at present, creating a series of various images with artists and athletes during and after their workout. I really love these different universes and the stories which we can see there. Every person is different and every image has its strength. I chose to create this series, every time, in the same way : as a composite.
This choice allows me to work in an efficacious way. I shoot the background in HDR and the subject is photographed in studio (or on location if it is not possible to be in a studio). So, it is possible for me to shoot the background alone, one day. And an another when the photographed person is available I shoot her alone. No pressure, no setback, all that I need for my final image !
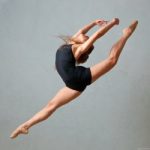
For this picture I photographed Clémentine Miano, she’s an excellent dancer. Lora von Gore is my make-up & hair artist on this project, be sure to check out her fantastic work!
The Subject

For this part, on the front, I used a 22″ beauty dish with a white socket to have a softer light.
The beauty dish was positioned at 45° above Clémentine and a 30″ white reflector was used to ease the shadow under her chin.
To enlighten the back (her hair and shoulders) and make the finals scene realistic I used a 30″ umbrella at 45″ just behind her.
The Background
For the background I always shoot five exposures to create a final HDR image. In that case, it’s not very important but outdoor it makes more sense. I love this dramatic effect. I always try to work on the symmetry of the place I will shot and I keep only the determining elements of my story. Here, there is only the exercises bar which imported.
Post Production
There is quite a bit of post production for this shot so I thought of doing a minute by minute walk-through of the process.
00:08 I use Photomatix Pro to merge my 5 bracketed images to one HDR background. I’ve no particular technique, it is more feeling. I prefer to use the natural aspect but here, it’s just my choice, your can be different.
00:20 I open my saved file on Photoshop with Camera Raw and make it more dramatic by using “clarity”
Others modifications are my own perception of what I want as start for my final image. I final this part with the “Sharpening” tool (Detail) and I open it.
00:29 In this part, I do exactly the same thing with the picture of the model. The only change is about the color balance.
Because of my flashes use a color temperature of 5500K I choose the same setting for this shot. (For this, you have to shoot RAW !) Then I open It as a smart object in case I need to make a change.
00:39 With the image open, I create directly a selection for the future composite. I use the “Quick Selection Tool” (W) and quickly select the whole body.
00:47 For a better selection, it’s time to use “Refine Edge”. You can use my setting for your own images, for me it the ones that I prefer.
With your settings selected paint where you want to refine your mask with the brush tool and click OK. For better results, make sure to shoot in front of a neutral wall (Not too dark, not too bright).
00:59 I create a new layer for removing skin imperfections or dusts using the “Spot healing brush tool” or the “healing brush tool. I always work on an empty new layer so, be sure to check “Sample all layers”.
It’s much better to work on a new layer because, if you make any mistakes or if you want make any change after you will can do it without damage to your original image !
01:30 While the refine edge is a powerful tool, it’s selection is imperfect. You need to make it more acceptable for a composite. To do it, I work on the mask created just after the “refine edge” part.
Press Alt-click on the mask (or CMD-click on Mac) to view it in black & white. Then, using the dodge and burn tools you can make a much more detailed selection.
02:25 I do the same thing that you can see at 00:59 – getting rid of distractions. I divide my work just to avoid the boredom on too long repetitive editing.
03:04 Sometimes the “Healing brush tool” can’t be use because of tiny details or complex shadows and highlights. In that case I use the dodge and burn technique. I create a 50% gray new layer (in soft light mode) and with a really small opacity/Fill (10%), I paint with white over the too dark zones and with black over the too bright zones to totally remove the differences between them and so, the resulting skin is much more beautiful (without wrinkles or folds).
04:40 Now it’s time for me to work on the background. I start by duplicating and flipping the image to create a perfect symmetry. Then, because I want a widescreen final image, I change the ratio for a 16/9 style and I compose my picture in this way.
04:55 Again, I create a new black layer and I delete the spots and unsightly elements to create the most uncluttered background.
05:15 Here, I take the picture of the model and I incorporate it in the current project.
05:34 Since hair is hard to select, I “cheat” by making it a little blurry using the lasso tool and the Gaussian blur filter.
05:42 I love lighting effects, you can see it in many of my images. Here in a new blank layer, I create a selection with the “Elliptical marquee tool” and I make it white.
Then, I duplicate it to make it more powerful. I want a more diffuse light so, I widened it using “free transform” (right click on it) and I duplicate and flip it for the other window.
05:50 Because natural lights are not really white I add a yellow tint on it using “layer style > Color Overlay. Then, I create a halo behind my model.
It’s a personal choice. Of course you don’t need that to succeed in your composite, it’s just a part of my style
06:03 Again, this is not mandatory, just part of my style. I use texture because the wall and the ceiling are too clean. I add textures and choose the overlay mode with a low opacity. For the ceiling I used the “perspective transformation” (Edit > Transform > Perspective).
Be careful, you must respect the perspective to have a realistic final look. If your not sure with your transformations make some tests.
06:48 I add lens flares. The background is really bright so lens flares are totally appropriate and helps to achieve a realistic and successful composite. In that case, the lights have gone through over the model to make it realistic.
06:53 Here I use the powerful liquify filter (Shift+Ctrl+x) to rebuild just a little bit the model. You’re not obliged of course but it’s just for a better esthetic of your final image.
Side note: I use the standard brush and a density of 20% to make my changes. It is powerful enough to make a change, yet subtle enough to keep it pleasant to the eye.
07:34 For skin corrections, I am using Portraiture (a plugin proposed by imagenomic) and I LOVE it ! Pretty simple to use and the results are fantastic. I recommend it.
07:48 In the same way than at 03:04 I use the dodge and burn technique but here it’s to give a 3D look to my picture. I create a 50% gray new layer (in soft light mode) and I paint with white where I want more lights or with black where I want more shadows.
It is a great technique to create a depth in the image.
08:36 Probably my favorite part and the most fun. It’s here that you give to your composite its final look. But furthermore, it’s important because it make your different parts fit together.
For my final look I use the “Color Balance” adjustment layer and work mainly on shadows. No rules here, choose what you want, what you like. After that I create a “Selective Color” adjustment layer and work just on the Blacks.
Then, I make two new layers with different colors to give a tint to my image.
Bonus : To completely finish the image, I create a 50% gray new layer (in soft light mode) and add to it a film grain. This helps to unify the images present in the composite...
About The Author
Antoine Willaeys is a feelance retoucher and photographer based at Metz (France). He works with various artists and models working towards becoming a full time advertising photographer. Antoine also writes for a french magazine Published by Oracom Editions. You can find more of his work on his website and follow him on facebook !

Udi Tirosh
Udi Tirosh is an entrepreneur, photography inventor, journalist, educator, and writer based in Israel. With over 25 years of experience in the photo-video industry, Udi has built and sold several photography-related brands. Udi has a double degree in mass media communications and computer science.


Join the Discussion
DIYP Comment Policy
Be nice, be on-topic, no personal information or flames.