


A Real DIY Slide Projector
Jul 2, 2012
Udi Tirosh
Udi Tirosh is an entrepreneur, photography inventor, journalist, educator, and writer based in Israel. With over 25 years of experience in the photo-video industry, Udi has built and sold several photography-related brands. Udi has a double degree in mass media communications and computer science.
Share:
So a few days ago we featured a photoshop tutorial that shows how to blend an image onto a black and white portrait.
The reason we initially shared this tutorial is because it showed a quick and dirty way to kinda make a projected slide on person effect. (Not that you can’t do it for real).
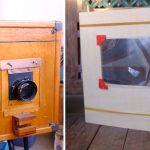
We got the following REAL projector tutorial courtesy of the awesome folks at Lomography, Instructables and Inventor Derte84. It uses an IKEA lamp rather than a strobe, so you’ll have to adjust exposure. (sadly, the Isbrytare is end-of-lined, but it is still available in used stores and sometimes on eBay).

In this tutorial Derte84 will show you how to build a lo-fi projector to display your photo slides on a huge wall. The lo-fi aspect is crucial to lineup to the lomography way. The fact that the project is also cheap is a plus! Sadly, the IKEA lamp I’m using (isbrytare) is out of stock and no more produced. You have to found in used or hope that IKEA will start again producing this beautiful lamp. Its cost was about 40$.
Step 1 – Needed Materials
In order to build your own lomo projector you’ll need:

- Isbrytare lamp from Ikea (ikea.com, no more in production.. find it on ebay)
- plans to build the adapter (downloadable in the next step)
- something to cut wood if you are planning to build it by yourself OR an account on an online laser-cut service (i use https://www.vectorealism.com)
- vinilic glue
Step 2 – Cut the wood for the slide holder
In order to build you slide holder download the two files attached to this step.
P1_PORTASLIDE3mm.svg, P1_PORTASLIDE5mm.svg

Now you have to choose how to proceed:
- you can give the file to an online laser-cut services like ponoko and let them to made the work for you. They will precisely cut the pieces and send them to your home. I suggest you to use 1/8 inches wood (mine is actually 3 millimeters)
- you can print the files on paper and glue the paper on thin wood as a guide for your cutting lines
If you choose the former, I suggest you to choose ponoko.com simply because files are already formatted for that site.
If you choose the latter you maybe need some more info:
A file with SVG extension has a particular format named VECTORIAL that allows you to describe an image with mathematical formulas. In other words, you can zoom the image as you wont without loosing quality. If you do not know how to open these file just download the open-source, multi-platform and free software https://inkscape.org/
Step 3 – Assemble the slide holder
Since we are using wood to assemble the holder we need vinilic glue

Step 1: glue part A to part B. Be careful to not exceed with the glue and to align the center hole of the two pieces

Step 2: turn the obtained piece and glue part C. Be careful to align the central hole and the side holes. (the order of the wood layers should be A – B – C)

Step 3: glue part D over part C again being careful to align holes

Step 4: leave the glue to harden for 24 hours

Step 4 – Attach the slide holder to the filter holder
Put the filter holder of the lamp over Part A of the slide holder.
Fasten the to 2 screws until the two pieces are firmly together.

Step 5 – Assemble the lamp and focus
Assemble the lamp putting the slide holder on the rails first, then the Fresnel lens. For now you do not want to fasten the screws.

Power the lamp and point it to a big wall. Move backward and forward the 2 pieces until the image on the wall is on focus

I also added a wood floor to the lamp so that it can stand by itself.

Enjoy your new photo-slide projector

Udi Tirosh
Udi Tirosh is an entrepreneur, photography inventor, journalist, educator, and writer based in Israel. With over 25 years of experience in the photo-video industry, Udi has built and sold several photography-related brands. Udi has a double degree in mass media communications and computer science.


Join the Discussion
DIYP Comment Policy
Be nice, be on-topic, no personal information or flames.
One response to “A Real DIY Slide Projector”
hi
tanks for your project information
please explanation about photo too need for this project
what kind of photo we can to use ????