


We Created a Cinematic Rain Effect Without a Studio, and the Results Were Surprising
Oct 29, 2025
Alex Baker
Alex Baker is a portrait and lifestyle driven photographer based in Valencia, Spain. She works on a range of projects from commercial to fine art and has had work featured in publications such as The Daily Mail, Conde Nast Traveller and El Mundo, and has exhibited work across Europe
Share:
If there’s one thing about living in a hot country that I really miss, it’s the rain. Hard to believe, I know, but sometimes I really get fed up with blue skies and sunshine 300 days a year, particularly for photography. So, when I stumbled across a local photography studio that has a dedicated rain stage, I knew it was something I wanted to try out. The images were incredible; however, renting a professional studio for a fun experimental shoot was definitely not in the budget.
Enter my friend and fellow photographer, Brandon Jackson, who I casually mentioned the idea to. Brandon’s the kind of person who could MacGyver a studio out of garden hoses and duct tape, and he promised he could help us build a DIY outdoor rain studio for almost nothing. I was sceptical at first, but knowing Brandon’s obsession with solving technical photography problems, I should have trusted him. And the results speak for themselves. Here’s how we he did it!
The Concept: Rain, But Make It Summer-Friendly
The idea was simple: lots of ‘movie rain’, shot at night, on a tiny budget. Sounds straightforward, except for two things: one, we were shooting in Spain in the middle of summer, so it stays light until fairly late, and two, it hasn’t rained here in months. Cue creative problem solving.
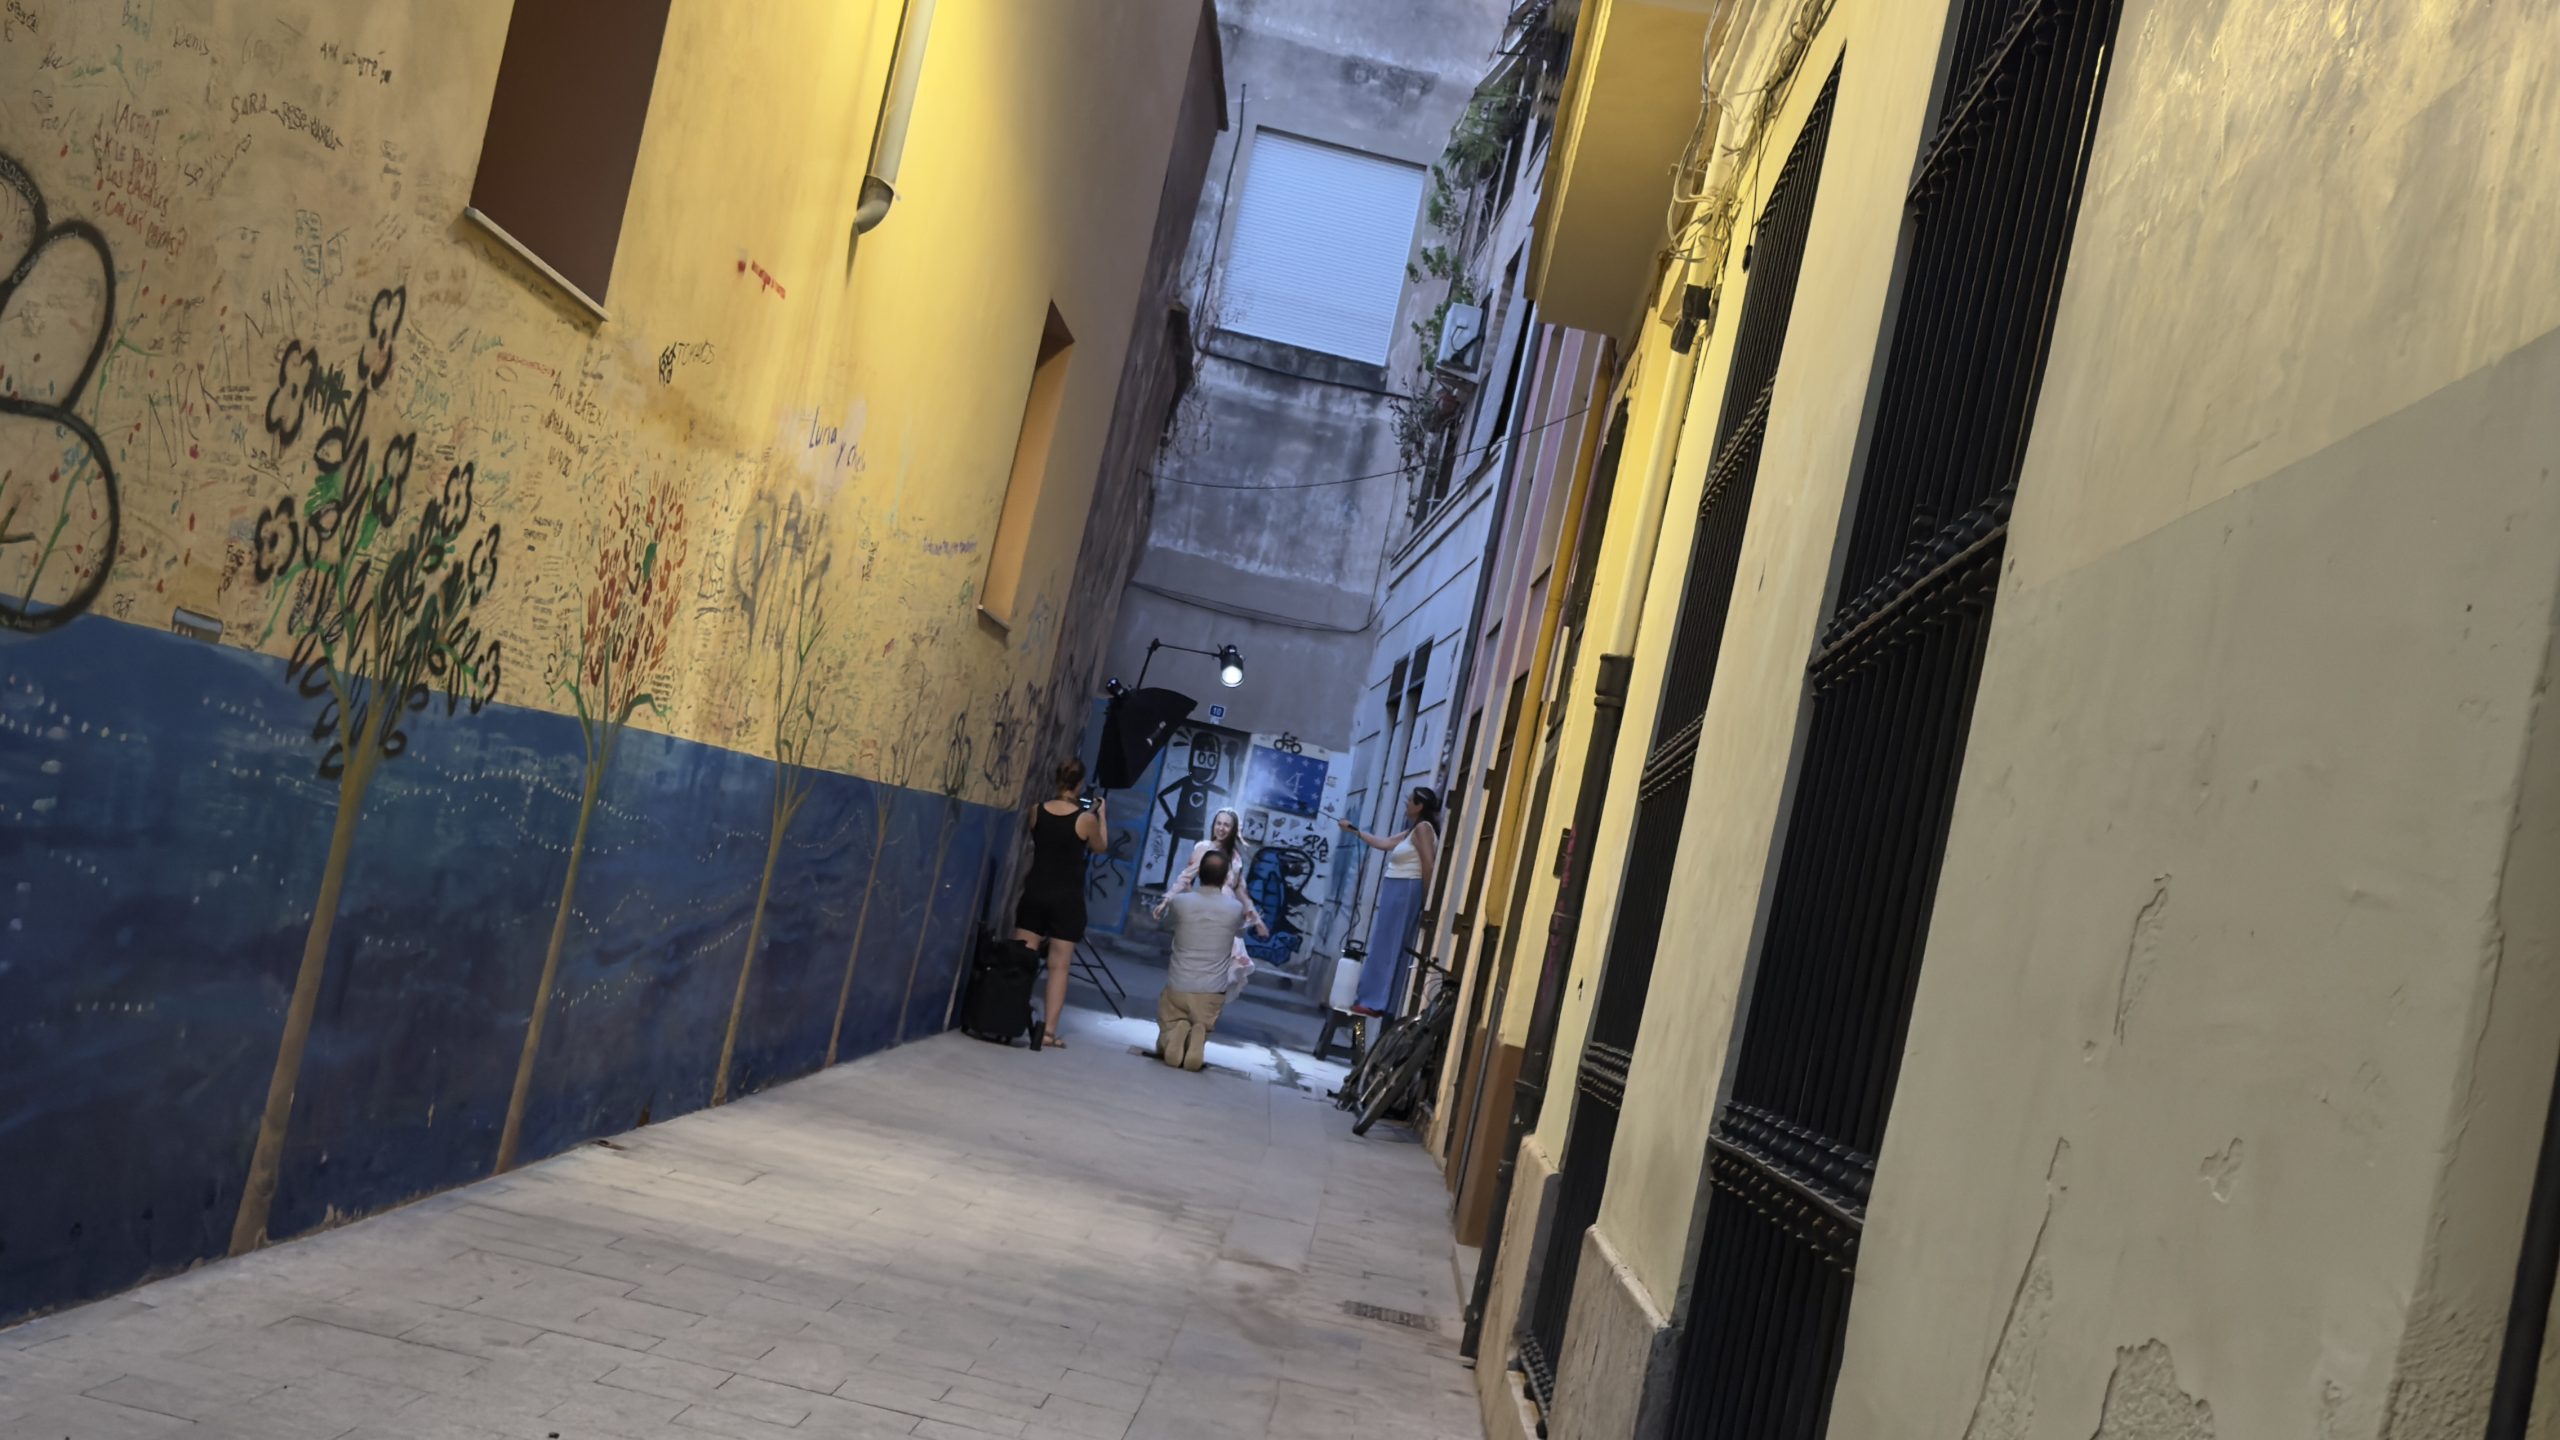
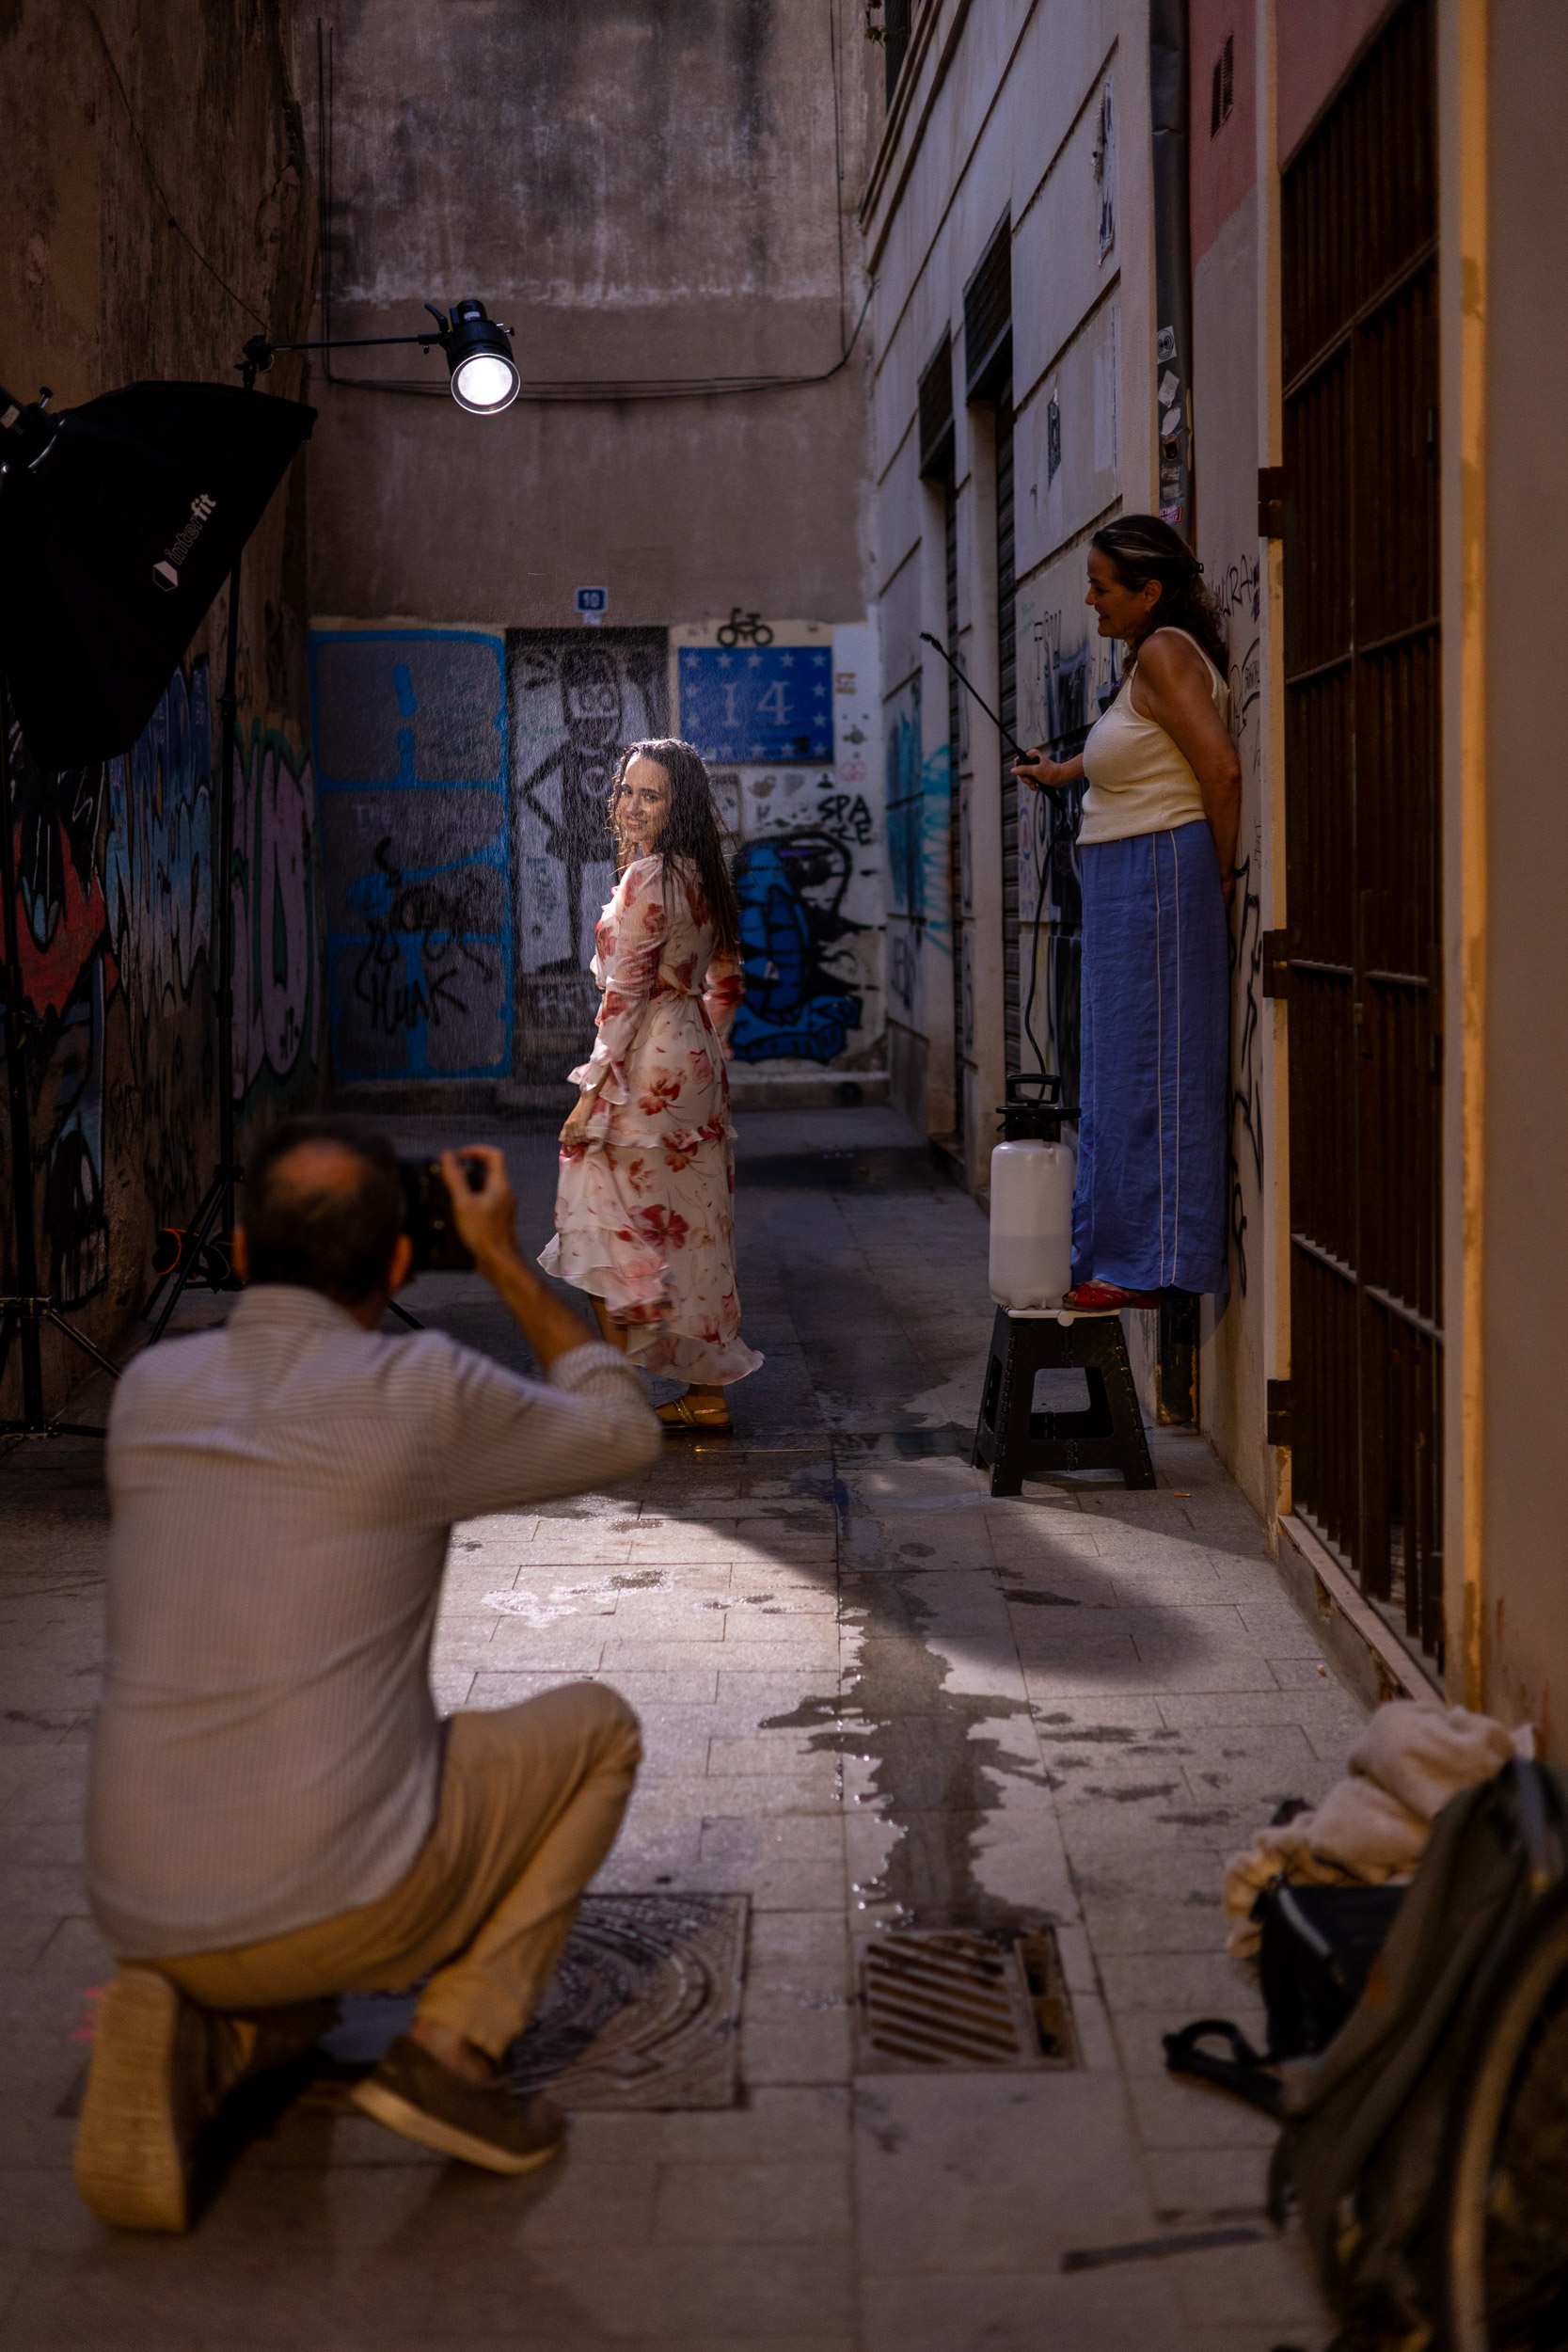
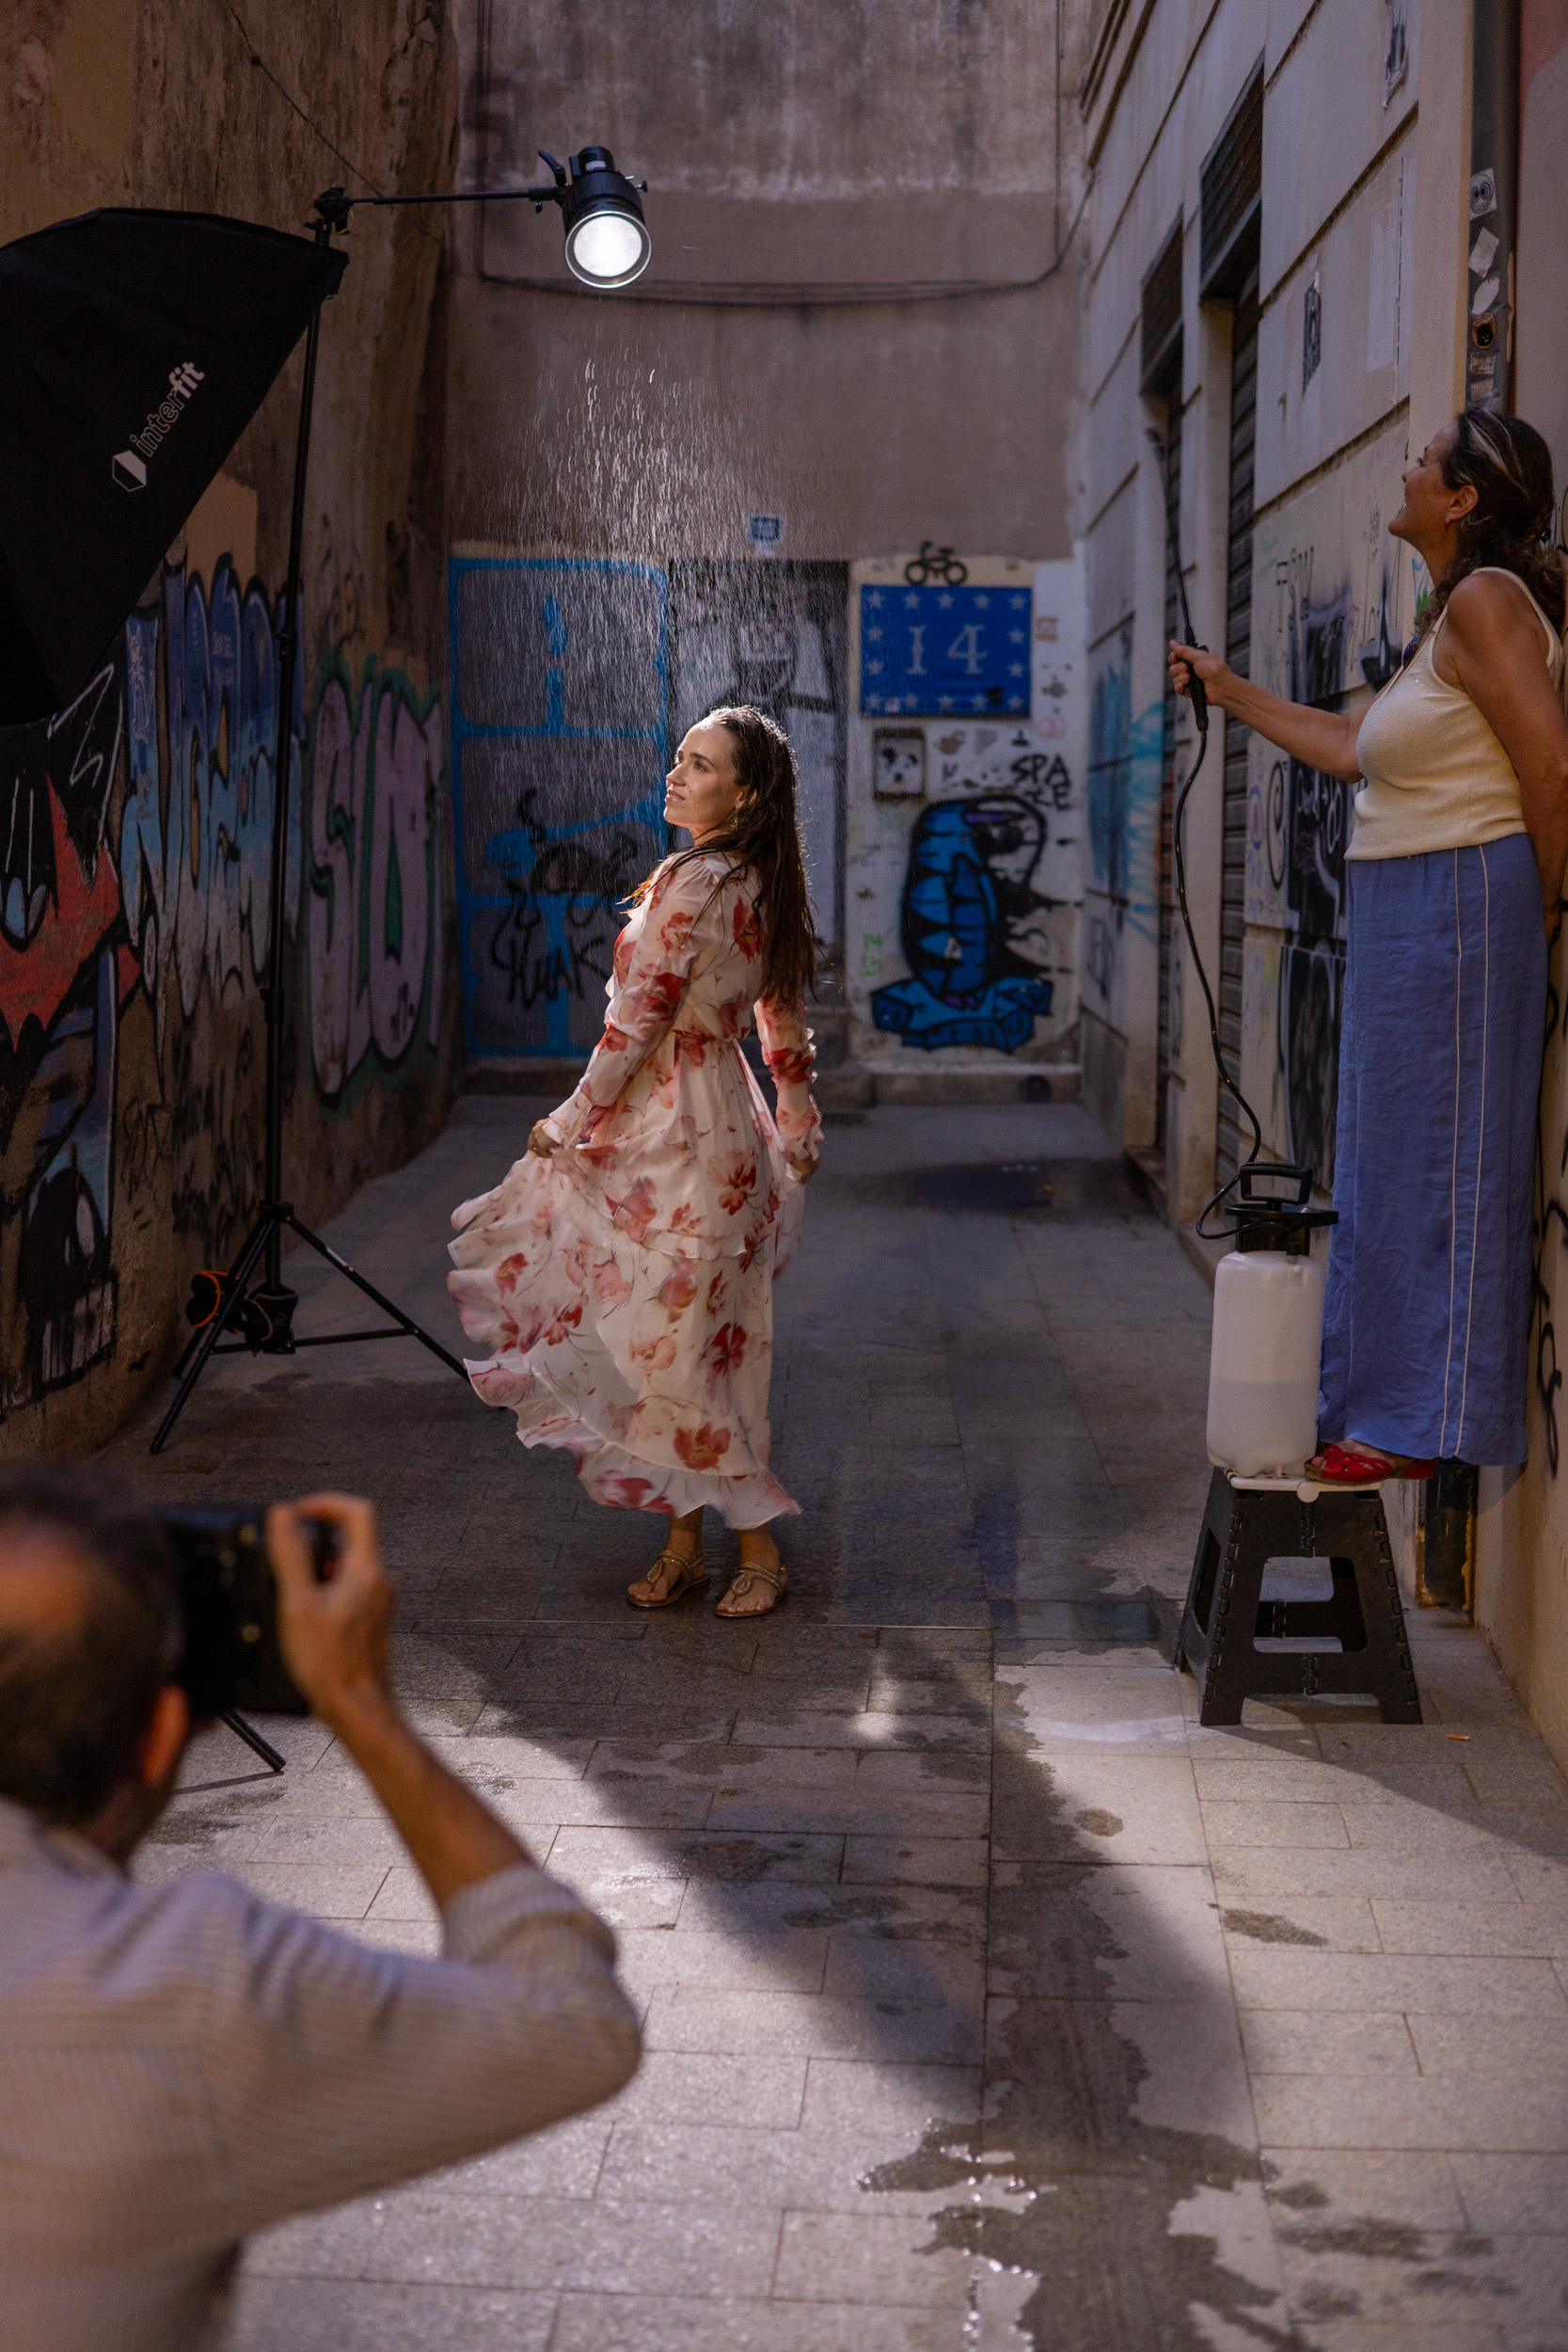
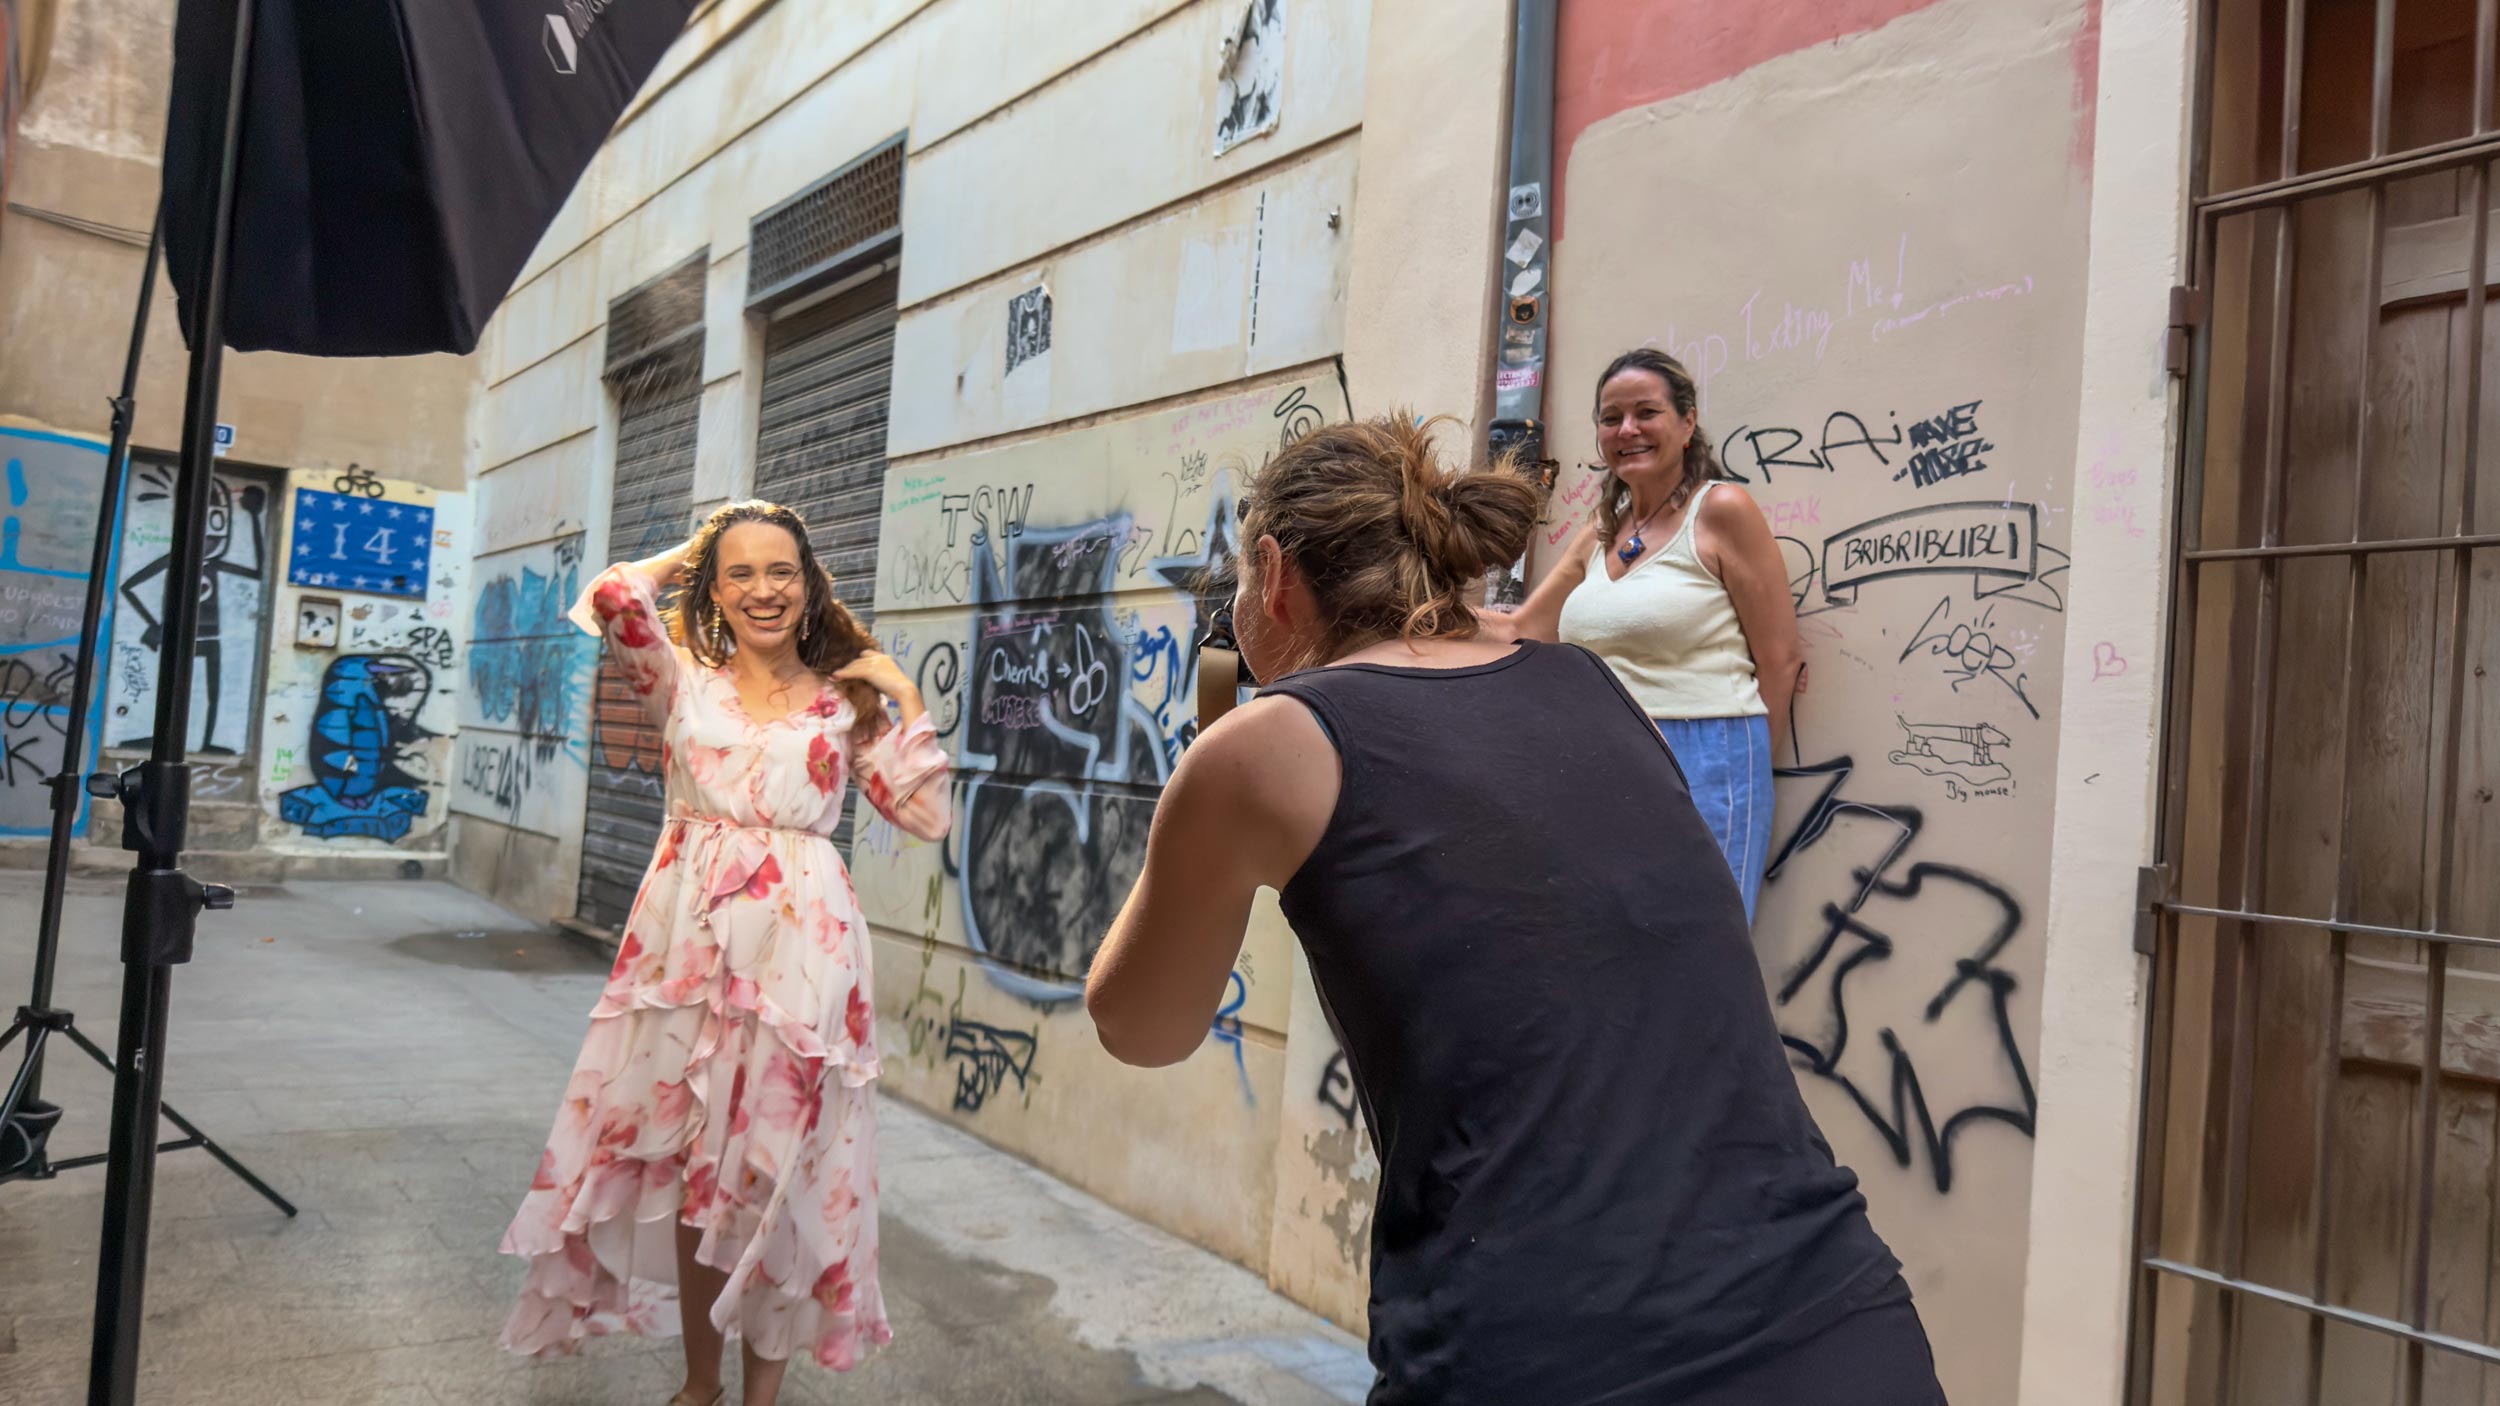
Fortunately, the temperature was still around 30°C, so our model, Christiana, wasn’t going to freeze. Instead of going indoors we scouted a narrow alleyway in Valencia’s old town. Lucky for us, it was a cul-de-sac with no apartment entrances, meaning zero interruptions and no curious onlookers. The graffiti and ambient street vibes were a nice bonus which added character to our shots without having to lift a finger.
One advantage to using fake rain is that you don’t need to rainproof your camera or lighting equipment. The water was kept to a minimal area, which meant that the photographers, assistants, and equipment were all completely dry. This isn’t something so easy to achieve if you’re shooting in the actual rain!
The Equipment: Simple and Cheap
We didn’t need a ton of gear. In fact, the less we used, the more fun it became. Here’s what we brought:
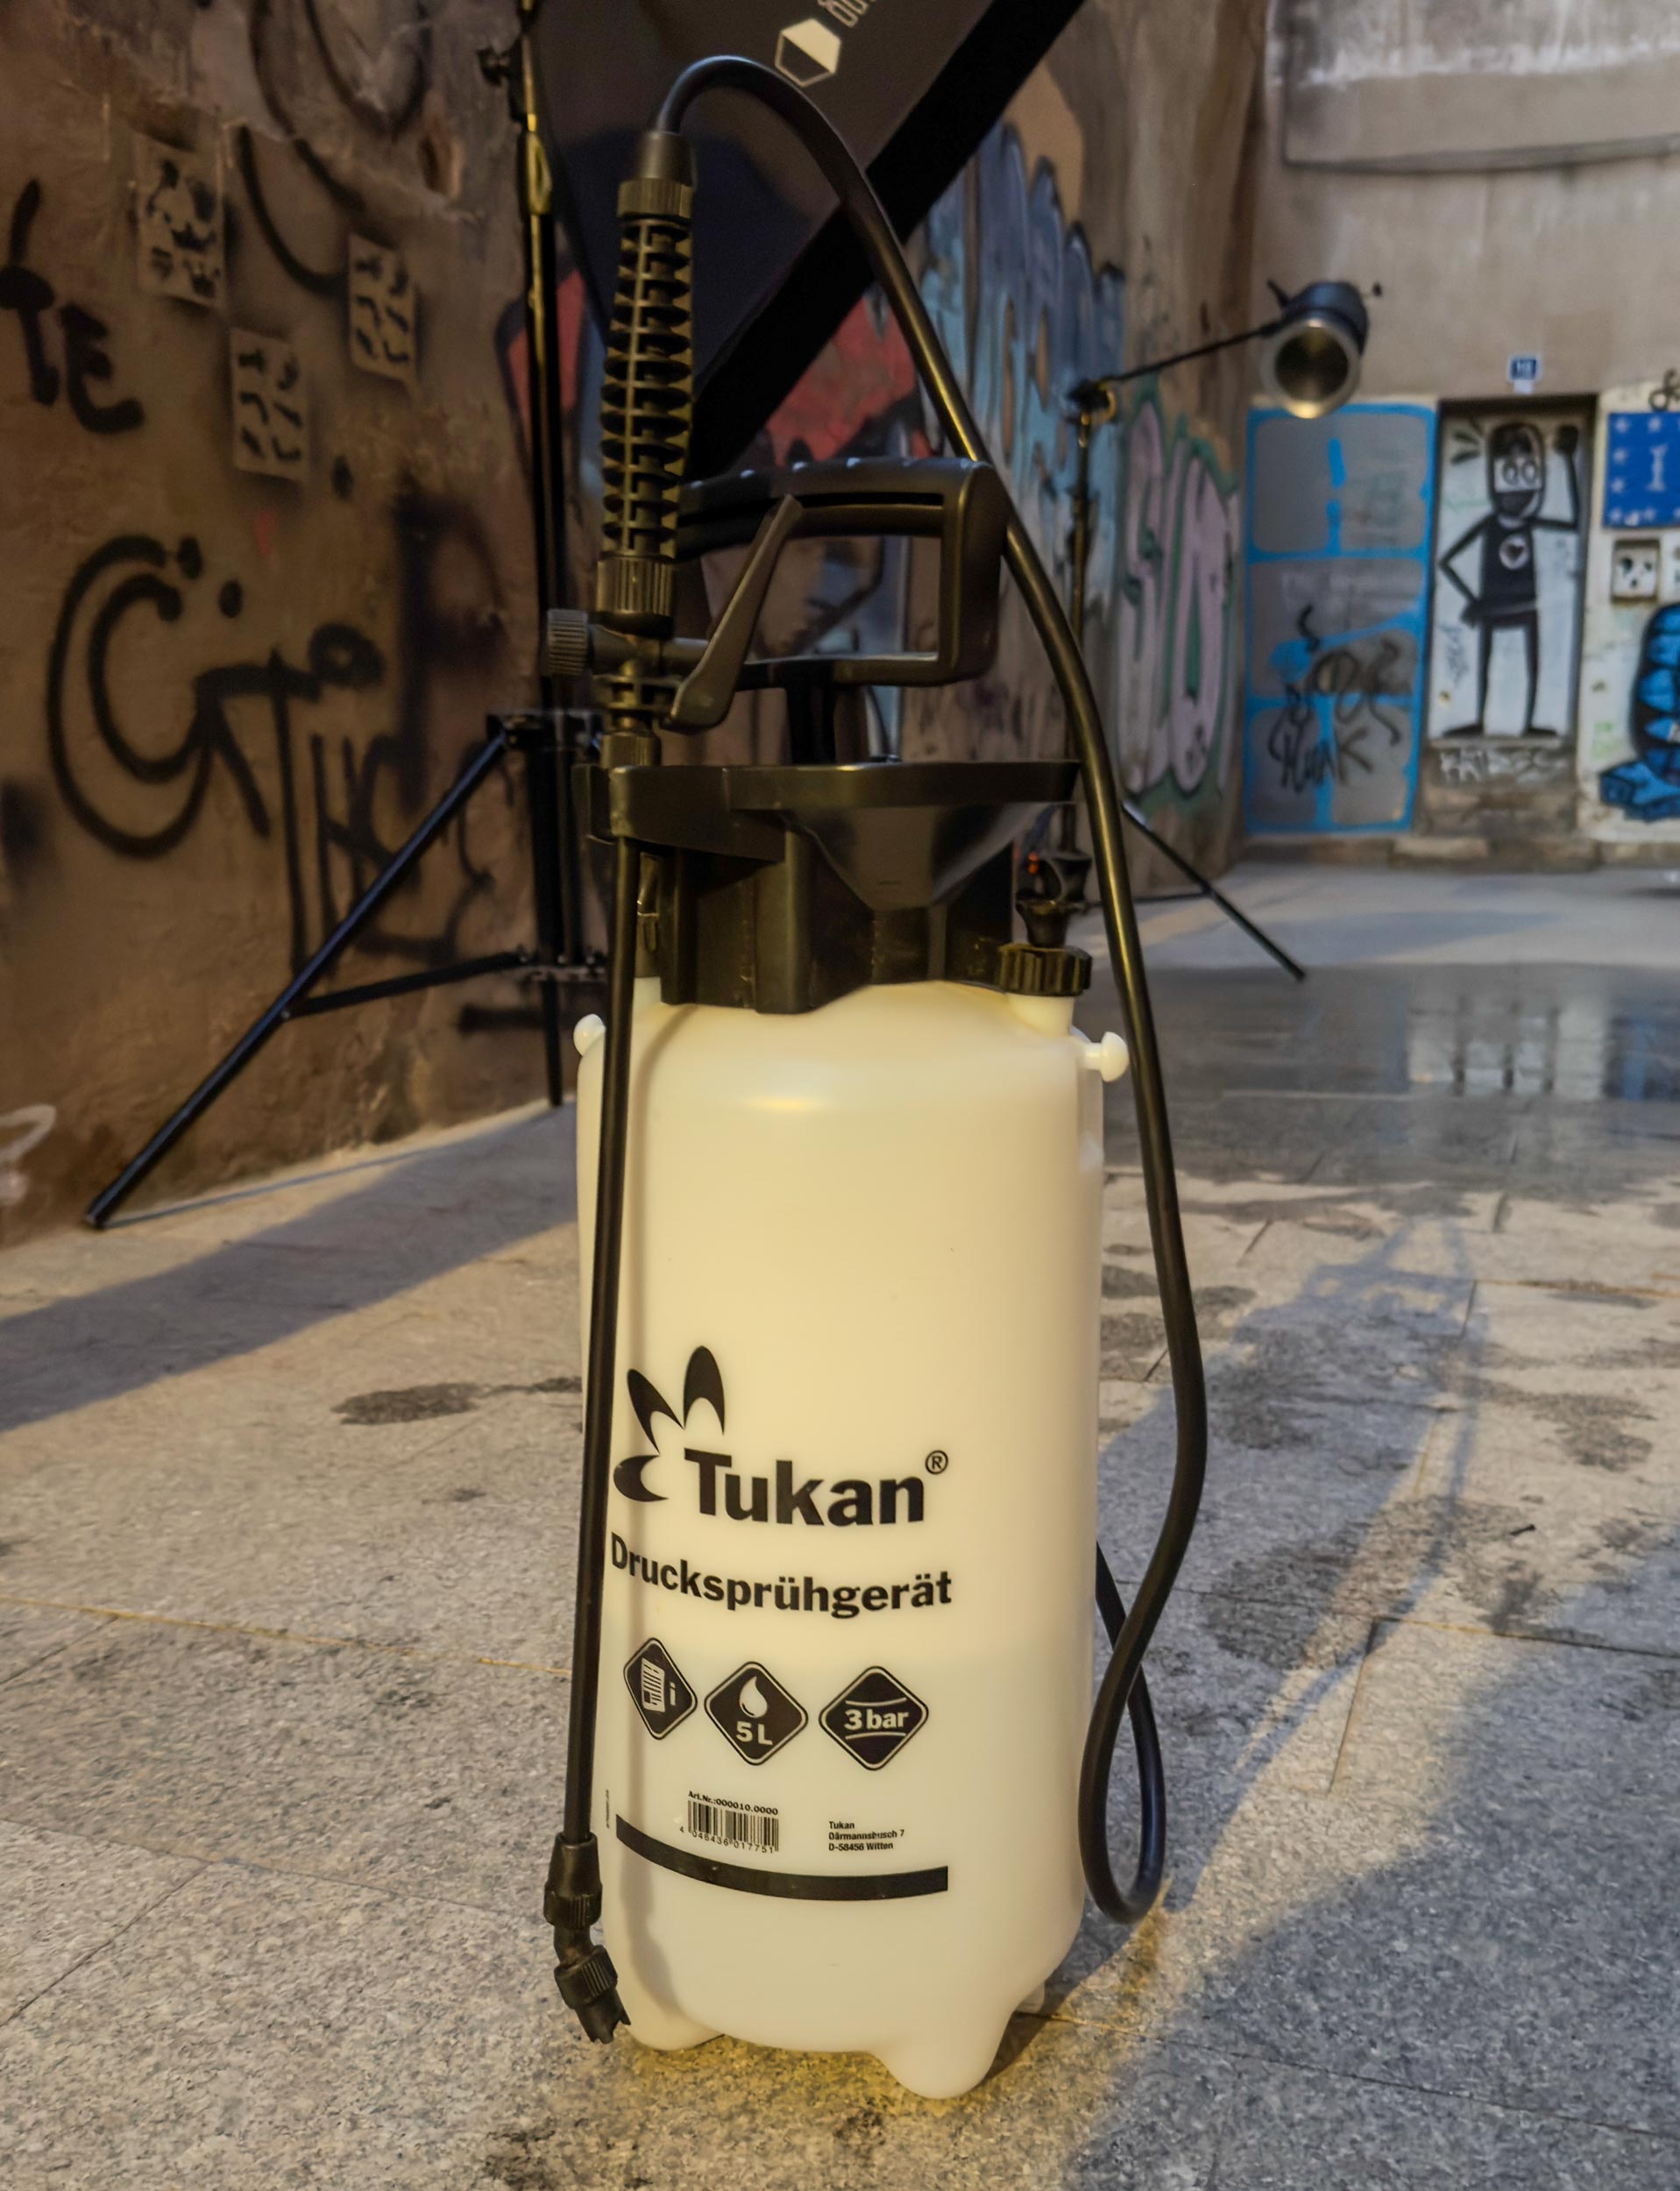
- Water spray pump: This pump produces a fine mist and uses very little water. We only used half the container for the entire shoot. The adjustable nozzle allowed us to control droplet size.
- Cameras & lenses: We each used our own cameras, paired with a 50mm or 65mm prime lens for crisp portraits.
- Lighting: Just two lights (more on that in a moment). 2 Godox AD300, one fitted with a 7-inch fresnel attachment, and the other with a strip box.
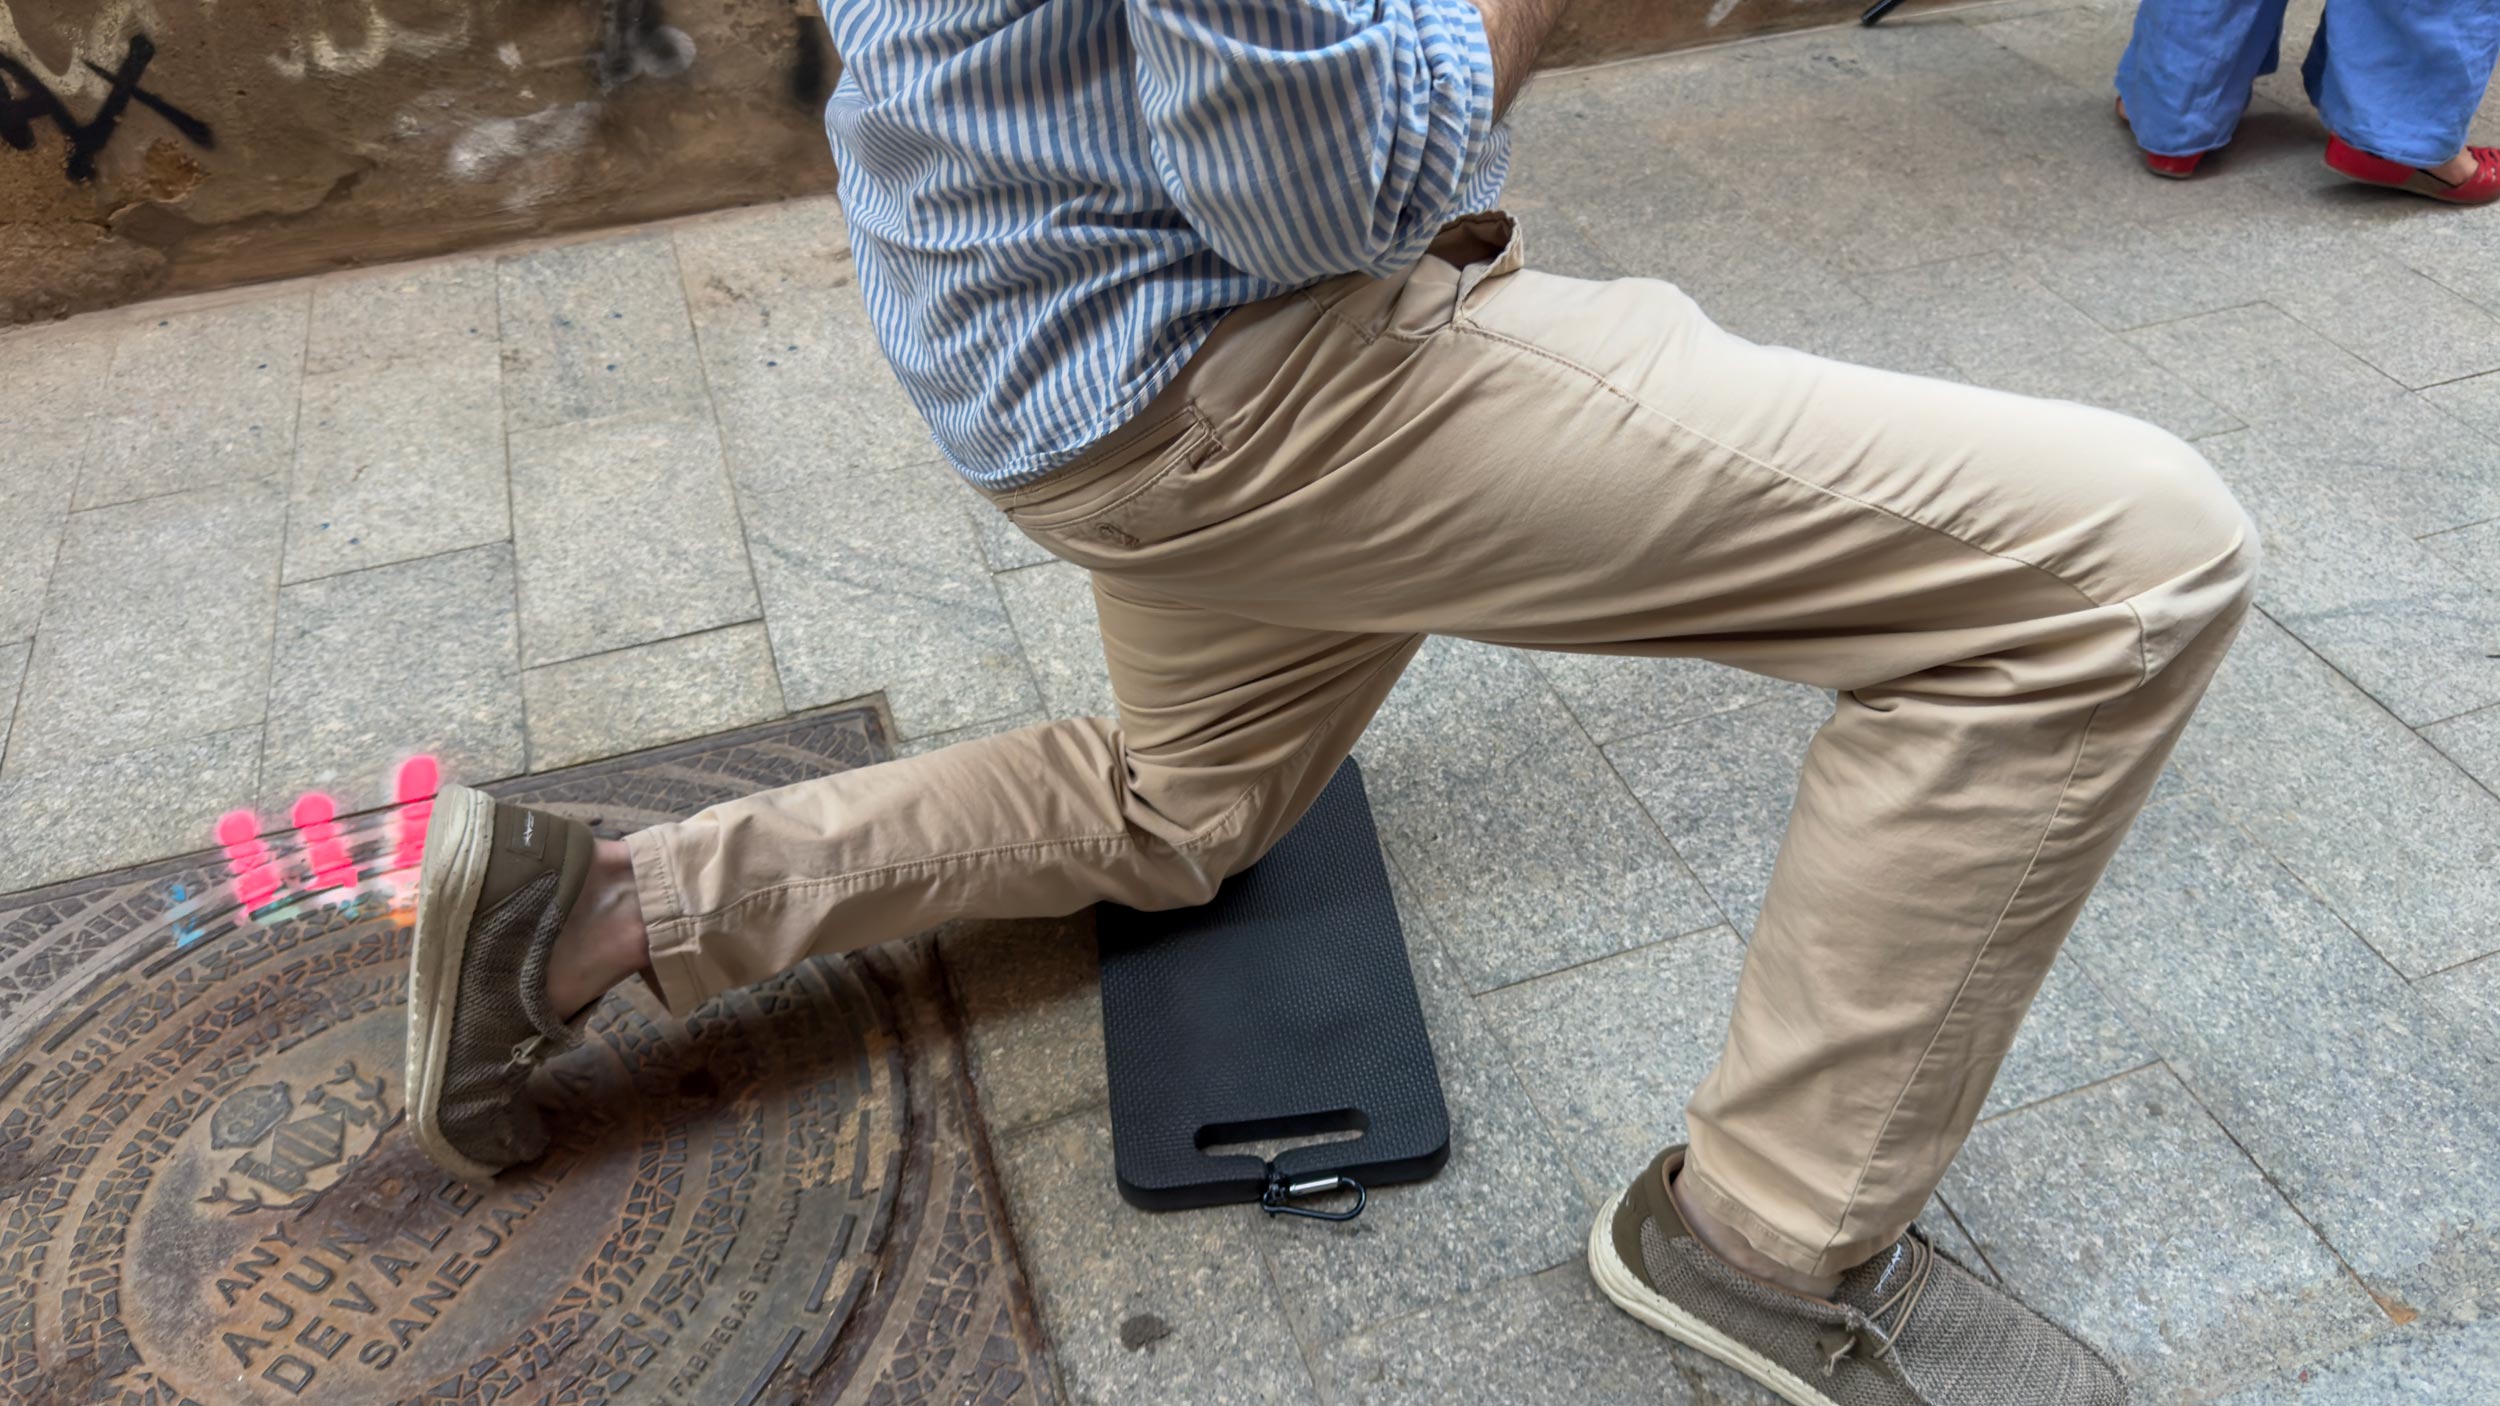
- Props & wardrobe: Christiana styled herself, and Brandon’s kneeling gardener’s mat was the only extra “equipment” (trust me, your knees will thank you).
If you’re trying this at home, don’t overthink it. The beauty of a DIY outdoor rain studio is that minimal gear and smart lighting can give you cinematic results.
Lighting Setup: Illuminate the Rain
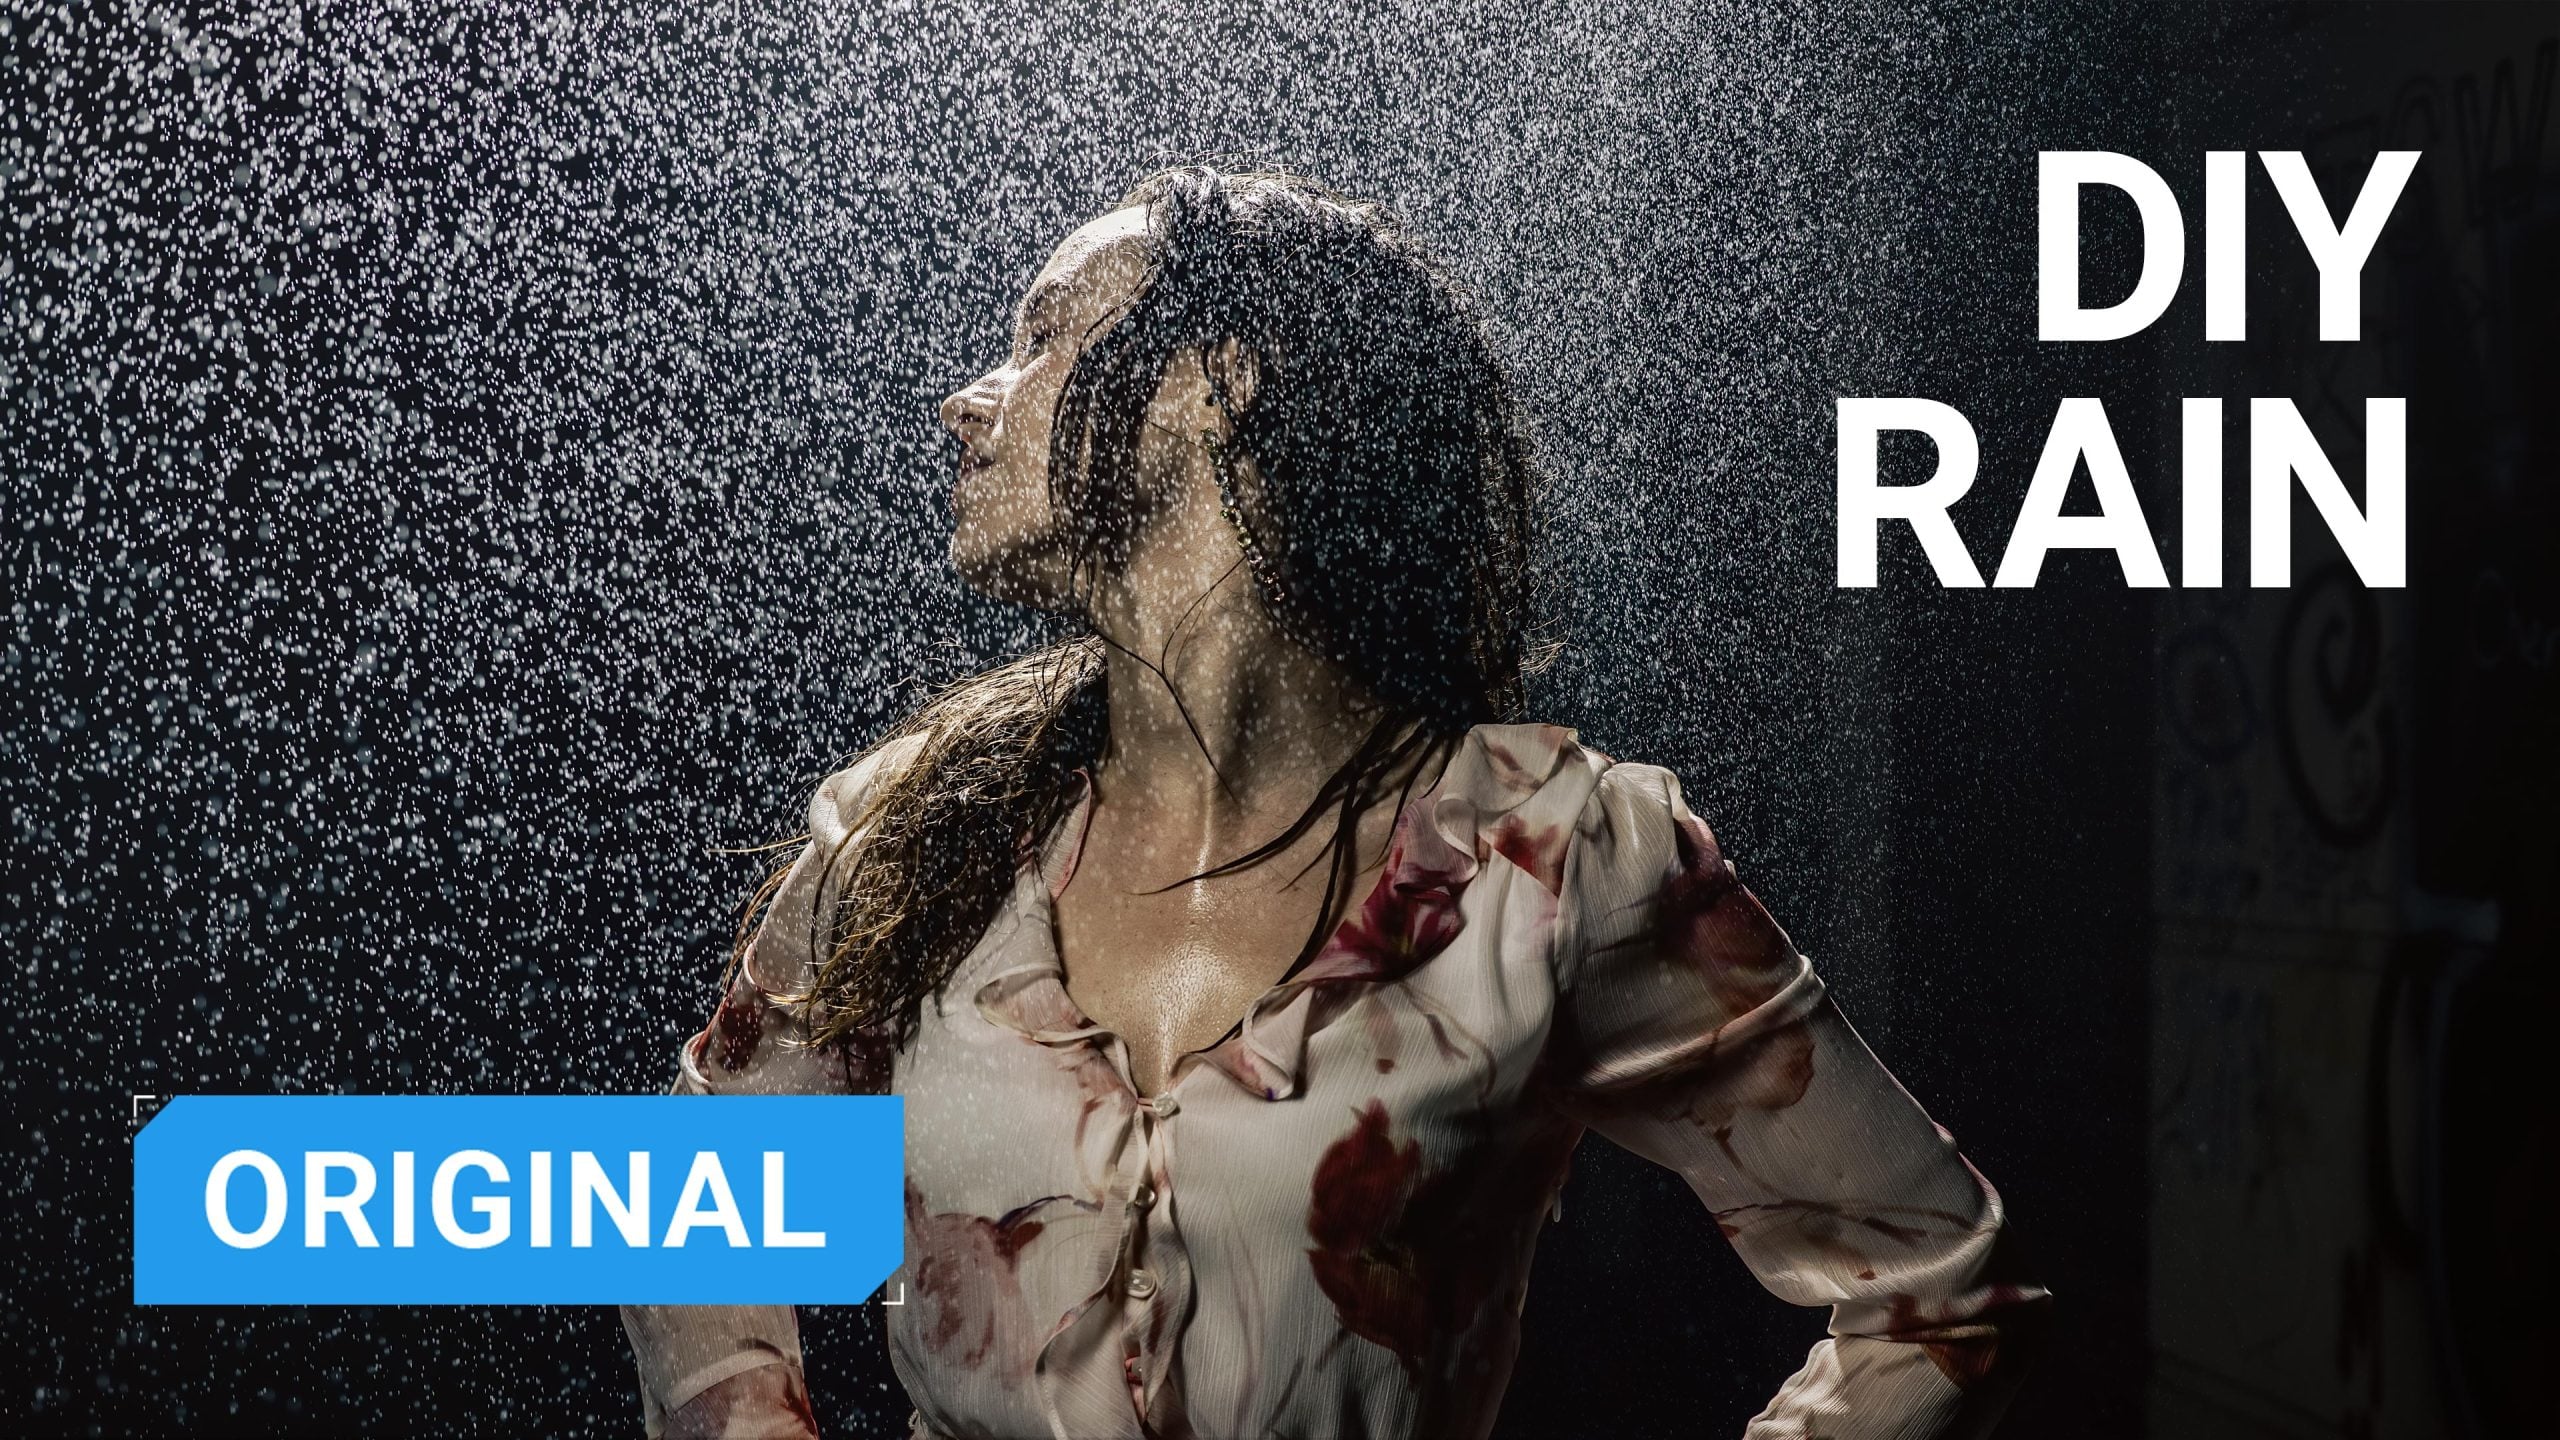
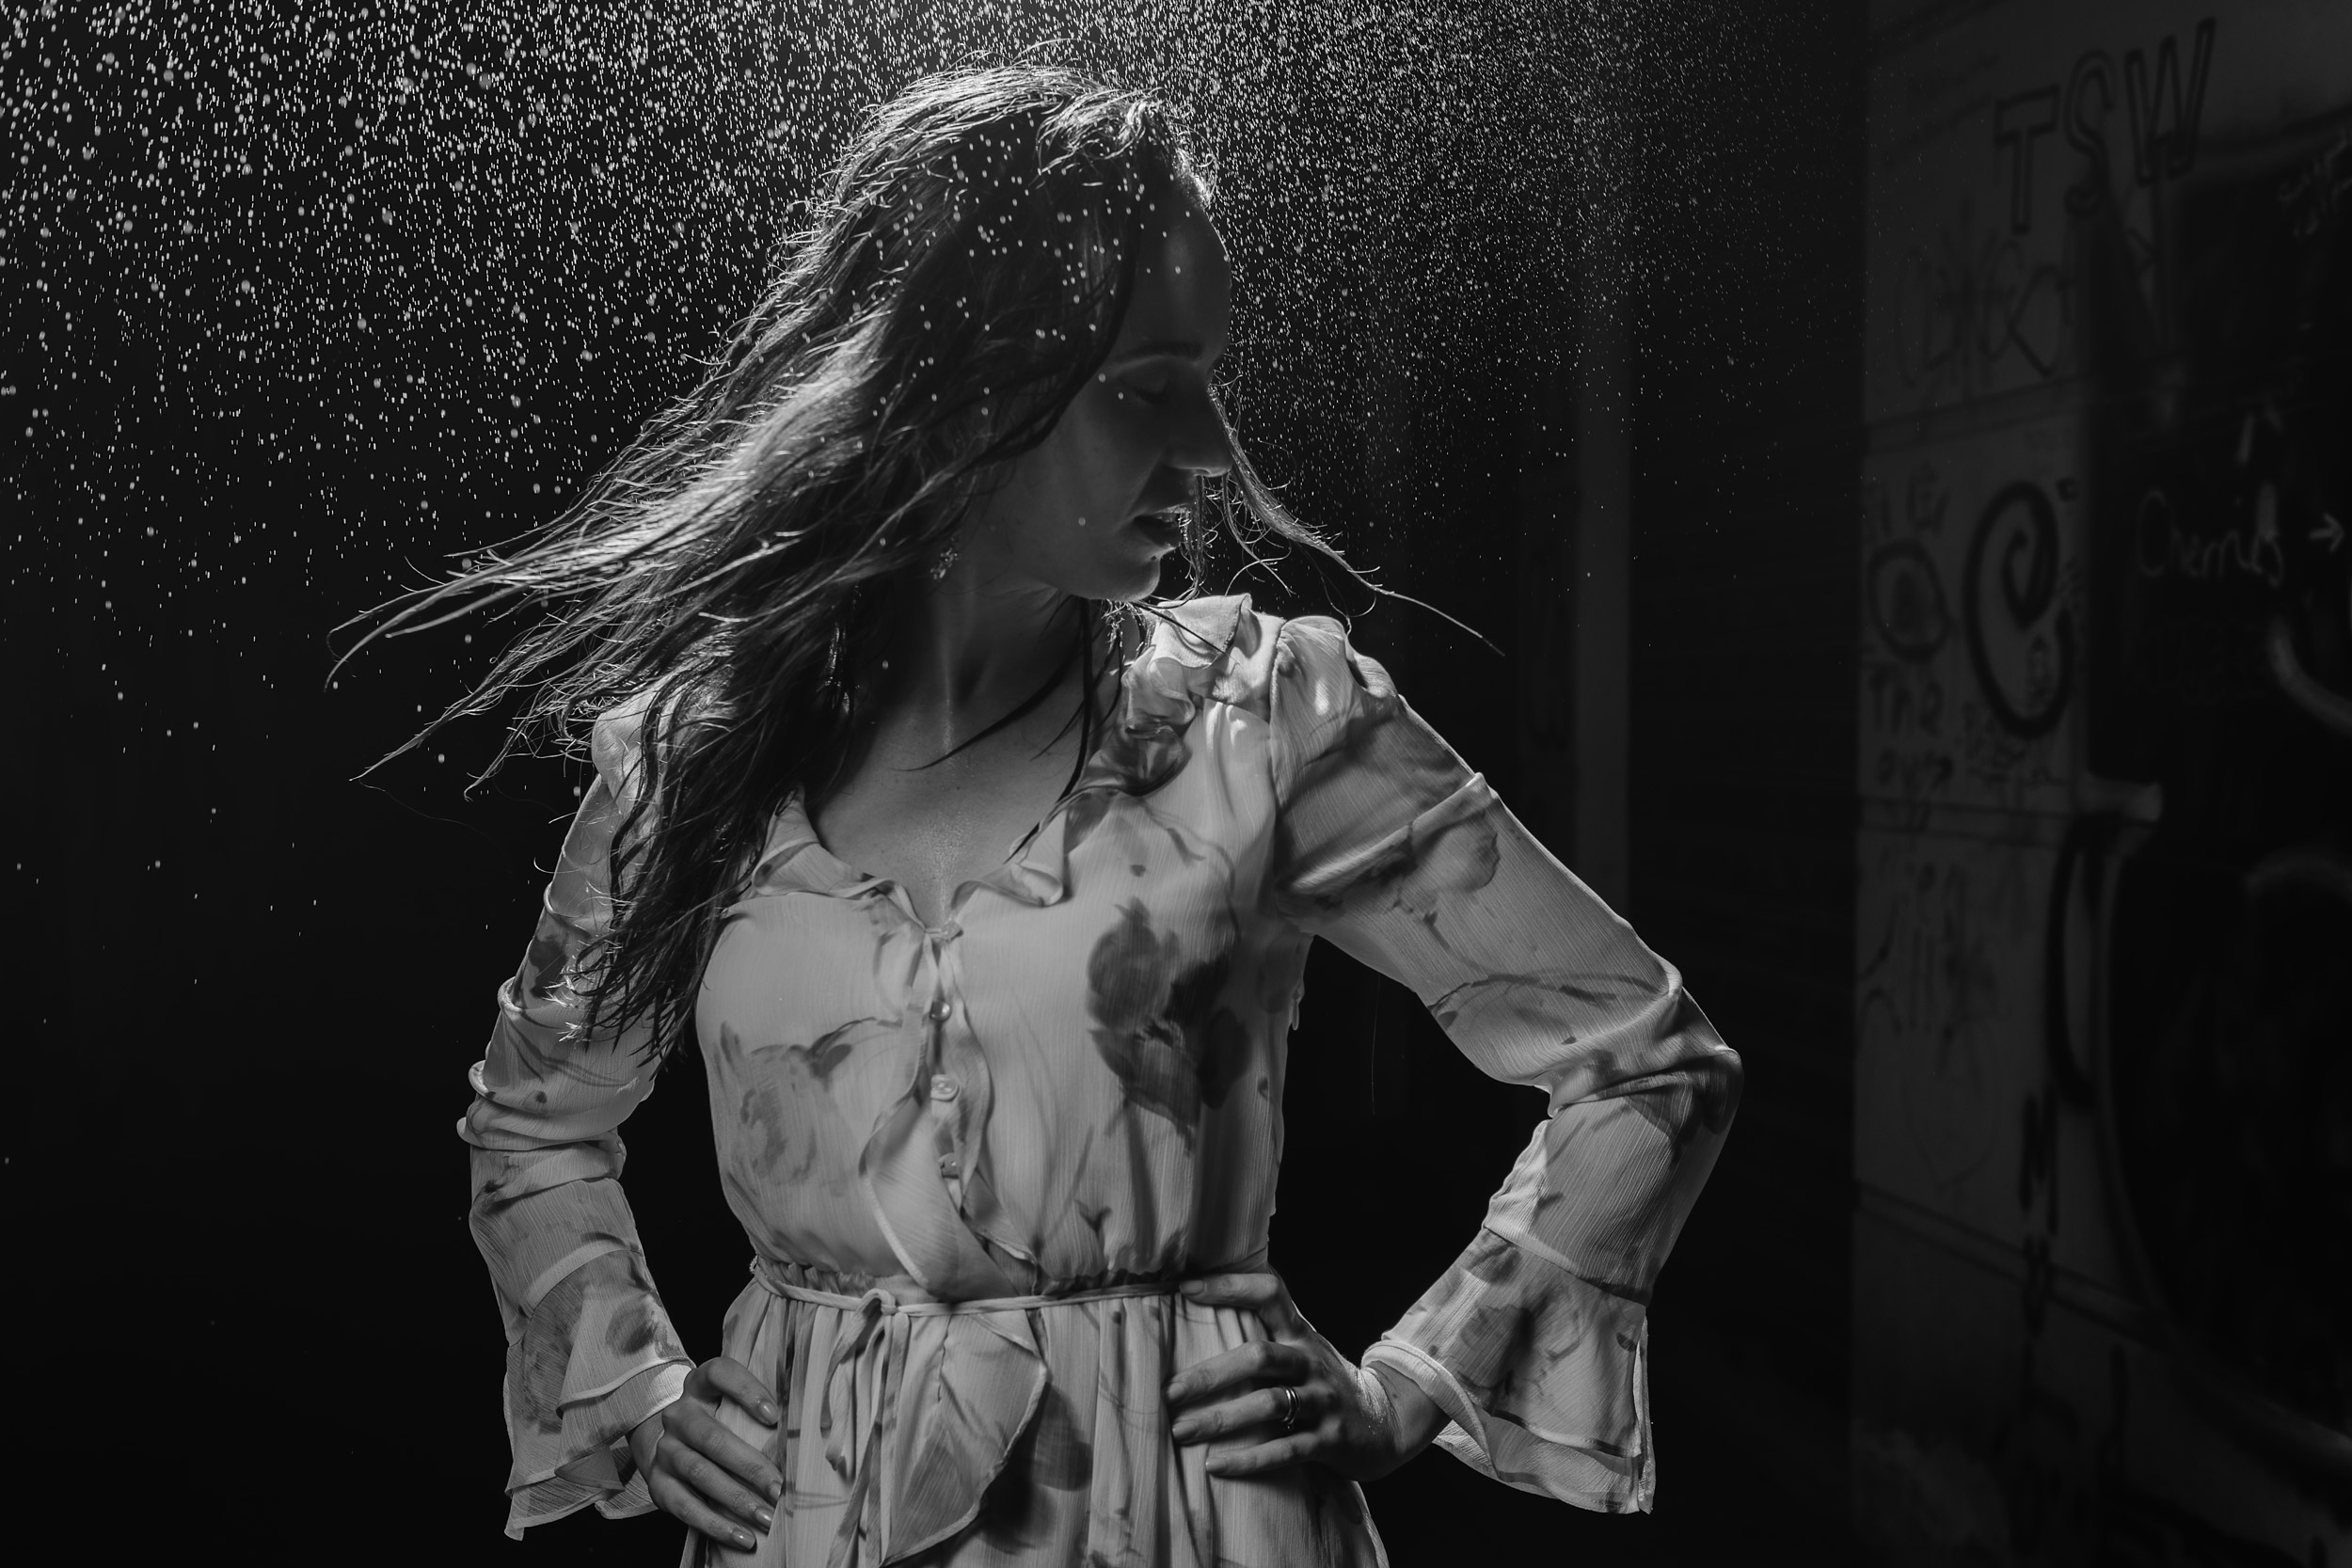
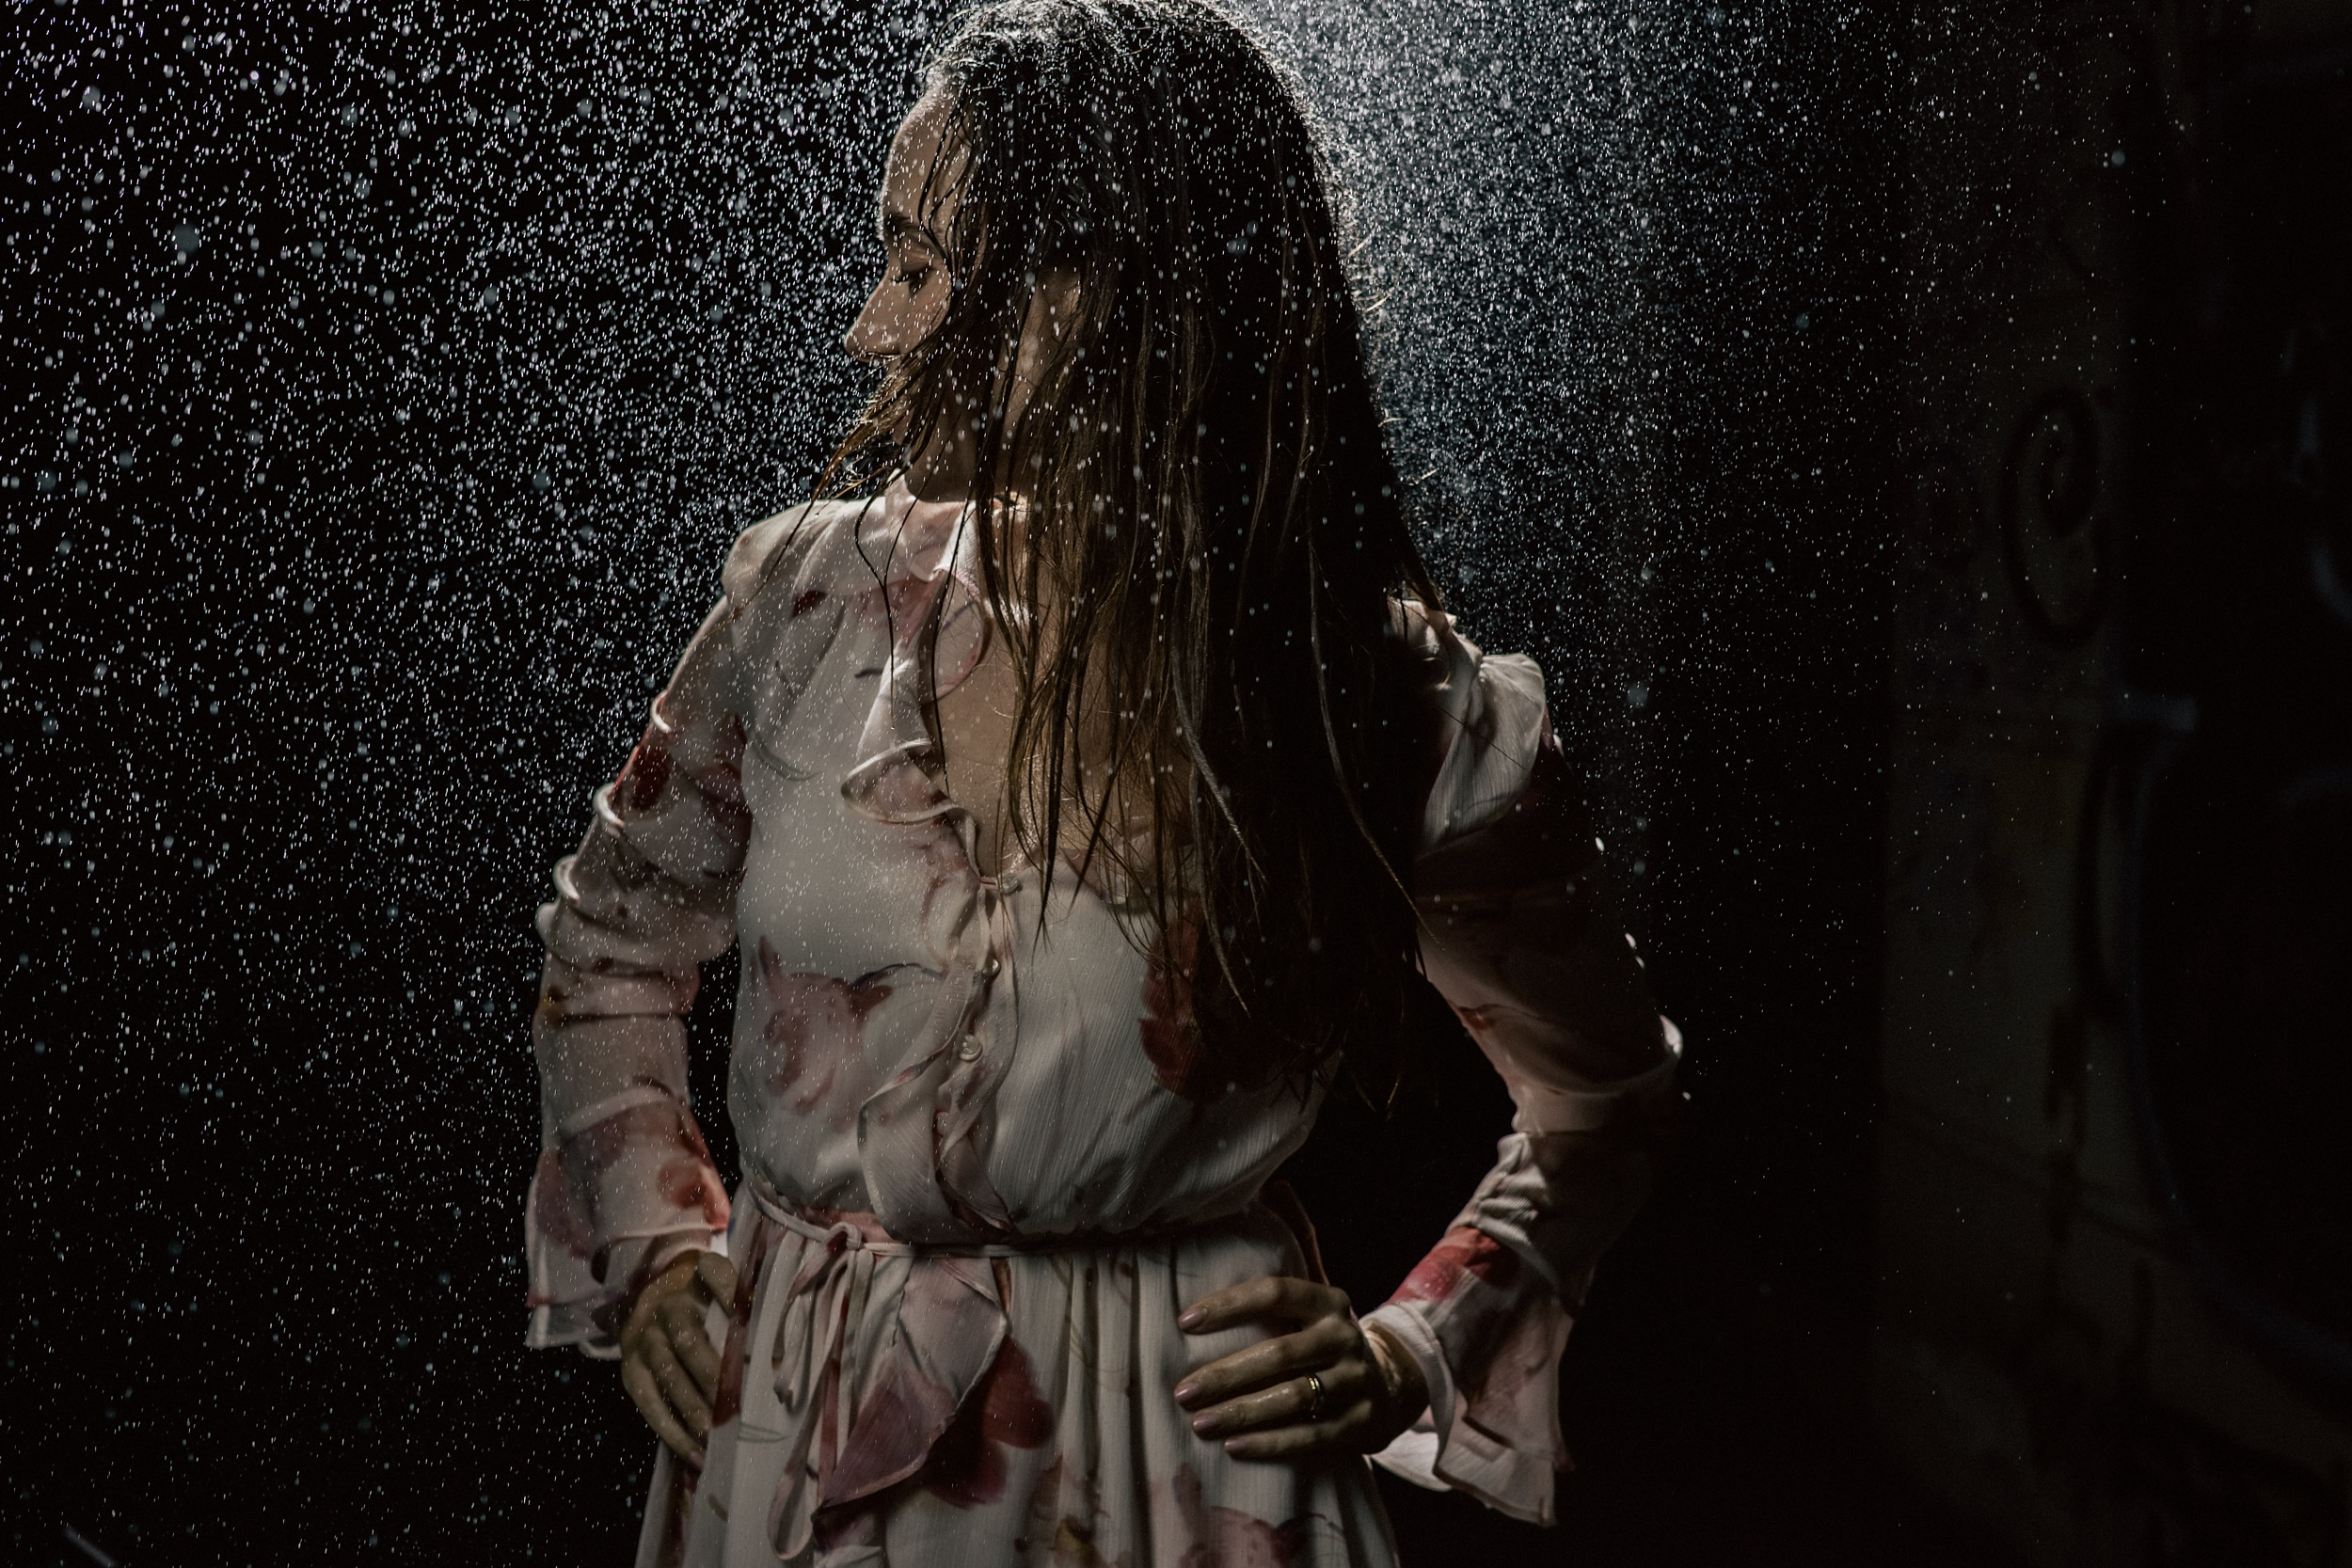
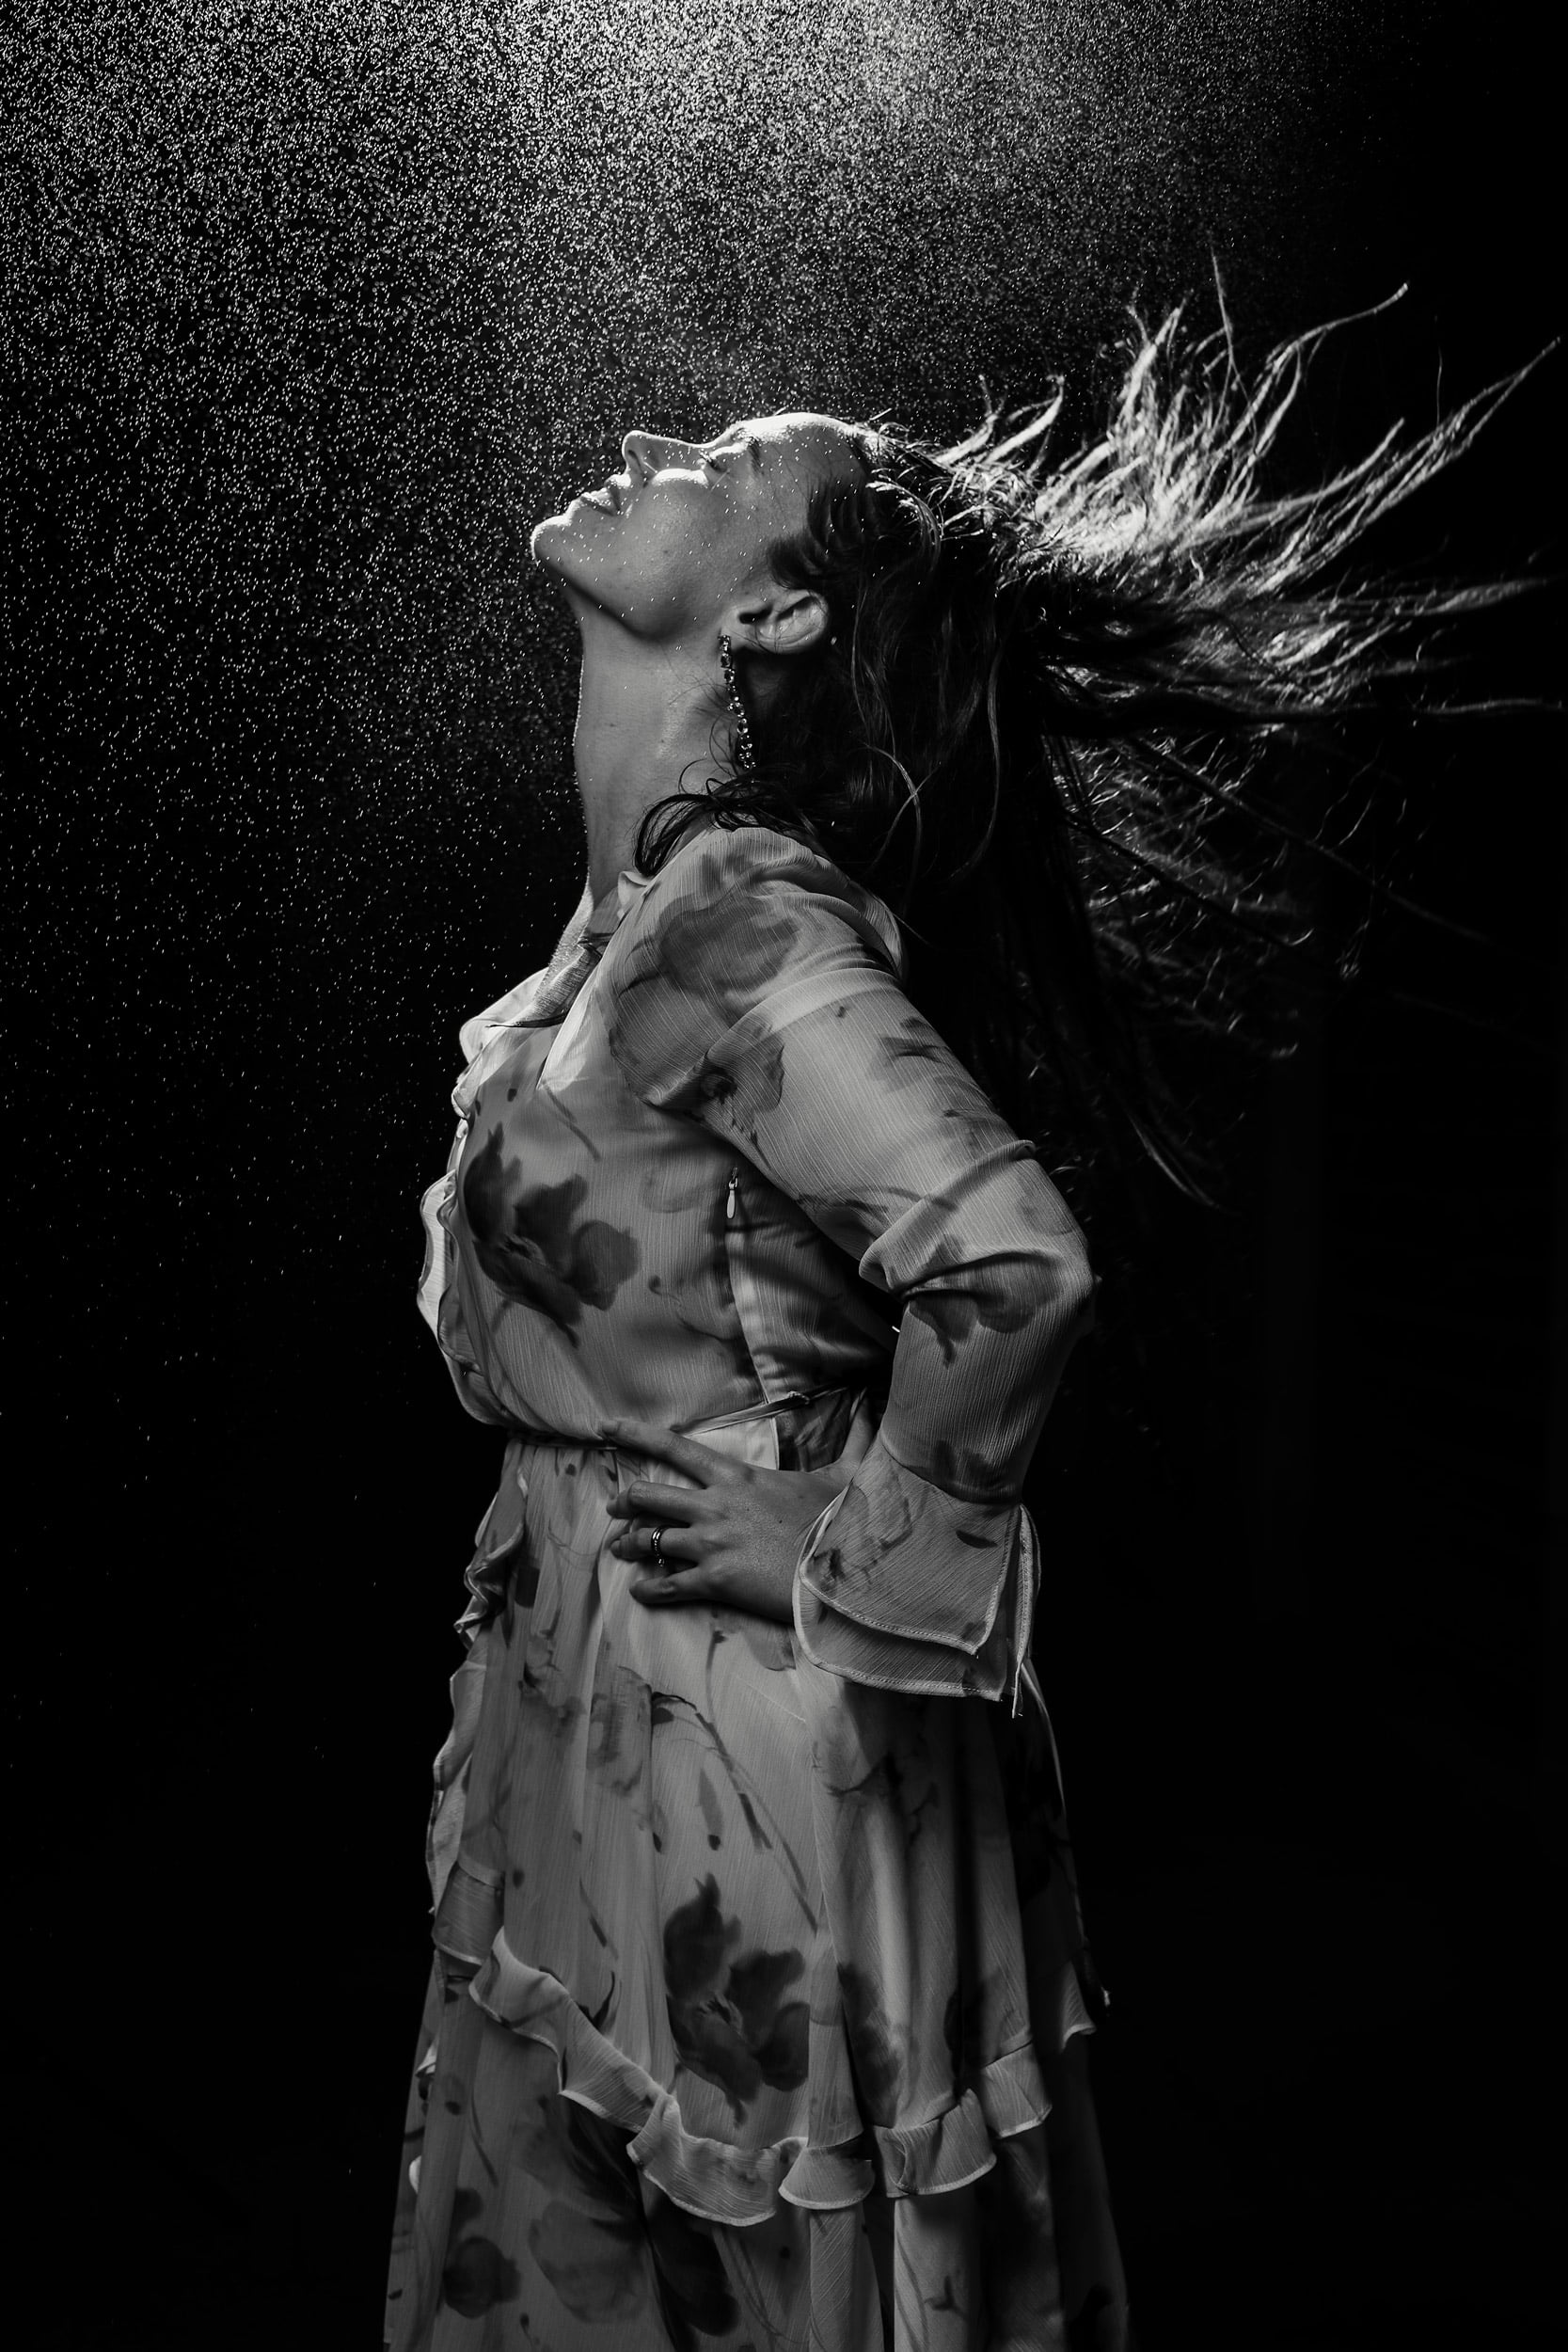
Lighting is the most critical part of making rain visible in photographs. Without proper lighting, rain can vanish entirely on camera, leaving your effort looking flat. The key principle is simple: rain (and smoke/steam) must be backlit to create drama and definition.
We used a two-light setup to achieve this:
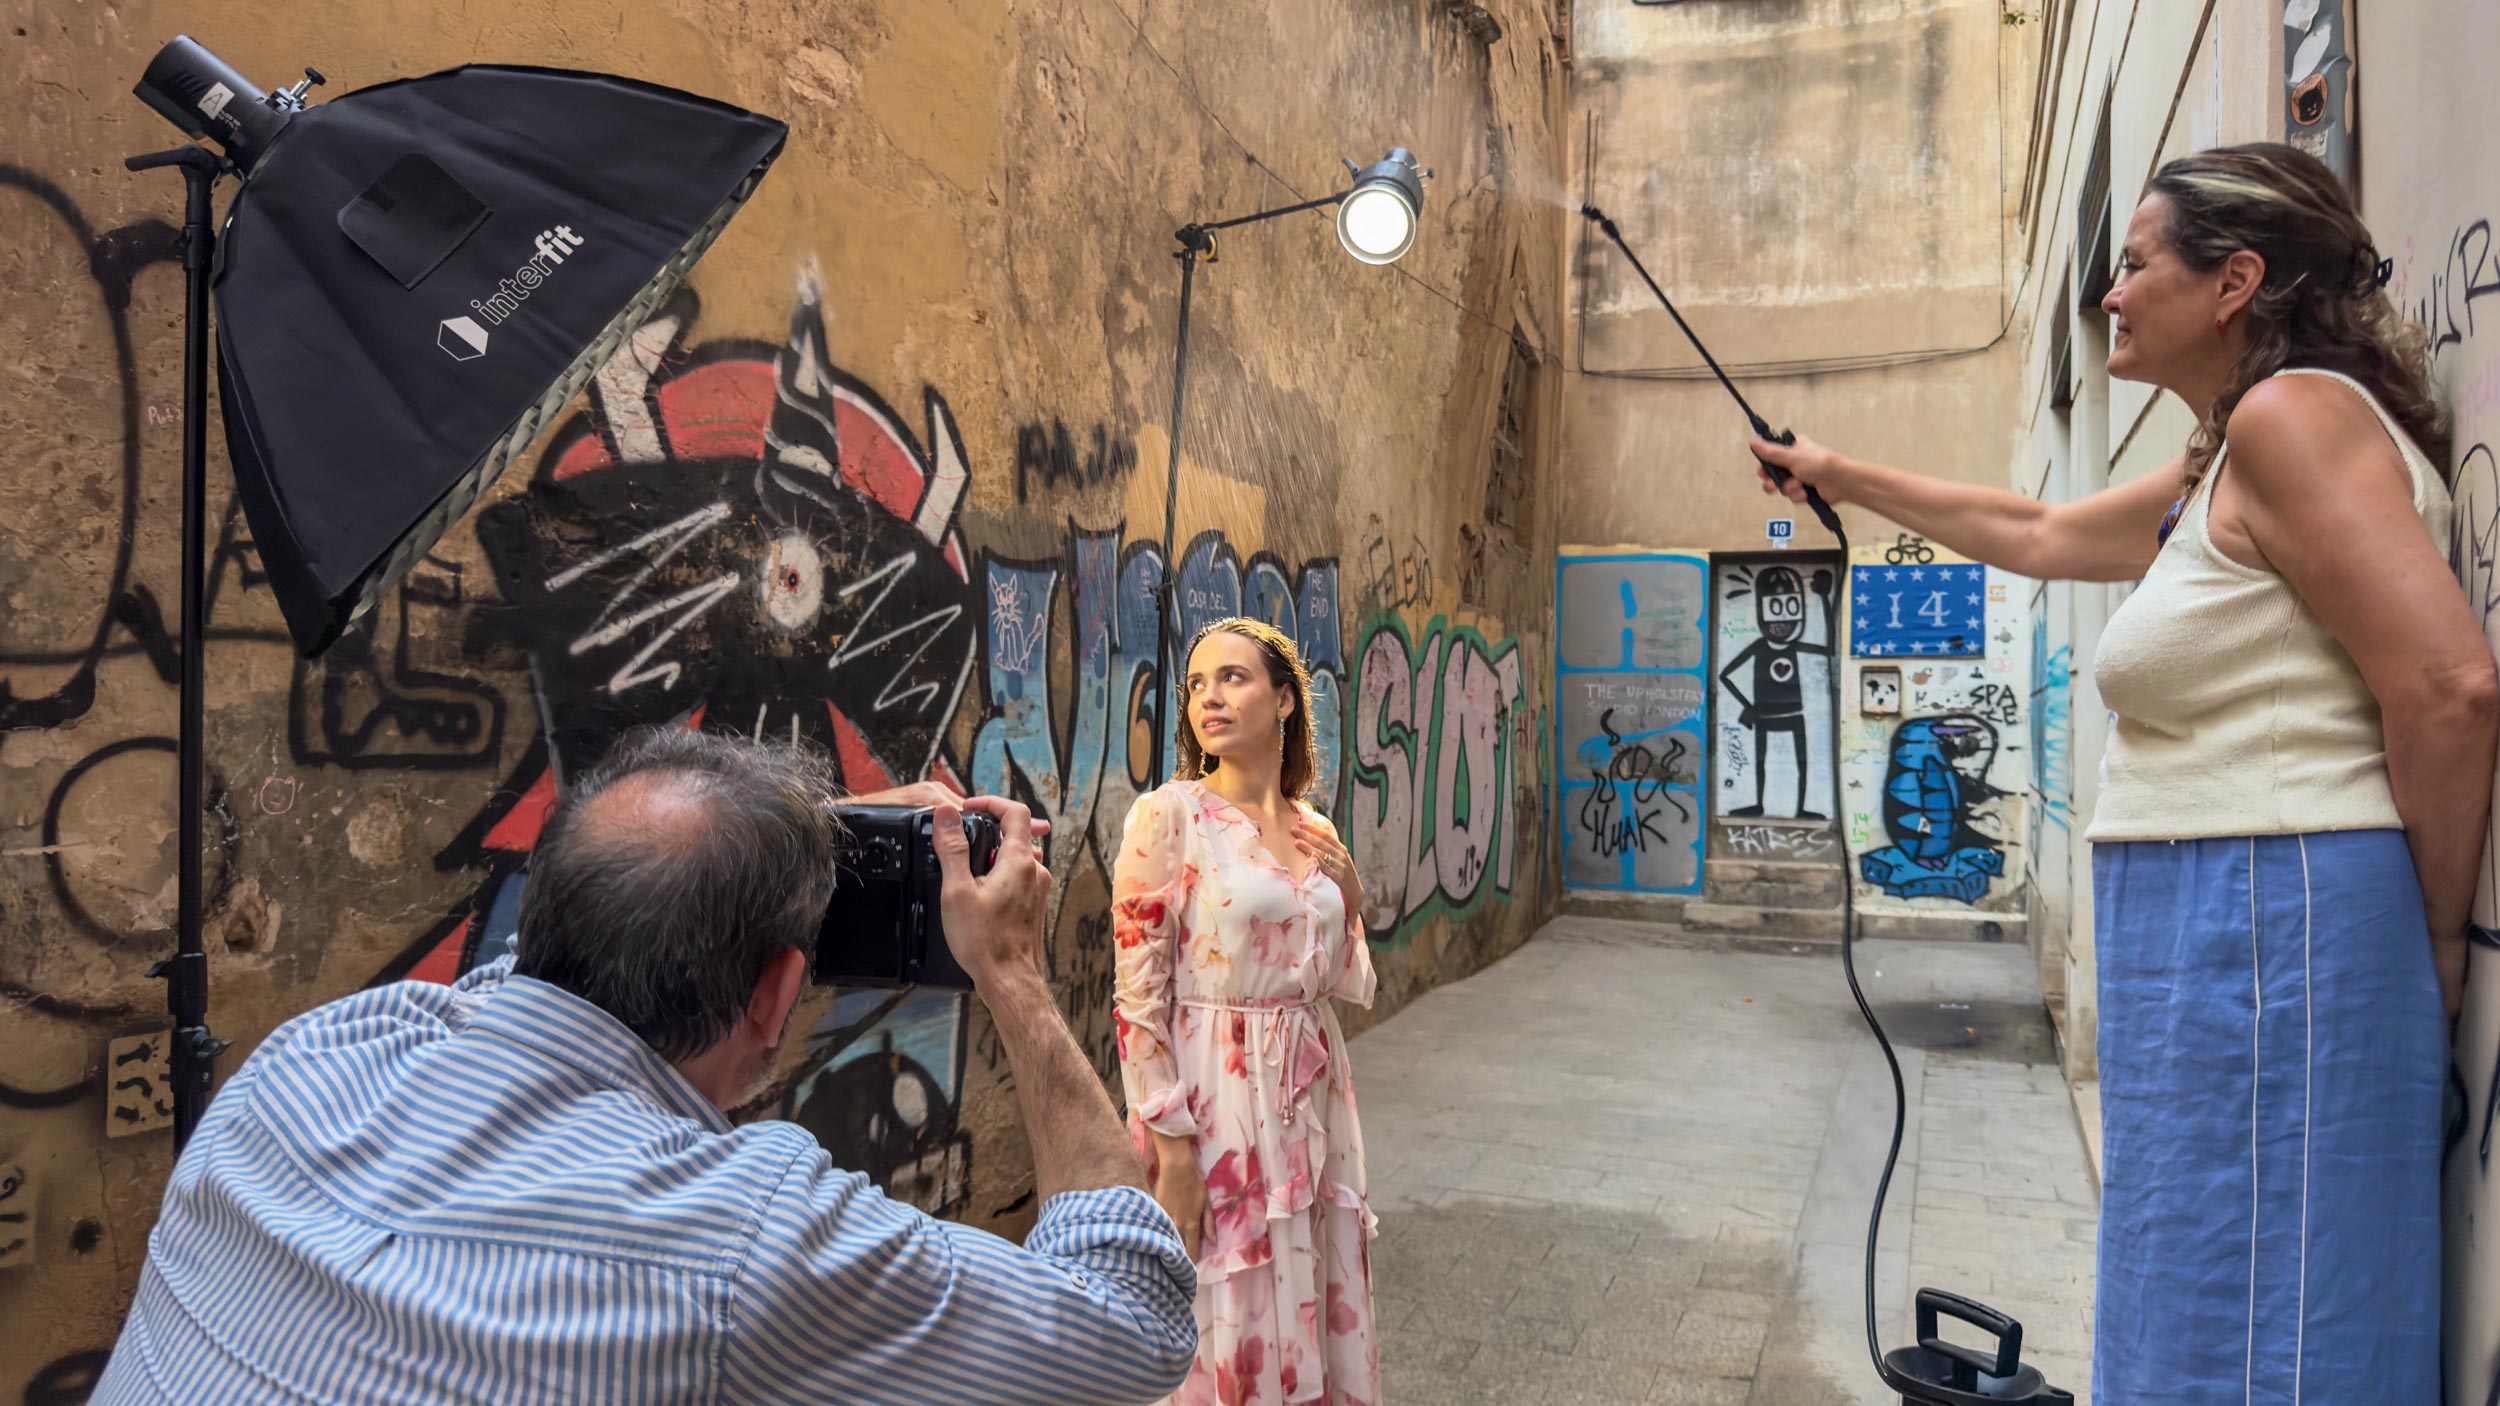
Key light: Positioned at a 3/4 angle to Christiana in a strip box. This provided soft, flattering illumination on her face and body, emphasising her features without washing out the details. A strip box works well in narrow alleyways because it gives directional light while keeping the edges of the frame dark, which adds depth and helps separate the subject from the background.
Hair and rain light: Placed high and behind the model, this light used a Fresnel head to create a focused, controlled beam. Its main job was to highlight the model’s hair and catch the mist in midair. Without this light, the fine spray from the water pump would have blended into the background, making the rain invisible. By positioning it behind and slightly above Christiana, each droplet caught the light and shimmered, creating the illusion of being caught in a rain shower.
We deliberately metered the lights slightly brighter than usual. This allowed the background to fall into shadow, enhancing the nighttime mood, while the rain itself sparkled under the beams. The balance between the key light and the hair/rain light was crucial. The key light needed to illuminate the model naturally, while the hair/rain light ensured the mist was visible without overpowering the subject.
Another tip from this shoot is to experiment with light angles and distance to change the look of the ‘rain’. Obviously, the flash duration will impact how the droplets appear due to the fraction of a second that they are illuminated for. Adjusting the power of the key light can also create more dramatic contrast between the subject and the alley walls.
Finally, small tweaks like adding gels or diffusers can completely transform the scene. For example, a slight blue gel could make the rain feel colder and nighttime-like, while warm tones emphasise summer evenings. On this shoot, we kept it neutral to maintain the gritty, urban feel of Valencia’s streets.
Camera Settings: Capturing Every Droplet
Capturing rain in photography requires precise control over shutter speed, aperture, and ISO. The goal is to make the droplets visible and dynamic while keeping the model sharp and well-lit. For our DIY outdoor rain studio, the camera settings we used were:
- ISO: 100 – Keeping the ISO low helped minimise noise and maintain image clarity. The bright, controlled lights compensated for the low sensitivity, allowing us to preserve sharp details in both the model and the rain.
- Aperture: f/5.6 – This provided enough depth of field to keep the model fully in focus while allowing the background to fall slightly out of focus, giving the rain more three-dimensional separation. A slightly wider aperture could blur the rain too much, while a narrower aperture would reduce the overall brightness of the scene.
- Shutter speed: 1/165s – This speed allowed the droplets to appear as small streaks, showing motion while still preserving their individual shapes. If you’re using ambient or continuous light, then faster shutters can freeze droplets entirely, while slower speeds may blur the rain into an indistinct haze. Because we were using flash, the flash duration actually freezes the motion of the water. For this shoot, the shutter speed also ensured that ambient lighting was minimised, further adding to the ‘night time’ effect, despite it not being completely dark when we did the shoot.
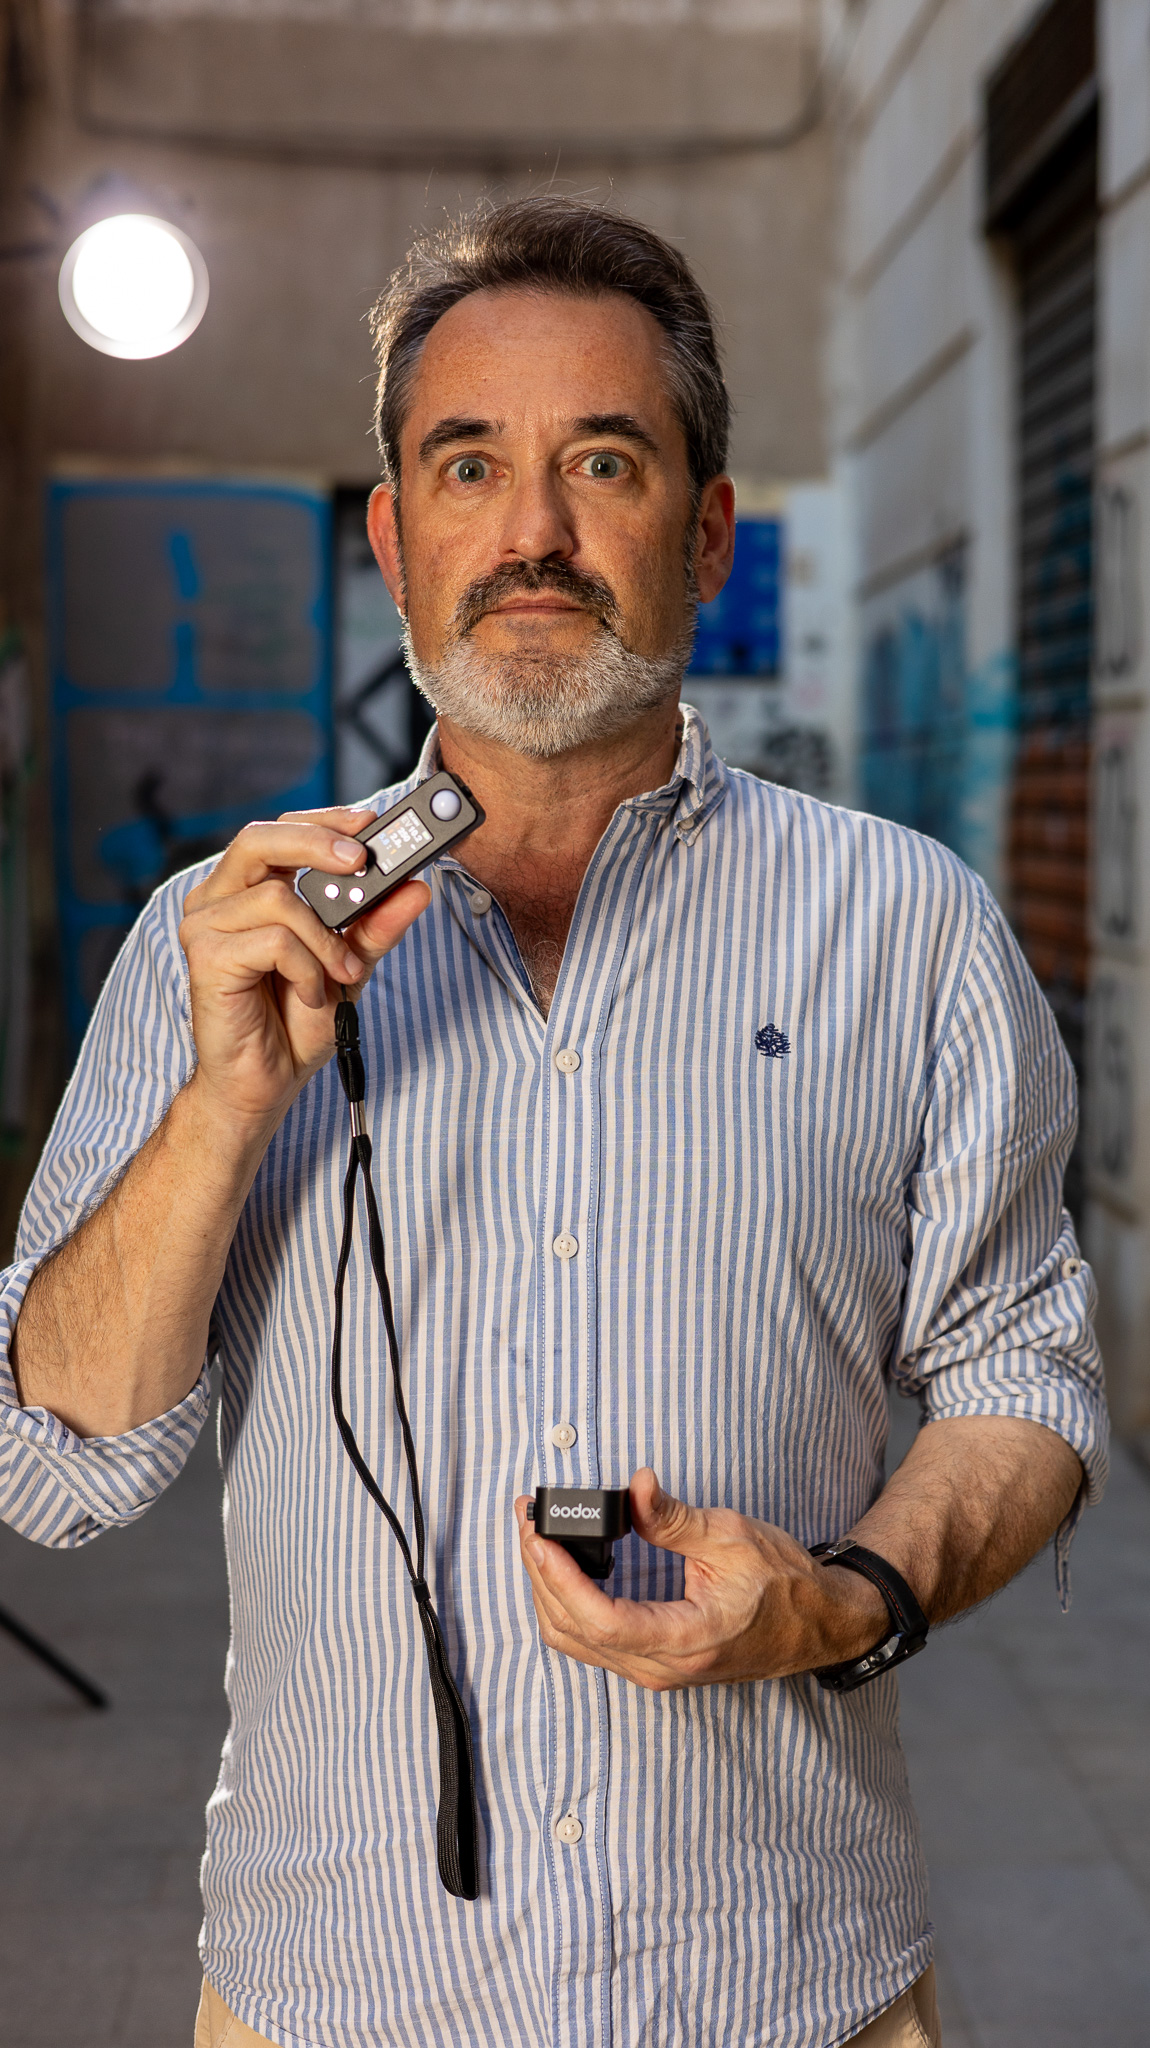
- Lighting balance: The key light was one stop brighter than the hair/rain light. This ensured the model remained the primary focus while the backlight effectively highlighted the falling mist. Brandon checked the light balance with a Lumo Light meter.
Lens Choices and Framing
Using prime lenses, like 50mm or 65mm, helped isolate the model from the background. These lenses also offered a fast aperture for controlling depth of field, which emphasised the rain without losing the model’s sharpness. In a narrow alley, prime lenses are perfect because they allow you to get closer to your subject while still capturing enough of the environment to provide context.
Tips for Shooting Rain
- Backlight the rain: Ensure at least one light source is behind the model to illuminate the droplets. Without this, rain will appear flat or disappear altogether.
- Adjust your shutter speed (if using HSS or continuous light) to match droplet size: Fine mist works well with slightly slower shutter speeds (1/160–1/200s), while heavier rain may need faster speeds to freeze motion. For us, the flash power essentially did the work in freezing the water motion.
- Use a low ISO with bright lights: This keeps noise minimal and ensures the rain retains detail.
- Experiment with angles: Positioning the camera slightly below the rain light can make droplets shimmer more. Shooting straight-on may flatten the effect.
- Check highlights carefully: Strong backlighting can blow out water droplets if the exposure is too high. Meter lights carefully and adjust power to balance the scene.
Why These Settings Worked
These settings created a natural look for summer rain, where droplets glimmered without appearing harsh or artificial. The controlled lights, paired with the correct shutter speed, allowed the rain to maintain a soft, cinematic feel, giving us a realistic yet dramatic effect. Combined with the alleyway location and minimal equipment, these settings proved that even a DIY outdoor rain studio can produce professional-level results.
Our assistant Carmen stood slightly out of frame on a small step ladder to one side of the model to operate the water pump.
Results: Close to Studio-Quality Rain
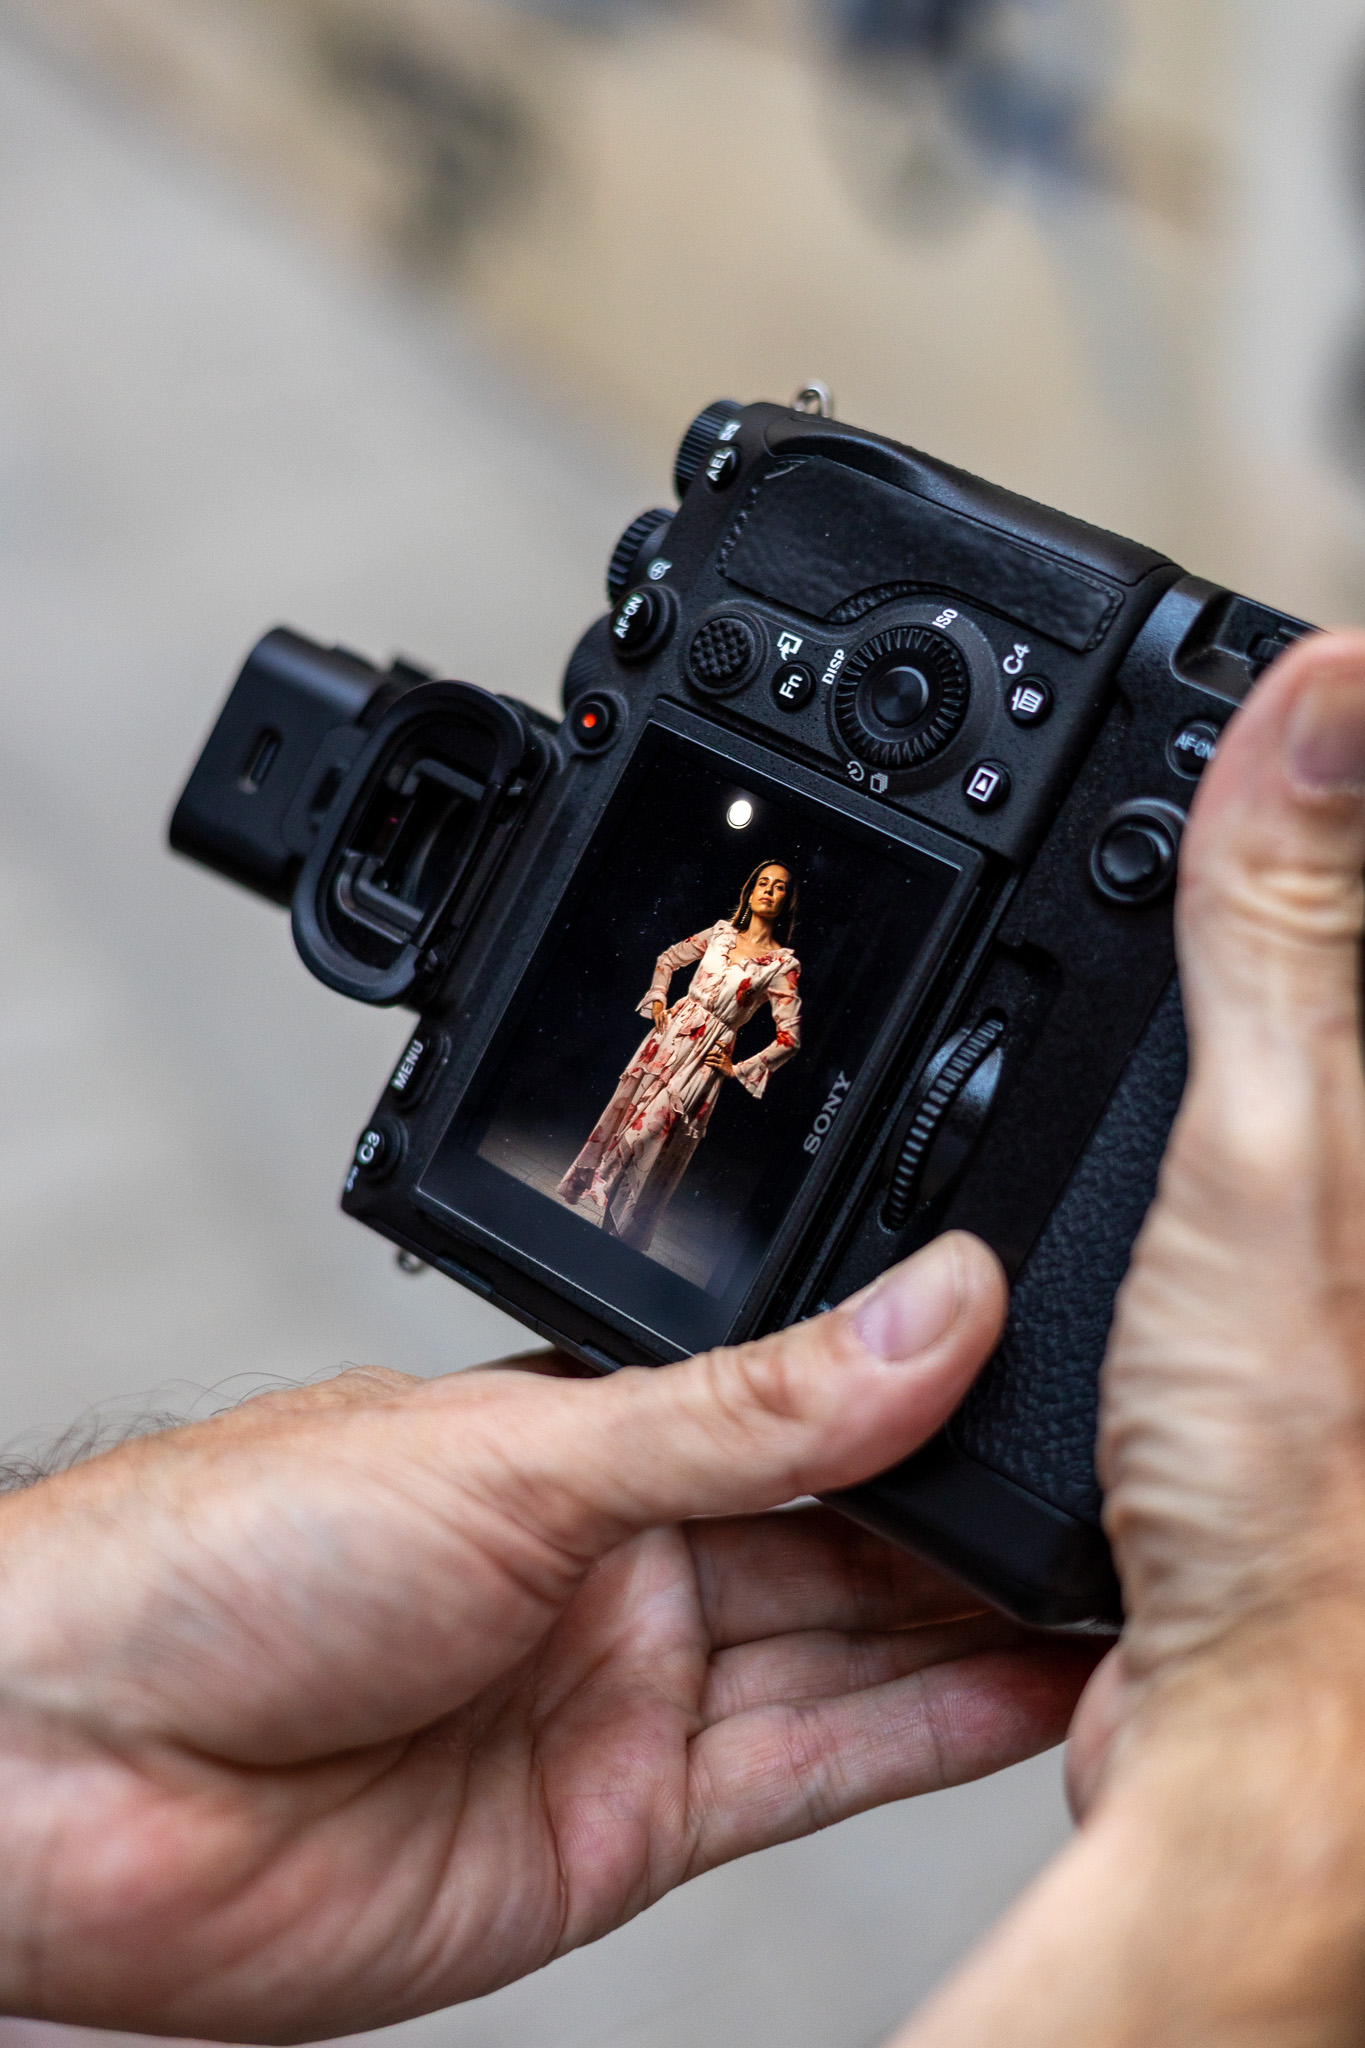
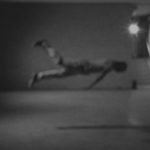
The DIY outdoor rain studio exceeded all my expectations. The backlit mist worked beautifully, catching the light in every droplet and creating a cinematic atmosphere that rivals what you might see in a professional studio shoot. The combination of carefully positioned lights and a fine water spray gave the rain depth and texture, making it appear more natural and three-dimensional on camera.
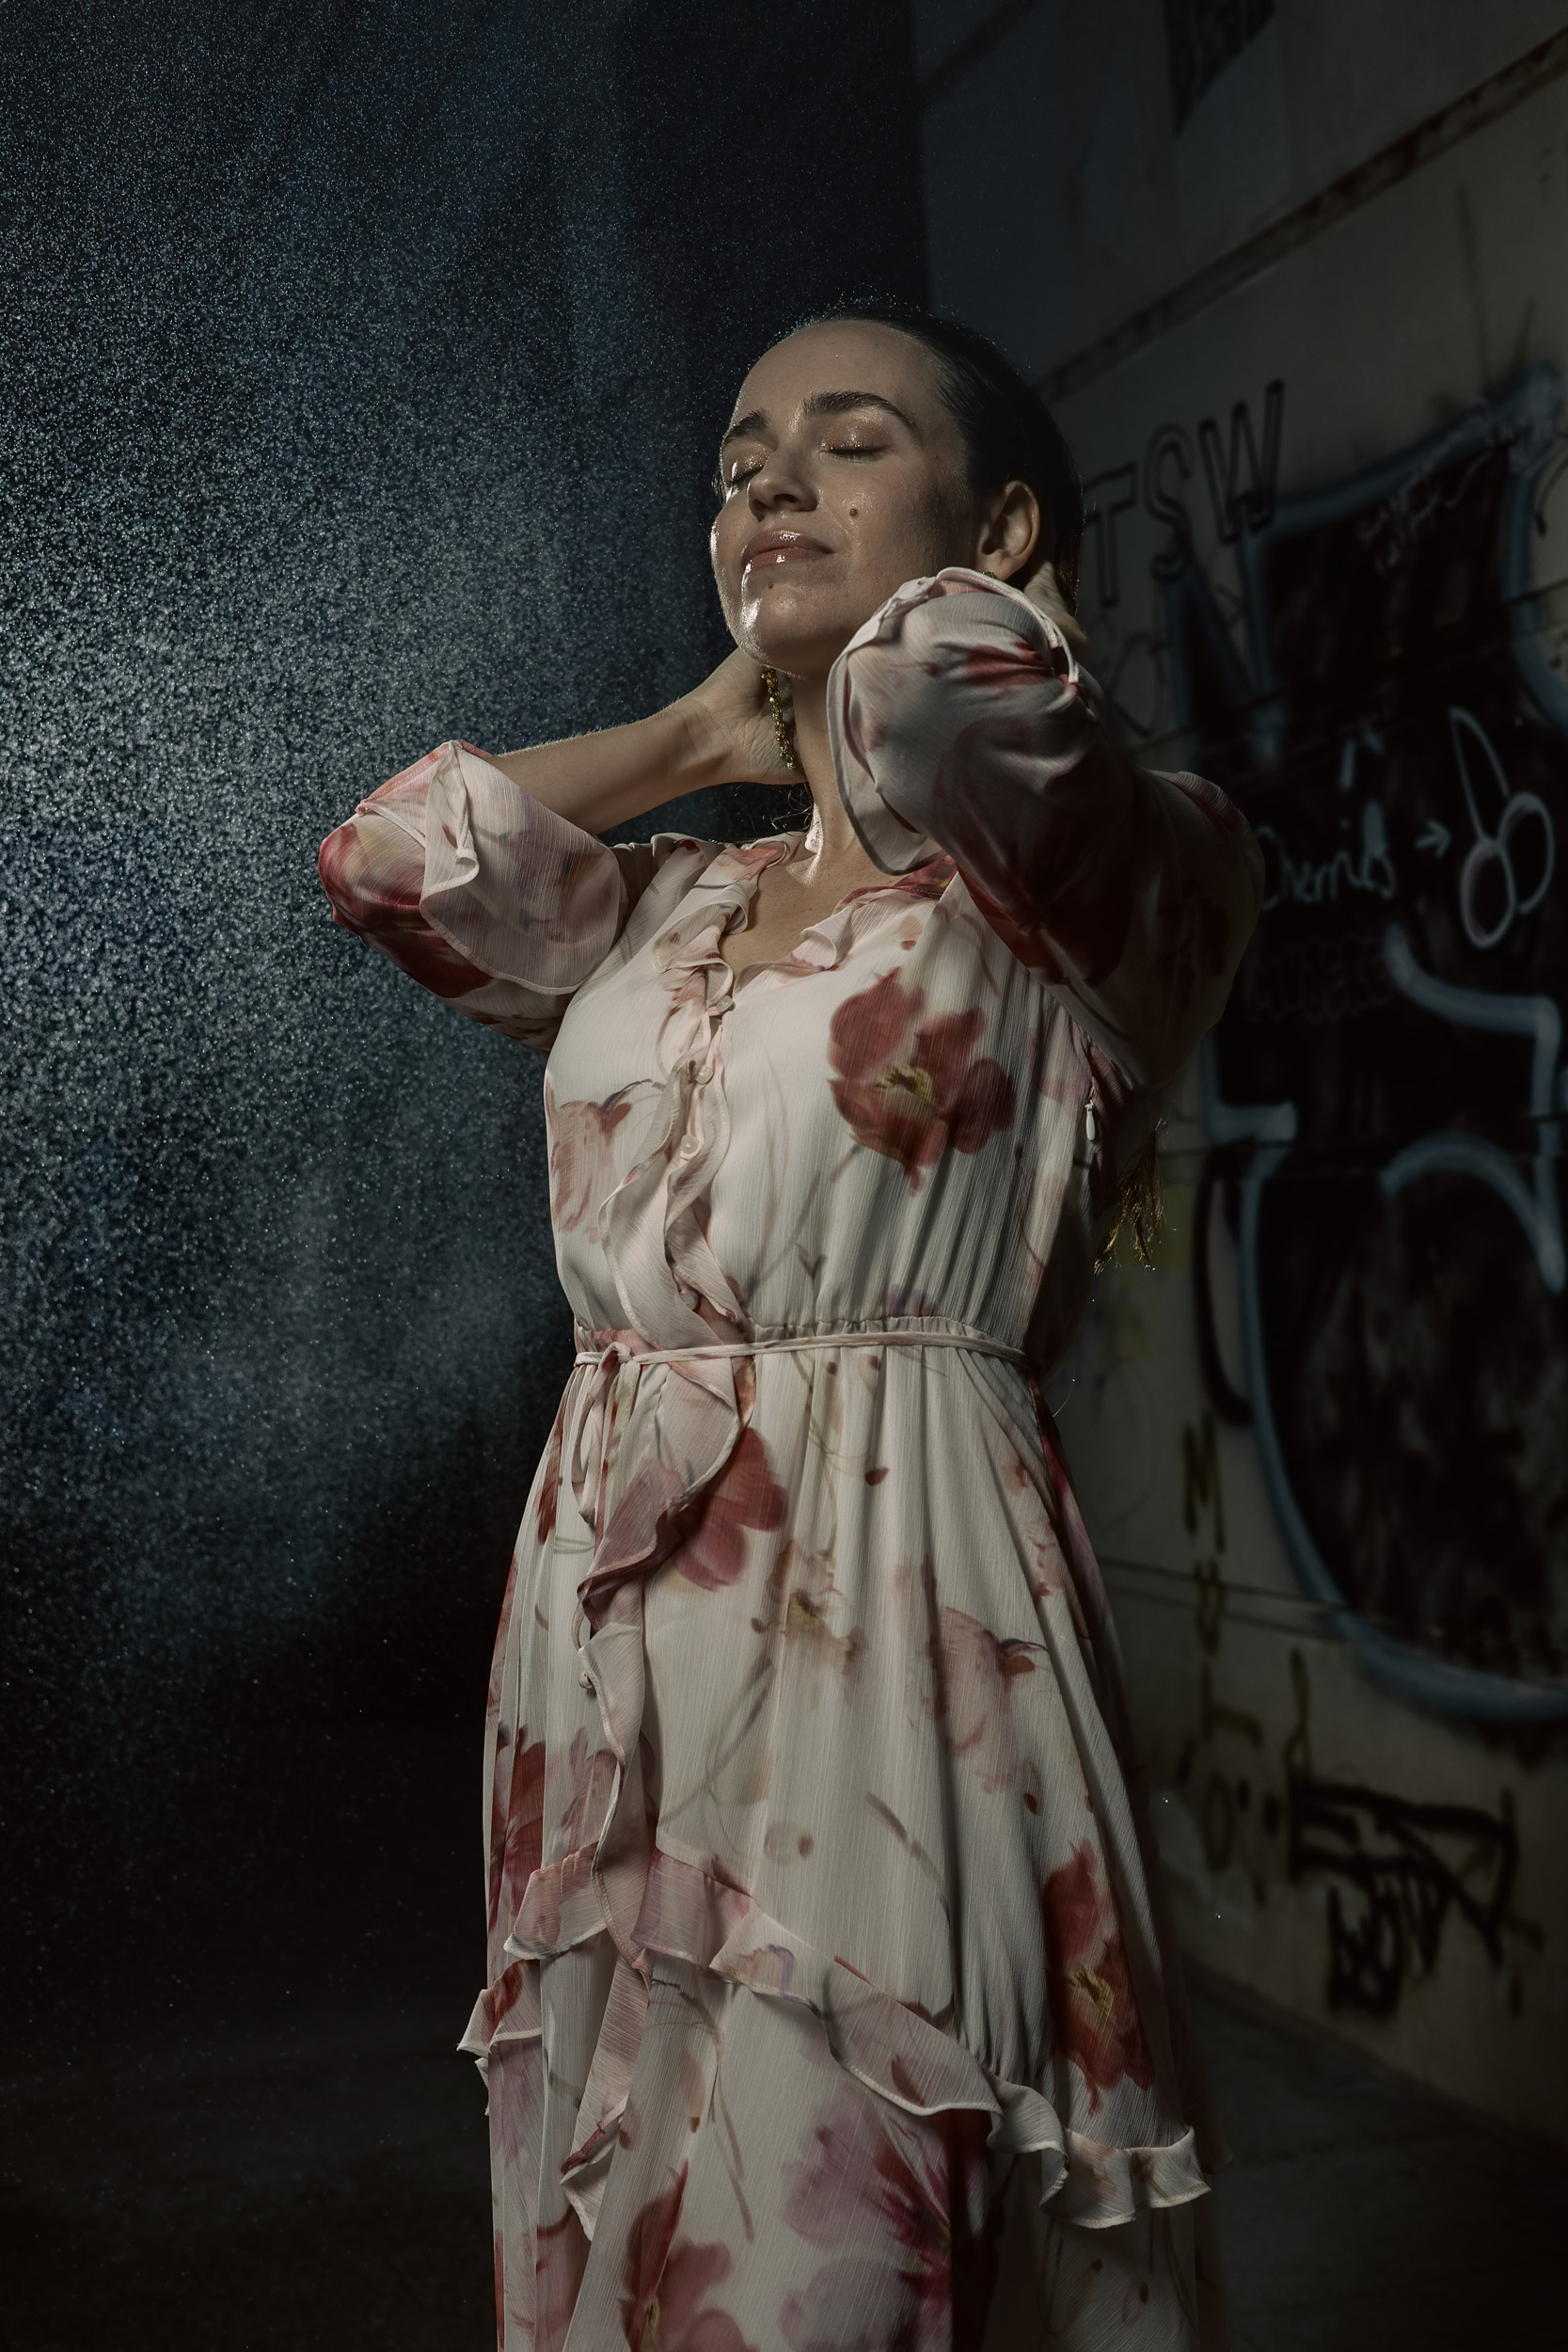
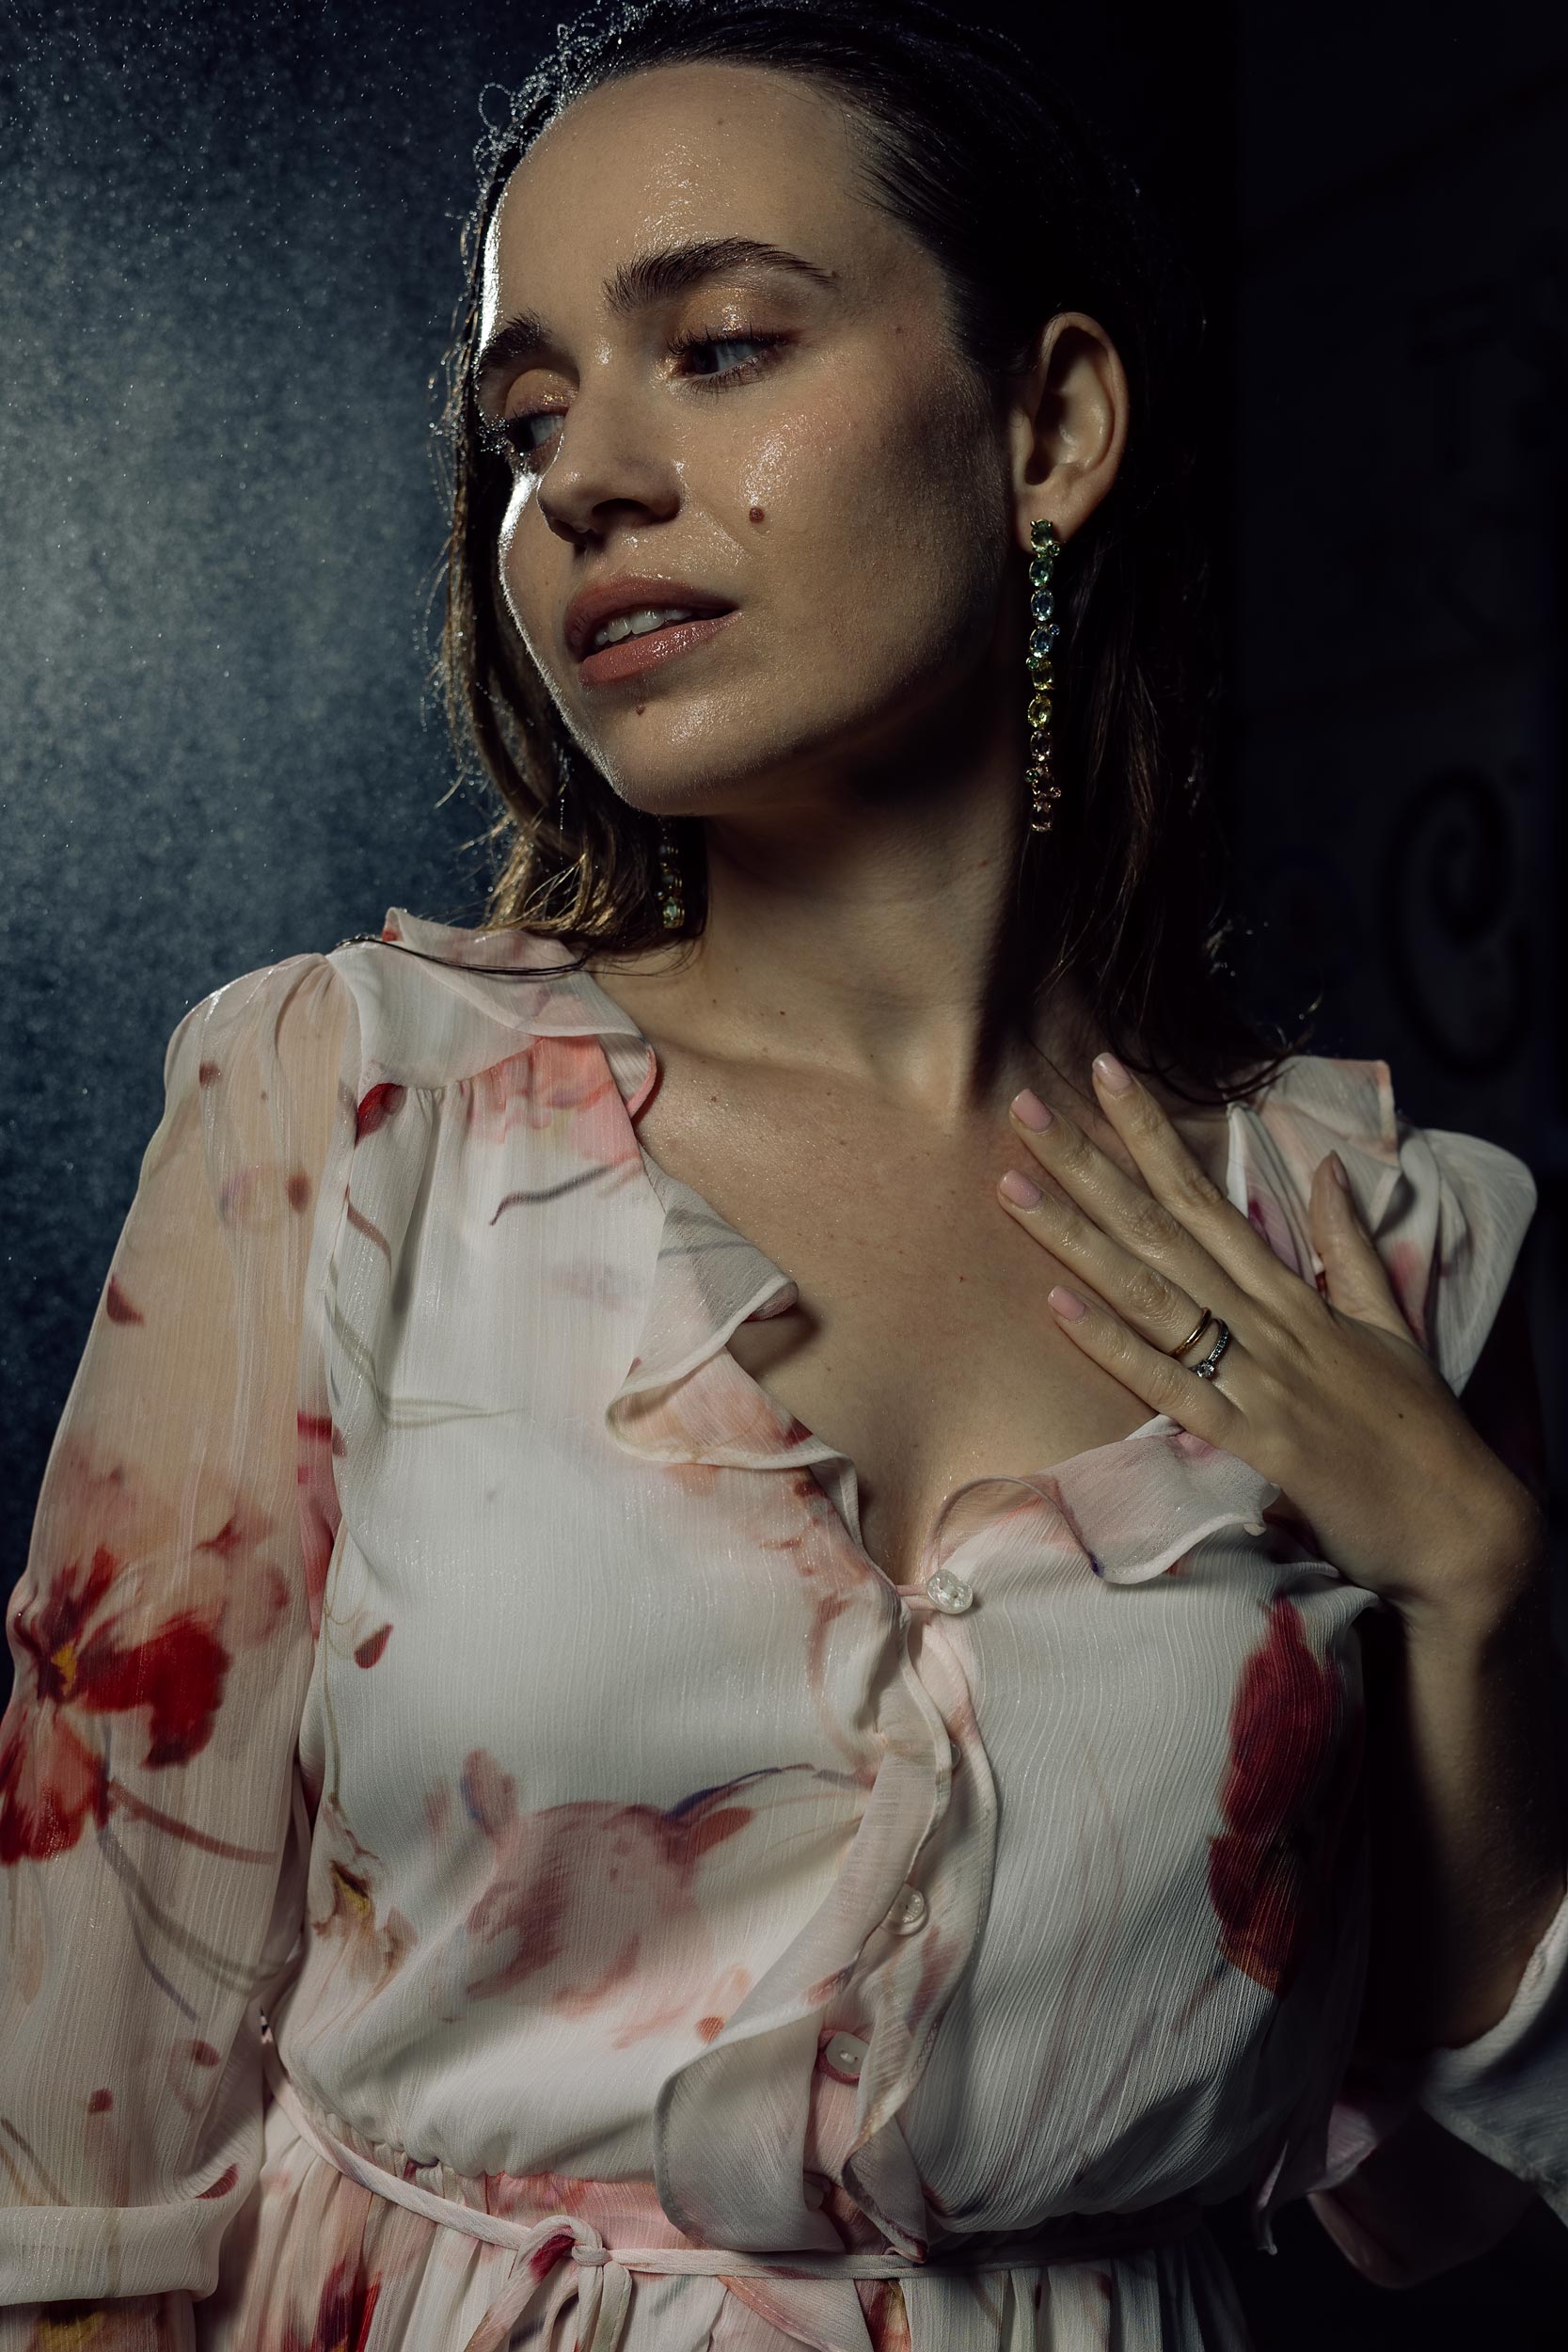
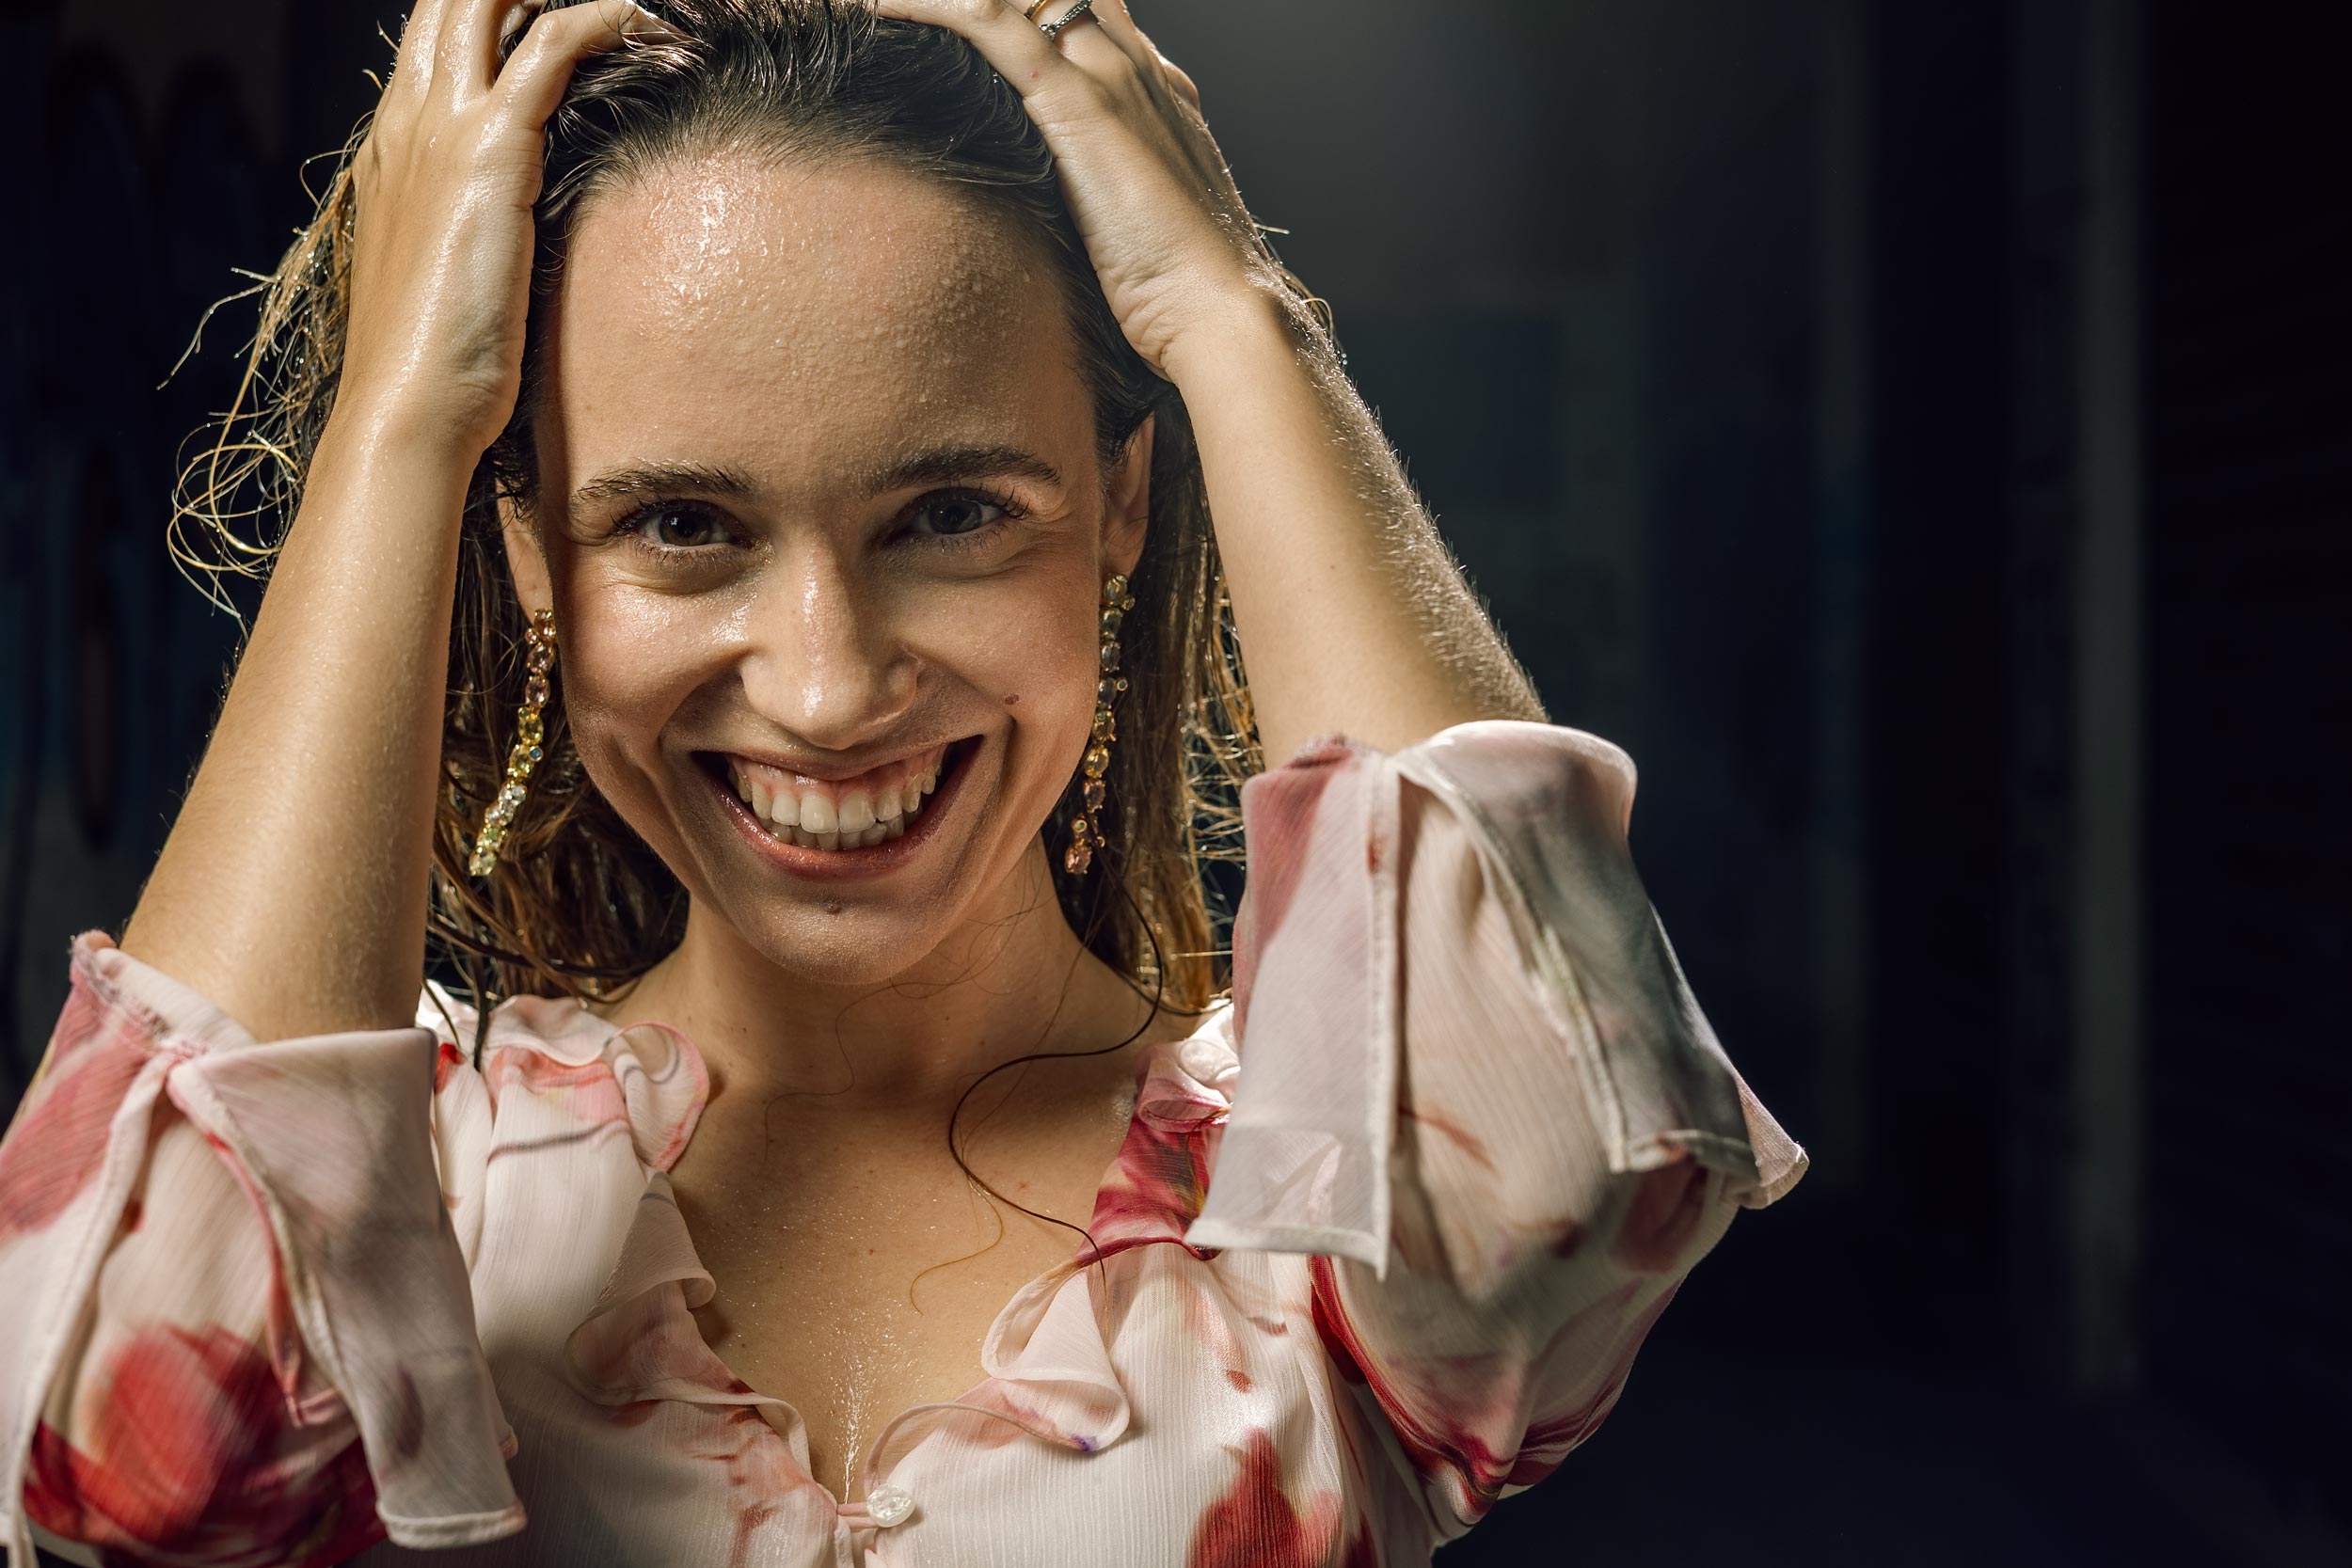
I have to admit that the water was finer than I was expecting, more Amsterdam drizzle than Malaysian monsoon; however, it did the job. While we could not create puddles or have Christiana lie directly on the wet ground, the fine mist produced a convincing rain effect that felt authentic. The smaller droplets were actually an advantage in some ways because they allowed Christiana to stay comfortable for longer during the shoot, which gave us extra time to experiment with poses, compositions, and lighting adjustments. This flexibility resulted in a variety of images with different moods and perspectives, all within the same setup.
One of the most satisfying aspects of this project was how professional the results looked despite using minimal equipment. The alleyway, graffiti walls, and simple lighting setup combined to produce images that could easily pass for studio work. Shadows and highlights were controlled precisely, and the rain appeared crisp and dynamic, adding motion and energy to the portraits.
The shoot also proved that careful planning and creativity can replace costly resources. By building this DIY setup, we avoided nearly $200 in studio rental fees. It reinforced the idea that constraints often encourage innovation, and that dramatic, cinematic portraits are achievable outside of traditional studios and huge rigs.
Conclusion
This shoot proved that a DIY outdoor rain studio is totally doable for any portrait photographer who’s willing to get a bit creative. You don’t need a ton of gear, just a few smart lights, a simple water spray, and a location that adds character can produce cinematic results that look way more expensive than they are.
Building your own rain setup is also a great way to sharpen your problem-solving skills, experiment with lighting and composition, and make unique images without relying on a commercial studio. Shooting rain outdoors lets you combine technical know-how with creative instincts. You can create dramatic, eye-catching portraits with just a spray pump, a couple of well-placed lights, and a model who’s happy to get a little wet. Sometimes, having limitations like this pushes you to come up with solutions that end up looking even more striking than the original plan.
Huge thanks to Brandon Jackson, model Christiana Mitrea, assistant Carmen Jackson and Theo Baker for the BTS shots and videos.
Filed Under:
Tagged With:

Alex Baker
Alex Baker is a portrait and lifestyle driven photographer based in Valencia, Spain. She works on a range of projects from commercial to fine art and has had work featured in publications such as The Daily Mail, Conde Nast Traveller and El Mundo, and has exhibited work across Europe


Join the Discussion
DIYP Comment Policy
Be nice, be on-topic, no personal information or flames.