


How I Shot This Portrait In Pouring Rain
Jun 23, 2014
Ilko Allexandroff

We love it when our readers get in touch with us to share their stories. This article was contributed to DIYP by a member of our community. If you would like to contribute an article, please contact us here.
Share:

Hi, Ilko Allexandroff here, in this post I’m happy to share the behind the scenes for one of my favorite shoots that was shot in the rain. Conditions were far from trivial and I’ll share some of my secrets as well as information about my location choice, lighting and how I usually shoot in rain.
Gear
I’m using Canon 5D Mark II for the photoshoot, and the lens is 135mm F/2, which I use in most of my shoots! I’m shooting at wide open aperture. And shutter speed is at the sync speed – 1/160. I shot at this speed since I didn’t want to have any unnecessary distractions from the background to be in my photograph.
The flash I use is the Nissin MG8000. It is pretty handy when I plan on shooting at 1/1 power because unlike some of the other flashes, it does not overheat when being used at full power for long shoots. This means I don’t need to stop in the middle of the shoot and wait for it the flash to cool down (I had that experience before with my Canon & Nikon flashes).
And finally the radio trigger – Cactus V6, it make my life quite easy because I don’t need to go to the flash to make adjustments of the flash power, and I and do them right from the camera!
Location

It was a rainy night, and for this shoot I needed a simple location without any distractions. That was a road in the night, where almost nobody is passing, so I could shoot without being bothered! The other advantage was that there were lots of water in the road too so I could play with reflections.
Lighting
From the beginning of the shoot, I knew that I’m gonna go with one light. A single flash from behind the model, and with that light I wanted to build everything in the photograph!
Using one light from behind as a main light can provide interesting results – and I do it quite often even if I don’t need the back light to light the rain. So, here comes the question: how I can get the model exposed correctly, if I don’t have any light coming from her front side?
For one, I did use some high ISO – 1000 to get at least a little from the ambient light but then, not too much to avoid the distractions of the background. Another reason to use high ISO is to get as much light as I can from the flash. I really wanted to show that rain, and I put the flash relatively far so I can light the rain at wider angle!
You can see on the shot above how I was thinking at the process of shooting:

1. First I just shot the scene with whatever settings I had to see my environment, slow shutter speed (1/10) and flash on low power. I was using a daylight white balance, which was not even what I wanted for the final shot.
2. Then I tuned in a faster shutter speed and get the white balance a bit cooler on the second shot!
3. At this point I felt like the flash was not powerful enough to light the rain correctly, so I bumped it from 1/16 to 1/2 on the third shot, which basically gave me the exposure I wanted! After that I started looking for a decent reflection to play with!
4. Finally, to get some light on the model’s face, I asked her to raise he hand, this got some reflected light off of her hand to her face, and this is what you see in the final shot.

Focusing at night can be tricky but there are easy ways around it. Here is what I do most of the time – get some mobile phone on the face line of the model and focus on that, then remove it and set the camera on manual mode. You have to be careful to not change the focal distance and let the model know she is not allowed to move from that spot.

I Also find it quite important to let the model know these technical things, it will make your shoot easier! Another way to focus in the night is to have a flashlight, point it to the model when you focus then turn it off!
Shooting in the rain
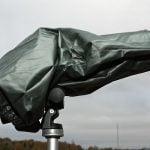
Here is big question: How to protect the gear when I’m shooting in the rain? Well, to be honest I’m not really trying to protect it so much, but if I’m in the mood I might get some white transparent plastic bags for the strobes. Why white? – because I don’t want to mess up the white balance! Here is how I protect my strobe for this shot:

For the camera and lens – in the beginning I was very careful when I was shooting in the rain, using a raincoat and plastic bags, but the more I go out in the rain I actually see that even if it gets slightly incredibly wet it’s just fine, and I noticed myself not thinking too much about it. I just go and shoot!
But, this is not an advice, definitely be careful in the rain :). Actually one of my last shoots almost got my Canon 5D Mark II. I was shooting a model on a rocky beach in a hard rain. and by the time the shoot was done it was in the middle of the night. I couldn’t ask the model to wait for me until I get my camera raincoat… etc. In that case I had to work fast! But still the camera did not turn on for a while. You know what, the shoot went so well that I didn’t even feel sorry for the camera!

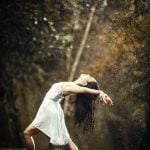
Final Results
That is basically how I do my shoots, I think I’ve been on the location no more than an hour and it was raining all the time! Model in the photoshoot is Yuzuki Aizawa, The models I often shoot with know that quite often my shoots will be at kinda messed up locations, and I want to make sure that they will be motivated to go to the edge for a good photo! Of course I need to give them a reason for that by shooting great photos, I think that how they become trusting me when I tell them my ideas!

About The Author
Originally from Bulgaria, Ilko Allexandroff is a photographer based in Kobe, Japan. He mainly doing portrait, fashion and weddings. You can see more of his work on his blog, as well as on his Facebook, 500px, twitter and Flickr stream.
We love it when our readers get in touch with us to share their stories. This article was contributed to DIYP by a member of our community. If you would like to contribute an article, please contact us here.


Join the Discussion
DIYP Comment Policy
Be nice, be on-topic, no personal information or flames.
9 responses to “How I Shot This Portrait In Pouring Rain”
Wow looks like the Cactus V6 survived the rain also :O
So the V6 on camera did not have issue in the rain? WOW…..
So the V6 on camera did not have issue in the rain? WOW…..
great images!
Good work! Do you shoot in RAW and if so, what’s the benefit of adjusting white balance in-camera?
The photos of the wet gear scare me haha!
Yep, I shoot RAW! Of course I also adjust the white balance later, the point is that I want to get close to the result I want in camera!
Thanks a lot for sharing these detailed descriptions. I guess one more flash would have been good, but the shots look great as they are! One can only hope that a real bride will be as willing to get soaked. :)
Those photos look amazing. I definitely want to try it out someday! I like portrait, I like rain (not sure my camera does however xD), I gotta try something similar to that, it’s very impressive!
All that effort and you didn’t remove the massive rain drop in front of her chin.