


Shooting the moon with a Raspberry PI, a cheap lens and no DSLR
Apr 5, 2016
James Mitchell

We love it when our readers get in touch with us to share their stories. This article was contributed to DIYP by a member of our community. If you would like to contribute an article, please contact us here.
Share:

Shooting the moon has been a little obsession of mine for a very long time, in fact ever since I started photography. I guess it is my love of impossible images, science fiction and science fact that drove me to want to take photographs of the moon.
I tried a few things using the gear that I have collected over the years. Sadly, neither zoom lenses nor telephoto lenses ever really resulted in a clear picture of the moon.
UNTIL!!!
I got the Picamera! A Raspberry PI camera module. Now don’t laugh, this 5 megapixel wonder has a trick up its sleeve! You can remove the lens and expose light directly to the sensor – and if you happen to have access to a 3D printer, you can make a Canon EOS lens mount for the Picamera!
My good friends at Dimension Alley (a 3D printing café here in Berlin – seriously check them out!) recently ran a competition on Twitter for a 50 Euro gift voucher to print anything the winner could come up with. I won! Naturally, I had to think up something cool and Raspberry Pi related to print.
FULL DISCLOSURE: This is not my design -I found the 3d print on thingiverse.com and sent it to be printed. The maker of the adapter does not know me, but I tried to contact him to thank him and to ask if I could write this post, but he’s not replied. If that’s you, please get in touch ?
The file was made by thingiverse user Charmlee – find it here.


First, I removed the lens from the Picamera and attached it to the adapter. Then I connected my 18-55 mm kit lens from my Canon and wow, the picture was awesome! If you know photography and know how the kit lens works, you might have already noticed that it is zoomed in on that shelf (last picture above) quite closely.
That’s because the 5 megapixel sensor only captures a tiny section of what the lens can actually see. In fact, you could put your finger on the edge of the glass and it wouldn’t be seen by the Picamera. The advantage: for that tiny section of lens, we get the full 5 megapixel worth of data/detail.
Here is how awesome the magnification is:
https://vine.co/v/idqWtFazXLn
NOTE: If you want to print one of these bad boys yourself, use black filament and try and block all the light getting to the 3D print. Maybe paint it or cover it in duct tape. My photos have a pink edge to them, because I went with a red filament.
On to the moon!
On a whim, I thought I would try this out on my 70-300 mm lens – on the moon, from my balcony.

Everything is connected to the Pi with a screen and tied to my tripod.
MIND BLOWN!

As my colleague from work put it…
Hey, you can see the holes in the cheese!
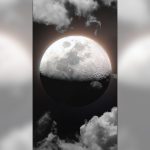
Could not have put it better myself. It’s not totally clear and there may be room for improvement, but I am super happy with the results. If you are in Berlin and have a lens longer than 300 mm, maybe drop me a message ?
My final image is the same picture, but run through a little Photoshop editing to get rid of the pink and highlight the black shapes on the moon!

About The Author
James Mitchell is a leader of the Raspberry Jam Berlin community – a user group of Raspberry Pi enthusiasts looking to learn or teach what they know. You can follow their adventures on raspberryjamberlin.de, Instagram and youtube channel. This article was also published here.
We love it when our readers get in touch with us to share their stories. This article was contributed to DIYP by a member of our community. If you would like to contribute an article, please contact us here.
Related Posts
 How To Build An Automated Weatherproof Timelapse DSLR Machine Using Raspberry Pi
 How to take this epic moon photo with a cheap telescope and a smartphone
 Is cheap gear really cheap? This is what it can cost you in the long run
 The Pikon is a 3D printed interchangeable lens Raspberry Pi camera with a mirrorless camera form factor
Join the Discussion
DIYP Comment Policy
Be nice, be on-topic, no personal information or flames.
5 responses to “Shooting the moon with a Raspberry PI, a cheap lens and no DSLR”
result looks cheap too….
Is the moon even in focus? As far as I know setting the focus to infinity on some lens will focus beyond infinity so focusing on the moon may require some fine tuning. Also have you tried lucky imaging to minimise atmospheric distortions?
Hokay, so, I don’t think this is a particularly successful capture, and having this article based on it doesn’t do the concept any favors. HOWEVER, the idea that we are getting to the point where Joe Consumer can print up a camera body based on a generic processor/sensor, which they can put on the software of their own choosing, is quite exciting.
Hey mate. That’s a really cool project!
One tip that may improve image quality.
Put your zool lens on your camera, stop the aperture down to maybe f8 or so.
Press the depth of field button to stop the iris down. Then detatch the lens with the dof preview button held.
It will leave the lens set at the aperture so you can get a sharper image on a camera that doesn’t give aperture control.
Ittl make a huge difference to sharpness as most lenses wide open are a bit soft.
Would love to see the results if you get a chance to try
Adnrew.
Hi, here’s my DIY moon photograph. I never post it before anywhere, I took it 3 years ago. Your post reminded me about one of my first passions in this world of phorography, the moon. During that time I only had a compact camera, and luckily the lens fit on my binoculars. I didn’t have a tripod for cameras but my father, an engineer had one that used at work and I built some instruments to hold together both the camera and the binoculars. After several shots this was one of the best. I think the quality is similar to your photos :) I always wanted to do the same thing on a telescope but I have never had the chance to do it, I can imagine that it works too.
Good luck with your projects.