


Rembrandt Lighting Setup Guide: Create Classic Portrait Drama in Any Space
Oct 20, 2025
Darlene Lleno
Darlene Lleno brings a unique perspective to DIY Photography as someone who grew up surrounded by camera gear but chose words over lenses. With five years of writing experience, she specializes in photography content that’s both technically informed and genuinely passionate. Growing up with a photographer twin brother meant camera talk was everyday conversation in her household. While he mastered capturing moments, Darlene discovered she preferred being the subject and the storyteller behind the scenes. As a travel enthusiast and mother of two, she understands the importance of preserving life’s precious moments. When not exploring new destinations or writing for DIY Photography, you’ll find her reading or tending to her garden. Her approach to photography writing is refreshingly authentic, she may not be behind the camera, but she knows exactly what it takes to help others capture the shots that matter most.
Share:
A Rembrandt lighting setup turns simple portraits into dramatic images using just one light. Named after the Dutch painter, this technique creates a triangle of light on your subject’s cheek. You can use it anywhere, from a pro studio to your bedroom.
This method works because it’s simple. You don’t need tons of expensive gear to get great results. One light at the right angle changes everything. Your portraits get depth and character that flat lighting can’t match.
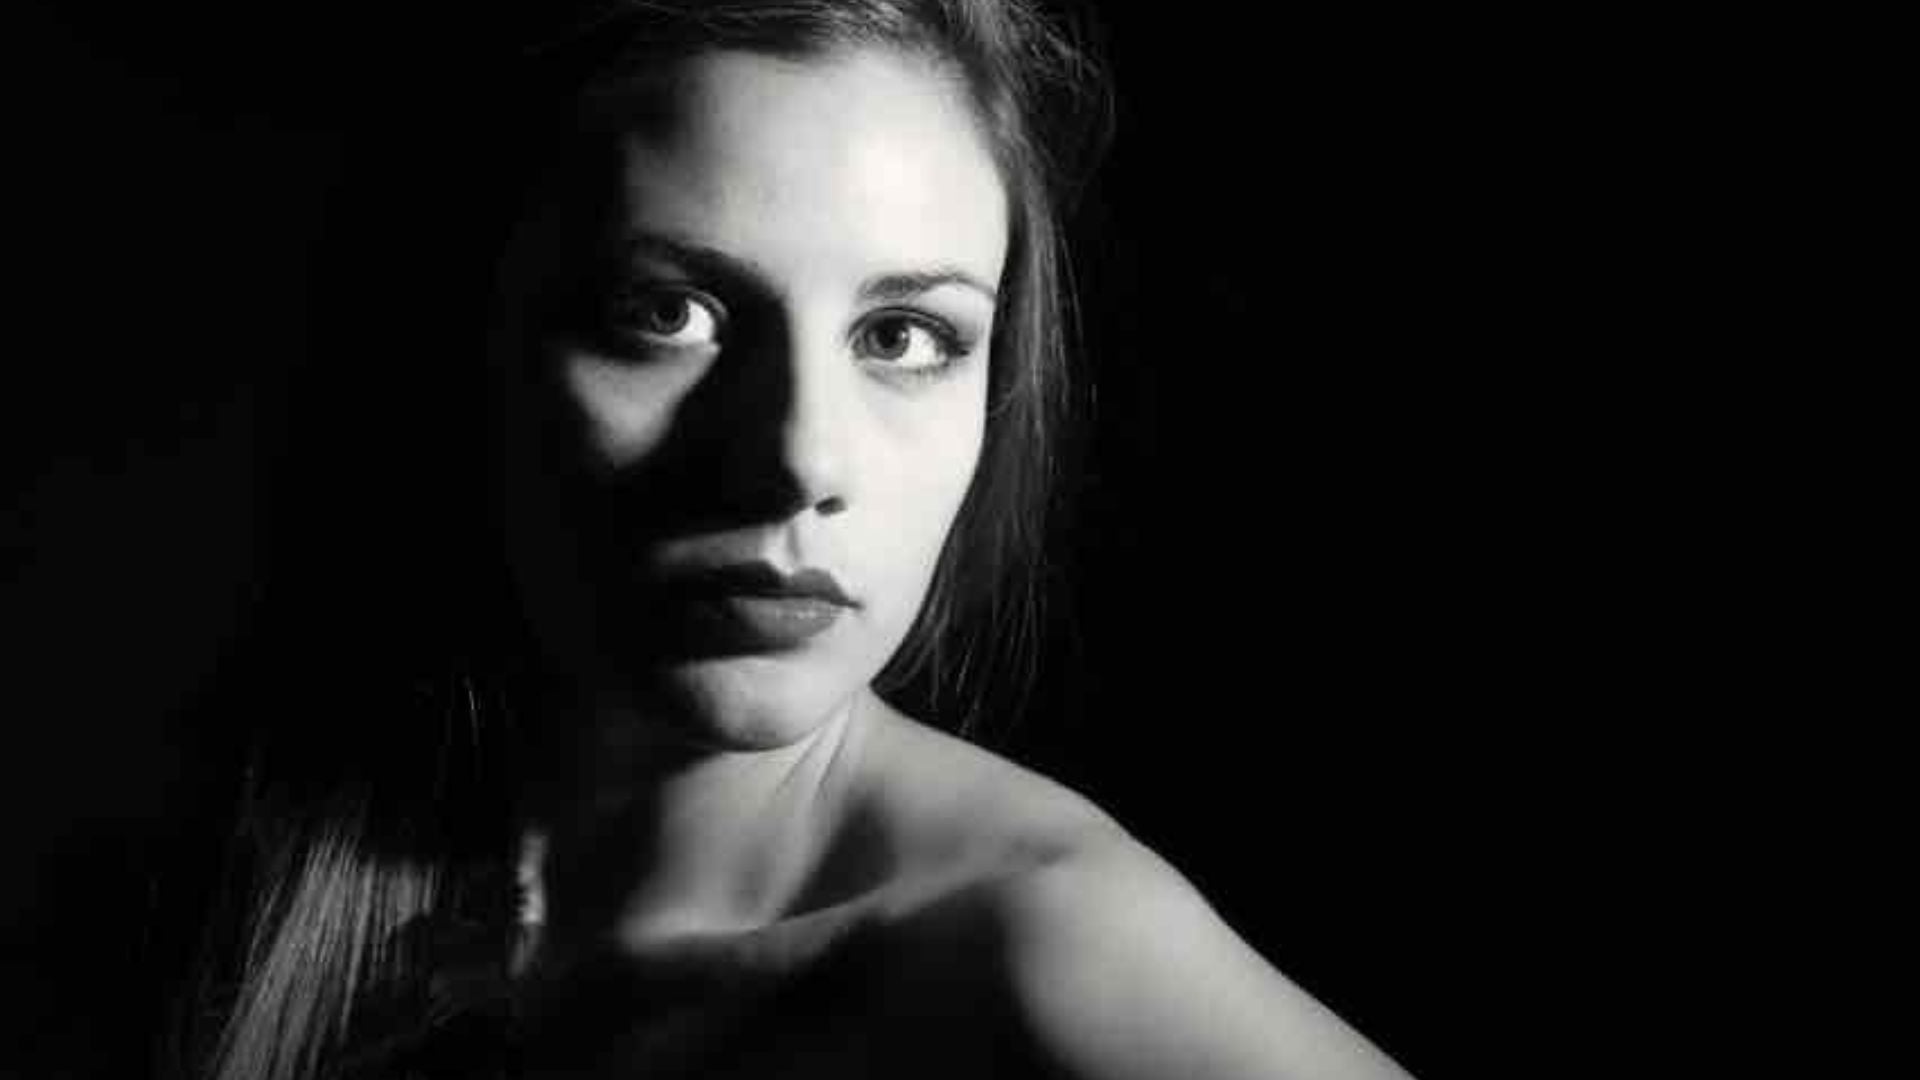
Understanding the Rembrandt Triangle
The signature of this lighting is a small triangle of light on your subject’s face. You’ll see it on the shadowed cheek, just below the eye. Your subject’s nose creates a shadow that connects with the cheek’s natural shadow.
This triangle should stay narrower than your subject’s eye. It shouldn’t go below their nose either. Many photographers tweak this rule based on different faces and artistic choices. The goal is balancing light and shadow to add dimension to your portraits.
Director Cecil B. DeMille created the term back in 1915. He was filming a movie called The Warrens of Virginia. He borrowed spotlights from an LA opera house and set them up to create natural shadows. People thought the results looked like Rembrandt’s paintings. The name stuck and photographers still use it today.
Basic Rembrandt Lighting Setup
Getting this classic look working takes just a few steps. Here’s what makes this lighting pattern so accessible for any photographer.
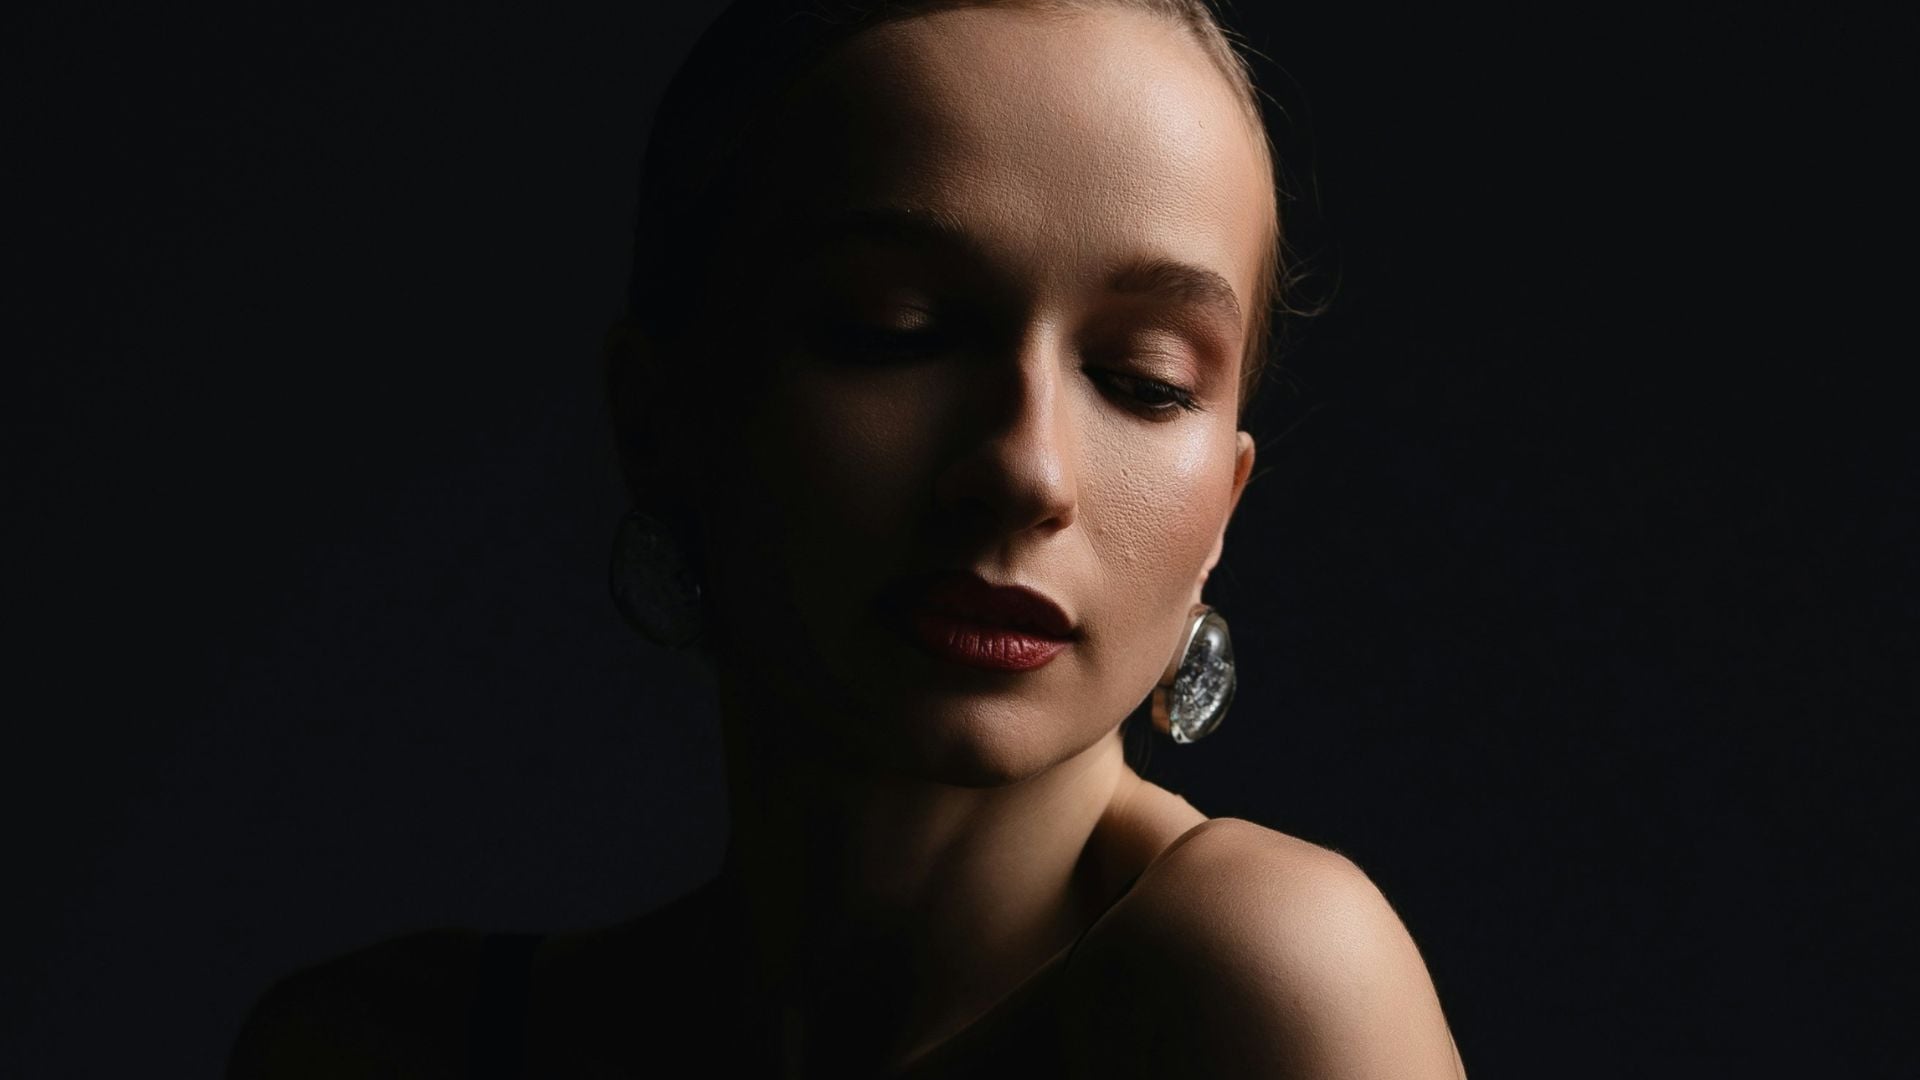
Start by putting your subject four to six feet from your background. Darker backgrounds work better because they create strong contrast. The lit areas of the face pop against the shadows.
Your key light goes at a 45-degree angle from your subject. Place it about five feet away. The light should sit two feet higher than eye level, angled down slightly. This position creates those signature shadows.
Have your subject turn their face a bit toward the light. Watch for that triangle to show up on the shadowed cheek. Small adjustments make huge differences here. Take your time getting it right.
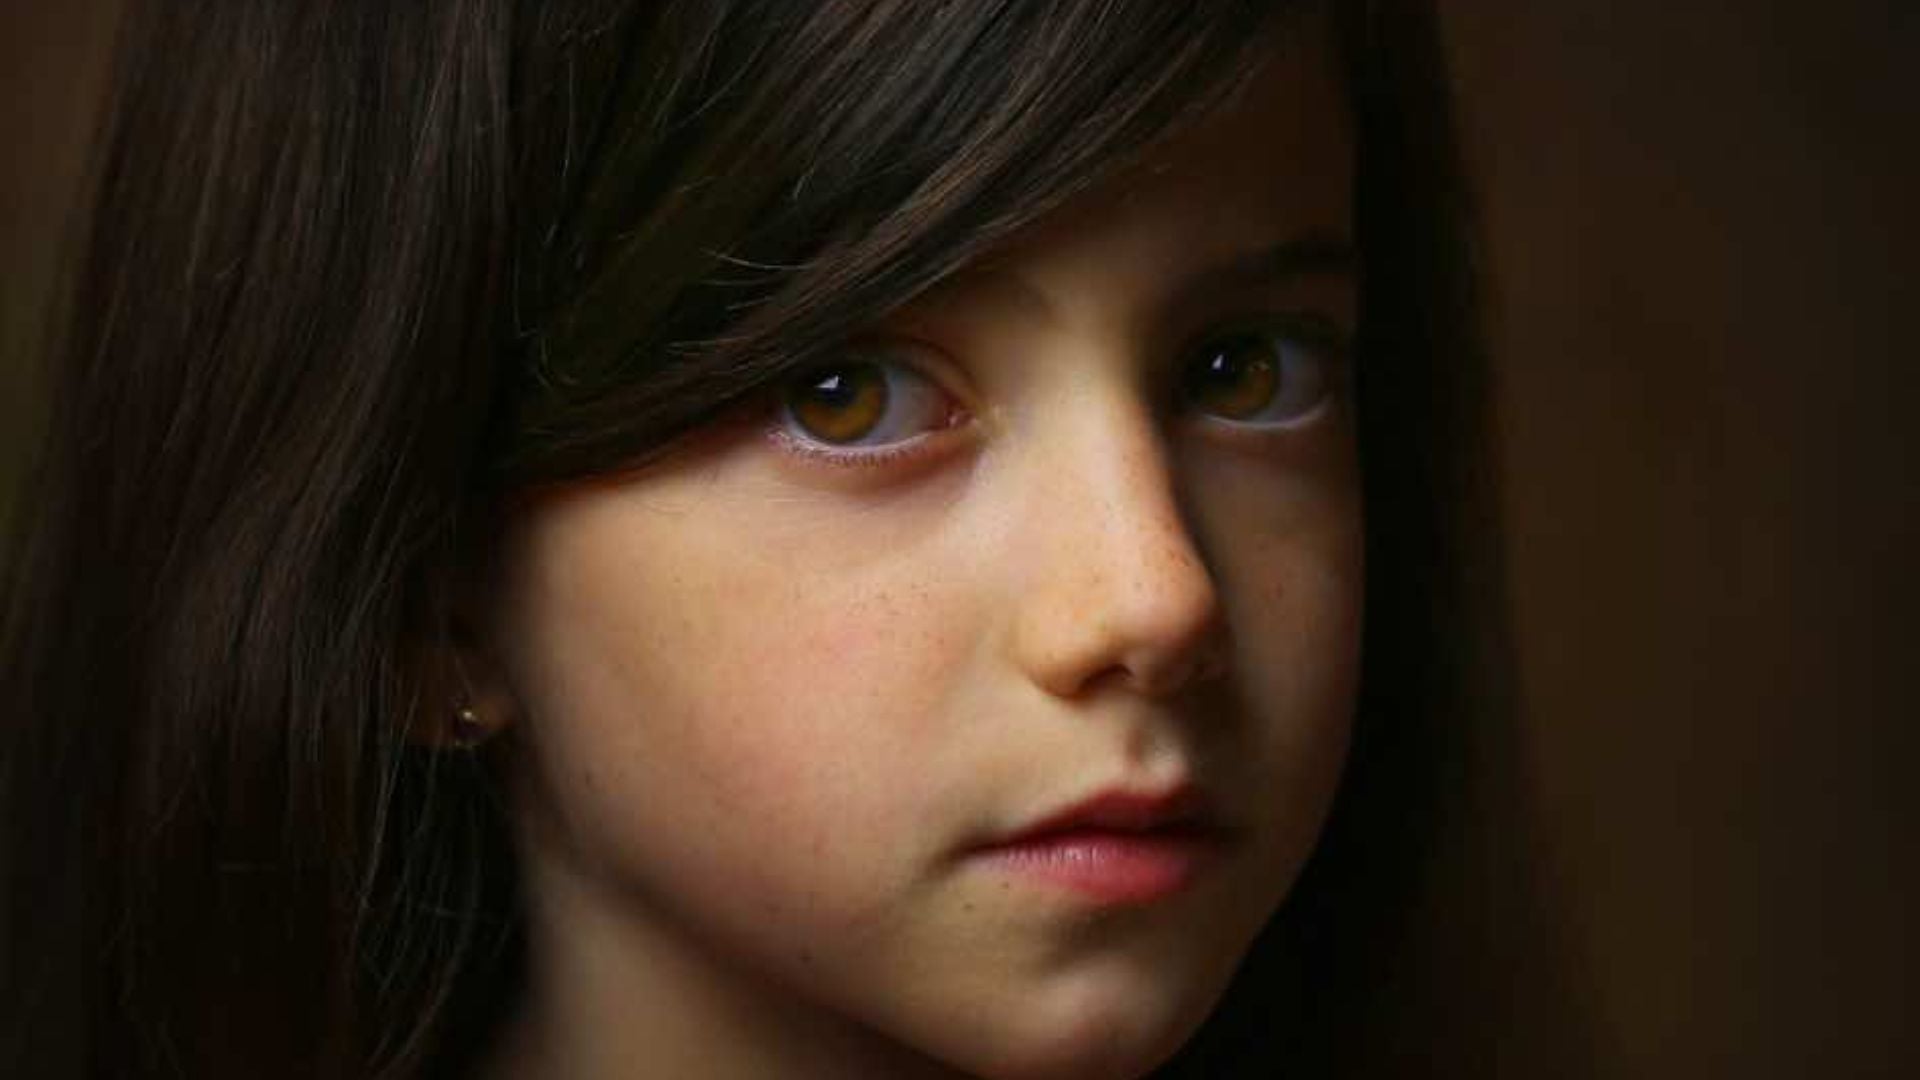
Face shape matters more than you might think. A bigger nose casts stronger shadows and makes setup easier. Flatter noses or small bridges need more careful positioning. You’ll need to fine-tune the angle to get that perfect triangle.
Working with Different Light Sources
You have tons of options for creating a Rembrandt lighting setup. The light source matters less than where you put it. Here’s how different types of lights work for this technique.
Studio strobes give you power and consistency. Flash units freeze motion and deliver the same output every time. Continuous LED lights let you see shadows before shooting. Both work great when you position them correctly.
Modifiers change how your light behaves. A softbox or umbrella spreads the light and softens harsh shadows. Smaller modifiers create harder, defined shadows. Bigger ones wrap light around your subject for gentler effects. Learning about portrait lighting patterns helps you choose the right modifier.
Natural Window Light
Windows give you amazing light for free. North-facing windows provide soft, steady light all day long. Direct sunlight works too if you soften it with a curtain.
Put your subject one to two feet from the window. Keep that 45-degree angle we talked about earlier. They should face slightly away from the window, not straight at it. The window height affects how sharp the triangle looks.
Cloudy days turn your window into a giant softbox. You get softer shadows while keeping that mood. Move your subject closer or farther from the window to control brightness. This approach mirrors what natural light photographers do outdoors.
DIY and Budget Options
Regular house lamps create this look when placed right. Hardware store clamp lights cost a few bucks and attach anywhere. Bounce them off white foam board to soften the output.
A desk lamp works perfect for practice. Set it up near a mirror and watch the shadows on your face. Move the lamp around to see what changes. This hands-on practice teaches you faster than reading about it.
You can even use DIY lighting setups with basic household items. The technique stays the same regardless of your gear.
Fine-Tuning Your Rembrandt Lighting Setup
Getting perfect balance takes some adjustment. Your first attempt might not nail it. Here’s how to tweak things until everything looks right.
Start with basic positioning. Then make small changes based on what your camera sees. Check your viewfinder often. What looks good to your eyes might need tweaking for the camera.

Adding Fill Light
Pure Rembrandt lighting creates strong contrast and deep shadows. Sometimes those shadows need detail though. A reflector on the opposite side bounces light back. White foam board or poster board works great for this.
Want to use a second light instead? Keep it at half your main light’s power. Put it opposite your key light at the same 45-degree angle. This brings out details without killing the mood. Many photographers combine this with three-point lighting techniques for more control.
Adjusting Light Distance
Moving your light closer amps up the drama. Shadows get darker and highlights get brighter. Pull the light back for softer, more even light.
Light follows the inverse square law. Double the distance and the light gets four times weaker. Understanding this helps you predict how distance affects your shot. It’s basic physics that changes everything about your images.
Camera Settings for Success
Shoot in manual mode to keep things consistent. Start with f/5.6 to f/8 for sharp focus on the face. Adjust your aperture based on background blur preference. Understanding proper exposure settings makes a big difference.
Keep ISO low to avoid grainy shots. ISO 100 to 400 works for most situations. Shutter speed depends on your light type. Flash needs you at or below sync speed. Continuous light needs faster speeds to freeze motion.

Common Mistakes and How to Fix Them
Even pros mess up this setup sometimes. Knowing what goes wrong helps you fix problems fast. Here are the biggest issues and their solutions.
Light Positioned Too Far to the Side
Your light sitting too far sideways creates split lighting instead. The face splits into two halves with no triangle. Move your light more toward the front. Keep that 45-degree angle from your subject, not your camera.
Light Too Low or Too High
Light at eye level or below won’t create that nose shadow. The triangle disappears completely. Lift your light about two feet above eye level. Angle it down toward the face.
Too high creates raccoon eyes with dark shadows. Lower it bit by bit until the triangle appears. Your subject’s eyes should still have light in them.
Inconsistent Results Between Subjects
Every face casts different shadows. What works great on one person might flop on another. Pay attention to nose shape, cheekbones, and face width. You’ll adjust for each person you shoot.
Round faces love this technique because it adds shape. Long faces might need the light moved slightly to avoid looking thinner. High cheekbones catch light beautifully and make stronger triangles. These soft lighting techniques adapt well to different face shapes.

Creative Variations of the Rembrandt Lighting Setup
Master the basics first, then start playing around. These variations keep your work fresh while using the same core principles.
Short Lighting vs. Broad Lighting
Short lighting puts the camera-side of the face in shadow. This slims faces and amps up drama. Broad lighting does the opposite. The near side gets lit, making faces look fuller.
Your camera position creates these effects. The light stays put. Move your camera to the other side and you switch styles instantly. Both use the same Rembrandt lighting setup at their core.
Adding Color
Colored gels on your fill or background lights change the mood completely. Warm amber or orange creates cozy, intimate feelings. Cool blues suggest mystery or sadness.
Keep your main light neutral for natural skin tones. Add color only to accent lights or backgrounds. This gives you options while keeping your subject looking real. Check out more dramatic lighting setups for inspiration.
Environmental Context
Classic Rembrandt lighting uses dark backgrounds for maximum drama. But you can adapt this for environmental portraits too. Just keep that key light position while showing meaningful surroundings.
A slightly brighter fill light reveals background details without losing the triangle. This works great for professional headshots where you want personality and polish together.
Rembrandt Lighting Setup for Different Spaces
You can create this look anywhere once you know the basics. Small tweaks let you work within whatever space you have.
Home Studio Considerations
Low ceilings limit where you can put lights. Can’t get a light high enough? Bounce it off your ceiling instead. Point the light up at a white ceiling. The reflected light comes down naturally from above.
Small rooms actually help with this setup. Everything sits closer together so you need less power. A speedlight or small LED gives plenty of output in a bedroom. These home studio setups work better than you’d think.
Outdoor Applications
This pattern works outside too, though you fight ambient light. Put your subject in open shade first to cut competing light. Then add your artificial light at 45 degrees.
Shoot during golden hour when natural light sits lower. Your flash needs less power to overpower the sun. The warm natural fill adds beautiful color for free.

Professional Studio Setup
Full studios give you room for background lights, hair lights, and complex setups. Start with the basic Rembrandt key light first though. Get that perfect before adding more.
Each light should do one specific job. Background lights separate your subject from the backdrop. Hair lights add dimension. But the key light creates mood, so nail it first. Understanding studio lighting diagrams helps you plan multi-light setups.
Beyond Portraits: Other Uses
This technique shines in portrait work, but the same ideas work elsewhere. Product photographers use similar 45-degree positioning for dimension.
Still life shots benefit from this directional approach too. Strong shadows and highlights reveal texture and form. Food photographers adapt this method all the time. They place key light to one side and add a reflector opposite.
Commercial work borrows these foundations constantly. Understanding how one light creates form helps you build bigger setups later. Start simple and add complexity as needed.
Mastering the Technique
Like any skill, this setup gets better with practice. Here’s how to speed up your learning curve.
Start by shooting yourself in a mirror with one lamp. Watch how moving the light changes shadows. This direct feedback teaches faster than any video tutorial. You see results instantly and adjust on the spot.
Photograph different people to see how faces affect the setup. Take notes about what works for various face shapes. This knowledge makes you faster and more confident on real shoots.
Study Rembrandt’s actual paintings for inspiration. Notice how he used light to create mood. Modern photographers learn tons from analyzing old master techniques. The principles haven’t changed in centuries.
The goal isn’t perfect shots every time. It’s understanding light well enough to create what you want consistently. Some portraits need soft, even lighting. Others need the punch that single light setups deliver.
Practical Tips for Success
Your first tries might not look perfect. That’s totally normal. These tips help you improve faster.
Test shots are your best friend. Shoot, check results, and adjust. Digital makes this free and instant. Use it to your advantage by testing often.
Talk with your subject about what you’re doing. Show them test shots so they understand the process. When they know the goal, they help you achieve it. Small movements from them can make or break the shot.
Keep gear simple at first. Master basic one-light techniques before adding more. You’ll learn more from one light than from randomly adding multiple sources.
Ready to Build Your Rembrandt Lighting Setup
This classic setup opens doors to understanding all types of light. Once you nail the basic Rembrandt approach, you’ll see light differently everywhere.
Natural light throughout your day creates similar patterns. Morning light through a window mimics this setup. Afternoon sun creates different shadow angles. This awareness improves all your photography, not just studio work.
Try breaking the rules once you know them well. Maybe your triangle goes beyond traditional boundaries. Perhaps you prefer higher contrast than usual. Your own style comes from understanding fundamentals first. Then you push beyond them and make something unique.
The Rembrandt lighting setup stays popular centuries after the painter died because it works. One light, placed right, creates portraits with depth and drama. Expensive strobes or bedroom lamps both do the job using these principles.
Start practicing today with whatever light you have. Put it at 45 degrees, watch for the triangle, and adjust. That moment when everything clicks feels amazing. And it’s just the start of your journey with light.

Darlene Lleno
Darlene Lleno brings a unique perspective to DIY Photography as someone who grew up surrounded by camera gear but chose words over lenses. With five years of writing experience, she specializes in photography content that’s both technically informed and genuinely passionate. Growing up with a photographer twin brother meant camera talk was everyday conversation in her household. While he mastered capturing moments, Darlene discovered she preferred being the subject and the storyteller behind the scenes. As a travel enthusiast and mother of two, she understands the importance of preserving life’s precious moments. When not exploring new destinations or writing for DIY Photography, you’ll find her reading or tending to her garden. Her approach to photography writing is refreshingly authentic, she may not be behind the camera, but she knows exactly what it takes to help others capture the shots that matter most.


Join the Discussion
DIYP Comment Policy
Be nice, be on-topic, no personal information or flames.