


Studio Lighting – Lighting Diagrams, Planning and Explaining
Oct 6, 2007
Udi Tirosh
Udi Tirosh is an entrepreneur, photography inventor, journalist, educator, and writer based in Israel. With over 25 years of experience in the photo-video industry, Udi has built and sold several photography-related brands. Udi has a double degree in mass media communications and computer science.
Share:
 Sometimes you want to make a diagram of your photo session. (OK, sometimes you don’t, but sometimes you do). I, for example, am going to use studio lighting diagrams for explaining about low key and high key studio setups. If you are like me, with two left hands in all that related to sketching, you are in a tight spot. When I draw (just like when I write), only one person in the world can understand what I wrote. Sadly, I have not met him yet.
So the solution to my situation is to use lighting diagrams “out of the box” with no handwriting involved what so ever. Ahhhhh…. sounds like heaven, right?
Great, how do you get one? Both Rui and Strobist have pointed out two great sources for creating lighting diagrams. One requires Photoshop and the other one is online. I’m going to show both.
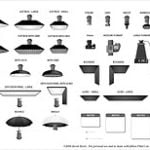
The first method involves using a Photoshop PSD file, created by Kevin Kertz, with all the studio and lighting elements you can think of: diffusers, flashes, gobos, grids, bookends, it’s all there. You start up with a nice sheet of paper and can add or remove elements. Each element is drawn in a separate layer, and you can selectively select (is that legal to say) which element to display. Check out the huge selection of lighting and studio assortments below.

You can get the PSD file right here. (Well worth the 160kb of bandwidth). If you want to learn more about what you can do with this PSD file, go and have a look at Maurice Mc Duff‘s work. I just love this guy. Not only does he share his lighting diagrams, but he also gives free studio workshops.
 Lastly, if you want to see what kind of image this setup will produce just click on the image and follow the link. Photographer Geren W. Mortensen, Jr. is sharing his setup. I recommend anyone who is practicing studio lighting to upload a scheme of their setup (it does not have to be a big bombastic Photoshop created art. it can also be a simple sketch with mspaint or sketch by hand). You will both share your knowledge and get better comments.
Another option, if you don’t want to use Photoshop (or don’t own it), there is yet a second alternative online. Scott David Garson has created the Lighting Studio 1.1 flash application, where you can place studio elements on a studio floor. You can also send your studio setup by creating a link. It has less studio accessories than the PSD file, but the major pro is that it is always accessible. One feature that I wish this gizmo had is “save to jpg file”. Other then that, it is great. And as always here is a screen shot:

So, why would you want to use lighting diagrams in the first place (and why I am telling you about them now?) I can think of two major reasons to use lighting diagrams: To plan and to share. When you are planning a photo you can use the diagrams to place your lighting materials and see all the you need and make good use of what you have. After you have taken a photo, you can use a diagram to explain how the picture was taken. See how a diagram makes the standard 3 point lighting. (if one of the diagram making solution would give a flahs presentation on te go, I’ll be the happiest man alive…)
I am telling you about this now, because I am going to be using those diagrams when explaining about high key and low key lighting schemes, and I just know that the first question that will pop is going to be “Man, how did you do those cool lighting schemes?” (Wanna make sure you catch this article? grab my RSS feed).
Relevant links:
– LightingSetup.psd.zip
– Lighting Studio 1.1
– High Key and Low Key

Udi Tirosh
Udi Tirosh is an entrepreneur, photography inventor, journalist, educator, and writer based in Israel. With over 25 years of experience in the photo-video industry, Udi has built and sold several photography-related brands. Udi has a double degree in mass media communications and computer science.


Join the Discussion
DIYP Comment Policy
Be nice, be on-topic, no personal information or flames.