


How to Create Stunning DIY Bokeh Using Everyday Objects
Oct 13, 2025
Darlene Lleno
Darlene Lleno brings a unique perspective to DIY Photography as someone who grew up surrounded by camera gear but chose words over lenses. With five years of writing experience, she specializes in photography content that’s both technically informed and genuinely passionate. Growing up with a photographer twin brother meant camera talk was everyday conversation in her household. While he mastered capturing moments, Darlene discovered she preferred being the subject and the storyteller behind the scenes. As a travel enthusiast and mother of two, she understands the importance of preserving life’s precious moments. When not exploring new destinations or writing for DIY Photography, you’ll find her reading or tending to her garden. Her approach to photography writing is refreshingly authentic, she may not be behind the camera, but she knows exactly what it takes to help others capture the shots that matter most.
Share:
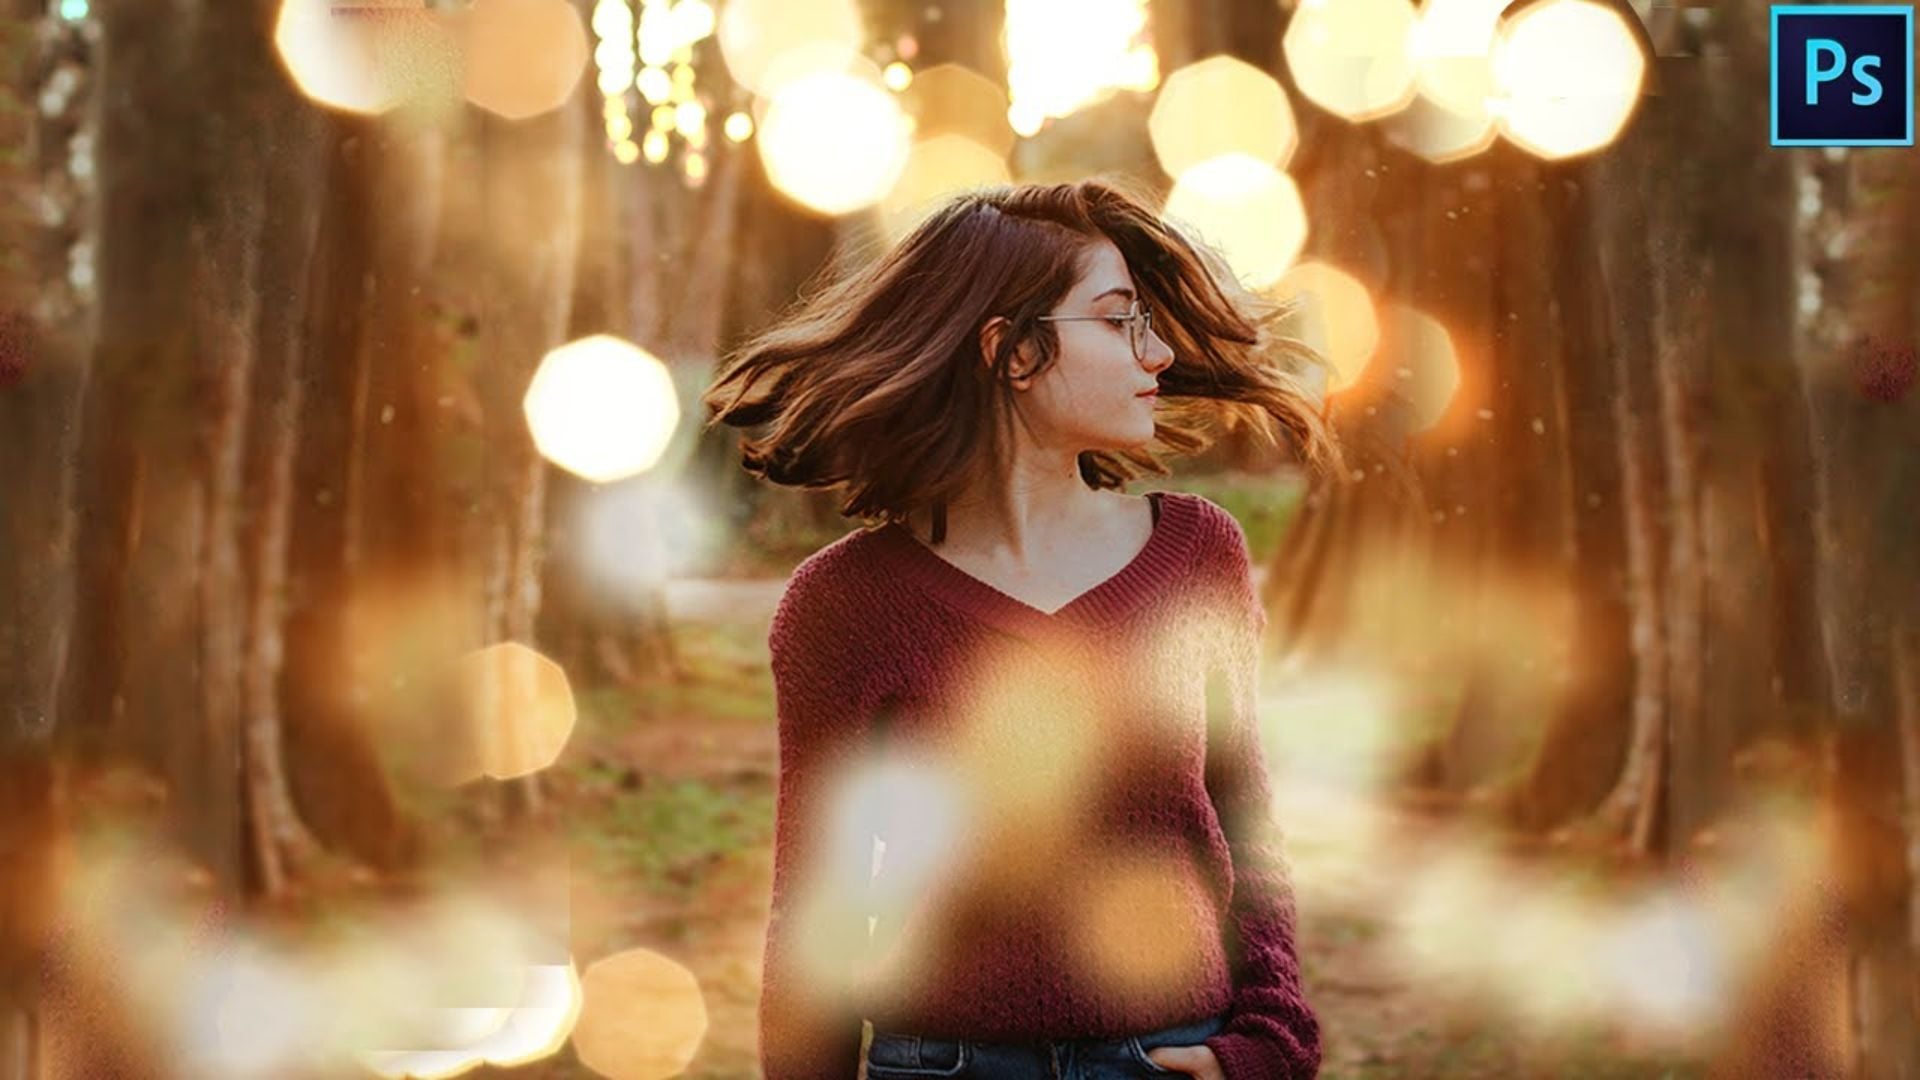
Creating beautiful DIY bokeh has become easier than most people think. You don’t need expensive lenses to get those dreamy background effects. A few household items and simple techniques can produce results that rival professional equipment.
Bokeh comes from a Japanese word meaning blur. It describes those soft, out-of-focus areas in photos that make subjects pop. While expensive lenses create smooth bokeh naturally, creative photographers found ways to make custom shapes using items from around the house.
The magic happens when you control how light enters your lens. Each bright spot in your blurry background becomes a circle or shape. Put a custom cutout in front of your lens, and those circles turn into hearts, stars, or any shape you want. The quality of bokeh depends heavily on lens construction and aperture blade design.
Read more: How to Create Stunning DIY Bokeh Using Everyday ObjectsScience Behind DIY Bokeh Creation
DIY bokeh works by changing your lens opening. Your camera’s aperture makes circular bokeh because the opening is round. When you add custom shapes, you create a new opening that changes how bokeh appears.
Several things affect your bokeh size and quality. Focal length plays a big role. Longer lenses make bigger bokeh circles. The distance between your subject and background matters too. More separation creates stronger blur and larger shapes.
Camera settings also make a difference. Modern lenses offer apertures as wide as f/0.95 to f/1.2 for extreme bokeh. Wide apertures like f/1.4 or f/2.8 create dramatic blur while maintaining shape definition. Very wide apertures might make custom shapes less sharp though.
The Role of Aperture in Custom Bokeh Effects
Getting good DIY bokeh means finding the right aperture sweet spot. Most custom bokeh works best between f/2.8 and f/5.6. This range gives you enough blur while keeping shapes crisp and well-defined.
Your lens choice affects results significantly. Modern mirrorless lenses often produce superior bokeh compared to older DSLR lenses. Prime lenses with wide apertures work better than zoom lenses. A 50mm f/1.8 or 85mm f/1.8 lens makes a great starting point for beginners trying custom bokeh shapes.
Different lenses create different bokeh qualities too. Some lenses make smooth, creamy backgrounds. Others create more defined edges around bokeh shapes. Test your lenses to see which ones work best for your projects.
Essential Materials for Creating Custom Bokeh Shapes
Building your DIY bokeh toolkit costs very little. Most materials come from craft stores, online retailers, or your house. You probably have everything you need already. Modern craft stores stock specialized materials that work even better than traditional options.
Black cardstock forms the base of most projects. The paper must block light completely. Thin cardboard works well too and lasts longer than regular paper. Construction paper also works if it’s thick enough.
Sharp cutting tools help create clean shapes. Craft knives work better than scissors for detailed cuts. Dull blades make ragged edges that show up in photos. Keep your blades sharp for best results.
You’ll also need measuring tools. A ruler helps make accurate cuts. A pencil lets you mark shapes before cutting. These simple tools ensure your shapes look centered and proportional.
Household Items That Double as Bokeh Modifiers
Creative photographers found many household items that work as bokeh modifiers. Coffee filters create soft, dreamy effects over your lens. The material diffuses harsh circles into gentle shapes.
Pantyhose stretched over lenses produces similar softening. This technique works great for portrait photography where you want flattering background blur.
Window screen material creates interesting patterns. The mesh breaks circular bokeh into tiny squares. This adds texture to your background blur in unique ways.
Plastic wrap with small holes poked through makes starlike effects. The irregular holes create varied shapes within one image. Each hole becomes a different shaped bokeh point.
Step-by-Step Guide to Making Custom Bokeh Filters
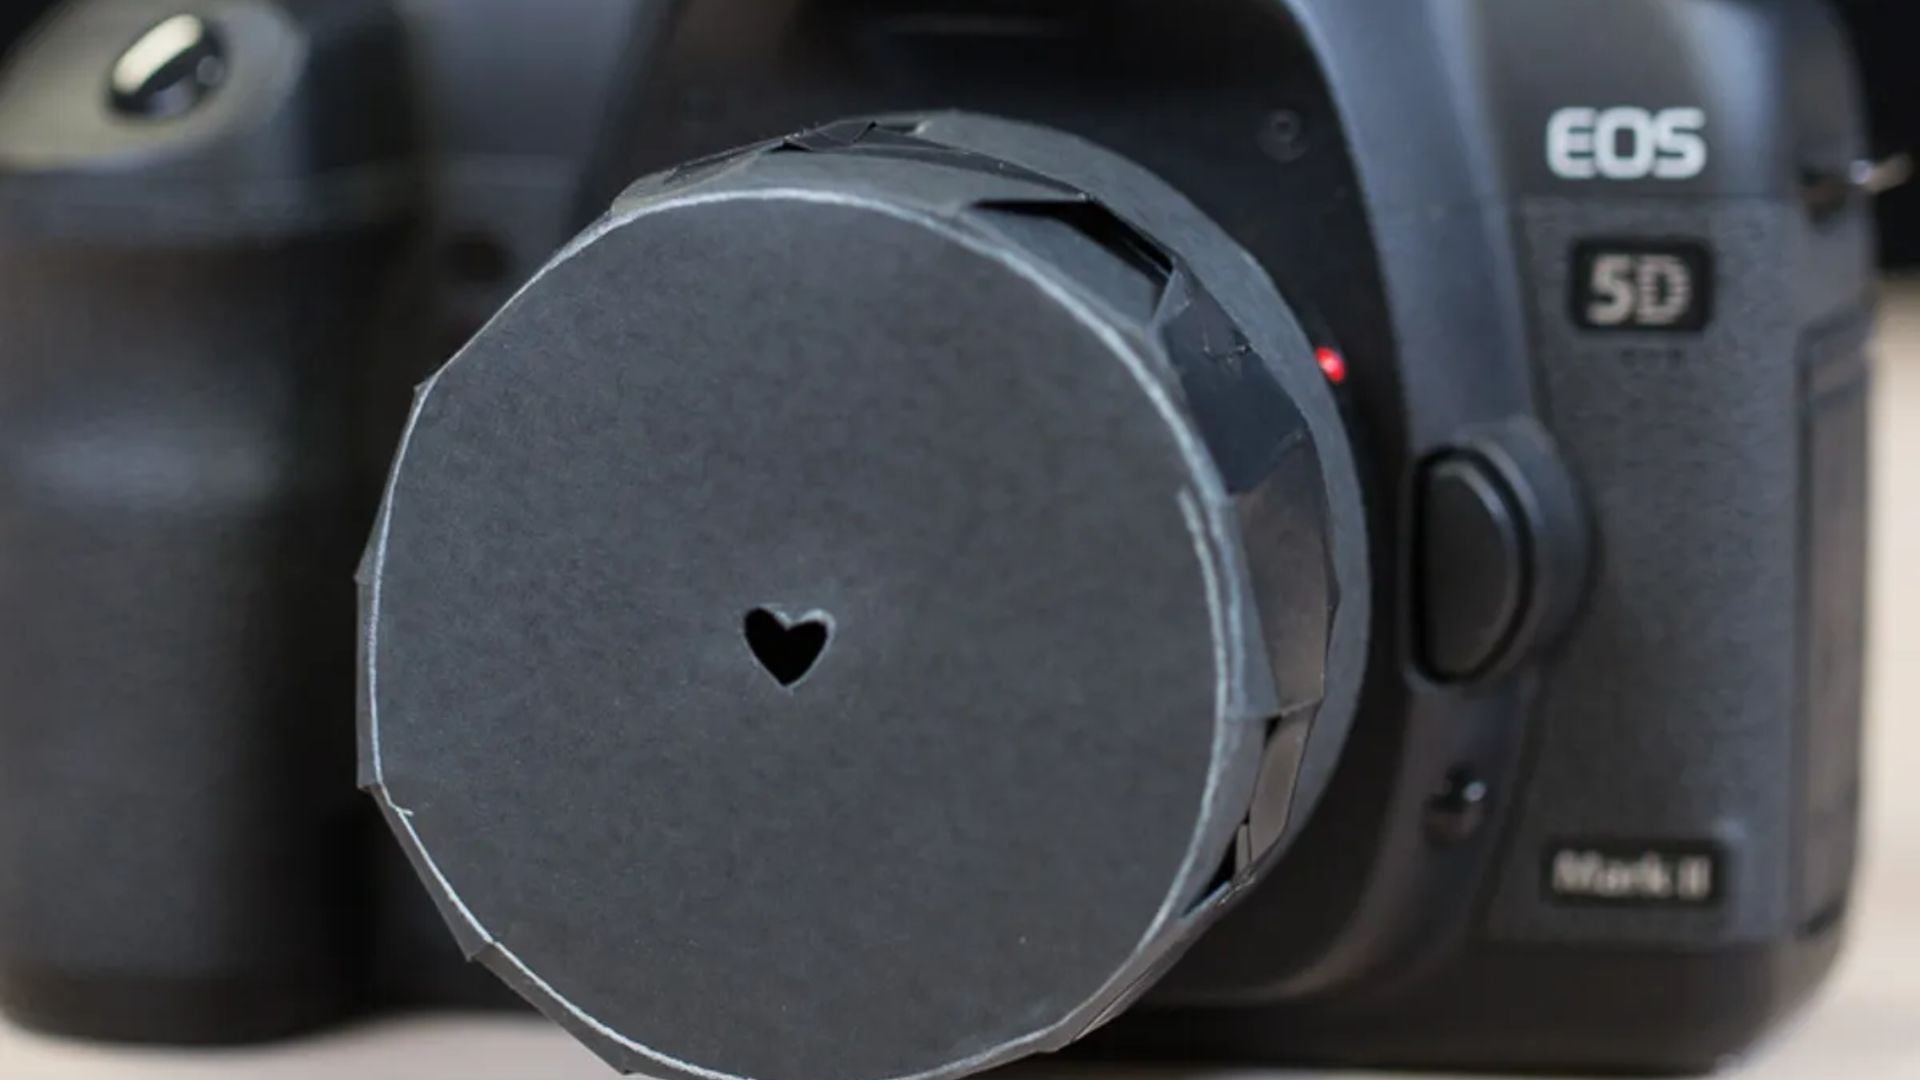
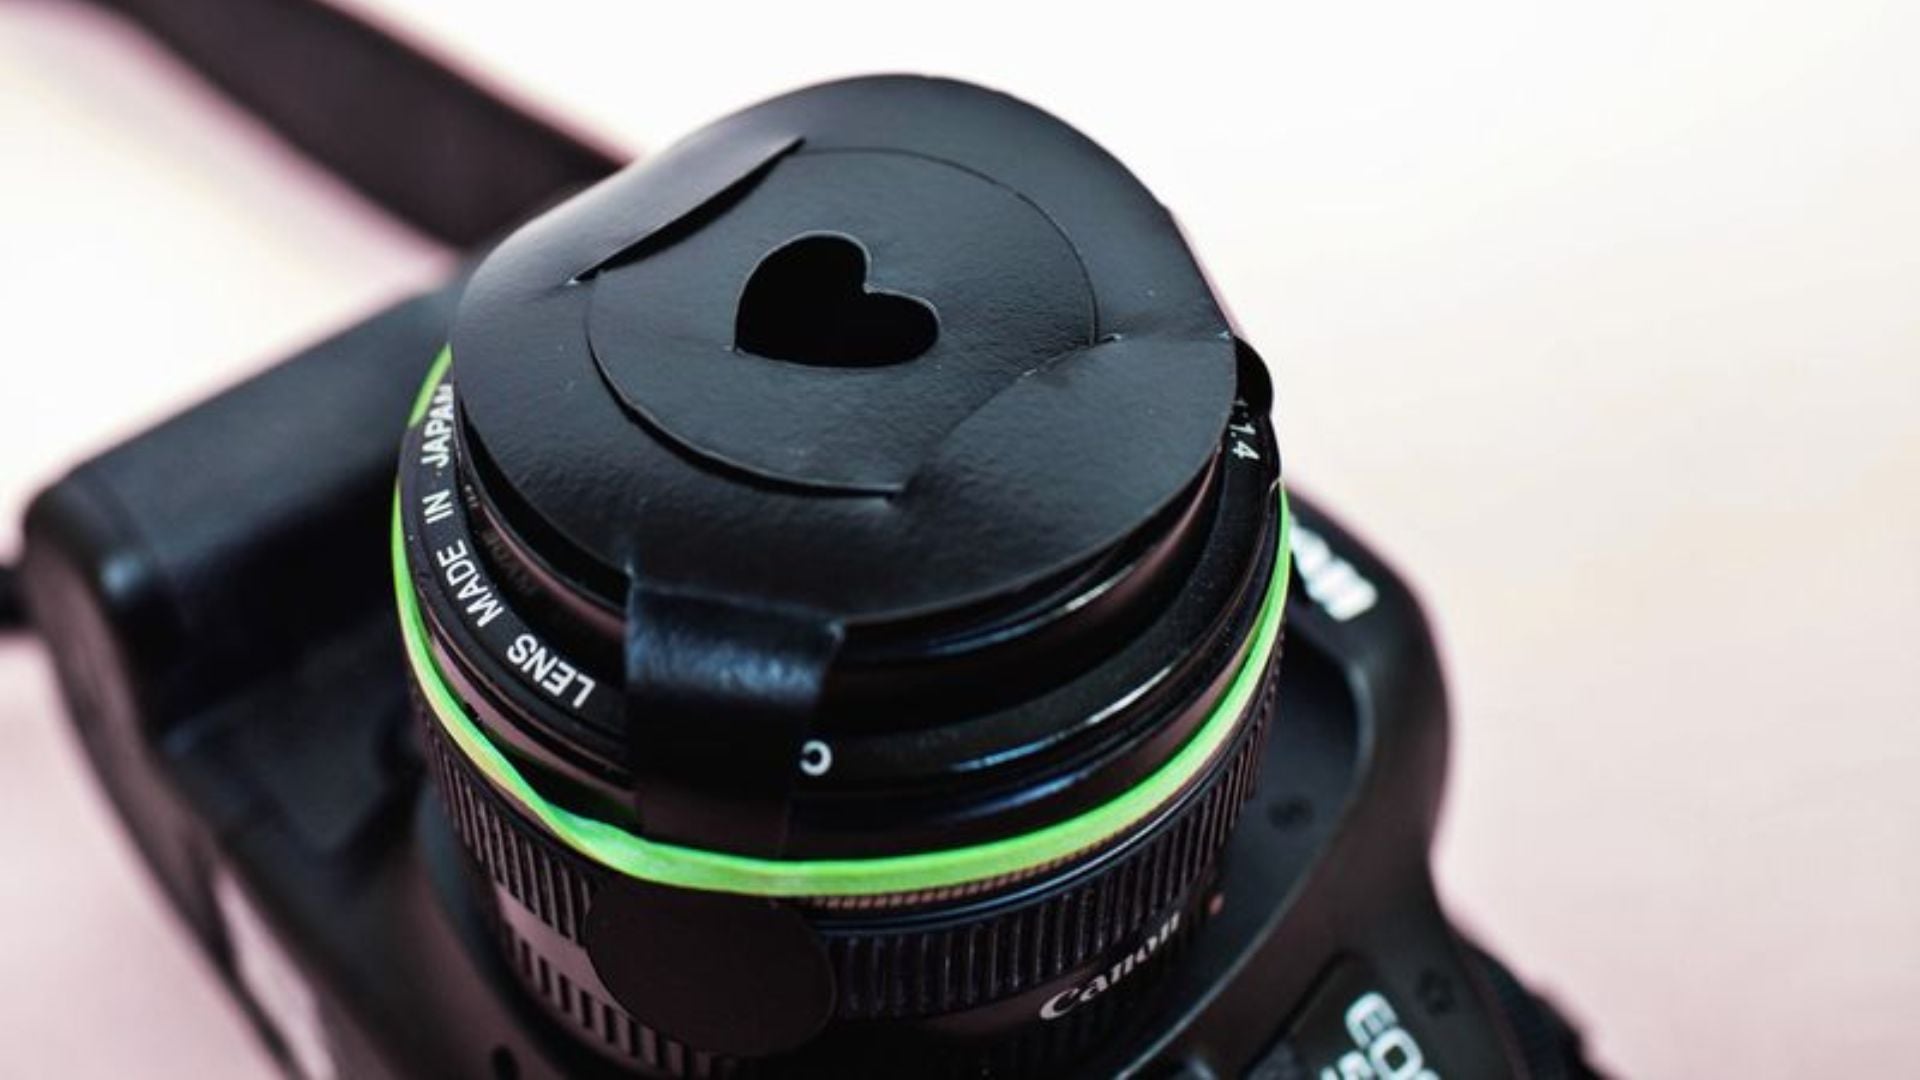
Making your first DIY bokeh filter takes just minutes. Start by measuring your lens diameter. This number appears on the front ring or in your lens specs.
Cut black cardstock into a square twice your lens width. Extra size prevents light leaks around edges. This coverage keeps unwanted light from ruining your shots.
Draw a circle matching your lens diameter in the cardstock center. Use a compass for perfect circles. Cut this opening carefully with steady hands. Clean cuts make better results.
Designing and Cutting Custom Shapes
Mark the center point of your cardstock circle. Your custom shape goes here. Keep shapes small, about one-quarter to one-third your lens opening size.
Simple shapes work best when starting out. Hearts, stars, and triangles show up clearly in photos. Complex shapes with thin lines often don’t translate well in final images.
Cut your shape with a sharp craft knife. Work on a cutting mat to protect surfaces. Take time with corners and curves. Rough spots show up magnified in photographs.
Test your cutout against bright light. The shape should open completely with smooth edges. Trim any paper fibers or rough areas before using. Clean shapes make better bokeh.
Advanced DIY Bokeh Techniques for Creative Photography
DIY bokeh goes beyond simple paper cutouts. Advanced methods create dynamic effects that look professional. These techniques take more time but produce amazing results.
Layered filters add depth to bokeh effects. Cut multiple shapes in different sizes. Layer them slightly offset from each other. This creates bokeh with multiple colors or size variations.
Color filters bring vibrant hues to custom shapes. Colored cellophane or gels behind cutouts tint resulting bokeh. Different colors in different frame areas create rainbow effects. PetaPixel’s bokeh guide explains how color temperature affects the overall mood of bokeh in photographs.
Moving filters during exposure creates motion blur within shapes. Mount your filter on a simple rotating device. Turn it slowly during longer exposures for swirling effects.

Creating Movement and Animation in Bokeh
Camera movement during exposure creates streaked bokeh. This suggests motion and energy in still photos. Use tripod-mounted cameras with stable subjects for best results.
Zooming during exposure makes expanding bokeh effects. Start your shot, then smoothly zoom in or out. This creates radiating patterns in background blur. Smooth movements work better than jerky ones.
Multiple exposures with different shapes create impossible combinations. Shoot the same scene with various custom filters. Combine images in post-processing for surreal artistic effects.
Professional photographers often use these techniques for commercial work. The results stand out from typical bokeh and catch viewers’ attention.
Troubleshooting Common DIY Bokeh Problems
DIY bokeh projects sometimes produce unexpected results. Most problems have simple solutions though. Understanding common issues helps you get consistent results.
Dark or invisible shapes usually mean insufficient background blur. Move closer to your subject to fix this. Use wider apertures or increase subject-to-background distance for more blur.
Uneven shapes often come from poor filter alignment. Center your cutout perfectly over your lens. Even small misalignments create lopsided shapes in final images.
Light leaks around filter edges ruin shots too. Make sure your filter covers the entire lens front. Tape edges if needed to prevent unwanted light from entering.

Fixing Exposure and Focus Issues
Custom filters block significant light amounts. This can cause exposure problems with your camera’s meter. Modern cameras handle high ISO much better than older models. Compensate by increasing ISO to 1600-3200 without quality loss, using slower shutter speeds, or opening aperture wider.
Focus becomes challenging with reduced light transmission. Modern mirrorless cameras with electronic viewfinders handle this better than DSLRs. Focus first without the filter attached. Then add it carefully without moving your lens position.
Manual focus often works better than autofocus for DIY bokeh shots. Modern cameras offer focus peaking, magnification, and zebra patterns for precise manual focusing. Use your camera’s focus assistance features when available. This ensures sharp subject focus despite modified light transmission.
Some cameras struggle with autofocus through heavily modified apertures. Practice manual focusing techniques to overcome this limitation. Good focus separates amateur attempts from professional results.
Professional Tips for Stunning Bokeh Photography
Professional photographers use specific methods to maximize DIY bokeh impact. These techniques separate amateur work from magazine-quality results. Small details make big differences in final images.
Background selection makes or breaks bokeh photos. Look for backgrounds with many small light sources. Christmas lights, street lamps, and sunlight through leaves work perfectly.
Subject positioning affects bokeh size and prominence. Closer subjects with distant backgrounds produce larger shapes. Experiment with different distances to find pleasing proportions.
Lighting conditions significantly impact results. Golden hour creates warm, inviting bokeh. Blue hour produces cool, mysterious effects. Harsh midday sun often creates distracting bright spots.
Composition Strategies for Maximum Impact
Leading lines within bokeh guide viewers’ eyes through compositions. Position custom shapes to support your main subject. Avoid competing with your subject for attention.
Color harmony between subjects and bokeh creates professional looks. Choose filter colors that complement your subject’s tones. Clashing colors distract from your main message.
Depth layering adds visual interest to compositions. Include foreground elements, main subjects, and custom bokeh backgrounds. This creates rich, three-dimensional images.
Many photographers overlook these composition basics. Paying attention to these details elevates your bokeh photography above typical snapshots.
Creative Applications and Project Ideas
DIY bokeh techniques offer endless creative possibilities. These applications show how versatile homemade bokeh effects can be. Personal projects and client work both benefit from custom shapes.
Portrait photography benefits enormously from custom bokeh. Heart shapes for engagement photos work perfectly. Star shapes for graduation portraits add personal touches. Holiday shapes for seasonal cards create memorable images.
Product photography uses custom bokeh for branding reinforcement. Company logos as bokeh shapes strengthen brand recognition. Seasonal symbols for holiday promotions catch attention. Geometric patterns suit modern, technical products well.
Event photographers incorporate custom bokeh to match themes. Wedding photographers use heart and ring shapes effectively. Party photographers might use birthday symbols or anniversary numbers.
Seasonal and Holiday Photography Projects
Holiday photography provides perfect opportunities for DIY bokeh experimentation. Christmas tree shapes work great for December shoots. Heart shapes suit Valentine’s Day perfectly. Pumpkin shapes add fun to Halloween portraits.
Spring photography benefits from flower-shaped bokeh. This echoes blooming gardens and seasonal renewal. Summer projects might use sun or wave shapes. These capture seasonal moods and energy effectively.
Winter photography with snowflake shapes adds magical elements. This works particularly well with backlighting and snow-covered scenes. The technique creates fairy-tale atmospheres in ordinary settings.
Sports photographers use team logos or sport-related shapes. This adds team spirit to action shots. Corporate photographers use company symbols for business portraits.

Master DIY Bokeh with Simple Household Items
Learning DIY photography techniques opens up many creative possibilities. Custom bokeh represents just one area where household items replace expensive equipment.
Consider exploring other DIY photography methods too. DIY camera accessories can save money while expanding capabilities. DIY studio setups help create professional results at home.
Many photographers combine multiple DIY techniques for unique results. Custom bokeh with homemade filters creates distinctive looks. Experimenting with different combinations leads to signature styles.
Building DIY skills also helps understand photography fundamentals better. When you create your own tools, you learn how light and optics work. This knowledge improves all your photography, not just DIY projects.
Custom bokeh creation transforms ordinary photography into extraordinary art. Simple materials and basic techniques produce results that rival expensive equipment. The key lies in experimentation and practice.
Your DIY bokeh journey starts with one custom cutout and basic light understanding. Practice with simple shapes before attempting complex designs. Don’t fear combining techniques for unique, personal effects.
Creativity and experimentation matter most in successful custom bokeh photography. Each project teaches new lessons and reveals fresh possibilities. Start making your own custom bokeh filters today and discover the magic possible with everyday materials.
The techniques work with any camera that accepts lens attachments. From modern smartphones with portrait modes to mirrorless cameras and DSLRs, custom bokeh enhances any photographic tool. Even computational photography in phones can benefit from physical bokeh modification. Your creativity limits results more than your equipment does.


Darlene Lleno
Darlene Lleno brings a unique perspective to DIY Photography as someone who grew up surrounded by camera gear but chose words over lenses. With five years of writing experience, she specializes in photography content that’s both technically informed and genuinely passionate. Growing up with a photographer twin brother meant camera talk was everyday conversation in her household. While he mastered capturing moments, Darlene discovered she preferred being the subject and the storyteller behind the scenes. As a travel enthusiast and mother of two, she understands the importance of preserving life’s precious moments. When not exploring new destinations or writing for DIY Photography, you’ll find her reading or tending to her garden. Her approach to photography writing is refreshingly authentic, she may not be behind the camera, but she knows exactly what it takes to help others capture the shots that matter most.


Join the Discussion
DIYP Comment Policy
Be nice, be on-topic, no personal information or flames.