


How to create double exposure photos on Nikon in-camera. Sort of
Jan 9, 2018
Dunja Đuđić Kalinin
Dunja Djudjic is a multi-talented artist based in Novi Sad, Serbia. With 15 years of experience as a photographer, she specializes in capturing the beauty of nature, travel, concerts, and fine art. In addition to her photography, Dunja also expresses her creativity through writing, embroidery, and jewelry making.
Share:

We’ve seen several different ways of creating double exposure photos in Photoshop. Photographer Leo Rosas shares an interesting tutorial on how to do it on a digital Nikon camera, in-camera. Well, sort of. You take the individual photos and blend them in-camera to create a RAW file. You can later fine tune it in Adobe Lightroom or Camera Raw. Take a look.
https://www.youtube.com/watch?v=dt1Q9OIih-c
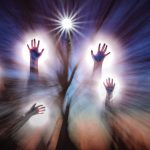
Before you take the photos, think about the scene you want to compose and create. Leo is taking double exposure portraits, and he uses white, very bright background. For this purpose, he places the first model in front of a Broncolor Octabox 150 mounted on a Siros L 800. He takes the photo of her silhouette, which will become the “canvas” for the second photo.
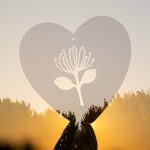
After this, it’s time to take the second photo. After you’ve taken both photos, you can now blend them in the camera. Leo uses Nikon D810 in the video. I own a Nikon D7000 and a Nikon D3000, and it works on them, too.
Go to your camera’s Retouch Menu and select Image Overlay. Here you can choose the first and the second image you want to overlay. The camera also lets you choose how strong you want each of the photos to be visible. Once you’re done with setting it up, press Overlay to view the result, and then press Save if you’re pleased with the final image. If you shoot RAW, this will give you a RAW file to work on later.


To be quite honest, I had no idea this option existed on Nikon cameras (and yes, I do feel a little stupid right now). I don’t normally use the Retouch Menu on my camera. Even when I explored it after buying each of my Nikons, I somehow missed this. I’ve only used Photoshop and the Double Exposure option on Nikon D7000 to mess with double exposures (although, I still suck at it). This option seems pretty useful and simple, and I’ll try it out. Have you used it so far? Or like me, you didn’t know it existed?
[How to shoot and create awesome double exposure portraits via ISO 1200]

Dunja Đuđić Kalinin
Dunja Djudjic is a multi-talented artist based in Novi Sad, Serbia. With 15 years of experience as a photographer, she specializes in capturing the beauty of nature, travel, concerts, and fine art. In addition to her photography, Dunja also expresses her creativity through writing, embroidery, and jewelry making.


Join the Discussion
DIYP Comment Policy
Be nice, be on-topic, no personal information or flames.
11 responses to “How to create double exposure photos on Nikon in-camera. Sort of”
No, I don’t own a Nikon, but my Olympus OMD cameras do it better.
I’m curious to know how better it does it?
It’s in the result or the process?
The OMD cameras allow you to combine two or three images at once, and the resultant image remains a raw file so it can then continue to be combined ad infinitum. You can vary the exposure in the images to be combined from +10 to -10, and once the combination is made you can apply Art Filters to the file, making amazing variations on it, again while leaving the raw file untouched. It’s a lot of fun.
The picture below took about ten seconds to make. https://uploads.disquscdn.com/images/cc6031e863f897a0814a67aa520206c3467b10232d3f1c2fc9ac4655561445f3.jpg
Apt name for someone who looks so spastic.
Only tried it couple of times but if I recall correctly, you can see the image in the viewfinder youre trying to overlay on top of another one. Just sold my Olympus so cant check. ?
Niklas Isberg You can also overlay images taken at different times. I like to keep a few moon pics in raw format on my sd card in the camera so I can make interesting overlays anytime I feel like it.
I just created this a few minutes ago. The overall picture was taken earlier this afternoon, and the moon, back in September. Not a great picture, but an example of what you can do.
^^ pretty cool.
A lot of Nikon cameras can do the old style double exposure but that replies on the second image being taken immediately after the first one. This gets around that issue. The Canon cameras that allow for double exposure let you select the first image before you shoot the second.
Another quick picture combined in my Olympus E-M1.
THANK YOU!!
Was searching of a way to do double exposures on my Nikon D3300 using my Cokin filters I’ve had for years (for my old 35mm SLR).
Will be sharing this info far & wide.