


How to turn toy action figures into life sized super heroes with compositing
Apr 1, 2016
John Aldred
John Aldred is a photographer with over 25 years of experience in the portrait and commercial worlds. He is based in Scotland and has been an early adopter – and occasional beta tester – of almost every digital imaging technology in that time. As well as his creative visual work, John uses 3D printing, electronics and programming to create his own photography and filmmaking tools and consults for a number of brands across the industry.
Share:

We’ve all been there, playing with our action figures as kids as if they were real. For me it was He-Man. For photographer Ari Mahardhika, it’s the characters of Marvel Universe, but just playing wasn’t enough.
In this amazing series of images, Ari has brought these action figures to life, using a selection of techniques to photograph and composite them into real world scenes.
DIYP spoke to Ari to get a little more information on how these images came to be.
I’m an Indonesian designer based in Hong Kong and I have been an enthusiast photographer since 2005. I love how photography could have a powerful emotional impact on viewers. Also how photography balances between our technical knowledge and artistic side.
I’m still learning today. There’s always something new to learn about photography and I want to experiment with all types of photography as much as I can.
This is what’s been keeping me going to take photos and creating images. There are so many amazing photographs and images out there that I could easily get inspired by.
Much of Ari’s photography is centred around people and places, a far cry from Super Heroes. We asked him about his inspiration for this project.
I love creating images, whether its people, nature, buildings or still life. And I’m still learning photography so I don’t want limit myself to one type of photography or label myself as a particular type of photographer. At least, not yet. I can always learn something new by exploring different kind of photography. The subject can be anything but the principle is the same, for example with lighting, and composition. I can always apply the experience and knowledge from one to another type of photography.
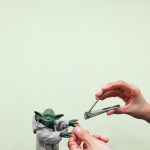
Aside from the recent Avengers movie, I shot these figures was simply because I wanted to learn how to create a dramatic scene by experimenting with light and smoke effect. But instead of using real life person I want to do it in a smaller scale first, sort of like doing a test shoot before an actual photo shoot. I have a friend who is an action figure collector and he owns Hulk and Ironman’s Hulkbuster action figures. I’m a big fan of these characters, and since I have not done this before, so I thought it would be exciting to experiment. It’s also a way to challenge my photography skills and be creative.

To create these images, Ari uses a Canon 5D Mark III mounted on a tripod with a 50mm f/1.4 lens and a 580EX II speedlight, triggered with a remote shutter release.
When creating composite images, there are a number of things that one needs to think about and plan for. We asked Ari how he prepared for shooting these images.
I paid an extra attention to these factors:
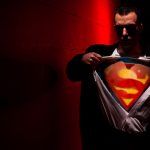
- Angle of view. In ‘reality’ these characters are taller than people so I shot them from about their hip level to get the “human eye” level view, but it doesn’t mean I need to always shoot it this way. Some of them were taken in high angle to give different vantage point and blended with a background image that would match the angle.
- Depth of Field. I use large depth of field with small aperture (f/8) to give the impression as if they were large scale figures. It’s basically the opposite principle of tilt shift effect where shallow DOF is used to create miniature effect.
- Sense of scale. Using background image with familiar size elements so the figures can be compared against and suggest the figures size (eg: lamp posts, trees, streets, cars, etc).

All images were taken with the light coming from the top and slightly behind the figures to create a more dramatic lighting and look for the background images in my library later (or shoot a new background if necessary) that would match the direction of the light. One important aspect in relation to the light is the shadow. I wanted to create textured shadow by using crumpled brown paper wrap to make the shadow look more realistic when blend with the ground.

Like many of us, Ari’s post processing workflow starts in Lightroom, and he went into elaborate detail explaining to DIYP how these images were treated once on the computer.
I always start with Lightroom when processing my photographs, mainly to achieve higher dynamic range by bringing out more details in the highlight and shadow areas. I use Photoshop for the creative part such as layer blending, dodging and burning, masking, cloning, etc., to create the composite and all the necessary process to make the image looks realistic.

Photos from camera are fine-tuned in Lightroom and were shot at f/8. 1/60 sec, ISO 100, at 50mm. A flashgun with a snoot sits on top (and slightly) behind the figures at full power. The smoke diffused the harsh light and captured the ray of light coming from above. The black backdrop was used to create the contrast between the smoke and the background.

The background image I selected from my image library f/11, 1/125sec, ISO 100, at 50mm. The trees and grasses act as elements to suggest the size of the figures at the human eye level.

I created a duplicate of the figures image and placed on top of the background layer using Hard Light blending.

White Layer mask is added to slightly bring back the background in the dark area by repeatedly erasing the layer with 50% opacity.

A layer was added between the figures and the background to remove the background image from the figures. For darker areas I used white/light grey paint brush, for bright areas I use black/dark grey paint brush. I used 100% brush opacity and start from the middle area and work my way through the edges with lower opacity and smaller brush and applied them repeatedly until I get the desired look.

This is how the layer looks like without the figure. There are other ways to achieve this properly with a more advance masking technique but I found this technique to be working very well with the images I’m using, especially with isolated lights, smoke, and relatively dark background image.

Additional light were added for the Hulkbuster.


The light bulb was created using a white paint brush 100% opacity and edge hardness of 30-40% (left) and removed unwanted light with erase tool with relatively the same brush setting (right).

The glow was added by increasing the brush size to about 370-380px and bring down the opacity to 25%. The brush size varies depending on the file size. My image is 5760 x 3840 pixels.

A grunge texture was added to create dust/dirt effect with Overlay blending and 40% opacity.

The texture used for this image.

A closer look after the texture was added.

Here I merged all layers and did the final tweaking. More contrast was added between light and shadow area using dodge and burn tools, removed unwanted artifacts and some of the joints using clone tools, and adjusted the white balance to a warmer color using color balance adjustment tool, and slightly brought down the saturation to give a filmy look.
When shooting things like this, there are obviously some great challenges, and you learn a lot each time you do such a shoot, whether it’s a new technique or just a way to make your workflow a little more efficient. Ari told DIYP about some of the challenges and things he learned from this project.
I wanted to make it more about photography than digital image/art. I wanted to get the images right in camera as much as I could to minimize the retouching and the number of photos use in the composite. For example I prefer to shoot these figures in one frame rather than separately and merged them in Photoshop. I would rather find a background image with a car in it rather than using a picture of an empty street and add the car image later in the post, or adding clouds when the sky was actually flat. While the contrary approach allows more flexibility, it would require more time in the post.
Getting most of shots right in camera would make the post processing a lot easier and faster, and the photography part more exciting and challenging. This also would make the image to look more realistic. Creating these images was also challenging because I need to think about the size of light, angle of view, and the technical aspect such as the aperture setting to get the right depth of field.

Shooting smoke was also challenging. It was very difficult to control the composition, hence shooting a few extra shots would come in handy later in the post. Adding the smoke effect in the post is possible but it’s good to have a reference from the actual image so the composite would look realistic.
Every type of photography has its own challenge and attraction/charm/appeal. The more we shoot, the more experienced and creative we become to solve problems and achieve the best outcome in any situation.
Many thanks to Ari for giving us his time and going into so much detail, and I’m looking forward to see what’s in store next for this project.
You can see more of Ari’s work on his Flickr profile, or reach to him via Facebook.
Filed Under:
Tagged With:

John Aldred
John Aldred is a photographer with over 25 years of experience in the portrait and commercial worlds. He is based in Scotland and has been an early adopter – and occasional beta tester – of almost every digital imaging technology in that time. As well as his creative visual work, John uses 3D printing, electronics and programming to create his own photography and filmmaking tools and consults for a number of brands across the industry.

Join the Discussion
DIYP Comment Policy
Be nice, be on-topic, no personal information or flames.
2 responses to “How to turn toy action figures into life sized super heroes with compositing”
this is so cool~
https://www.youtube.com/watch?v=qK_SMutW8eM
Hulkbuster VS Hulk :)
And, this is awesome tutorial, thanks :)