


How To Take a Selfie With the Milky Way
Share:
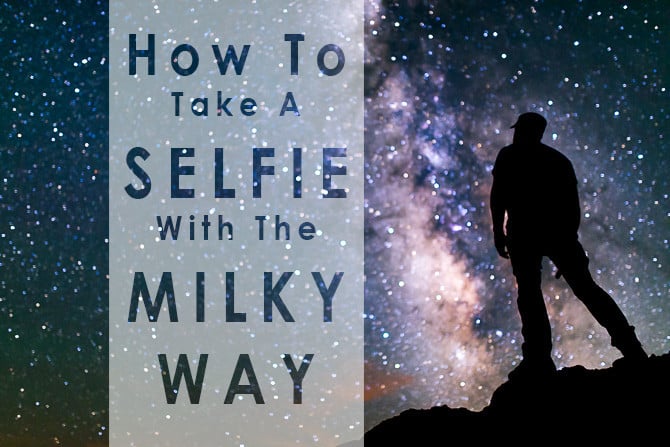
If you always wanted your very own selfie in front of the Milky Way – its actually not that hard to do!
Here’s what you need:
- DSLR camera with good high ISO performance.
- Fast, sharp wide angle lens.
- Tripod.
- Remote shutter release.
- A wide open really dark location.
- Lightroom or Photoshop for post-processing.
Continue reading and I’ll tell you how I took these Milky Way selfies step by step.
Step 1: Go Somewhere Really Dark and Find the Milky Way
I was in the Bisti/De-Na-Zin Wilderness Area in New Mexico for these photos. It was dark, but there was still some light pollution from nearby ranches.
If you can see the Milky Way, you’re good.
If you’re not sure where to look, a mobile phone app like the Stellarium Mobile Sky Map is a lot of help (and fun for finding constellations too).
The location of the Milky Way changes depending on the time of the year, as does its location in the sky throughout the night.
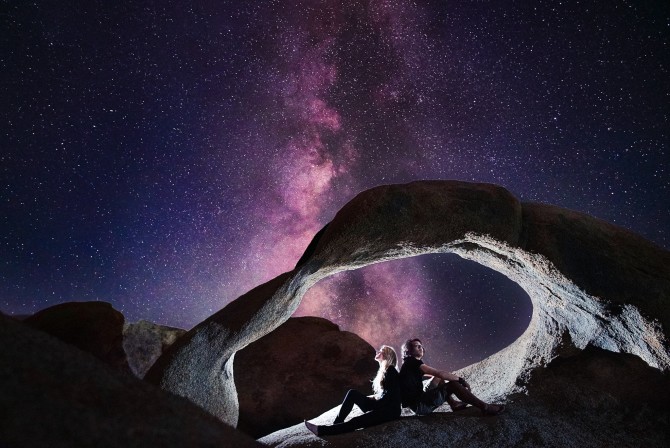
If you want a silhouette in front of the Milky Way, like in these photos you will need to find a high point to stand on so that you can shoot up towards yourself and the sky.
Usually, you’ll also get the best photos if there is no moon – or after the moon has set.

Step 2: Set Up Your Camera
You will need a sturdy tripod and a remote shutter release to take photos of the Milky Way.
(I use a Vello Wireless ShutterBoss – its affordable, reliable and you can use it as a time lapse intervalometer too.)
Once you have your camera set up, you will need to focus your lens.
You have two choices – you can focus on yourself, or you can focus on the night sky.
(Depending on how far away you are from your camera and the focal length of the lens you are using, this may or may not matter – because once you are past the hyperfocal distance of your lens, you will be focusing to infinity anyway).
To focus on yourself, stand where you are going to stand for your photo, shine a flashlight on yourself and half press the shutter release to focus normally.
To focus on the night sky, you can either manually focus your lens to infinity – or you can focus on something bright and far away (like the moon, or the horizon earlier in the day).
If it is sufficiently dark to photograph the Milky Way, you won’t be able to focus on something far away at night – so you can always do this earlier in the day.
Once your lens is focused – switch it to manual. You don’t want your camera to try and re-focus after every shot.

Step 3: Camera Settings
I took these Milky Way photos with a Nikon D800 with a Sigma 35mm f/1.4 ART series lens.
My camera was set to ISO 3200, f/1.4 with a 15 second exposure.
For photos of the Milky Way, these settings should get you close. You want to slightly overexpose your Milky Way photos (if your gear will let you do that). Starting from a slightly overexposed Milky Way photo works much better in post processing and results in a lot less noise versus trying to increase the exposure in post.
If the fastest lens you have is a f/2.8 or slower, you will have to increase your ISO and exposure time to compensate.
For f/2.8 I usually use ISO 6400 and 20 seconds (not quite a full two stops of extra light, but close).
Step 4: Get Into Position and Stand Still
Now that you’ve got your camera all set up and ready to go, all you need to do is stand in the right place and take the shot.
If you don’t have someone to help you out, it might take a few tries to stand in the right place, but it shouldn’t be too hard to figure out.
The hardest part is trying to stay perfectly still for the duration of your exposure.
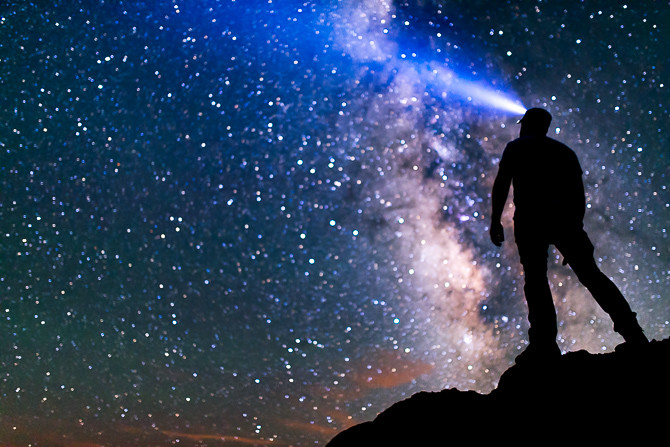
I find it helps to stand in a comfortable pose that’s not off balance or awkward. I also hold my breath for the duration of the shot.
While you’re at it – try some light painting! Just remember, your camera is set to capture a very dim scene – so only a little light is needed (a bright LED flashlight will nuke your scene).
This photo was taken with the home screen on my mobile phone dimmed in energy saving mode.

Step 5: Post-Processing With Lightroom or Photoshop
Post-processing astrophotography can be quite involved – especially if your scene is underexposed and you are trying to get rid of noise after boosting the exposure in post.
However, all of the images in this post were processed from single exposures using Lightroom.
Every image will be different, but here are the Lightroom settings that I used for these images:
- Temp: 4000
- Tint: +31 (The white balance of Milky Way photos is very touchy – set yours to taste).
- Exposure: -0.25
- Contrast: 0
- Highlights: -16
- Shadows: 0
- Whites: +57
- Blacks: -100
- Blue Hue: +14
- Sharpening: 25 with a 98 mask
- Noise Reduction: 44 Luminance
- Lens Profile Correction Enabled
- Dehaze: +30
Try It Yourself
Now you should know everything you need to go out and take your own Milky Way selfies – good luck!
Update
If you want to step up your game, check out this amazing Milky Way selfie by Ben Von Wong.
On his facebook page, Ben explains the technical details:
Lit with a combination of headlights and flashlights – yet another shot of our selfie series with the #SonyA7r triggered with the Playmemories App.
2 shots, One for the background and one for the foreground, not because of lighting but because of focus. You can’t have shutter longer than 20-sum seconds without the stars blurring so u need to shoot wide open!
Filed Under:
Tagged With:

JP Danko
JP Danko is a commercial photographer based in Toronto, Canada. JP can change a lens mid-rappel, swap a memory card while treading water, or use a camel as a light stand.
Related Posts
 You Don’t Need A Selfie Stick To Take A Selfie In Space
 Half of Selfie-Related Deaths Worldwide Were in India; “No-Selfie Zones” Proclaimed
 India proclaims “no-selfie zones” to reduce selfie-related deaths at tourist spots
 Vivo V21 targets selfie-shooters and vloggers with optically stabilised 44-megapixel selfie camera
Join the Discussion
DIYP Comment Policy
Be nice, be on-topic, no personal information or flames.
9 responses to “How To Take a Selfie With the Milky Way”
Will definitely try this!
Q: I set the self-timer on a camera, stepped back five feet, and it took my photo.
A: That’s in the selfie family, but isn’t a pure selfie. Consider it a self-portrait.
http://www.nytimes.com/2015/07/22/opinion/is-this-a-selfie.html
hahaha – that was a fun read – so yes, technically a self portrait with the Milky Way…but the kids today, we need them to click on headlines – they’re all about selfies (of course most of them probably don’t have a DSLR, but that’s another story :)
Thought this was cool Bri Zelda
Yawn!
A New Way to Capture Your Moments
Easily and creatively be a part of your pictures.
search for “Tagmoment app” for more details
I have already taken the shot of Milky Way but when I try to combine my silhouette photo, it comes out very very blurry. Do you have any tips? The background doesn’t get so bright as yours(I used stacking method to get Milky Way) therefore my silhouette isn’t as impressive as yours. And no matter how still I try to stand, there is always some form of movement and hence the picture turns out to be blurry. Will it help if I try to stand in front of a full Moon?
these photos are composites made from several images stitched together in photoshop…..
If you don’t mind me asking.. how far away are you from the camera.. I know that depends on the focal length but in general.. how far were you from the camera?