


Master How to Resize Image in GIMP: Desktop, Web & Mobile
Nov 18, 2025
Darlene Lleno
Darlene Lleno brings a unique perspective to DIY Photography as someone who grew up surrounded by camera gear but chose words over lenses. With five years of writing experience, she specializes in photography content that’s both technically informed and genuinely passionate. Growing up with a photographer twin brother meant camera talk was everyday conversation in her household. While he mastered capturing moments, Darlene discovered she preferred being the subject and the storyteller behind the scenes. As a travel enthusiast and mother of two, she understands the importance of preserving life’s precious moments. When not exploring new destinations or writing for DIY Photography, you’ll find her reading or tending to her garden. Her approach to photography writing is refreshingly authentic, she may not be behind the camera, but she knows exactly what it takes to help others capture the shots that matter most.
Share:

Learning how to resize images in GIMP can save you time and frustration when preparing photos for different uses. This free image editor offers powerful tools that work across multiple platforms. You can adjust image dimensions, maintain quality, and optimize files for web or print in just a few clicks.
GIMP provides two main resizing methods for desktop users. The Scale Image dialog offers precise numerical control, while the Scale Tool lets you adjust dimensions visually on canvas. Each method suits different workflows and skill levels.
Getting your image dimensions right becomes especially important for print work. Our free print size calculator takes the guesswork out of determining optimal pixel dimensions for any print size. The tool helps you avoid quality issues before you resize and export your final images.
How to Resize Images in GIMP on Desktop
Desktop GIMP offers the most complete feature set. The software works on Windows, macOS, and Linux systems without any cost.
Method 1: Using the Scale Image Dialog
This approach works best when you need exact dimensions. Web designers and print professionals rely on this method for accuracy.
Step 1: Open Your Image
Go to File > Open and select your photo. The image appears on your canvas ready for editing.
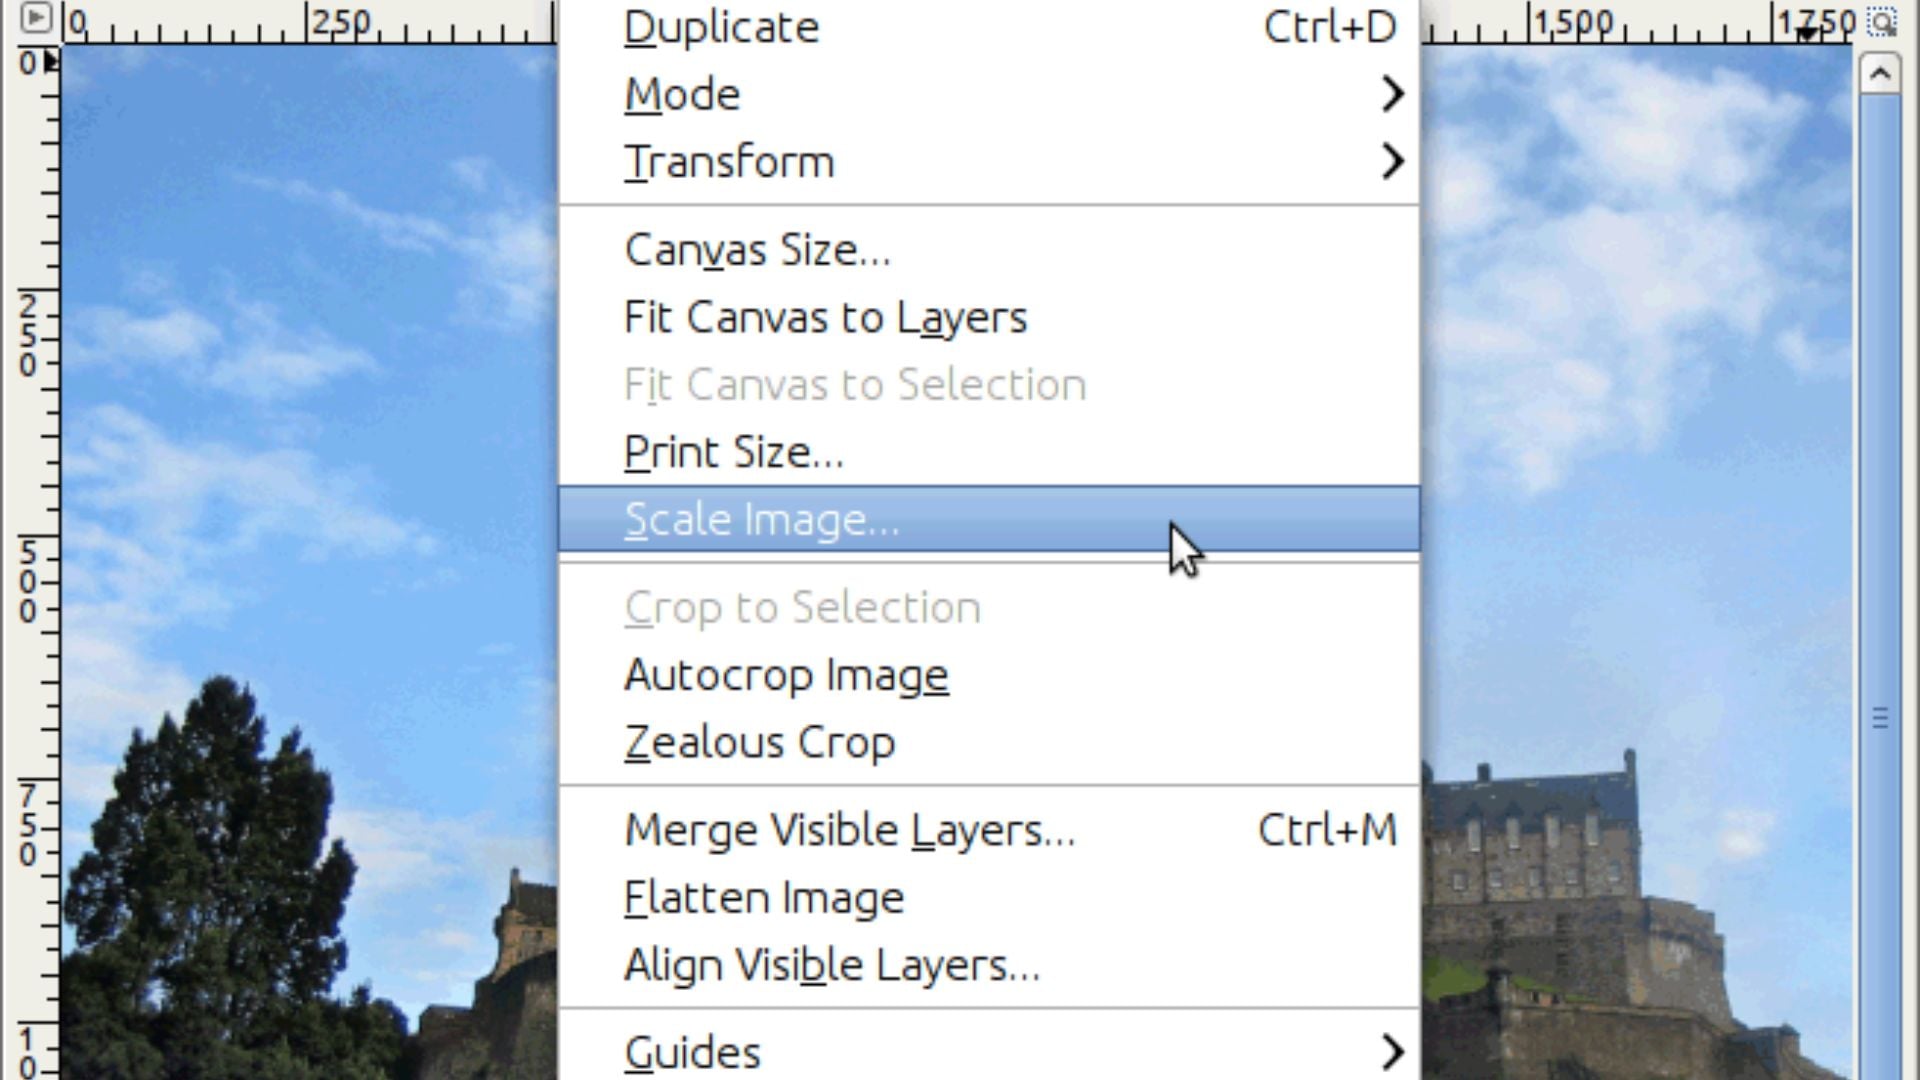
Step 2: Access the Scale Image Dialog
Navigate to the top menu and select Image > Scale Image. A dialog box opens with several adjustment options.
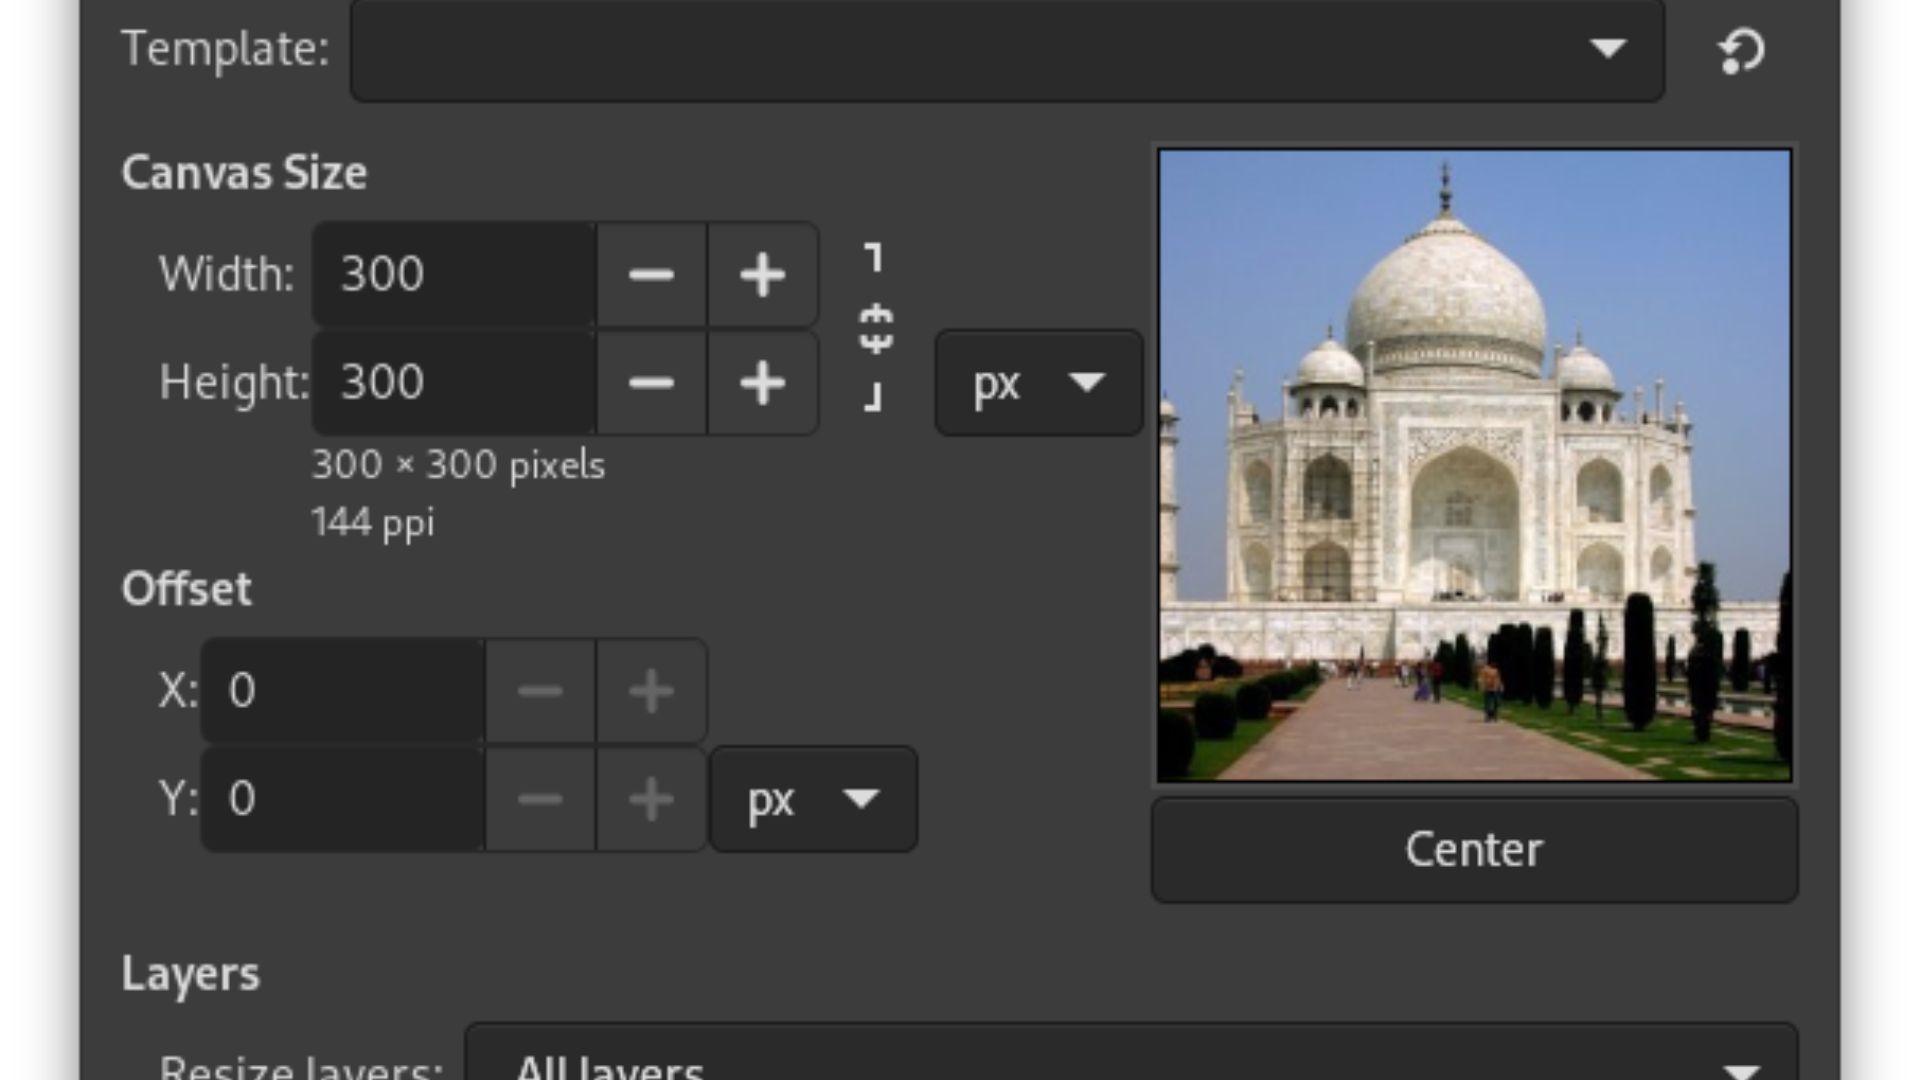
Step 3: Enter New Dimensions
Type your desired width or height in the input fields. The software accepts multiple units including pixels, inches, and percentages. Choose the unit that matches your project needs.
Step 4: Lock the Aspect Ratio
Look for the chain icon between the width and height fields. Keep it linked to maintain proportions and prevent distortion. Your image composition stays balanced when you lock the aspect ratio.
Step 5: Adjust Resolution Settings
The resolution settings matter for your final output. Set 72 pixels per inch for web images. Print projects need 300 PPI or higher for sharp results. These exposure settings affect how crisp your final image appears.
Step 6: Choose Interpolation Method
Select your interpolation method under Quality settings. Cubic interpolation delivers the best results for most photos. This option preserves detail better than basic resampling.
Step 7: Apply Changes
Click the Scale button to apply your changes. The software processes your adjustments instantly.
Step 8: Export Your Image
Go to File > Export As to save your work. Choose JPEG for photos or PNG for graphics with transparency. WebP format offers excellent compression for modern websites.
Method 2: Using the Scale Tool
The Scale Tool gives you visual control over dimensions. This method suits photographers who prefer hands-on adjustments.
Step 1: Activate the Scale Tool
Find the Scale Tool in your toolbox or press Shift + S. The keyboard shortcut saves time when you work on multiple images.
Step 2: Select Your Image
Click your image to activate scaling handles. These appear at the corners and edges of your photo. Professional portrait photographers often use this method for quick crops.
Step 3: Adjust the Size
Drag a corner handle to adjust your image size. The default setting maintains proportions automatically. Hold Shift to stretch only one dimension, though this can create unwanted distortion.
Step 4: Enter Precise Values (Optional)
A dialog box displays your new dimensions while you work. You can enter specific numbers here for precise control.
Step 5: Confirm Your Changes
Press Enter or click Scale to confirm your changes. The transformation applies to your active layer immediately.
Step 6: Fit the Canvas
Your canvas size might not match the new image dimensions. Go to Image > Crop to Content to fit the canvas perfectly. This step matters when you edit photos for specific layouts.

Resizing Images for Web Use
Web images require special attention to file size and loading speed. Bloated images slow down your site and frustrate visitors.
Step 1: Set Web Resolution
Set your resolution to 72 PPI in the Scale Image dialog. Web browsers display images at this resolution by default. Higher resolution settings waste bandwidth without visible quality improvements.
Step 2: Choose Appropriate Dimensions
Choose appropriate dimensions for your platform. Social media sites have specific size requirements. Check their guidelines before resizing.
Step 3: Export Your File
Export using File > Export As when you finish resizing. JPEG works well for photographs with compression between 75-90%. This range balances quality and file size effectively.
Step 4: Select the Right Format
WebP format delivers better compression than JPEG. Modern browsers support this format widely. Enable the preview option in the export dialog to check quality before saving.
PNG suits graphics with sharp edges and transparency. Use this format for logos, illustrations, and screenshots. The file sizes run larger than JPEG for complex photos.
Step 5: Monitor File Size
Monitor your file size in the export preview. Aim for under 200KB for standard web images. Larger files increase page load times significantly, as noted by web performance experts.
How to Resize Images in GIMP Online
Several web-based versions of GIMP exist through browser platforms. These services run the desktop software remotely in your browser.
OffiDocs and RollApp offer online GIMP access. You can edit images without installing software. These platforms work on Chromebooks and tablets with keyboards.
Step 1: Open the Online Editor
Open the online editor through your browser. Upload your image file from your computer or cloud storage.
Step 2: Access Scale Image
The interface matches desktop GIMP exactly. Navigate to Image > Scale Image just like the desktop version. All the same tools and options appear in your browser.
Step 3: Adjust Your Settings
Performance varies based on your internet connection. Remote rendering can feel slower than local editing. Larger files take more time to upload and process.
Online editing tools have practical limits. Complex projects with multiple layers work better on desktop software.
Step 4: Save Your Work
Save your edited file back to your computer. The export process works identically to the desktop version. Choose your format and quality settings before downloading.
Privacy matters when using online editors. Your images upload to remote servers for processing. Read the service terms carefully before working with sensitive photos.

GIMP Mobile Options and Alternatives
GIMP lacks an official mobile app with touch-optimized interface. The available mobile versions present serious usability challenges.
Android Options
Apps like XGimp and GIMP by UserLAnd run desktop GIMP on Android. These apps emulate the full software through remote desktop technology.
The interface doesn’t adapt well to phone screens. Buttons and menus appear tiny and difficult to tap. Many users find these apps essentially unusable on standard smartphones.
Tablets with large screens fare slightly better. A stylus helps with precision, but the experience still feels clunky. The apps work better as curiosities than practical tools.
Most photographers skip mobile GIMP entirely. Touch-optimized alternatives offer far better experiences on phones.
iOS Limitations
GIMP cannot release official iOS apps. The GPL v3 license conflicts with Apple’s App Store terms. This legal barrier prevents proper iOS distribution.
Some third-party apps claim GIMP functionality on iOS. These often run remote desktop connections similar to Android versions. The same usability problems plague these implementations.
Better Mobile Alternatives
Snapseed provides professional editing tools on both platforms. Google’s app handles RAW files and offers extensive adjustment options.
Adobe Lightroom Mobile works well for photographers. The app syncs with desktop Lightroom automatically. Your edits transfer between devices seamlessly.
Pixlr delivers solid editing capabilities with intuitive touch controls. The interface feels natural on phones and tablets. Basic and advanced tools coexist without confusion.
Photoshop Express suits quick edits and social media photos. Adobe optimized the interface specifically for mobile workflows.
Touch-optimized apps understand mobile constraints. They offer gesture controls and simplified interfaces. Your editing speed improves dramatically versus adapted desktop software.
Tips for Better Resizing Results
Quality preservation matters when you resize photos. Follow these practices to maintain image clarity.
Here are the key techniques that deliver professional results:
- Start with the highest quality original. Enlarging small images creates pixelation and blur. Work from RAW files or maximum quality JPEGs when possible.
- Save copies before resizing. Keep your original files untouched for future edits. Storage space costs less than losing irreplaceable photos.
- Choose the right interpolation method. Cubic or LoHalo interpolation preserves detail better than basic methods. The quality difference shows clearly in test comparisons.
- Avoid repeated resizing cycles. Each resize operation degrades image quality slightly. Plan your final dimensions before starting edits.
- Consider the viewing context. Phone screens need smaller files than desktop monitors. Print materials require much higher resolution than web graphics.
- Test different export quality settings. Use the preview function to check results. Find the balance between file size and acceptable quality.
- Use batch processing for multiple images. GIMP supports plugins like BIMP for bulk operations. This saves time when preparing photo albums or galleries.
Common Resizing Mistakes to Avoid
New users often make predictable errors when learning to resize images in GIMP. Awareness prevents quality problems.
Watch out for these common pitfalls:
- Never resize by stretching only one dimension. This creates distorted photos that look amateurish. Keep the chain icon linked in the Scale Image dialog.
- Enlarging small photos rarely works well. Digital zoom cannot recover missing detail. Accept the limitations of your source material.
- Forgetting to adjust resolution causes problems. Web images at 300 PPI waste bandwidth. Print files at 72 PPI appear pixelated and blurry.
- Choosing the wrong export format affects results. JPEG works poorly for graphics with text. PNG creates massive files for complex photographs.
- Ignoring file size impacts website performance. Pages load slowly when images exceed reasonable sizes. Test your pages after adding resized photos.
- Working on the original file risks permanent changes. Always duplicate important images before editing. This simple habit prevents countless disasters.
- Skipping quality previews before export leads to surprises. Check your results before finalizing changes. The preview window shows exactly what you’ll get.

Getting Started Today
Resizing images in GIMP gives you professional control without subscription costs. Desktop users enjoy the most complete toolset with precise adjustments and quality options. Web-based GIMP offers convenience for quick edits without installation.
Mobile users should explore touch-optimized alternatives instead of struggling with adapted desktop interfaces. Apps like Snapseed and Lightroom Mobile deliver superior experiences on phones and tablets.
Master the Scale Image dialog for precision work and the Scale Tool for visual adjustments. Choose appropriate resolution settings for your output medium. Export in the right format to balance quality and file size.
GIMP handles image resizing professionally when you apply these techniques correctly. Practice with different images to build confidence. Your workflow efficiency improves dramatically once these methods become second nature.

Darlene Lleno
Darlene Lleno brings a unique perspective to DIY Photography as someone who grew up surrounded by camera gear but chose words over lenses. With five years of writing experience, she specializes in photography content that’s both technically informed and genuinely passionate. Growing up with a photographer twin brother meant camera talk was everyday conversation in her household. While he mastered capturing moments, Darlene discovered she preferred being the subject and the storyteller behind the scenes. As a travel enthusiast and mother of two, she understands the importance of preserving life’s precious moments. When not exploring new destinations or writing for DIY Photography, you’ll find her reading or tending to her garden. Her approach to photography writing is refreshingly authentic, she may not be behind the camera, but she knows exactly what it takes to help others capture the shots that matter most.


Join the Discussion
DIYP Comment Policy
Be nice, be on-topic, no personal information or flames.