


How to Resize Images in Desktop (Mac Windows) Using Built-In Tools
Nov 20, 2025
Darlene Lleno
Darlene Lleno brings a unique perspective to DIY Photography as someone who grew up surrounded by camera gear but chose words over lenses. With five years of writing experience, she specializes in photography content that’s both technically informed and genuinely passionate. Growing up with a photographer twin brother meant camera talk was everyday conversation in her household. While he mastered capturing moments, Darlene discovered she preferred being the subject and the storyteller behind the scenes. As a travel enthusiast and mother of two, she understands the importance of preserving life’s precious moments. When not exploring new destinations or writing for DIY Photography, you’ll find her reading or tending to her garden. Her approach to photography writing is refreshingly authentic, she may not be behind the camera, but she knows exactly what it takes to help others capture the shots that matter most.
Share:
Learning to resize images in desktop is easier than most people think. Both Mac and Windows come with powerful built-in tools that let you adjust image dimensions without spending a dime on extra software.
Whether you’re preparing photos for web use, email, or print, knowing the right dimensions before you start saves time and prevents quality issues. Our free print size calculator helps you determine the exact pixel dimensions needed for any print size, so you can resize with confidence right from the start.
Why You Need to Resize Images in Desktop
Your camera produces massive files. A single photo can easily hit 20-30 megabytes. These giant files slow down websites, fill up storage, and take forever to email. You need different sizes for different purposes. Social media posts work best around 1200 pixels wide. Emails should stay under 1MB. Print size calculations require specific dimensions to look sharp.
Many photographers waste money on expensive software when free tools already exist on their computers. Mac users have Preview. Windows users get Photos and Paint. These programs handle basic resizing perfectly.

How to Resize Images in Desktop on Mac Using Preview
Mac’s Preview app makes it simple to resize images in desktop. Here’s exactly how to do it.
Step 1: Open the Image in Preview
Right-click any image file. Select “Open With” and choose Preview. Preview usually opens by default when you click image files. The app loads almost instantly.
You can also open multiple images at once. Select several files in Finder, then open them all together in Preview. The sidebar shows thumbnails of every open image.
Step 2: Access the Adjust Size Tool
Click “Tools” in the top menu bar. Select “Adjust Size” from the dropdown menu. A small window pops up showing your current image dimensions.
The window displays width and height in pixels. You’ll also see the resolution setting and current file size.
Step 3: Enable Scale Proportionally
Check the box labeled “Scale proportionally.” This setting maintains your aspect ratio. Your image won’t get stretched or squished.
When you change the width, the height adjusts automatically. Change the height instead and the width follows along. This keeps your portrait photography looking natural.
Step 4: Enter New Dimensions
Type your new dimension in either the width or height field. Common web sizes include 1920 pixels wide for full-screen viewing or 1200 pixels for standard posts. The other dimension calculates itself.
You can also change the unit of measurement. Switch from pixels to percentage, inches, or centimeters using the dropdown menu.
Step 5: Choose Resample Image Option
The “Resample image” checkbox determines file size changes. Keep it checked to reduce both dimensions and file size. Your 25MB photo becomes 2MB.
Uncheck this box only if you want to change printed dimensions without affecting file size. Most photographers keep resampling checked for storage management purposes.
Step 6: Save Your Resized Image
Click “OK” to apply changes. Your image updates immediately in Preview. Go to “File” and choose “Save” to overwrite the original.
Pick “Export” instead to create a copy. The original stays untouched. Export also lets you choose different file formats like JPEG or PNG.

Bonus: Batch Resize Multiple Images on Mac
Preview handles dozens of images at once. Select all photos in Finder that need resizing. Open them together in Preview. The sidebar shows every selected image.
Click the first thumbnail. Hold Command and click additional thumbnails. Or press Command+A to select everything. Now choose “Tools” and “Adjust Size.” Every selected image gets the same dimensions.
This batch feature saves massive amounts of time. Wedding photographers resize hundreds of preview images this way.

How to Resize Images in Desktop on Windows Using Photos App
Windows 10 and 11 include the Photos app by default. Here’s your step-by-step guide to resize images in desktop on Windows.
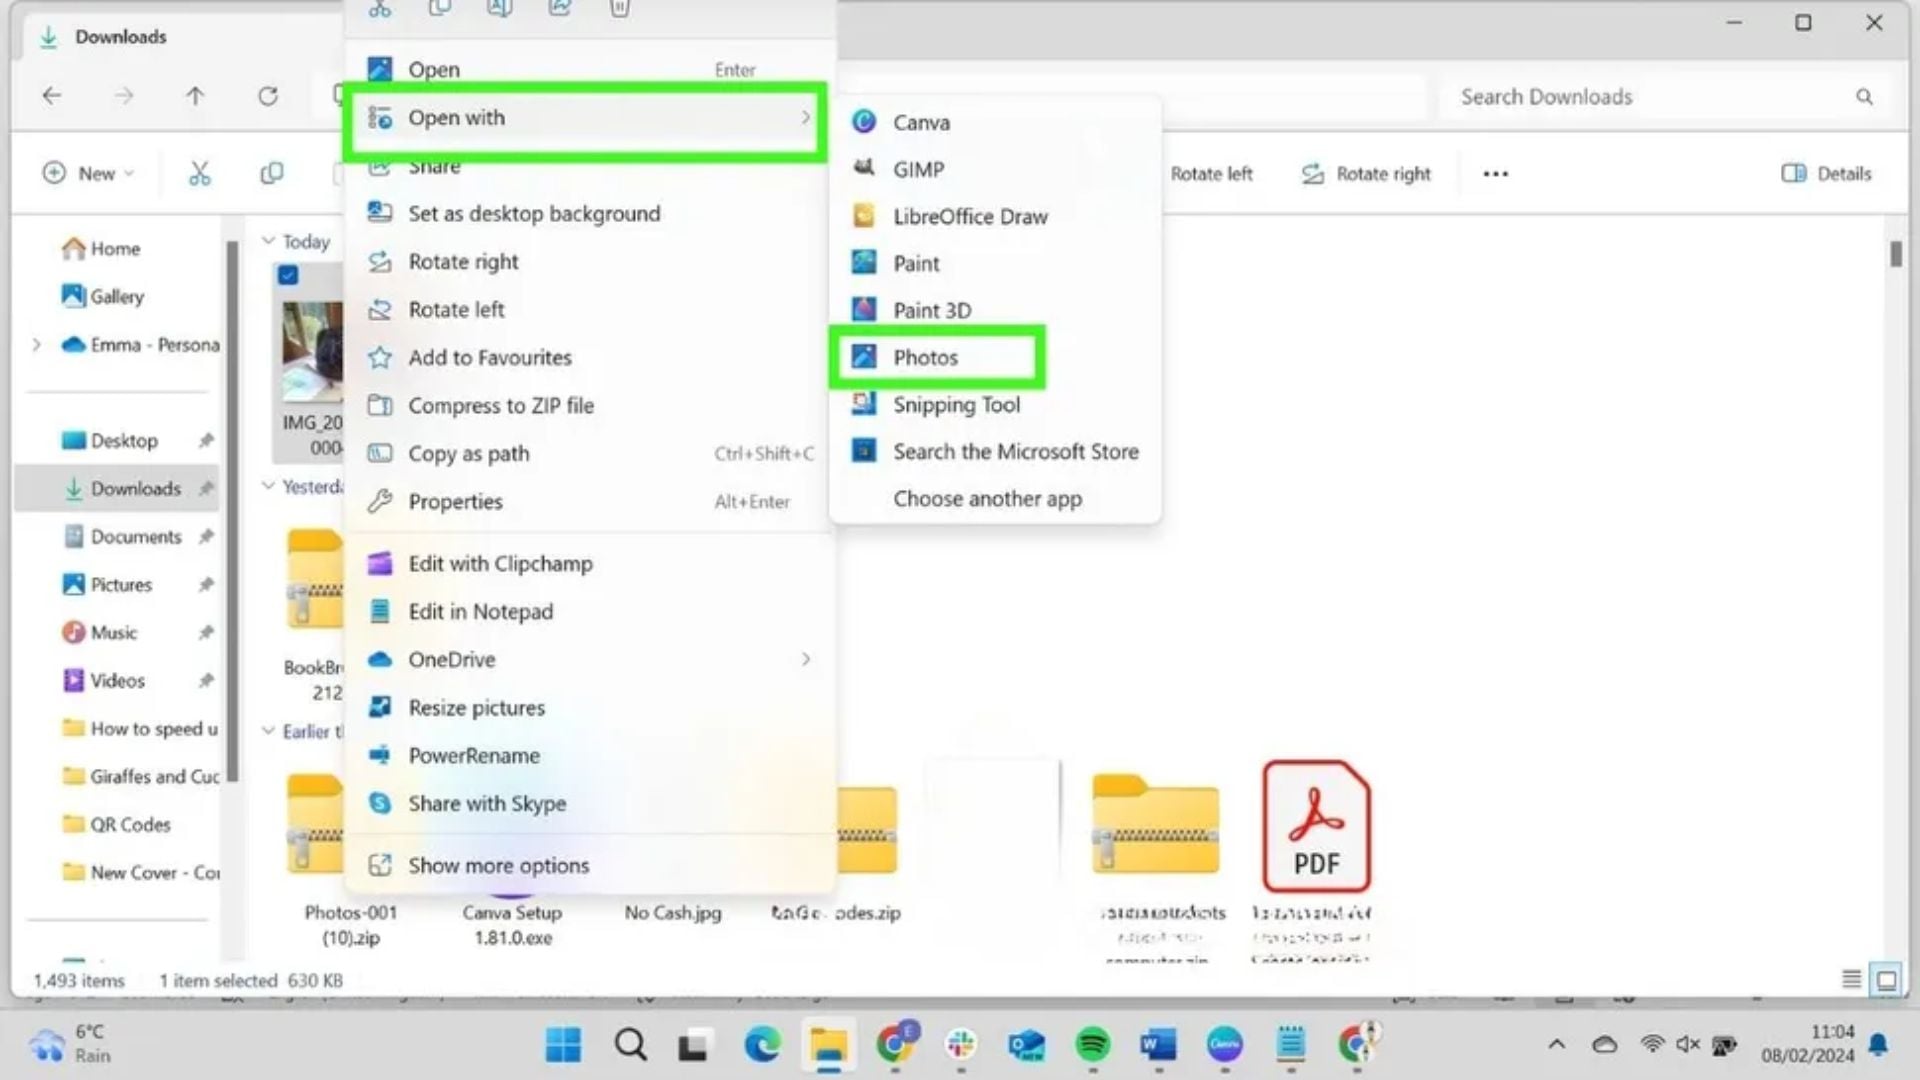
Step 1: Open Your Image in Photos
Double-click any photo to open it in Photos. The app launches automatically for most image formats.
You can also right-click and select “Open with” then choose Photos from the menu. The Photos interface stays minimal and clean.
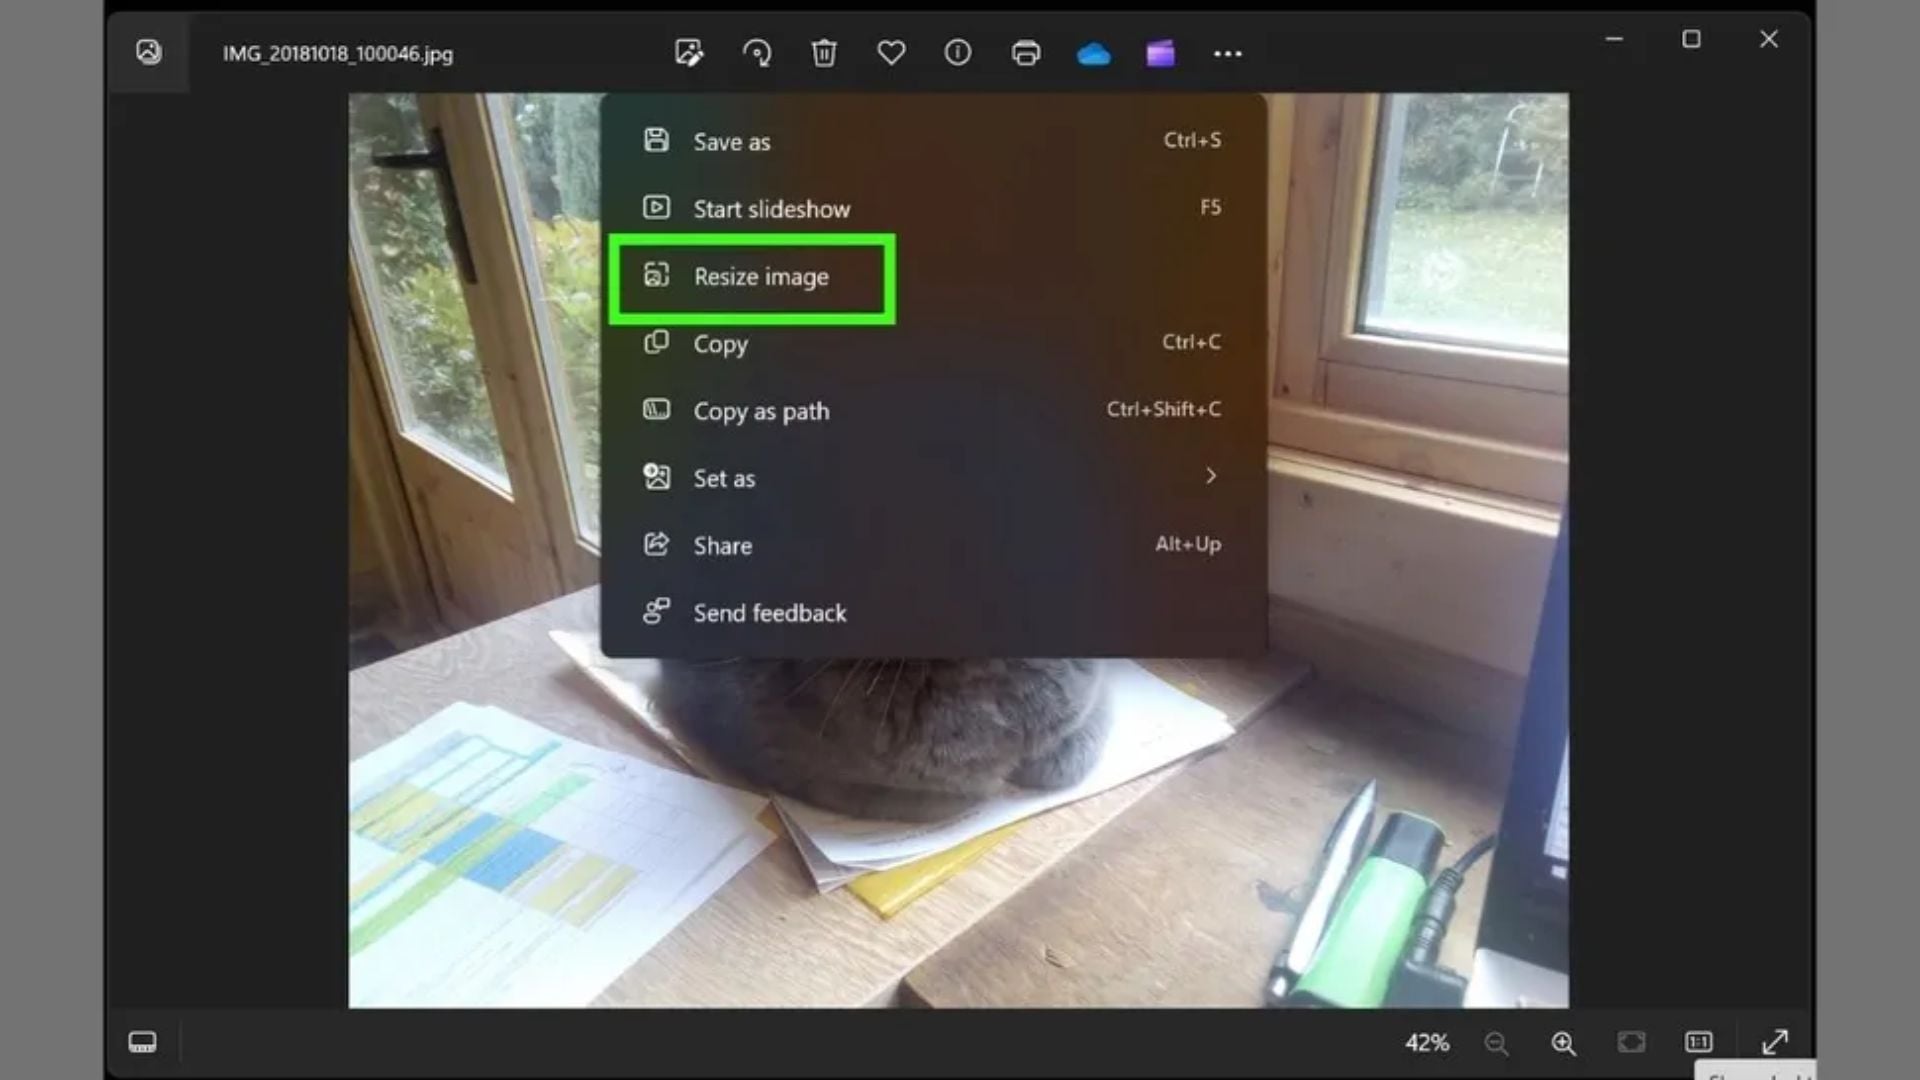
Step 2: Find the Resize Option
Click the three dots in the top-right corner. These dots open a dropdown menu with various options. Select “Resize image” from the list.
A popup window appears with preset sizes. Microsoft offers Small, Medium, and Large options.

Step 3: Select Preset or Custom Size
Choose a preset for quick resizing. Small works for thumbnails. Medium suits most web use. Large maintains higher quality.
Click “Define custom dimensions” for precise control. This option gives you exact width and height input fields.
Step 4: Enter Custom Dimensions
Type your desired width or height value. Photos locks the aspect ratio automatically. Your image stays proportional without distortion.
The quality slider lets you balance file size against visual clarity. Higher quality means bigger files but better appearance for photo editing work.
Step 5: Save Resized Copy
Click “Save resized copy” when ready. Photos creates a new file. Your original remains unchanged.
The app suggests a filename and location. Pick a different folder to keep originals separate from web versions.
How to Resize Images in Desktop on Windows Using Paint
Paint offers more control than Photos. Here’s how to resize images in desktop using this classic Windows tool.
Step 1: Open Image in Paint
Right-click your photo. Select “Open with” and choose Paint. The image appears in Paint’s workspace.
Large photos fill the entire window. The interface looks simple but the functionality remains solid for basic tasks.
Step 2: Click the Resize Button
Find the “Resize” button in the Home tab toolbar. You can also press Ctrl+W as a keyboard shortcut. A small dialog box opens with resize options.
Paint offers two measurement types. Choose “Pixels” for exact dimensions. Pick “Percentage” to scale by a specific amount.
Step 3: Enable Maintain Aspect Ratio
Check “Maintain aspect ratio” before entering numbers. This prevents distortion. Your photo scales proportionally.
Square images stay square. Rectangular images keep their shape. This protects your image quality from stretching.

Step 4: Input New Size Values
Select “Pixels” as your measurement unit. Enter a new width value. The height updates automatically.
Or change the height and watch the width adjust itself. The locked aspect ratio does the math for you.
Step 5: Apply and Review Changes
Click “OK” to apply the resize. Paint immediately shows your resized image. Check the results before saving.
If something looks wrong, press Ctrl+Z to undo. Adjust your settings and try again.
Step 6: Save in Your Preferred Format
Click “File” then “Save as” to choose your format. Paint supports JPEG, PNG, BMP, GIF, and TIFF.
JPEG works best for photographs. PNG suits graphics and text. Name your file something descriptive for easier organization later.
Understanding Resolution When You Resize Images in Desktop
Screen resolution differs from print resolution. Computer monitors display at 72-96 pixels per inch. Phones use even higher densities. Print requires 300 pixels per inch minimum for sharp results.
A 3000-pixel-wide image prints beautifully at 10 inches wide. That same image displays perfectly on any screen. Lower resolutions look fine on screens but print poorly.
Camera settings determine your starting resolution. Modern cameras shoot 20-50 megapixels. These files contain plenty of data for any normal use.
Common Mistakes When You Resize Images in Desktop
Starting with the wrong file creates problems. Always work from original, high-resolution versions. Resizing an already-resized image compounds quality loss.
Forgetting to keep originals causes headaches later. You might need a larger version someday. Copy files before resizing them. Storage costs almost nothing these days.
Choosing the wrong aspect ratio stretches images unnaturally. People look wider or taller than reality. Always maintain proportional scaling to preserve natural appearance.
Tips for Better Results
Create a standard workflow for efficiency. Decide on your common output sizes. Maybe 1920×1080 for desktop wallpapers and 1200×800 for blog posts.
Consider your destination before resizing. Instagram prefers squares or 4:5 ratios. Twitter likes 16:9 images. Social media platforms each have preferred dimensions.
File naming systems help organization tremendously. Add size information to filenames. “sunset-original.jpg” and “sunset-1200px.jpg” tell you exactly what each file contains.

When Professional Software Makes Sense
Built-in tools handle basic resizing perfectly. Professional photographers sometimes need advanced features. Lightroom offers batch processing with complex adjustments. Photoshop provides precise control over sharpening during resize.
Specialized algorithms in paid software preserve more detail. Adobe’s resizing engines use artificial intelligence. They analyze content and optimize the resize process.
Web-focused tools like AI-powered editors offer automatic optimization. They adjust compression, format, and dimensions simultaneously.
Troubleshooting Resizing Issues
Files looking blurry after resizing usually means too much reduction. Shrinking a 6000-pixel image down to 300 pixels loses enormous detail. Stick to reasonable scaling ratios.
Colors shifting during resize happens with certain formats. JPEG compression can change color values slightly. Save at maximum quality settings when colors matter for professional color grading work.
Unexpected file sizes indicate wrong settings. A smaller image should always have a smaller file size. If your 500-pixel image weighs more than your 5000-pixel original, check your format and quality settings.
Ready to Start Resizing
You don’t need expensive software to resize images in desktop effectively. Mac’s Preview and Windows’ Photos and Paint handle most common scenarios perfectly. These free tools ship with your operating system and work immediately.
Professional photographers use these same tools for quick tasks. Learning the built-in options saves money and simplifies your workflow. Master these basics before considering paid alternatives.
Start small. Practice on a few images. Develop your workflow. Soon you’ll resize images in desktop without thinking about the process.

Darlene Lleno
Darlene Lleno brings a unique perspective to DIY Photography as someone who grew up surrounded by camera gear but chose words over lenses. With five years of writing experience, she specializes in photography content that’s both technically informed and genuinely passionate. Growing up with a photographer twin brother meant camera talk was everyday conversation in her household. While he mastered capturing moments, Darlene discovered she preferred being the subject and the storyteller behind the scenes. As a travel enthusiast and mother of two, she understands the importance of preserving life’s precious moments. When not exploring new destinations or writing for DIY Photography, you’ll find her reading or tending to her garden. Her approach to photography writing is refreshingly authentic, she may not be behind the camera, but she knows exactly what it takes to help others capture the shots that matter most.


Join the Discussion
DIYP Comment Policy
Be nice, be on-topic, no personal information or flames.