


How to Create and Import LUTs in Photoshop for Better Color Grading
Aug 31, 2025
Anzalna Siddiqui
A psychology major in her third year of Bachelor’s, Anzalna Siddiqui has endless curiosity for the human mind and a deep love for storytelling – both through words and visuals. Though she hasn’t taken up photography as a profession, her Instagram is where her passion finds its home. In addition to this, she’s a travel enthusiast who never travels without her camera because every place has a story waiting to be captured.
Share:
What if I told you there’s a simple little trick that can bottle up all your favorite color grading moves into one reusable file? A magic little shortcut that lets you apply your signature style to any image or video, without having to start from scratch every single time. That’s what I’m talking about: Create & Import LUTs in Photoshop.
I recently stumbled upon a video by Photoshop mastermind Aaron Nace of PHLEARN, and he lays out the process in such a fantastic way. He shows you how to create, export, and import your own custom LUTs. Seriously, it’s revolutionary.
What’s a LUT and Why Do You Need One?
Let’s start with the basics: what exactly is a LUT? According to Aaron, a LUT is essentially a bundle of all your color edits. Think of it as an enhanced preset. Instead of just saving a single adjustment, you can combine multiple adjustments — like Color Balance, Levels, and Gradient Maps — into one file. This is super useful because you can apply a LUT in various software, such as Adobe Premiere, DaVinci Resolve, and Photoshop. It’s similar to creating your own custom Instagram filter, but it’s much more powerful and professional.
He begins with a photo and aims for a mix of cool and warm tones. I really like this method because it’s a timeless color grading style that always looks nice. You know the effect: lovely teal shadows paired with golden highlights. It’s almost like wrapping your image in a cinematic embrace.
Building Your Foundation: Color Grading Layers
How do you create this amazing LUT? You begin by stacking your favorite adjustments. Aaron kicks off his method by adding a Color Balance adjustment layer. He shifts the sliders towards cyan and yellow, which he believes produces a nice split-tone effect. It’s a subtle yet strong way to manipulate your colors.
After that, it’s time to introduce a Levels adjustment layer. This is where you can get a bit more creative. Go to the blue channel and tweak the sliders to infuse some warm yellows into the highlights and cool blues into the shadows. This step is essential for achieving that classic film-like appearance. It seems to me that this is one of the best ways to bring mood and storytelling to your image. Just by looking at it, you can almost sense the emotion the photo is meant to express.
Next, you’ll want to add a Gradient Map adjustment layer. I used to ignore this type of layer, but Aaron’s video shows that it’s actually a fantastic tool for color grading. You can choose a gradient and set its blend mode to “Soft Light” or “Color.” In his example, Aaron uses a gradient from purple to yellow, but he suggests reversing it if it doesn’t look good. I think that’s a smart idea — there are no strict rules in art! You can experiment and have fun. You can also lower the opacity of this layer to create a more subtle effect, maybe around 10-30%.
Finally, take a look at all your layers together. You should notice a clear change in your image, but it shouldn’t be too extreme. The great thing about this method is that you can always go back and adjust each layer until you achieve the look you want.
Exporting Your LUT: From Layers to a Single File
Now comes the exciting part: combining all those lovely layers into a single LUT file. According to the video, all you need to do is select all your adjustment layers, then navigate to File > Export > Color Look Up Tables. It’s really that simple! A dialog box will appear where you can give your creation a name, add your copyright details, and select the file formats you want.
Aaron has named his LUT “Warm and Cool Vibe,” which is a great choice, in my opinion. He also mentions that you can export various file types, such as .cube and .3dl. This is a smart move because it makes sure your LUT will be compatible with many different programs.
Importing and Using Your Custom LUT
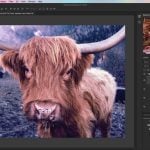
You’ve saved your new LUT file. Now, how do you put it to use? The steps are quite easy. Just go to Layer > New Adjustment Layer > Color Lookup. When you access the properties of this new layer, you’ll find a dropdown menu. To load your new LUT, click on Load 3D LUT and choose the .cube file you created.
This is where the fun begins. You’ll notice that one layer now provides the same effect that used to require three or four layers. It’s like condensing all your effort into a small, powerful tool. This really saves time, especially if you want to apply a specific look to multiple photos.
Aaron demonstrates the flexibility of these LUTs by using his “Warm and Cool Vibe” LUT on a completely different image. This isn’t just a one-time solution; it’s a versatile tool that can enhance any image you use it on.
Making Your LUTs Permanent: The Secret Folder
If you want your new LUT to appear in Photoshop’s dropdown menu without having to load it manually each time, Aaron tells a solution for it. All you need to do is locate a specific folder on your computer.
According to him, this folder can be found in the Photoshop application directory, specifically in a subfolder called 3D LUTs. You can check the exact path based on your operating system. Once you locate it, simply copy your .cube file into that folder. He mentions that after you do this, just close and reopen Photoshop. Your custom LUT should then show up in the dropdown list, making it easy to access whenever you need it. This is a great trick for anyone looking to create their own collection of presets. He also points out that you can remove any pre-loaded LUTs you don’t use, which is a smart way to keep your workspace tidy.
LUTs are an essential resource for photographers and videographers. They allow you to manage your color grading and ensure a uniform, professional appearance in all your projects. I think that making your own custom LUT is an excellent way to establish your unique style and can save you a lot of time in the future.
According to Aaron, you can download the materials he used in his tutorial, including sample images and the LUT he made, for free. This means you can easily follow along and practice on your own. It’s a fantastic opportunity to start exploring this useful tool.
Creating your own custom LUTs can be an enjoyable and imaginative experience. You get to experiment with different colors and tones, resulting in a file that reflects your personal touch. So why not give it a shot? The worst that could happen is you develop a cool new color-grading style and find yourself with more time to focus on what you truly enjoy: creating.
[How to Create & Import LUTs in Photoshop I PHLEARN]

Anzalna Siddiqui
A psychology major in her third year of Bachelor’s, Anzalna Siddiqui has endless curiosity for the human mind and a deep love for storytelling – both through words and visuals. Though she hasn’t taken up photography as a profession, her Instagram is where her passion finds its home. In addition to this, she’s a travel enthusiast who never travels without her camera because every place has a story waiting to be captured.


Join the Discussion
DIYP Comment Policy
Be nice, be on-topic, no personal information or flames.