


Preparing for Desert Photography Travel
Jan 7, 2012
Udi Tirosh
Udi Tirosh is an entrepreneur, photography inventor, journalist, educator, and writer based in Israel. With over 25 years of experience in the photo-video industry, Udi has built and sold several photography-related brands. Udi has a double degree in mass media communications and computer science.
Share:

One environment that I never tire of photographing is the deserts of the southwest United States. While the desert may look drab and gray during daylight hours during the golden and blue hour the desert transforms into a colorful and often surreal landscape. Mix in a little bad weather and you can capture some amazing landscape photos. Since the desert is an extreme environment I prepare for my shoots there with more scrutiny. Over the years my approach to desert photography preparations have bled into my general landscape photo shoot prep.
Here are 10 tips to prepare for your next adventure in the desert including 4 very important steps to ensure your safety:
1. Research Your Destination
Evaluate the sites and locations you want to visit. I first start by visiting the official web site of the area I’m visiting and then do a Google and Flickr search to see what has and has not worked for other people. Often this later research provides insight to times of year when poor weather can sink a photo trip. It also may provide some insight as to which destinations may be better suited for morning or evening shooting. As the date for my trip nears I then double and triple check the 10-day weather forecasts.

2. Buy and Study a Paper Map
Don’t rely on cell phone based maps, received over data networks, or car based GPS maps that are often inaccurate or out of date. In Death Valley National Park the term “Death by GPS” has been coined. It’s sadly common for people to drive on closed roads, get stuck and die as they follow their GPS into the desert. The best practice is to always have a paper map on hand of the area(s) you’re visiting. Keeping a pocket compass with you is also advised just in case.
3. Create an Itinerary
Match up your previous research of locations and times of day to photograph the area to create an itinerary. Having an idea as to the days and times you’ll be in certain areas, will allow you to better formulate the types of photos you’ll be taking and keep others informed to your where abouts – both being important in later steps.

4. Keep Others Informed
An important best practice is to share your itinerary, even if rough, with a friend or family member. Be sure to include emergency contact numbers for agencies overseeing the areas you’ll be visiting. Since many desert destinations lack cell coverage if you run into trouble and are not heard from at identified check-in times or your visit unexpectedly runs over your friend or family can alert authorities in case they feel something is amiss.

5. Lens & Body Selection
I tend to focus on 3 types of photography while in the desert including wide angle landscapes, long lens landscapes and macro photography. It’s not to say that there aren’t other approaches, this is just my tendency. No matter what your preferences, knowing what they are is the first step in gear selection. Based on the areas identified in my itinerary I begin fighting with myself about which lenses to bring. Invariably my camera bag starts out with everything in it and slowly I remind myself that I can’t possibly carry it all and slowly focus on what I want to get out of my trip. With my goals in mind I tend to thin the herd of possible lenses that will make the trip. If I am concerned about dust and frequent lens changes then I may consider dedicating a single lens to multiple dSLR bodies (example a wide angle lens and long lens each on their own dedicated dSLRs). This will reduce the number of in the field lens changes that might introduce dust or worse yet sand on my camera sensor.

6. Photo Accessory Selection
The top accessories that I bring with me include a tripod, two cable releases, a headlamp, a handheld GPS unit, spare batteries, microfiber lens clothes and my iPhone. Since I shoot often in low light conditions its essential to have a good tripod and use a cable release to minimize camera shake. My cable release of choice is also an intervalometer which I use for star trail photos and time-lapses. The headlamp just makes working in low light conditions easier. The GPS unit allows me to mark & track potential subjects on my hike(s) and safely return to my car when I’m off the beaten path day or night. My iPhone now contains numerous handy applications for night photography that are invaluable to reference in the field even with out network connectivity. Lastly if I am planning on doing light painting then I will take LED flashlights with me as well.
7. Sensor Cleaning
I have to admit I am particularly attentive to keeping my dSLR camera sensor clean. I think it is important to address, so as to minimize the post-production work of cloning out dust spots. With that in mind before every trip I take I clean my camera sensor. At first I do this with a bulb blower and as necessary by other means. If you’re not using a dSLR this is a non-issue, but for those using cameras with interchangeable lenses its a good practice to adopt.

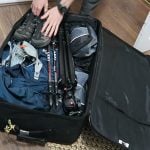
8. Bag Packing
Even though I take care to minimize what I take with me in the field I am often guilty of over packing. My primary back country camera bag is a Lowepro Vertex 200 AW that holds plenty of gear including a laptop. Alternatively for traveling light I use a Think Tank Sling-O-Matic 10. Increasingly for longer trips I stow the Think Tank bag (empty) in my checked-in luggage, as using a smaller bag gives my back a rest, and carry my Lowepro bag as a carry-on. The Lowepro will hold a dSLR body or two and at least a few lenses. I also include my polarizing and graduated neutral density filters, spare batteries, tools (small screwdriver, hex wrench, etc.), Gepe CF card safes, cable release / intervalometer and business cards.
9. Data Backup
One practice that I’ve adopted is to backup my images in the field. My goal here is to keep no less than two copies of the images in tow, one copy on me and another in my carry-on bag. To do this I download my images to an external hard drive and keep my un-erased CF cards on me at all times. If I have the luxury of time I’ll duplicate my photos from one hard drive to another to have three copies. The reason for the file duplication is to make sure I don’t lose my work due to data corruption, theft or some other unforeseen event.

10. Creative Prep
In transit either by plane or car I’m thinking subjects, lighting, composition and challenging myself to think of something new. If on a plane, I enjoy sketching out more complex ideas. Of course in the field many of my pre-conceived ideas may not pan out, but that’s ok. The exercise of thinking out different photo scenarios puts my mind in the right place creatively. In essence my mind is primed to think creatively before I even get to my destination.
About The Author
Jim M. Goldstein is a professional photographer and author who just released the eBook Photographing the 4th Dimension – Time and runs the JMG-Galleries Blog. Also check out Jim’s Photo Workshop & Photo Tour Schedule

Udi Tirosh
Udi Tirosh is an entrepreneur, photography inventor, journalist, educator, and writer based in Israel. With over 25 years of experience in the photo-video industry, Udi has built and sold several photography-related brands. Udi has a double degree in mass media communications and computer science.
Related Posts
 Tips for planning, packing and preparing for a landscape travel photography shoot
 Photography marketing: preparing the ground for your business to flourish
 Preparing For Their 67th Wedding, This Couple Has Been Keeping Photographers Across The World Very Busy
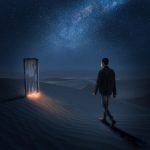 How I blended photography and CGI to create a desert door composite
Join the Discussion
DIYP Comment Policy
Be nice, be on-topic, no personal information or flames.
One response to “Preparing for Desert Photography Travel”
As someone who lives in Mesa, AZ in the Sonoran Desert, I agree with most of what this author says. I restrict my desert imaging to a Fuji super-zoom so no dust or sand reaches the sensor. I wear a Camelback-type daypack with a 1.5 liter bladder & carry extra water bottles in its pockets. Attached to the daypack is a metal whistle; three short blasts are a distress signal. I also carry a pocket mirror to signal a search helicopter if needed. I also use a trekking pole since the best desert photography involves hiking up-&-down foothills & ‘small’ mountains’, & a trekking pole has saved me from tripping downhill many times. Also, I know near dawn & dusk are ideal times for desert imaging, but the high contrast during the day makes it ideal for HDR.