


How I took this whisky shot with just one light
Dec 12, 2018
Barry Mountford

We love it when our readers get in touch with us to share their stories. This article was contributed to DIYP by a member of our community. If you would like to contribute an article, please contact us here.
Share:

Hey guys I have been really looking forward to sharing this post and the video which goes into it in more detail (link below), for all of the new photographers new to lighting and to all who think they are limited by their lack of gear! Well in this blog and video I will show you how you can create this image with just ONE LIGHT and all captured in camera and no editing ( that’s optional really as I would always finish my images with a quick tidy up if needed) but for this post below is the raw image straight from the camera.
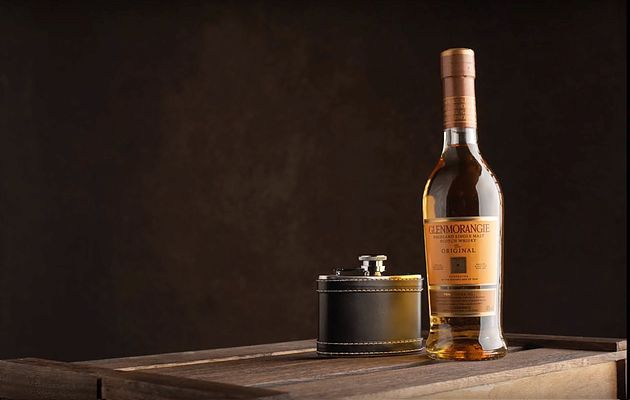
Most of this image is in the setup and by that I mean shooting at a nice angle for the bottle and hip flask, an angle which is pleasing to the eye so for this shot I had the camera low and pointing slightly upwards to the bottle and flask, I played about with the position of the wooden apple box and settled for this angle, for the background I used a hand painted backdrop from Artery Backdrops, it has great texture and colours which suited this scene perfectly but you can use pretty much anything as a background just be mindful it compliments the product your shooting. On to the lighting setup and a little technique I discovered which works great in this scenario, I used the Pixapro Citi 600 in a 90 cm Softbox but don’t be put off if you don’t have the same light, as you can use what ever light you have, you only need one. First using the Softbox to create a nice highlight down the side of the bottle and positioned camera right, you can see what this produces in the image below.

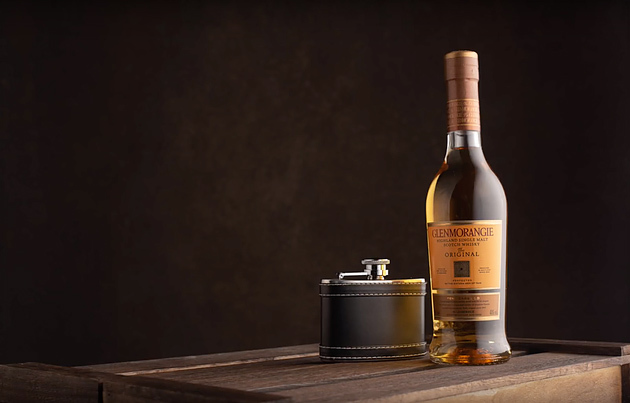
Now the problem we have is the left hand side of the bottle is really dark so we need to add some light to it but remember we are only using one light so we do this by adding a white foam board to bounce the light back into that side of the bottle, you can see the results below (if you don’t have any foam board you can use card or anything that will reflect that light back).

You can see how its lifted the shadows and produce another highlight down the left side of the bottle, now if you don’t like how wide that highlight is simply adjust the fill card/foam board until you get your preferred look. Now a couple of things still wrong with this image, the first being the highlight on the right of the bottle its still too hard and the second is there is too much light falling on to the canvas background the best way around this would be to move the whole set away from the background but if like me you are limited for space we need another way, you could use a flag/gobo placed behind the light and in front of the background to stop the light falling on it but that would mean more stands in a small space so my work around is to add a strip box grid to the softbox at the back of the softbox and turning the modifier away from the background slightly (you can see how I have done this in the video) and below is the effect that has on the image.
Now I have the background how I want it, its time to work on the highlight down the right hand side of the bottle, this highlight is too hard, even though we are using a softbox which is placed quite close, we need to soften this more and we do this by adding an inexpensive diffusion panel from a 5 in 1 reflector ( if you don’t have one of these a white shower curtain would give a similar effect ), if we position this as close to the bottle as we can so it doesn’t creep into the shot and take another shot you can see the effect it has in the image below.
That has produced a really nice soft highlight which looks so much better, I would much prefer to light this with multiple lights it would be so much easier to get everything looking exactly the way I want it but we are sticking with just the one light for the purpose of this blog and video. Next we need to lift the colour of the liquid in the bottle and this is going to make a big difference to the whole look of this set and we do this by adding some coloured card cut out in the shape of the bottle, just slightly smaller in size overall, and placed behind the bottle to bounce light and colour back through to give this effect below.

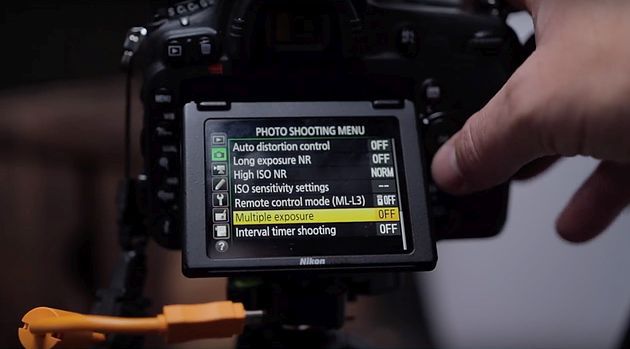
Wow that really does make a huge difference to the image! Now we have that looking really good with just one light I now want a small ball of light on the background just a glow, but how I only have one light? Well this is where the great little technique I discovered and tested out on this image comes into play, you may already be familiar with or know of the multiple exposure technique I have seen this used many times in portraits where they take a portrait shot almost silhouetted and another image of the sky and clouds and the camera combines it all in camera and this got me thinking I wanted to try this in a product shot using just one light. To do this we need to setup the camera to shoot two images and combine them in camera, on my Nikon d750 I turn on multiple exposure and set the number of shots I need to take, you have a choice of 2-3.

Once this is set on the camera the next step is to take the first shot as below.
Now what we need to do is remove the light from the softbox and fit it in a standard gridded reflector and place it facing the background just behind the bottle, we take another shot, image below.

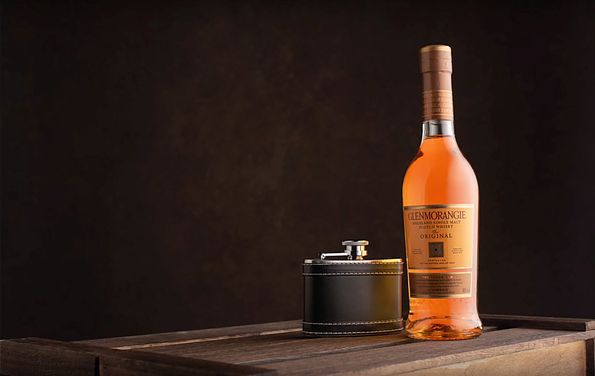
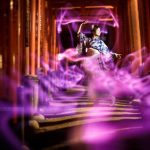
Now this is the really cool part! the camera now combines the images adding the nice glow on the background area to our first image producing a raw image in camera !! image below.

I was super happy with the results and using this little technique and I hope it gives you a bit of inspiration to give it a go as it is really effective and produces great images with just one light!! below is a link to all the gear used and be sure to check out the full video on youtube where you can see the set up in real time. Until next time.
- Pixapro citi 600 (Godox AD600)
- 5 in 1 reflector (Godox Collapsible 5-In-1 Reflector)
- Softbox
- backdrop
- flash trigger
- C Stand
About the Author
Barry Mountford is a portrait photographer based in Gateshead, England. For more of his work, check out his website, follow him on Twitter and Instagram and subscribe to his YouTube channel. To get in touch, you can look him up on Facebook. This article was also published here and shared with permission.
We love it when our readers get in touch with us to share their stories. This article was contributed to DIYP by a member of our community. If you would like to contribute an article, please contact us here.


Join the Discussion
DIYP Comment Policy
Be nice, be on-topic, no personal information or flames.
7 responses to “How I took this whisky shot with just one light”
I would go digitally even if my camera allows multi-exposure. With such space and transporting, I think speedlites are better; They are light and I’m sure quick to handle and change their settings as well.
Sorry, but that doesn’t look like whisky at all anymore. You made it look like a Breezer or something.
I cant agree more
I like the techniques
Would be good to see the image worked on some more, e.g. light above, fill on the label, post processing
whiskey looks like it is bioluminascent 2 previous look way better and normal
Would’ve helped to put the BG head reflector below the line of sight so it doesn’t end up in the final image!
Bottles are not easy to light, with four lights, a gold reflective paper behind the bottle you can get this result. Used continues lighting for the shot because it was for both still and video. The key is a 1k soft box through 215 diffusion, 650 for background, 300 for edge light and a 150 for spot on label. the bottle was placed on polish steel motorized Lazy Susan for slight movement for the video. https://uploads.disquscdn.com/images/4849418e3a10a7fa6a58ed8597d489ec17e385a80f30ec107703d8835ec80f53.jpg