


HDR – an abomination? Not if you do it right!
Feb 2, 2020
Ole Henrik Skjelstad
Ole Henrik Skjelstad is a Norwegian math teacher and landscape photographer. He fell in love with photography in 2013 when he got a camera as a birthday present.
Share:

We probably all know that HDR stands for High Dynamic Range. In all simplicity, this means images that cover the entire tonal range in a given scene. The photographer has been able to preserve the highlights and yet has enough shadow detail information. The photo avoids any clipped shadows or ‘black holes’ as I call them. The trouble with black holes is that they steal a lot of attention, and may draw the eyes to all the wrong places in an image. The same goes for severely clipped highlights. They are boring plain white, with hard transition lines.
There are three ways we can achieve a high dynamic range image. We will in the following briefly discuss each of them.
Expose to the left
One of the many advantages with newer sensor technology is that we can expose to the left (shadows) in order to not lose any highlight information. We trust that our sensor has captured all the shadow detail we need. When we start pushing the file in Lightroom or Photoshop we won’t see any magenta color cast, or excessive shadow noise.
The following image is exposed to the left (click to enlarge):

The Histogram pretty much sums up how I exposed for the highlights that morning. Notice the arrows on either end at the top. The one to the left is white indicating shadow clipping (pure black), whereas the right one is red indicating highlight clipping (pure white).

The finished high dynamic range image:

The histogram now shows no clipping on either end:

How successful this approach is depends on your camera and its sensor. My very first full-frame camera purchased back in 2013 would have left me with excessive noise in the darkest shadows and would also have produced some magenta color shift.
Filters
The second approach is to use a filter that darkens the sky. That would perhaps be a graduated neutral density filter like this one. The filter will reduce a scene’s dynamic range. Since there are fewer stops of difference to capture, the sensor can capture the available information in both the shadows and highlights regions.
The following examples are from a sunrise in Rondane National Park. The ground was relatively dark compared to the sky which was brightened by the rising sun which rose to the left. I am inclined to let the images speak for themselves.
There is no filter on the left image, and a filter on right image.


The filter here is a Nisi Switch with two Nisi graduated filters positioned in various directions. Rondane National Park, Norway
Bracketing
The third way is to shoot bracketed. When we apply this approach we can either blend the exposures by hand or use hdr software to carry out the blending.

The image above is the result of three bracketed images. The one below is the exposure for the shadows. In other words, that image is exposed to the right and a lot of highlight detail is missing and is impossible to rescue in post.

When HDR images trended, around ten years ago, many pushed the HDR software sliders (including me) too far. This resulted in weird colors. Rocks, for example, turned yellowish on a bright day. Quite a bit of images came with strong halos around trees or where the ground met the sky.
The “old” HDR software also softened the pixels quite a bit, giving the image a very pronounced HDR Look. None of this is pleasing to my eyes. I 100% agree that many of the images back then were overcooked, something some are quick to point out – also today even when the image is not processed in HDR software. Admittedly, I still see HDR images on various social media platforms that are not well carried out.
This comes down to experience. When we first start with photography and next begin to edit our images ourselves we do not so easily see halos or other hdr “artifacts”. There is a reason that the stages of the Photographer chart has an “HDR hole”.
As our eyes become more mature we can better tune HDR, do you agree?
To me HDR is simply to have produced an image which covers the entire tonal range in a scene. Which measures we take to achieve this is really not so important. What is more vital is that we have the necessary tools and techniques which we have learned and know how to use. Sometimes we even have to combine techniques. More than once have I shoot bracketed with neutral density filters mounted due to a scene’s very wide dynamic range. At last, even our cell phones now come with an hdr option.

Ole Henrik Skjelstad
Ole Henrik Skjelstad is a Norwegian math teacher and landscape photographer. He fell in love with photography in 2013 when he got a camera as a birthday present.
Related Posts
 Forget about Photoshop, you can use Microsoft Excel to make HDR photos
 Natural HDR In Films – Disney’s New Algorithm Is Taking Us One Step Closer
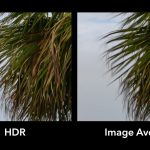 When and how to ditch HDR and use image averaging instead
 Capture One 22 lets you stitch panoramics and create merged HDR images – releasing on December 9th
Join the Discussion
DIYP Comment Policy
Be nice, be on-topic, no personal information or flames.
13 responses to “HDR – an abomination? Not if you do it right!”
Finally, a good HDR article!
Ole Henrik Skjelstad didn’t even read who wrote it, should have done that. But that explains everything, because you are an amazing photographer. Love your images!
The problem is that nobody ever seems to do it right.
That’s because all the guides doesn’t even do it right.
Like everything, it can be good or can be bad depending on execution. There is a lot of really bad over processed stuff out there but there is a lot of great stuff too (pick up a copy of Architectural Digest and you’ll see good examples all through it).
The image of the stages of a photographer should probably be updated to remove “gear faggotry”. Not really appropriate.
Butthurt much?
Appreciate your perspective on this, but if you’re confused as to why I feel this way, I just don’t find it to be consistent with an otherwise thorough and informative article about photography. I assumed it was an oversight and wanted to alert the author. To me, it’s an unexpectedly tasteless joke for what I perceived to be a rather artful site. I think it would be a shame for the site to lose credibility because of its authors’ editorial choices, but that’s just me.
But please, don’t feel obligated to respond again. I’d really hate to take any more time away from your other helpful and insightful contributions across the rest of the internet. ;)
The gayness is great in this one
What’s your problem?
HDR displays are also helping the situation in cinematography and for photos that will be viewed on phones.
And here I am, choosing my dynamic range based on the subject matter, like some deranged lunatic.
If it’s done correctly I have no problems with it.