


How to Edit Smartphone Photos for a Natural Look
Jan 11, 2026
Darlene Lleno
Darlene Lleno brings a unique perspective to DIY Photography as someone who grew up surrounded by camera gear but chose words over lenses. With five years of writing experience, she specializes in photography content that’s both technically informed and genuinely passionate. Growing up with a photographer twin brother meant camera talk was everyday conversation in her household. While he mastered capturing moments, Darlene discovered she preferred being the subject and the storyteller behind the scenes. As a travel enthusiast and mother of two, she understands the importance of preserving life’s precious moments. When not exploring new destinations or writing for DIY Photography, you’ll find her reading or tending to her garden. Her approach to photography writing is refreshingly authentic, she may not be behind the camera, but she knows exactly what it takes to help others capture the shots that matter most.
Share:

Learning to edit smartphone photos properly separates amateur snapshots from professional-looking images. Most people snap a picture and immediately apply heavy filters. This creates unnatural results that scream “over-edited” to anyone who sees them.
Your phone already captures incredible detail straight from the camera. The goal when you edit smartphone photos should be subtle improvements that look believable. Heavy-handed editing destroys the authentic feel of your original shot completely.
This guide teaches you how to enhance your images while keeping them natural. You’ll learn which adjustments actually matter and which ones ruin photos. Professional photographers rely on these exact techniques for their own mobile work.
Start with Proper Exposure Before You Edit Smartphone Photos
Exposure controls how bright or dark your image appears overall. This forms the foundation of every edit you’ll make. Getting exposure right first makes every other adjustment significantly easier.
Most phone editors include a simple exposure slider somewhere in their tools. Slide it right to brighten shadows and reveal hidden details. Slide it left to tone down blown-out highlights that lost all texture.
Make small adjustments of plus or minus 10 to 20 percent. Huge exposure changes look fake and introduce visible noise into your image. Understanding exposure helps you know exactly how far to push this slider. PetaPixel explains proper exposure technique for smartphone photography.
Balance Highlights and Shadows Separately
Modern photo apps split exposure into highlights and shadows controls. Highlights control the brightest parts while shadows affect the darkest areas. Pull down highlights if your sky looks completely white. Lift shadows slightly to reveal hidden details in dark parts.
Keep both adjustments subtle and believable. Natural photos show some bright areas and some dark areas. Everything shouldn’t sit at identical brightness levels.
Watch Out for Clipped Areas
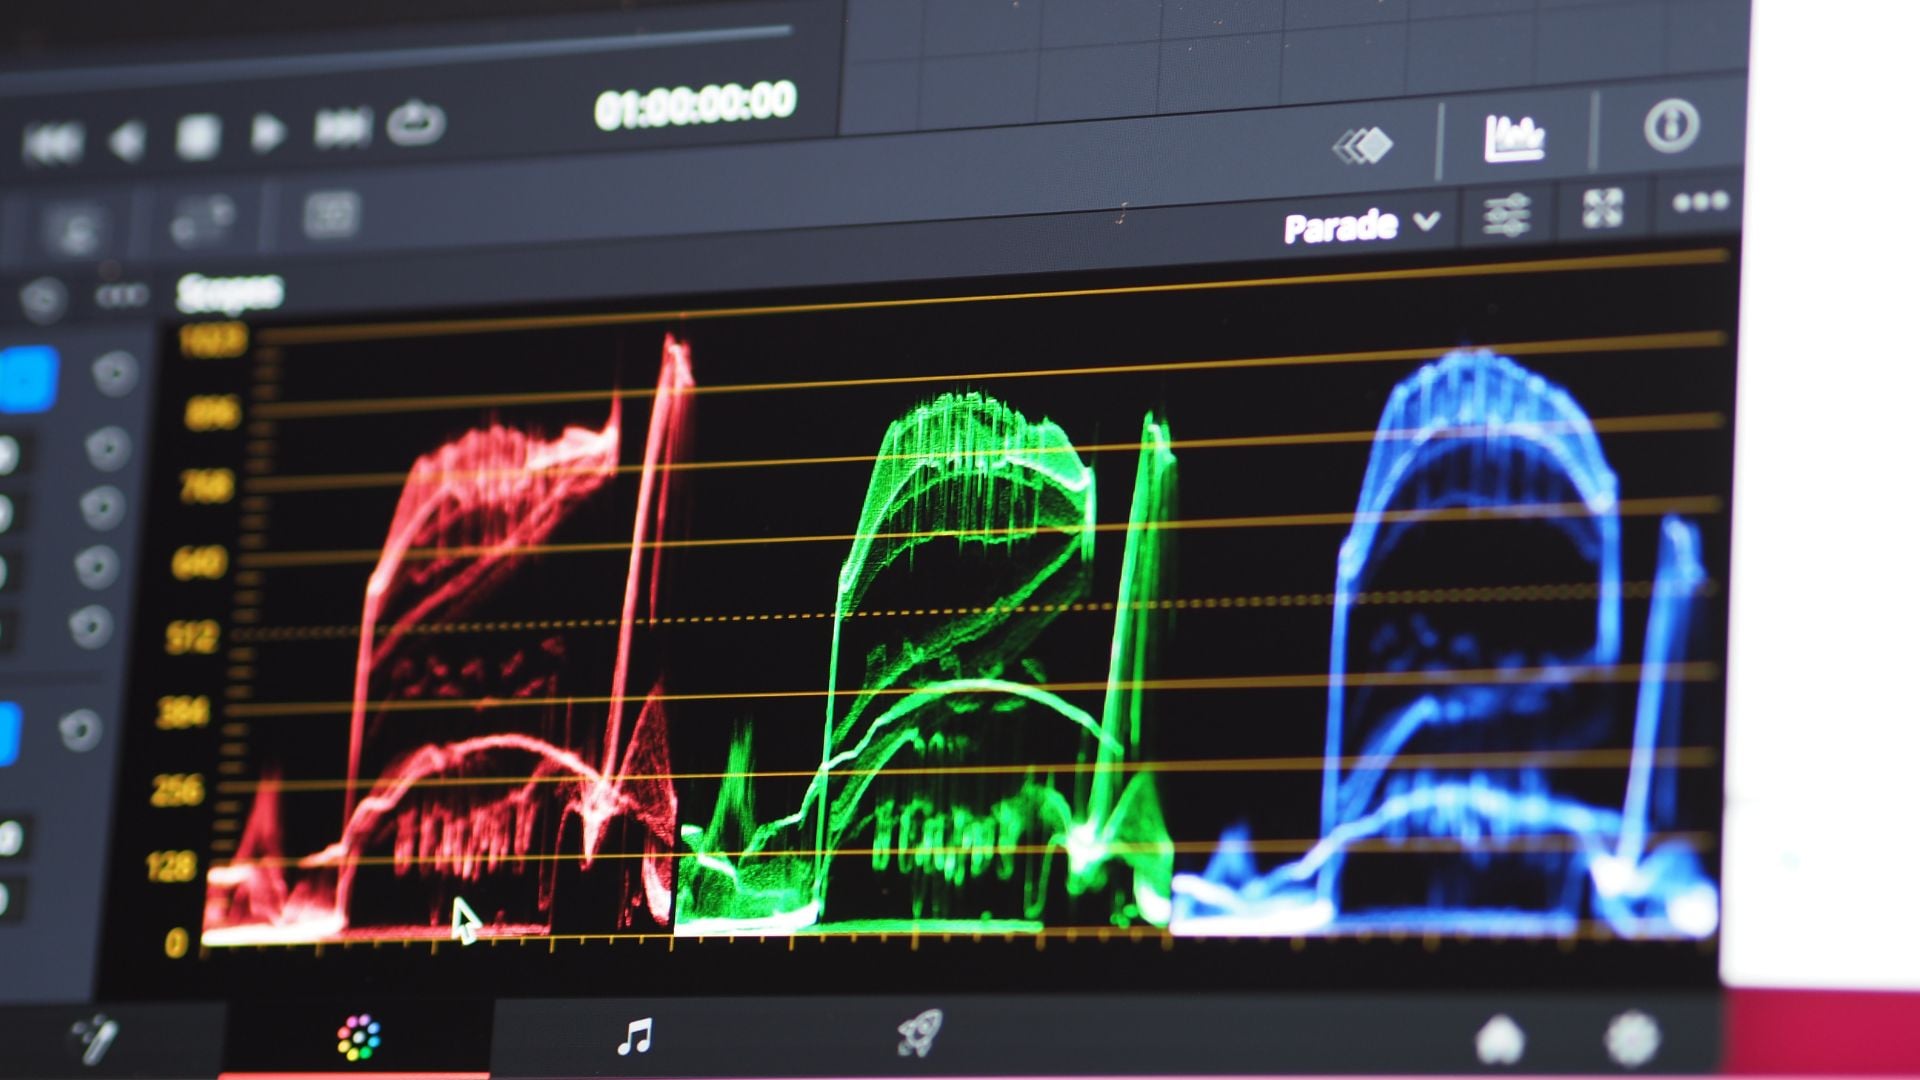
Clipped areas contain zero detail because they’re pure white or black. No amount of editing can recover detail never captured. Your histogram shows exactly where clipping happens.
Check your histogram after making exposure adjustments. Slight clipping in small areas is acceptable. Large areas of pure white or black look unnatural and amateur.
How to Edit Smartphone Photos: Adjust Contrast Carefully
Contrast determines the difference between your lightest and darkest tones. Higher contrast creates punch and drama in your images. Lower contrast produces softer, more subtle results that feel gentler.
Most people crank contrast way too high when they edit smartphone photos. This creates harsh transitions between light and dark that look obviously fake. The goal is adding just enough contrast to make the image pop.
Start by increasing contrast by 5 to 15 percent maximum. View your image at full size to see if details look natural. Portrait photography especially suffers from excessive contrast that ages skin texture.
Midtone Contrast Adds Depth
Some advanced apps include separate midtone contrast controls. Midtones sit between your brightest highlights and darkest shadows. Adding contrast here creates depth without destroying highlights or crushing shadows.
Increase midtone contrast when your image looks flat. Midtone adjustments work great for landscape photography and architecture shots.
Avoid Contrast on Skin Tones
High contrast makes skin look older and emphasizes imperfections. Lower contrast slightly when editing photos of people up close. This softens skin texture while maintaining natural dimension.
Some photo apps include skin smoothing tools designed for this. Use them sparingly to avoid the plastic doll effect.
Master Color Temperature When You Edit Smartphone Photos
Color temperature determines whether your image feels warm or cool overall. Warm photos lean toward orange and yellow tones that feel cozy. Cool photos shift toward blue and cyan that feel crisp and clean.
Auto white balance on phone cameras often guesses wrong about color temperature. Indoor lighting especially throws off automatic settings with ugly yellow or green casts. Fixing temperature is one of the most important edits you’ll make.
Drag the temperature slider left to cool down overly warm images. Move it right to add warmth to cold-looking photos. Natural results usually need only small adjustments of a few hundred degrees.
Match the Actual Lighting Conditions
Your edit should reflect the actual lighting when you took the photo. Golden hour shots should look warm. Shade photos should look slightly cool.
Don’t force unnatural color temperatures onto your images. Blue hour photography depends on that cool, magical quality. Trust your eyes but reference the original scene if possible.
Tint Corrects Color Casts
Tint works alongside temperature to fix weird color casts. Temperature handles warm to cool spectrum while tint addresses green to magenta issues. Shift tint toward magenta to neutralize unwanted green in your photos.
Skin tones reveal color cast problems immediately when you edit smartphone photos. Adjust tint until skin appears natural without green or pink casts.
Edit Smartphone Photos: Control Saturation and Vibrance
Saturation increases or decreases the intensity of all colors equally. Vibrance targets less-saturated colors while protecting already-vibrant ones. Both tools affect color intensity but work very differently under the hood.
Over-saturated photos look cartoonish and fake to everyone who sees them. Social media is full of these nuclear sunsets and neon-green grass shots. Natural editing means restraining your urge to push saturation to maximum levels.
Increase saturation by 5 to 10 percent maximum for most photos. Use vibrance instead when you want safer color enhancement. Vibrance protects skin tones automatically while boosting other colors in your frame.
Boost Specific Colors Selectively
Advanced photo apps include HSL tools that adjust individual color channels. Increase blue saturation for skies without making skin tones orange. Selective color editing creates natural results impossible with global saturation adjustments.
Color correction becomes more sophisticated with selective color tools. Professionals rely on these controls for polished results.
Desaturate for Subtle Looks
Not every photo needs maximum color intensity. Sometimes pulling saturation down creates sophisticated, understated results. Reduce saturation by 10 to 20 percent for a more film-like appearance.
This works well for portrait photos where skin tones should look natural. Over-saturated portraits look amateurish and processed.
Sharpen Strategically to Edit Smartphone Photos
Sharpening enhances edge definition and makes details pop visibly. Phone cameras capture soft images that benefit from appropriate sharpening. Too much sharpening creates ugly halos and artificial-looking edges throughout your photo.
Apply sharpening as your final edit after all other adjustments finish. Sharpening amplifies noise and artifacts if you do it too early. Save it for the last step before exporting your edited image.
Most phone apps include a sharpness slider with values from zero to 100. Keep sharpening between 20 to 40 for natural results on most images. Architecture and detail shots can handle slightly more sharpening than portraits.
Avoid Oversharpening Faces
Excessive sharpening makes skin texture look terrible. Keep sharpening under 25 percent for close-up portrait work. Focus sharpening on eyes, hair, and clothing instead of skin.
Soft portraits often skip sharpening entirely on skin areas. This creates a flattering look while keeping other details crisp.
Structure and Clarity Alternatives
Some apps offer structure or clarity adjustments instead of traditional sharpening. These tools enhance midtone contrast and local edge definition. Structure works great for landscape images where you want texture emphasis.
Clarity can go wrong quickly if pushed too far. Start with small amounts and evaluate carefully.
Crop and Straighten When You Edit Smartphone Photos
Cropping removes unwanted areas and improves your overall composition significantly. Straightening fixes tilted horizons that make photos look careless and rushed. Both adjustments take seconds but dramatically improve your final results.
Always crop before making other edits when possible. This reduces the file size your phone needs to process. You also avoid wasting time editing areas you’ll eventually crop away anyway.
Most apps include grid overlays showing the rule of thirds. Place important subjects along these lines or at intersection points. Compositional techniques like this create more engaging images automatically.
Maintain Aspect Ratios
Different platforms require different aspect ratios. Square crops work perfectly for Instagram feed posts. Vertical 4:5 ratios fill mobile screens better.
Choose your aspect ratio before cropping to avoid re-editing later. Plan ahead based on where you’ll share your edited photos.
Fix Perspective Distortion
Phone cameras create perspective distortion especially with wide-angle lenses. Buildings lean backward and vertical lines converge. Many editing apps include perspective correction tools that fix this.
Drag vertical sliders until building walls run truly vertical. Perspective correction crops into your image slightly to maintain rectangular edges.
Handle Noise Reduction Properly
Digital noise appears as colored speckles throughout your image. Low light photos show the most noise because your sensor needs high ISO. Noise reduction softens these artifacts but can destroy fine details if overused.
Apply noise reduction before sharpening when you edit smartphone photos. Sharpening amplifies noise and makes it more visible. Getting the order right matters for clean final results.
Start with noise reduction around 20 to 30 percent strength. View your image at 100 percent zoom to check that details don’t blur. Faces especially suffer from excessive noise reduction that removes skin texture completely.
Luminance vs Color Noise
Advanced apps separate luminance noise from color noise reduction. Color noise shows as random colored speckles that look digital. You can push color noise reduction higher without losing details.
Some photographers intentionally add grain to simulate film photography aesthetics. This only works after removing all color noise first.
Detail Preservation Sliders
Premium editing apps include detail preservation options alongside noise reduction. Maximize detail preservation when editing architectural shots with important textures. Lower it for portraits where smooth skin matters more.
Balance noise reduction and detail preservation until you’re happy with the tradeoff.
Use Filters and Presets Carefully
Filters apply multiple edits simultaneously for a specific look. Presets work the same way but often allow customization after applying. Both tools offer quick results but usually need refinement for natural-looking photos.
Most built-in phone filters apply adjustments too heavily for realistic results. They’re designed to make photos pop on small screens quickly. Professional editors rarely use filters straight out of the box without modifications.
Try filters at reduced opacity when you edit smartphone photos. Many apps let you adjust filter strength from zero to 100 percent. Applying filters at 30 to 50 percent strength creates subtler, more believable results.
Create Your Own Presets
Once you develop a consistent editing style, save it as a custom preset. This speeds up your workflow dramatically. Professional photographers use presets constantly to maintain consistency.
Test your presets on various photos before relying on them. What works for landscapes might not work for portraits.
Avoid Dated Filter Trends
Heavy vignettes, excessive grain, and crushed blacks were trendy years ago. These effects now make photos look dated and amateurish. Natural editing avoids trendy looks that will age poorly.
Stick to subtle enhancements that could have existed in-camera. Classic, timeless editing stands the test of time better than chasing trends.
Edit Smartphone Photos in the Right Apps
Choosing the right editing app matters as much as your technique. Some apps prioritize filters and effects over precise control. Others offer professional-grade tools but have steep learning curves that frustrate beginners.
Snapseed from Google provides excellent free editing tools for detailed work. Adobe Lightroom Mobile offers professional features with a subscription model. Amateur Photographer recommends Snapseed as one of the best free apps available. Both apps give you enough control for truly natural-looking edits.
Native phone photo editors work fine for basic adjustments. They lack advanced features like selective editing and curve adjustments though. Serious mobile photographers eventually need dedicated editing apps for best results.

Consider Your Workflow
Some apps work better for quick social media edits. Others excel at detailed editing for prints. Choose based on how you actually use your photos.
VSCO remains popular for its film-inspired presets. Darkroom offers powerful tools specifically designed for iOS workflows. Try several apps to find which interface feels most natural.
Learn One App Thoroughly
Pick one primary editing app and learn every tool it offers. Deep knowledge of one app beats surface familiarity with five different apps.
Watch tutorials specific to your chosen app. Mastering your tools lets you focus on creativity rather than fighting software. Professional results come from technique more than which app you use.
Export Settings Matter for Quality
Your editing work means nothing if you export at low quality. Compression destroys detail and introduces artifacts throughout your image. Understanding export settings preserves the quality you worked hard to achieve.
Most apps default to 80 to 90 percent JPEG quality. This balances file size against image quality reasonably. Going below 80 percent creates visible compression artifacts in most photos.
Maximum quality exports create larger files but preserve every detail. Use maximum quality for photos you plan to print or use professionally. Social media posts can use slightly lower quality since they get compressed anyway.
Choose the Right Format
JPEG works fine for most photos and offers universal compatibility. Export as JPEG at 90 to 95 percent quality for social media. Use maximum quality JPEG for photos you’ll print.
Some platforms compress uploads regardless of your export settings. Instagram and Facebook both compress images automatically. Account for this when editing specifically for social sharing.
Resize Appropriately
Exporting at full resolution creates unnecessarily large files. Most social platforms limit display size to 2048 pixels maximum. Resize to platform requirements before uploading when possible.
Keep full-resolution masters separate from social media exports. You might need the full file later for prints.
Begin Your Natural Editing Journey
Better editing can’t fix a poorly captured photo completely. Learning to edit smartphone photos properly matters most when you start with decent source material. Spend time understanding your phone camera before diving deep into editing.
Proper exposure, focus, and composition during capture make editing much easier. You’ll spend less time fixing problems and more time enhancing what’s already good. Great photos need minimal editing when captured correctly initially.
Study light and how it affects your subjects throughout the day. Golden hour produces naturally flattering light that needs little correction. Harsh midday sun creates problems no amount of editing can fully solve.
Understanding photography fundamentals transforms your editing approach completely. You’ll know which adjustments actually help versus which ones just make things worse. Technical knowledge and artistic vision work together for consistently natural results.
The best mobile photographers barely edit their photos at all. They get things right in camera through skill and experience. Your goal should be learning to edit smartphone photos in ways that enhance rather than rescue.

Darlene Lleno
Darlene Lleno brings a unique perspective to DIY Photography as someone who grew up surrounded by camera gear but chose words over lenses. With five years of writing experience, she specializes in photography content that’s both technically informed and genuinely passionate. Growing up with a photographer twin brother meant camera talk was everyday conversation in her household. While he mastered capturing moments, Darlene discovered she preferred being the subject and the storyteller behind the scenes. As a travel enthusiast and mother of two, she understands the importance of preserving life’s precious moments. When not exploring new destinations or writing for DIY Photography, you’ll find her reading or tending to her garden. Her approach to photography writing is refreshingly authentic, she may not be behind the camera, but she knows exactly what it takes to help others capture the shots that matter most.
Related Posts
 18 Jaw Dropping Photos That Celebrate The Natural Beauty Of Breastfeeding Mothers
 Taking photos at Florida’s amazing springs – Swimming in a natural lazy river
 Shortlisted photos of 2019 Wildlife Photographer of the Year show the beauty and cruelty of natural world
 This is how you can edit video on a smartphone or tablet
Join the Discussion
DIYP Comment Policy
Be nice, be on-topic, no personal information or flames.