


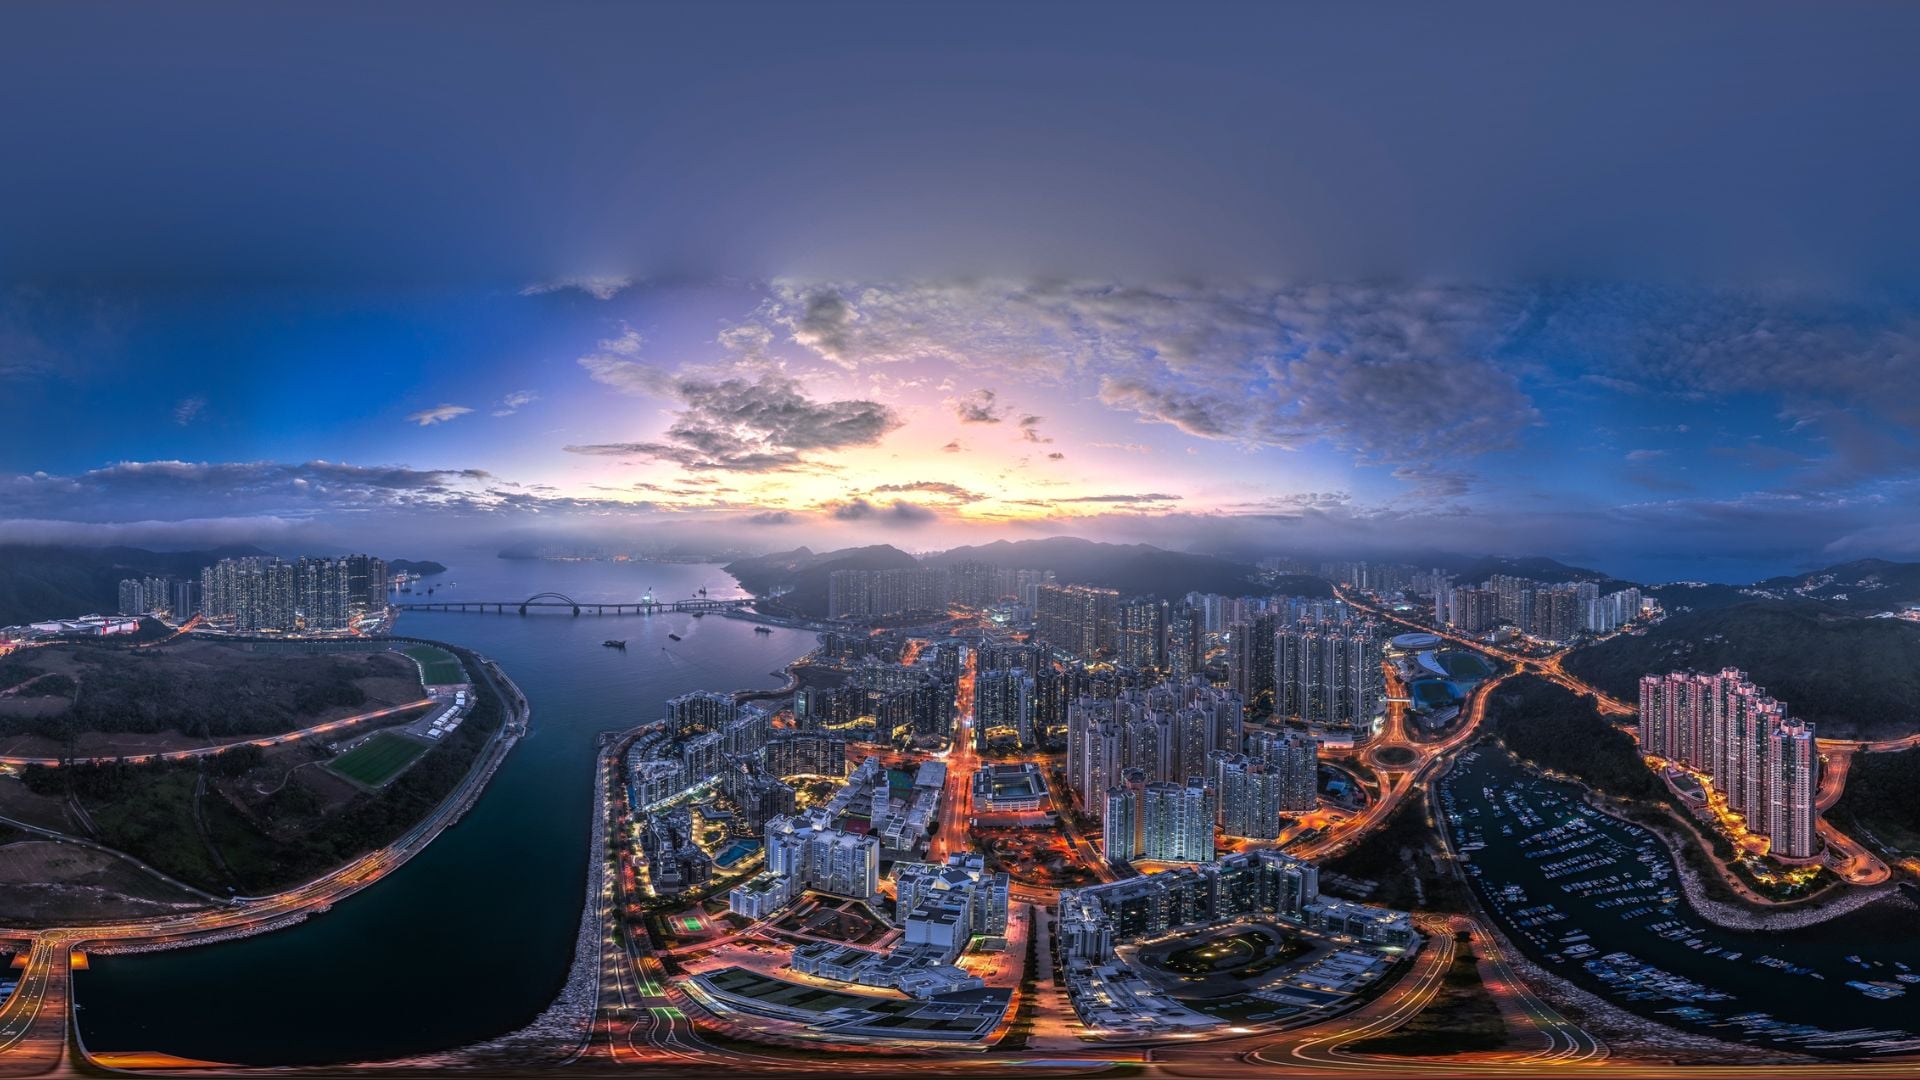
Complete Guide to DIY 360 Degree Panorama Photography Without Costly Software
Oct 8, 2025
Darlene Lleno
Darlene Lleno brings a unique perspective to DIY Photography as someone who grew up surrounded by camera gear but chose words over lenses. With five years of writing experience, she specializes in photography content that’s both technically informed and genuinely passionate. Growing up with a photographer twin brother meant camera talk was everyday conversation in her household. While he mastered capturing moments, Darlene discovered she preferred being the subject and the storyteller behind the scenes. As a travel enthusiast and mother of two, she understands the importance of preserving life’s precious moments. When not exploring new destinations or writing for DIY Photography, you’ll find her reading or tending to her garden. Her approach to photography writing is refreshingly authentic, she may not be behind the camera, but she knows exactly what it takes to help others capture the shots that matter most.
Share:

Creating stunning panorama photography doesn’t require expensive software packages. You can capture amazing 360-degree views using free tools and simple techniques. Many photographers think they need costly programs to create seamless panoramic images. The reality is different.
Smart shooting techniques and accessible software options deliver professional results. Modern technology has made panoramic photography accessible to everyone. Anyone with a camera and basic computer skills can produce gallery-worthy panoramic shots.
Read more: Complete Guide to DIY 360 Degree Panorama Photography Without Costly SoftwarePanoramic Photography Basics
Panoramic photography means capturing multiple overlapping images and combining them into one wide-angle view. You need careful planning and execution during both shooting and stitching phases. Your camera collects puzzle pieces that eventually form a complete picture.
The secret lies in understanding how overlapping images work together. Each shot needs to share about 30-40% of its content with the next frame. This overlap gives the software reference points to align and blend images smoothly.
Essential Equipment for DIY Panoramas
Building your panorama toolkit doesn’t require expensive gear. A sturdy tripod forms the foundation of your setup. It ensures consistent positioning throughout the sequence. You can shoot handheld panoramas, but a tripod eliminates variables that cause alignment problems later.
Your camera’s manual mode becomes essential for maintaining consistent exposure across all frames. Automatic settings will adjust for different lighting conditions in each shot. This creates noticeable variations in the final panorama. Lock your exposure, white balance, and focus before starting the sequence.
A remote shutter release or your camera’s timer function minimizes camera shake during each exposure. Even slight movements can mess up the alignment process. This is especially true with longer focal length lenses.
Camera Settings for Perfect Panorama Capture
Manual exposure control prevents frustrating exposure variations that ruin many panoramic attempts. Take a test shot in the middle of your intended scene. Then use those settings throughout the entire sequence. Your aperture should stay constant to maintain consistent depth of field across all frames.
Focus deserves special attention in panoramic work. Set your lens to manual focus and choose a focal point that keeps most of your scene sharp. Understanding dynamic range helps maximize sharpness from foreground to background. This is particularly important for landscape panoramas.
White balance consistency ensures color harmony across your final image. Camera auto white balance might shift between frames. This creates color casts that become obvious in the finished panorama. Choose a specific white balance setting based on your lighting conditions and stick with it.
Modern Camera Features for Panoramic Photography
Today’s cameras include advanced features that simplify panoramic capture significantly. Many mirrorless cameras offer built-in panorama modes with live view guides. These guides show you exactly where to position your next frame for perfect overlap.
Electronic viewfinders display exposure information in real-time across your panoramic sequence. This helps maintain consistent settings throughout the capture process. Some cameras even lock exposure automatically when you start a panoramic sequence.
Focus peaking and magnification features help ensure sharp focus across your entire panoramic scene. These tools work especially well when using manual focus for panoramic sequences. Live histograms prevent overexposed highlights that can’t be recovered in post-processing.
Several free software options excel at panorama stitching without the cost of premium programs. Hugin remains the most powerful open-source panoramic stitching solution available. This software handles complex alignments and produces professional-quality results. The learning curve is steeper than simpler alternatives, but the results justify the time investment.
PTGui offers a free version with basic stitching capabilities, though the full version requires payment. Adobe Lightroom’s panorama merge feature provides excellent results for simpler panoramic projects. Many photographers overlook this built-in capability that comes with their existing Creative Cloud subscription.
Getting Started with Free Panoramic Software
Hugin simplifies complex panoramic projects through its comprehensive toolset. The software automatically detects control points between overlapping images and calculates optimal projection parameters. Simply load your image sequence into the assistant and let it analyze overlap patterns and alignment points. The software’s exposure blending corrects exposure differences between frames.
Modern smartphones include built-in panorama modes that work surprisingly well for casual photography. iPhone’s panorama mode and Google’s Camera app both use advanced computational photography. These built-in tools handle simple horizontal panoramas automatically. They work best for landscapes and architectural subjects without complex foreground elements.
Adobe Lightroom’s panorama merge feature offers professional results within a familiar interface. The software maintains RAW data throughout the process. This preserves maximum editing flexibility in your final panoramic image. Export options include various formats and quality settings optimized for different uses.

Mastering Hugin for Advanced Control
Hugin’s control point system allows precise alignment of problematic images. When automatic stitching fails, manual control points help the software understand how images connect. This feature proves valuable for architectural panoramas or scenes with repetitive patterns. These patterns confuse automatic algorithms.
The software’s exposure correction tools handle challenging lighting situations. Graduated filters and local adjustments can balance exposure differences that occur across wide panoramic views. These tools work like traditional darkroom techniques but with digital precision.
Lens correction options in Hugin address distortion issues that affect panoramic quality. Barrel distortion from wide-angle lenses can create alignment problems. The software’s correction algorithms compensate for these optical imperfections during the stitching process.
Advanced DIY Techniques for Professional Results
Professional panoramic photographers use specific techniques that separate their work from casual attempts. These methods require more planning but deliver dramatically better results.
Nodal point alignment eliminates parallax errors that cause stitching failures. Find your lens’s nodal point by positioning objects at different distances. Adjust your tripod mount until near and far objects maintain their relative positions as you rotate the camera.
Multiple row captures expand your panorama vertically. This creates true spherical images. Start with the horizon row, then capture rows above and below with the same overlap principles. This technique produces immersive 360-degree experiences without specialized equipment.
Shooting Strategies for Complex Scenes
Complex lighting situations require special approaches that go beyond basic panoramic techniques:
- HDR Integration: Capture multiple exposures of each frame position, then combine them using HDR software before stitching
- Strategic Timing: Wait for consistent lighting conditions across your entire panoramic scene
- Graduated Filters: Use physical filters to balance extreme brightness differences during capture
- Weather Monitoring: Plan shoots during stable atmospheric conditions to avoid shifting light
High dynamic range techniques work well with panoramic photography. Capture multiple exposures of each frame position. Then combine them using HDR software before stitching. This approach handles challenging lighting conditions that single exposures cannot manage effectively.
Foreground-background relationships require careful consideration in panoramic work. Objects very close to the camera can create parallax issues even with perfect nodal point alignment. Position your camera to minimize extreme foreground elements. Plan multiple passes with different focus points if needed.
Moving subjects present unique challenges in panoramic photography. Wind-blown vegetation, water features, or people moving through the scene can create ghosting artifacts in the final image. Time your captures during calm moments. Use the software’s ghost removal features when necessary.

Color and Exposure Matching Techniques
Manual exposure blending gives you control over how different brightness zones combine in your panorama. Some software allows you to weight certain frames more heavily in the final blend. This is useful for scenes with extreme lighting variations.
Color temperature shifts across wide scenes can create unnatural-looking panoramas. Scout your location during your intended shooting time to understand how light changes across the view. Sometimes a single white balance setting won’t work for the entire scene.
Graduated filter techniques help balance exposure differences during capture rather than relying entirely on post-processing corrections. Physical filters attached to your lens can control extreme brightness differences more naturally than digital corrections.
Troubleshooting Common Panorama Problems
Even experienced photographers encounter specific issues when creating panoramic images. Understanding these problems and their solutions saves time and frustration.
Alignment and Stitching Issues
Common problems and their solutions include:
- Insufficient Overlap: Increase overlap to 40-50% for challenging subjects
- Perspective Changes: Maintain consistent camera height and rotation axis
- Moving Elements: Time captures during calm conditions or use ghost removal tools
- Exposure Variations: Double-check manual settings before each sequence
Alignment failures usually result from insufficient overlap between frames or dramatic changes in perspective. Increase your overlap percentage to 40-50% for challenging subjects. Architectural scenes with strong geometric elements need more overlap than organic landscapes.
Exposure banding appears as visible lines where frames meet in the final panorama. This problem comes from inconsistent camera settings between shots. Double-check your manual settings before each shooting session. Avoid changing ISO or aperture mid-sequence.
Ghosting artifacts occur when moving elements appear in multiple frames at different positions. Most stitching software includes ghost removal tools. Prevention during capture works better than correction afterward. Wait for calm conditions or plan your composition to minimize moving elements.

Software-Specific Solutions
Each stitching program handles problems differently in 2025. Hugin provides the most comprehensive manual controls for difficult stitching situations. Adobe Lightroom’s panorama merge works best for straightforward landscape panoramas. PTGui’s free version handles basic stitching well but limits output resolution.
AI-powered stitching algorithms have improved significantly. These systems can handle moving clouds, water, and vegetation better than older software versions. However, they still struggle with extreme parallax errors and dramatic lighting changes.
Projection distortions can make straight lines appear curved in your final panorama. Different projection methods handle this issue in various ways. Rectilinear projection maintains straight lines but limits the maximum field of view. Cylindrical projection allows wider angles but curves vertical lines.
File format considerations affect both workflow and final quality in 2025. Shooting in RAW format provides maximum flexibility for exposure and color corrections before stitching. Modern stitching software handles RAW files directly, eliminating the need for conversion. HEIF format offers better compression than JPEG while maintaining higher quality for mobile panoramic photography.
Creative Applications Beyond Standard Panoramas
Panoramic techniques open doors to creative possibilities that extend far beyond traditional landscape photography. These applications demonstrate the versatility of panoramic methods.
Vertical and Multi-Row Techniques
Vertical panoramas capture tall subjects like waterfalls, skyscrapers, or towering trees using the same techniques as horizontal captures. Rotate your camera 90 degrees and apply the same overlap principles vertically instead of horizontally.
Multi-row spherical panoramas create immersive virtual reality experiences. Capture multiple horizontal rows at different vertical angles. Ensure overlap both horizontally and vertically. Specialized viewers can display these images as interactive 360-degree experiences.
Abstract and Artistic Approaches
Creative panoramic applications push beyond traditional documentation:
- Intentional Camera Movement: Create surreal perspectives impossible with single exposures
- Time-lapse Integration: Document changing conditions across wide scenes over time
- Multiple Exposure Blending: Layer different time periods into single images
- Architectural Abstractions: Use panoramic distortions for artistic effect
Intentional camera movement during panoramic capture creates unique artistic effects. Slight rotations or tilts between frames produce surreal perspectives impossible with single exposures. This technique requires experimentation to achieve pleasing results.
Time-lapse panoramas combine two challenging techniques into dynamic presentations. Capture panoramic sequences at regular intervals. Then combine the resulting panoramas into time-lapse videos. This approach documents changing light or weather conditions across wide scenes.
Multiple exposure panoramas layer different time periods into single images. Capture your panoramic sequence, then repeat the process minutes or hours later. Blend the two panoramic sets to show temporal changes across the scene.
Panorama Post-Processing Tips
Post-processing panoramic images requires different approaches than single-frame photography. These techniques help you get the most from your panorama stitching efforts.
Professional panoramic photographers often process their images in stages. First, they optimize individual frames before stitching. This includes basic exposure corrections, white balance adjustments, and lens corrections. Then they stitch the optimized images and make final global adjustments.
Color grading panoramic images requires attention to how adjustments affect the entire wide field of view. What looks good in one section might not work across the entire image. Use graduated adjustments and masking to fine-tune different areas independently.
Sharpening panoramic images needs special consideration due to their large file sizes and varied content. Apply sharpening selectively to maintain natural-looking results across the wide format. Focus sharpening on key areas rather than applying it uniformly.
Equipment Recommendations for Better Results
While you don’t need expensive gear to create great panoramas, certain equipment improvements can significantly boost your success rate and final image quality.
A panoramic head for your tripod helps achieve perfect nodal point alignment. These specialized mounts rotate your camera around the lens’s entrance pupil. This eliminates parallax errors that cause stitching problems.
L-brackets allow easy switching between horizontal and vertical orientations without readjusting your tripod setup. This is especially useful for multi-row panoramic captures where you need to maintain precise positioning.
Electronic shutter releases or intervalometers ensure consistent timing between shots. Some models even have built-in delays and automatic sequence modes specifically designed for panoramic photography.

Your Path to Professional Panoramas
Creating stunning 360-degree panoramic photography without expensive software opens new creative possibilities for photographers at any budget level. The combination of careful shooting techniques and powerful free software produces professional-quality results. These results rival expensive commercial solutions.
Success comes from understanding the principles behind panoramic capture and applying them consistently throughout your workflow. Master these DIY techniques, and you’ll discover that creating breathtaking panoramic images depends more on skill and creativity than expensive tools. Your panorama photography journey starts with the next wide scene that catches your eye and a willingness to experiment with these accessible techniques.

Darlene Lleno
Darlene Lleno brings a unique perspective to DIY Photography as someone who grew up surrounded by camera gear but chose words over lenses. With five years of writing experience, she specializes in photography content that’s both technically informed and genuinely passionate. Growing up with a photographer twin brother meant camera talk was everyday conversation in her household. While he mastered capturing moments, Darlene discovered she preferred being the subject and the storyteller behind the scenes. As a travel enthusiast and mother of two, she understands the importance of preserving life’s precious moments. When not exploring new destinations or writing for DIY Photography, you’ll find her reading or tending to her garden. Her approach to photography writing is refreshingly authentic, she may not be behind the camera, but she knows exactly what it takes to help others capture the shots that matter most.
Related Posts
 Samsung Enters the 360 Degree Camera Market With the Samsung Gear 360. Mark Zuckerberg Supports
 This is why you need to pre-process moon images – a complete guide to using PIPP software
 How To Create A Turntable For 360 Degree Product Photography In 5 Minutes And $15
 Costly landscape photography mistakes and how to avoid them
Join the Discussion
DIYP Comment Policy
Be nice, be on-topic, no personal information or flames.
One response to “Complete Guide to DIY 360 Degree Panorama Photography Without Costly Software”
horrible article, useless knowledge and misleading information. not mentioned anything about focal length. I make 360 panoramas since 2007 and this article is just a piece of junk!