


DIY Oral Autofocus & Shutter Release
Apr 15, 2010
Udi Tirosh
Udi Tirosh is an entrepreneur, photography inventor, journalist, educator, and writer based in Israel. With over 25 years of experience in the photo-video industry, Udi has built and sold several photography-related brands. Udi has a double degree in mass media communications and computer science.
Share:
 In the following post, Jay Scott shares how he built an oral autofocus shutter release to enable him to take better photographs from his wheelchair. Jay is a talented photographer and a Strobist in heart, you can check his portfolio here.
Ever since I first began photography with a DSLR the possibility of having a problem with the weight of the camera existed for me. Why, you might ask? Because my hands (and the rest of my body from the chest down) are paralyzed. I have plenty of arm strength, but my dexterity with somewhat stiff, lifeless, fingers leaves something to be desired. I won’t go into details about the cause of my paralysis, but you can read about it here if you are interested.
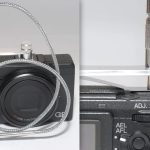
Weight was never an issue with my first camera, a point and shoot Fujifilm S5100. With that first camera my method of shooting was to hold it in my right hand while reaching over the top with my left to press the shutter button. Now, with my Pentax K10D, I support the body and lens with my left palm and press the shutter with the inside of my right thumb’s knuckle. This works fine for most landscape oriented shots. To describe my portrait oriented shooting method would simply be too confusing so I’ll provide a photo:

You can see the pressure placed on my brow by the weight of the camera and lens since my left hand is doing nothing to support the weight. This is fine for a few minutes with a slow lens. Any longer, or if using faster or heavier glass and my brow starts to feel bruised. Add to that my inability to shoot anything at a downward angle, because the camera slips out of my hand in either portrait or landscape orientation, and interesting angles grow fewer. I needed a solution to bolster my already limited shooting options, so I designed and built an autofocus oral shutter release.
Manual focus releases of this type exist. The best, and most expensive, are made by Conceptus Inc. An online acquaintance, who happens to live a very short distance from Conceptus Inc, runs a disabled photographer adaptive equipment blog, Rolling F-Stop, and has tried to convince them to build an AF bite release. They said they could do it, but the costs would be prohibitive to mass produce it. The target market is understandably small. Why doesn’t an AF version already exist? In researching before I built mine, I was given the answer. Most skydivers use wide angle lenses, are thousands of feet beyond infinity focus, so simply set it to infinity and jump, firing away without a need to refocus.
With a manual focus only shutter release my left hand would be on the lens anyway so it’s better than if it were under the body, as in landscape orientation, but we did not pay as much money as we did for this technology to limit it to manual focus. I knew it was possible to produce an autofocus shutter release because Gadget Infinity, an eBay store, sells wireless shutter releases that incorporate a two-stage pushbutton switch where, similar to half depressing a shutter button, the first stage of the button is autofocus and the second releases the shutter. With the remote included in one of these releases I tried using it by itself in my mouth but, big as it may be, it did not fit nicely in my maw and the recessed button was difficult to consistently and effectively press with a tooth or tongue.
A few quick tests with a multimeter on the wireless shutter release to determine the continuity and I soon learned that the tip of the stereo micro phone (2.5 mm) plug was for the shutter, the sleeve or center part was for autofocus, and the base was the ground. I know this is the case for Pentax DSLR cameras. Canon consumer models use the same jack, but I cannot guarantee which of the contacts perform which function. As soon as you get to prosumer models and up a different end is used. The same can be said for Nikon, Sony, Olympus, Samsung etc. The point is that before beginning you’ll need to acquire the appropriate end for your camera if you decide to build one. Thankfully most releases are well under $10 on eBay so butchering one won’t be too painful to your wallet if you cannot find just the end. I was unable to find a two-stage switch anywhere on the internet despite a very thorough search. If you know of a source please leave it in a comment. I decided that I had the tongue dexterity to work with two small, low spring pressure, pushbutton switches physically (not electrically) parallel to each other. All I needed was to figure out a few of the design details since the electrical was very simple.
After all that, let’s get to the build.
Materials you will need:
- 2 small pushbutton switches
- Wired autofocus shutter release for your camera model OR
- Appropriate end to fit your camera’s shutter release jack
- A length of three wired cable (phone cable is pretty ideal and ample)
- Mounting container for the switches: Initially I used a piece of spam credit card but the finished version used the end of a large utility knife container. A sports mouth guard was suggested on one site for a DIY manual focus release but I felt it would crowd my tongue and be more difficult to saliva proof.
- Balloon, exam glove or other water/saliva proofing sleeve
- Small nylon zip tie
Tools needed:
- Multimeter/continuity tester
- Side cutters
- Wire strippers
- Utility knife
- Drill (optional)
- Soldering pencil
- Hot glue gun
- Heat shrink tubing or electrical tape
- Appropriate wrench to for the nuts on the pushbutton switches
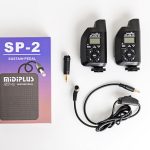
Here are the materials I used initially:

Build Steps
Step 1 – Determine the contact functions.
Using your multimeter determine which contacts from the autofocus wired release trigger the focusing and which one trips the shutter. To do this see which contacts cause the continuity circuit to be closed at which stage of the button press on the wired release. Keep in mind that one contact will be the ground for both the AF and the shutter. I would recommend writing down your findings so you can refer back to them later. If you decided to try to purchase the appropriate end and use cable you may need to research which contact performs which function. Doing a quick search of the internet I did not have much luck finding of this information but I am sure it is out there or could be asked about in a forum.
Step 2 – Cut off the remote
Make certain that you leave enough cable to reach from the shutter release to your mouth or whatever length you desire. Those of us fortunate enough to use a nice simple 2.5 mm jack can buy any type of cord or adapter for pennies on eBay and not need to trash a remote. However, if it means the difference between limiting your opportunities as a photographer and getting much more unique shots I don’t think a few dollars to cut off a remote is a difficult decision.
Step 3 – Wiring
Cut off the outer insulation and strip the inner wires
Now, Test continuity with your multimeter to determine which color of wire corresponds with the different contacts as determined in step one.
Step 4 – Connecting the buttons
Run your stripped ground wire through one of each of the two switches’ contacts looping it back to itself and then solder in place.
As mentioned, they will have a common ground. Soldering it up this way will not affect the circuitry because whether one or both switches are activated it is simply a ground and all electricity will “drain” through this wire. You can see in the photos provided that I made sure each of the switches’ contacts that held the ground wire were beside each other when the final mounting was completed. This just minimized the likelihood of a short.

Run your stripped autofocus wire through the other prong of one of the switches and solder in place. If you feel it necessary slide some heat shrink tubing over the wire before soldering and then shrink it in place over top of the solder joint. Of course, electrical tape could be used instead. A final insulating step will be performed for the whole circuit so this is not necessary unless the leads are very close to each other or have a tendency to touch one another.
Run your stripped shutter release wire through the open prong of the other switch and solder in place. As in step six, use heat shrink tubing or electrical tape if you feel it necessary.
Step 5 – Test
This would be a good time to test your setup. Plug it into your camera and test the function. At this point I would not recommend using your mouth. I do not know if the voltage would be increased from the typical 7.2 to 9.6V by the camera but I don’t want to find out the hard way if there is any voltage increase in there or not.
Step 6 – Mount your switches
Drill two holes the size of your switches’ diameter, side-by-side, in your mounting container. If you don’t have a drill you could melt them with your soldering pencil, but I’ll admit that using a soldering pencil in that manner is a big pet peeve of mine. You may want to clean out the edges of the holes with your utility knife to make a better fit. Slide the switches through the holes you’ve drilled and cleaned out, thread the nuts on the two switches and tighten them in place. If you’re using a container, fill the cavity with hot glue or silicone to insulate the circuitry so you don’t get any contacts shorting out on each other. If your mounting container is an open piece of plastic, as my first version was, apply some hot glue or silicone around the contacts to insulate, protect the solder joints and give you an additional option of where to hold the release with your teeth.

Step 7 – Saliva Proofing
10. Tape up any places where the wire enters your mounting container that could be a point of stress on the wire and perform any other cosmetic work you would like to finalize your release. I certainly did not mind the release without the final saliva cover but I did find that after a period of use my saliva would get into the switches enough that they would fail to function perfectly. I ended up using a typical black balloon and then tied off the bottom with a zip tie. I found that an exam glove was just simply too big, and individual finger or some of the glove was too small and, to be honest, a condom would be too embarrassing. A balloon was just right.
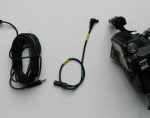
My final Version without the balloon.

A Few Things Worth Mentioning
* I was not too concerned about the testing of this release causing damage to the camera because it was going to be as simple as either it worked and the shutter released or nothing happened. But, as with any DIY hack that directly involves the camera and its electronics it is a “try at your own risk” project.
* I thought about mounting the switches in a perpendicular fashion so that lip or teeth pressure could be used as the autofocus and then your tongue as the shutter release. However, I found even these tiny little switches to require me to keep my mouth open wider than is comfortable for any length of time when holding it vertically in my teeth or lips.
* May I suggest using switches that are different colours or some other method to identify clearly and quickly which side is which function. A notch in the switch or container might be wiser since it will be in your mouth.
* Part of successful portraiture is maintaining a good repertoire and conversation with your model as you shoot. Undoubtedly an oral shutter release may make for some laughter initially but I do not know about the helpfulness of it about 10 minutes or more into the shoot when the novelty and humour of the shutter release turns to annoyance and nuisance as you try to communicate what you want from your model and they try to understand what you are saying with a piece of hardware in your mouth. I suppose practice and experience is about the only way to figure out the best way to work effectively with a piece of equipment like this.

I do not know how useful this release will be to your average, able-bodied, shooter, but maybe it is exactly the tool you’ve been looking for to minimize the shake even from pressing the shutter button in more critical situations like macro work, paradiving with a partner or long focal length wildlife shots.

Udi Tirosh
Udi Tirosh is an entrepreneur, photography inventor, journalist, educator, and writer based in Israel. With over 25 years of experience in the photo-video industry, Udi has built and sold several photography-related brands. Udi has a double degree in mass media communications and computer science.

Join the Discussion
DIYP Comment Policy
Be nice, be on-topic, no personal information or flames.