


Creating a Simple Shutter Release Cable From An Old PC Case
Jan 20, 2011
Udi Tirosh
Udi Tirosh is an entrepreneur, photography inventor, journalist, educator, and writer based in Israel. With over 25 years of experience in the photo-video industry, Udi has built and sold several photography-related brands. Udi has a double degree in mass media communications and computer science.
Share:
 Boy! Is this the most efficient way to do this? Heck no. But we know that you killed your computer for the DVD lens, so here is a good use for its leftovers.
If you have any camera that uses the 3 pin N3 shutter release socket, then here is a step by step guide to creating a cheap (if not free) basic shutter release for camera’s like the 30D, 5D, 7D, etc.
Technically, nothing bad can happen from accidentally shorting out the wrong pins in the N3 socket, but still, I take no responsibility for any damage that may occur from anyone making use of this information.
Step 1 – Get your mits on an old PC case.
Grab yourself an old PC computer case; you’ll often find them loitering the streets around the time when your local council picks up hard rubbish, we’re after the power switch and cable that goes with it, either extract in-situ, or drag the box home for surgery.

Step 2 – Open the case.
Open the PC case and expose the motherboard if it has one in it, no problem if it doesn’t, just make sure the power switch and cable are still there.
Pull off the front facia of the case as well, you will need to get access to the actual power switch

Step 3 – Find the Power Switch.
The actual switch is usually hidden under the plastic power button itself found on the facia. Sometimes these buttons can be a little hard to spot, they’re usually small, black and square in appearance.

Step 4 – Find the power cable inside case and it’s attachment to the motherboard.
Track the cable back from the power switch on the inside of the case back to where it connects to the motherboard. These cables should only have 2 strands, and are often blue and white in colour. If you’re cable has more than 2 strands, you will have to do some detective work later on to sort out the right 2 strands.

There will be a gaggle of plugs all bunched up around the power plug on the motherboard, they’re all black and rectangular and all should have their name printed on the plug in lovely white lettering for ease of identification, the words however, are often encrypted to make it all a little more challenging for you!
Oh, um, You will want to unplug the cable from the motherboard… makes plugging it into the camera easier!

Step 5 – The power switch inside the case
The switch itself is often seated inside a small plastic housing that is secured to the computer case via 2 or more little “squeezy” plastic clips.
Usually you will need to squeeze them from the front of the case, and the switch and housing should pop out on the inside, they shouldn’t provide too much of a resistance, a pair of pliers and a blow torch are always useful if the squeezy clips start to act up!


Step 6 – The power switch case
Once you have removed the switch and cable from the case, you can remove the plastic housing from the switch if you like, or you may want to fabricate some elaborate, homemade masterpiece, in which case, leave it be.
I removed the housing, as it can easily fall off and is not necessary for functionality.

Step 7 – Trim the plug
I had to trim the edges of the plastic casing around the connector at the other end of the plug to get it to fit inside the N3 socket on the camera.
Make sure you don’t trim too much off so that the 2 metal connectors inside the plug touch each other, otherwise your camera will just keep shooting as soon as you plug your cable in!

Step 8 – The N3 Socket pinout diagram
The N3 socket is really pretty simple. There are 3 pins inside a plastic casing that has a semi-circular cutout at one end to ensure the plug aligns correctly.
With the cut tout to the right, the top pin is “ground”, the left pin is the “Shutter release” and the right pin is the “focus”.
Theoretically, connecting (otherwise known as shorting) the shutter and focus pins will cause the camera to focus, and shorting the ground and the shutter will release the shutter.
You want to connect the 2 connectors inside the power cable’s plug to the shutter and ground pins for the shutter release to work.
I found that have the plug connected to these 2 pins still caused the camera to focus when pressing the switch, so… bonus!

Step 9 – plug it in
Plug the end that was connected to the motherboard into the N3 socket, ensuring that the 2 connectors inside the plug connect to the shutter and ground pins (see the previous step).
If you haven’t trimmed off too much of the plastic on the plug, it should sit fairly snugly inside the socket and not fall out too easily, electrical tape may come in use to secure the plug in place, or just to fatten up the plug so that is stays in place when inside the socket.

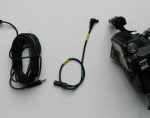
Step 10 – DIY Shutter release from PC power switch
There you have it, one simple DIY shutter release cable made from the power switch and cable from an old computer case.
Enjoy!

About the author
Ravian Budde is a Graphic Designer by trade, and started teaching Photoshop to Photographers about a year ago which sparked a desire in him to start shooting things. Check out his work at www.ravian.com.au
P.S. If you dont have an old PC around, check other options for a release cord like a a really basic one, an oral one and a wireless one that’s good for kilometers

Udi Tirosh
Udi Tirosh is an entrepreneur, photography inventor, journalist, educator, and writer based in Israel. With over 25 years of experience in the photo-video industry, Udi has built and sold several photography-related brands. Udi has a double degree in mass media communications and computer science.


Join the Discussion
DIYP Comment Policy
Be nice, be on-topic, no personal information or flames.
One response to “Creating a Simple Shutter Release Cable From An Old PC Case”
Super article!