


My Solution For Creating Simple And Inexpensive Studio Backgrounds
Sep 2, 2015
Robert Mitchell

Udi Tirosh is an entrepreneur, photography inventor, journalist, educator, and writer based in Israel. With over 25 years of experience in the photo-video industry, Udi has built and sold several photography-related brands. Udi has a double degree in mass media communications and computer science.
Share:
Photographer Robert Mitchell (see bio below) came up with a clever solution for creating an almost infinite amount of backgrounds using nothing more than a wall and a bucket of paint. While painting and repainting takes some time, the results definitely justify the effort.

Every photographer that builds a studio or converts a room for use as a photo studio gives thought to backgrounds and backdrops. Seamless paper is available in a few widths and a multitude of colors but it’s not always interesting or appropriate and depending on what you’re shooting, seamless can be boring and ugly. The paper itself doesn’t cost that much and you can rig things to hold a roll without any serious investment in hardware, and for some, this is more than enough, and everything they need.
If you’ve determined that you want something more interesting than colored seamless then the next most common choice seems to be canvas, muslin and assorted fabric backgrounds. There are so many choices and they can work quite well, but I always found them to be boring once I used them a few times and I didn’t want my work to always have the same look when I shot in the studio. Some of the hand painted backgrounds I’ve seen are really beautiful and can be used in many ways so as not to be so boring but they carry a hefty price tag.
If you’re the kind of person that enjoys DIY then you can always try to create some hand painted fabric backgrounds. Painting canvas didn’t agree with me in so many ways.
Creating backgrounds in post production is also an option with limitless possibilities although it would never be my first choice.
I chose to go in a slightly different direction.
In my studio, I wanted to have one shooting area that I could change easily with very little expense. The solution was to designate a portion of one wall in the studio that I paint and repaint, making it whatever I want or need and once I’ve shot with it a few times I just change it. For me, a hard surface is much easier to work with than a flexible piece of canvas and ultimately, repainting canvas wouldn’t hold up as well as the wall and would be cumbersome to roll, fold and store.
Not only does my painted wall give me the variety and change that I like but it costs very little to create and almost nothing to change. The wall I’m using is 8 feet high and 6 feet wide. The tools and materials needed are minimal. I bought a few cheap 2 inch and 3 inch brushes, a sea sponge, 1 gallon of glaze and 1 gallon of flat white paint. This gives me everything I need except for the color, and to color or change it, I use 2 of those little paint samples you can get at most paint and home centers and that costs me $6. Every so often I’ll need a third sampler and that brings the cost of change to $9. The other paint and glaze go a very long way and are used to alter a color or to create some form of faux finish using glaze. After a year or so of doing this, I have yet to need more white paint or glaze.
It took me a while to get good at knowing what would look good and how to light it, but now I change it every week or two and I love the results.
Since I do a lot of work against the wall and use it as a prop, I can’t create visual effects behind my subject, and so, for my work, the background must be physically changed rather than just using gels or projected patterns and lighting effects. It’s actually quite a bit of fun and I’ve learned a lot of interesting painting and faux finish techniques. I learned by doing and by experimenting.
Everyone does what makes the most sense for them based on budget, creativity and type of work they shoot. The only thing that makes one solution better than another is if it’s better for you. What works for one person may not work for another.
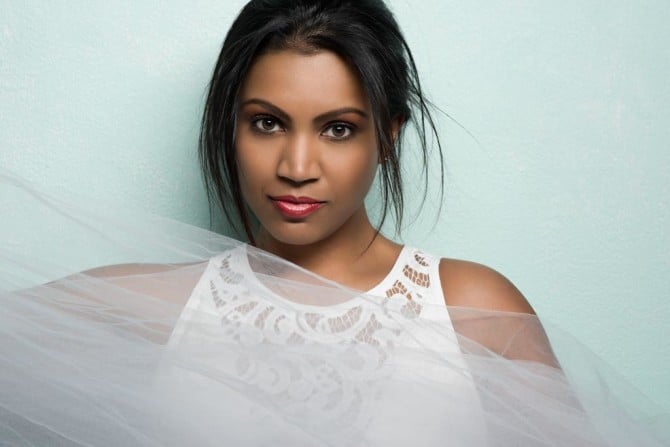
This is a sampling of images shot using my hand painted wall. I’ve gone from soft pastels to gritty and edgy textures. Mix that with lighting and visual effects and I have a far more flexible shooting zone than I would with one or even a few fabric backgrounds or colored seamless paper.


Robert Mitchell is a New York based photographer and instructor specializing in contemporary portraits and headshots photography. You can follow Robert on Facebook, Twitter and his blog. This article was originally published here and shared with permission.
We love it when our readers get in touch with us to share their stories. This article was contributed to DIYP by a member of our community. If you would like to contribute an article, please contact us here.


Join the Discussion
DIYP Comment Policy
Be nice, be on-topic, no personal information or flames.
25 responses to “My Solution For Creating Simple And Inexpensive Studio Backgrounds”
painting and repainting wall… are you kidding me…
Photographer: Hold on let me repaint a background
Model: I will just refresh my make up
(Both watching paint dry for 1 hour…. )
Are you kidding ME? DO you really think I paint the wall with my client there or ask them to wait? GIve me a break. Do you have anything better to do than to judge my idea? The wall is painted prior to a shoot. My clients come to me for a custom and unique experience. The wall is one shooting area in my studio as I say in my article. I have other shooting areas and can move around and use the wall as I please.
if you planning to take peoples opinion like this … maybe you should just keep your ‘great’ ideas to your self
as much as I love idea of painted walls over canvas etc its as practical as changing house every time you sick of the furniture in it…
good luck
Hi Art. I’m simply responding tot he comments so that those that might be interested can appreciate the idea and determine if it will work. If you and others choose to come at me and start telling me how impractical and idea it is, when in fact it’s not, then sure, I’ll defend the idea and my position. Your last comment is as ridiculous as your first. Good luck to you too.
I think his reaction to your trolling was perfectly understandable. No where did he suggest repainting a wall during a shoot, but between you and the other troll that seemed to think he paints the client’s walls when on location, he has good reason to wonder why he bothered sharing his method…which seems to work fine based on the examples.
You mad, bro?
Ummm…”neat”? Not really, “simple”?…not at all. While repainting a wall is one way it could be done. The draw of backdrops is that they can be switched quickly and are far more portable than carrying a couple quarts of paint and a brush or roller, and a paint tray, and some drywall…you know…if the client doesn’t want you to repaint their walls….completely uninformative article.
Agreed :/
Great if you have a part-time job at Home Depot and lots of spare time… ;-)
For all the people that seem to think my idea isn’t a good one, that’s fine. Your responses are a bit silly though. It takes me 30 minutes to paint a new wall. It costs me no more than $10 to do so. I don’t need portability. I create a custom and unique experience for my clients.
It is SIMPLE. It is EASY. It is Inexpensive. While I could spend a lot of money and swap out backgrounds, it’s not the best solution for me. The responses put down my idea, yet it works perfectly for me. If it doesn’t work for you then don’t do it. If you want to use backdrops, then do so, but to mock my idea and make it seem as it it’s not a good one is just ridiculous. Have a nice day, gents.
Interesting concept. I don’t see it working for me, as I like to change backdrops during the shoot. Also I’m the messiest painter ever.
Hi Angie. As mentioned, it is one shooting area in my studio so I have tons of flexibility. Just to be clear and expand on what is in my studio… I have a white wall and corner, I have an area that I can use window light, I have a black wall and corner and another window light area. I also have 9 foot white, black and grey seamless mounted and can be raised and lowered when needed. So the one wall I designate as the panted wall is one shooting area among many and I can and do shoot in multiple zones when I do a shoot. The painted wall is a fixture in the studio and not something that is transported or created in clients homes or on location.
It might serve everyone’s interest to at least read an article before dismissing it.
After READING the article I would say this would never be practical to do for most photographers. I have heard of painting a wall gray and lighting gels of of it to change the color.
Perhaps not for most, but for a healthy population of photographers, it works beautifully. To name one that is very successful and does beautiful work, is Damien Lovegrove. He has an area in his studio, roughly the same size as mine, and he paints it and changes it as he sees fit. I don’t need white or black. I have that. I also have fashion grey. If you look at my images and if you DID read the article you would see that many of the backgrounds have texture and faux finishes. You can’t get textured seamless or a textured canvas backdrop and unless the backdrop is stretched and mounted to a wall, you can’t lean against it and use it for posing and angles other than dead on. Gels can change the color but they can’t change it behind a subject unless the subject is pulled away from the wall. I use the wall as a prop and therefore you can’t color or alter it with any form of gel or effect. It would seem that everyone is jumping all over this without truly understanding what I’m doing and why. Perhaps we should ask everyone to not only read the full article, but to comprehend all the points made. Once again, this is an idea that works for me and many working photographers. If it’s not for you, very cool, but understanding what I wrote helps before remarking about its impracticality or suggesting alternate methods. I’m not a newbie and despite your dislike for my methods, it works for me, my business and my studio.
It may be a limiting solution for me since I only have one usable wall and my studio is pretty small, but it would be fun experimenting with colors, textures, and techniques.
I can always roll down the seamless paper in front of the wall if needed.
Very neat idea, Thanks!
Hello Andrea. Certainly, in a studio with very limited space it’s not necessarily a great option, but for anyone that has seamless they raise and lower in front of an existing wall, that wall can become another powerful tool in their toolbox when it comes to creativity and the ability to create something different.
Great idea Robert, and sounds like it works perfectly for the use you are putting it to. The interwebs are full of knuckleheads and chuckleheads, not worth it to respond to them. Non carborundum illegitimi
Hi Rex. You’re right. I really shouldn’t waste my energy. I just wanted to make sure that the idea and its implementation was clearly understood before it was judged. In the end, It works beautifully for me and that’s what prompted me to put the blog article together. If others can be inspired to create something different and to think outside the box, they might be surprised at what they can do.
link 404 “The requested URL /a-neat-solution-for-simple-and-inexpensive-studio-backgrounds/ was not found on this server.”
Working now.
The only real problem I see is when a client sends a model back for a revised pose and the background that matches the rest of the set is now under 2 layers of paint. If space would allow, I think I’d be hanging panels on ceiling track and that way several different backgrounds could be easily saved and rolled in and out of view. Another option would be paper faced 6×8 sheets of styrofoam where 2 sides are now paintable and scenes could be easily shuffled into place as needed.
Sweet :/
This makes plenty of sense, if you have the studio space. Obviously you won’t be doing this at the clients space. It’s not supposed to be a portable option. It is a pretty simple one.
Thanks for sharing this great idea! Beats all the different rolls of paper and very inexpensive to do. I love painting so can totally see me doing this…..Your shots are great too……