


Building A Photo Booth Using A Gopro Camera, Some Led Lights And A Doorbell
Sep 28, 2014
Lars Brandt Stisen

We love it when our readers get in touch with us to share their stories. This article was contributed to DIYP by a member of our community. If you would like to contribute an article, please contact us here.
Share:
I offered our good friends to build a photo booth for their wedding to be held here in Berlin Germany. They had already been asking around and searching the web for a solution without any luck.
I immediately knew that I wanted to make a fun automated contraption that mimicked something from an amusement park, rather than just setting up a DSLR with an umbrella etc. as it needed to be something different that people would relax in front of and not feel intimidated by equipment.

I also knew I wanted to use a camera with an extreme wide angle lens as it creates dynamic and fun images, plus it needed to be a rugged but highly portable solution that I could throw in a cab when going to and from the party. So the choice for integrating an action camera like the GoPro was given.


The GoPro camera (a HERO3+ Black Edition) is hooked up to a set of kit timer-relay circuits that also control the 12v LED lights (the booth is capable of operating in complete darkness) and an 8v two-tone doorbell for controlled audible feedback. It is important to note that the camera must be set to spot metering for a proper result with this lighting setup.

I trigger the camera using the WiFi remote which has several advantages: It is easy to hack without risk of destroying the camera and it may control several secondary cameras if you want pictures from outside the booth, different angles of the room, party etc. And as you may know both the camera and remote will operate (and charge their batteries) while powered by USB, making it an ideal setup for continuous use.

The remote only register shutter button-press impulses with a duration less than one second, and my timer-relay circuits had a minimum of one second switch intervals. So with only one day left until the wedding I decided to let the door bell act as camera trigger and rigged the electromagnetic hammer with a conductive surface that would short-circuit on it’s return, and that did the trick.

Here are a few images from the wedding taken with the “Selfie-Booth”:


Pressing the illuminated industrial grade button (which can withstand rough handling by drunk people) will start the carefully timed sequence to reproduce the feel of a classic photo contraption. Pressing the button repeatedly during a running sequence is purposely ignored by the electronic circuits to prevent any interruption.

Here is a comparison with an image directly from the camera and one where I’ve added a basic filter.


And of course a selfie-booth-selfie to end things in style.
The photo booth became a social meeting point at the party and were a big hit among the guests. I was asked several times during the evening by people wanting to rent or buy a photo booth, even before seeing the image results, because the contraption in it self worked so well they didn’t doubt the output. I prepared and transferred the
images to the bride and groom a few days later and soon after many of the guests were using the images on their facebook profiles etc.
Future enhancements (apart from tidy wiring and proper shielding) will include integrating a tablet and writing custom software to add filters with preview and online publishing options. Custom themes and materials for the housing to fit different types of events, parties and weddings is also an obvious playground.
I hope you enjoyed my little project and let me know if you have any questions.
Cheers
Lars
About The Author
Lars Brandt Stisen is a Berlin based commercial photographer from Denmark, working in advertising and fashion with a background as software engineer and IT entrepreneur.
You can follow his work at his website, Behance, Blog and Twitter.
We love it when our readers get in touch with us to share their stories. This article was contributed to DIYP by a member of our community. If you would like to contribute an article, please contact us here.


Join the Discussion
DIYP Comment Policy
Be nice, be on-topic, no personal information or flames.
86 responses to “Building A Photo Booth Using A Gopro Camera, Some Led Lights And A Doorbell”
Looks like a crazy fun wedding! Good job on your DIY project!
Thank you very much! Yes it was a fun wedding :)
Moyo Mitchell
I would love to know how you did it all to do it too .. thanks from Israel
I am pleased to hear that. A step-by-step guide would be great to do if I get the time at some point. I also think it could be fun to develop an assembly kit :)
Oh yess, assembly kit would be great!
But for now i would be fine with a step-by-step guide from you soon. ;) Hope you will get some time to do that.
That Booth is perfectly done!
Thank you Stefan! :)
Count me in as someone who would definitely be interested in an assembly kit! (Or even just step-by-step instructions.) As someone currently planning a wedding, I can vouch that you would definitely have customers and fans. :)
Thank you for the feedback :)
Brilliant, looks fantastic!
I’d be interested to know how to stopped people from pushing it over with just a single column support; it looks as if you had it against a wall maybe?
Thank you very much Mark!
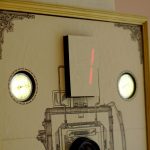
It is actually surprisingly stable on the lighting stand I am using (see attached image, showing the booth from the back) and it doesn’t sway or rotate (due to the locking superclamp inside the booth) but I added a sandbag on the stand and placed it against the wall so that people would approach it from the front, as you guessed :)
Fantastic, thanks Stisen :) I do have one more question please, if you don’t mind. What wattage or light output (lumens) were the LEDs? I’m building something similar, and was going to use flashes, but your lighting looks perfect, and LEDs would be so much simpler. It’s just that there’s a huge range of outputs available, from about 70 to 350 lumens (1.8 to 12 watts).
You’re welcome! I used 4 Philips 12v 6.5W 390 lumens “warm white” LEDs (warm light on purpose) and added two layers of “diffusion” for each lamp using rigid fade-resistant paper (doesn’t turn yellow over time) sewn together to add the retro-look. The LEDs are a bit harsh for the eyes without anything in front. I hope this helps :)
Superb, thank you so much for that info :)
The box is great! What paper did you use as diffusion?
Thanks Anne, I used two layers of thick (110 grams) Vellum paper, also known as translucent technical drawing paper.
Hayley O’Hanlon Holly Thoms
Amazing!!!!!!
Thank you Hayley!
Wanna sell this?
I’ll keep this one for now :)
About the best photobooth pics I have seen. Just great…never mind the fun!!
Thank you!! I’m pleased to hear that! :D
wow very cool :) , i would buy one immediatly ..
Thank you :)
Question for DIYP and photobooth operators everywhere… With the recent monkey selfie ruling in the states how do you handle copyright assignment and photo release for photobooth images? I’m assuming you got release to publish these to the web, but what’s your opinion on who owns copyright?
In this case the images belongs to the initiator/photo booth owner (as in any photo shoot) unless otherwise agreed, with implicit consent by the guests for non-commercial use in the public domain as stated by a printed note of usage (placed on the photo booth) and by the event in its self (submitting your photograph to an installation like a photo booth at a public or private event or letting an event photographer take your picture etc.). But any appearing guests has the right to revoke publication of an image at any time if within reason.
In this case the images belongs to the initiator/photo booth owner (as in any photo shoot) unless otherwise agreed, with implicit consent by the guests for non-commercial use in the public domain as stated by a printed note of usage (placed on the photo booth) and by the event in itself (submitting your photograph to an installation like a photo booth at a public or private event or letting an event photographer take your picture etc.). But any appearing guests has the right to revoke publication of an image at any time if within reason.
I would love to see a Step-by-Step-Guide on how to build this epic Thing!
Thanks, I’m pleased to hear that! I have yet to find the time for making a proper guide :)
a few of these photos really made me want to test the theory about german girls and their lack of inhibitions
Hi Lars!
Thanks a lot! Thats awesome!
That is the best booth I’ve Seen yet!
:D
Would it be possible to post a part list (maybe amazon of Conrad.de?)
To See which Timer circuits You Took?
The two Other Electronic parts are the dimmer controls for the lights I guess?
Thank You! :)
Thank you for the praise! The timer circuits are from Velleman, modul VM141 available at Conrad/Amazon etc. as you suggested. The components on the left, under the doorbell are power supplies for the bell and lights. A complete components list is something I have yet to compile :)
Hi Lars,
I got my own gopro a few dass ago and the first think I did was to test it together with Shuttersnitch for iPad because I want to Build a PhotoBooth like yours including the ability to show the guests the Image they have just made on a screen.
But unfortunately its not possible to connect a gopro to the Remote and connect it to an iPad (or tablet at all) :((
You can just do One of it at a time.
Do you have an idea how it could be possible to Show guests their picture Instantly?
Best
Mike
Awesome!! Four super clamps? I guess this thing isn’t that cheap to build ;-)
You could place it on a table or hang it on the wall to avoid the extra cost of a lighting stand and fittings :)
Amazing photobooth, very stylish. Is there any way to print photos right from the photobooth? Thanks for sharing this article.
Thanks Andrew! That’s definitely possible, depending on how you want to use the concept. My approach was aimed at social media and letting the bride and groom reveal the images a few days later along with their Thank You Note to the attending guests :)
Now this is a DIY project worthy of my time! Would be so much fun to give this as a gift to friends that are getting married instead of something cliche… And there’s quite a few of my friends getting married in the coming months. Any chance of getting a simple schematic of how everything is tied together?
And the case, is that a crate?
Great to hear! I have yet to compile everything for a proper DIY guide.
Simply Brilliant!! I would like to know how you did it step by step, hope you’ll find the time to make that guide, you will make tons of people happy with it, keep up the great job!!
Thank you! :)
Great work! What was the case you used?
Thanks :) The main housing is a sturdy ABS plastic crate from the local DIY store, with a lid to seal off the booth using padlocks. But you could use virtually any crate.
A step by step, a kit or whatever would be awsome!
Thank you for sharing!
You’re welcome :)
Amazing project… like a lot the people write.. could be really nice see a step by step. I bought my gopro few months a go and i didnt use it to much… and i was thinking on try a photobooth but didnt find to much info until this. Can be great have at list a reference of how you hack the remote control and the leds… well it looks like a lot of work… any way great idea and hope can see a step by step
Thanks Carlos, that’s great to hear!
I’m generally disappointed by photo booth images but your pictures rock! And the rig is great — I’ve spent a worthwhile half hour trying to figure it all out!
Thank you Nick, I’m very pleased to hear that! :)
I like the fisheye look the gopro lens produces….will have to get one for my canon and see how it turns out.
http://hdphotoboothorlando.com
Brilliant idea man! That was awesome. Hope you will have a time to do the step by step instruction diy. I want to build one. From muscat oman.
Thanks Jake, I appreciate that!
Incredibly awesome! :) I agree with all the comment, a step by step would be great! I would love to do one of this.
(Hopefully my guests are as fun as your friends’)
Thanks from Mexico :)
Thank you Yurii :)
I would totally order a diy kit from you, or indiegogo or kickstarter if you ever had the time to put one together! Heck, I’d even just buy the plans for one. Awesome job!
Thank you very much Rob!
That’s awesome!
I been looking for one for my wedding.
I have looked quite on the internet and loved what you did with the GoPro camera.
However needed a little help from you to mount my Photo Booth, because I don’t understand any of this.
Do you have a step by step guide that you can provide me?
It’s possible join an interacting tablet?
Keep up the good work.
Hi Mauro, I’m pleased to hear you like the project. As soon as there is any news regarding a Step-by-Step guide, this forum will be the place to find it.
But, you could go for the “quick-n-dirty” solution and take a GoPro, mount its remote (or a tablet with the GoPro App) in front for people to trigger the camera. And then just use a continuous light source above the camera, an office lamp etc.
That’s awesome!
For some time I search for an original idea to use on my wedding day , and finally found.
Is it possible to give me a step by step guide , because I do not understand any of it
and would love to the build this Photo Booth with the GoPro camera.
I think the guests will love it.
Its possible join an interactive tablet? How can I do that?
I hope you can help me.
Keep the good work.
You know you can make a lot of money by selling this! You are very talented! I’m a Photo Booth business owner and have never seen a Gopro photo booth.
Thank you for the kind words Luis! :)
Hi, I’m the guy who built the WiFi Photobooth you might have seen some days ago on DIYP. Your Selfiebooth was a big inspiration to my build, as you can see. :)
Can you give any information what model and brand the box is, in which you mounted the switch? And/or where to get it in Germany? I love the look of it and want to use it in some
future projects.
Congratulations on your build, I see the similarities ;)
It’s an electrical ABS installation box I had lying around which I decorated. But I’m sure you’ll be able to find something similar with a little research.
“Similar” is not close enough for my purpose. I really like the hidden screws and the lowered front for signs/foil keypads. It makes it perfect for so many projects!
With a massive research an enclosures I narrowed it down to the MNX series by Fibox. It might be the Fibox MNX PC 125/60 HG
http://de.rs-online.com/web/p/gefahrstoffschranke/2896263/
Only problem though: Fibox has no black enclosures. :(
Awesome job! I’m doing my own at my wedding, remote in hand and boom lol But what are the camera settings?
Thank you! It’s really dependent on your setup, but setting Spot Metering to “On” is recommended, if you are using a light source for closeup shots, like I did.
I absolutely NEED this in my life! It’s genius!
Thank you, I’m pleased to hear that :)
Lol I see you’re in Germany, I am too if I bring you my GoPro can you rig this up for me! lol just kidding, I hope you’re planning to give out a step by step guide because I’m looking to make one for an event in November!
Stisen, this looks amazing! I don’t suppose you have drawn up a parts list have you? I get married myself in a few weeks and would love to put something similar together!
Hi Lars,
I just wanted to thank you for the excellent inspiration! I really liked the look of your images and so I set out to create a Gopro based photobooth as well. I use a Raspberry Pi to read in the start button, control the lighting,trigger the Gopro via WLAN, grab the newest picture via WLAN as well and then set up a local website on the Raspberry for everyone to instantly watch the pictures. The setup had it’s first test last weekend and it was a great success.
Best,
Robert
That’s amazing! Do you have a tutorial?
My wedding is on 27 june and I would like to do one for my friends have some fun.
I hope you can help me because i don’t have much time.
Sorry, I don’t have a tutorial right now.
Any way to get a step by step on how to make this?
I loved it, if you ‘re selling a kit , know that already has a buyer in Brazil
kisses
Thanks everyone for all your comments! I will keep you posted if there is any news regarding the project :)
ohhh very very nice! You are brilliant! I would like to know also how you’ve made from this “selfie booth” please..please..please… here is my email: imjanamichelle@yahoo.com thank you so much!
please send me details and the things I need to have. Thanks so much
Practical ideas . I learned a lot from the facts – Does anyone know where my assistant could grab a sample a form copy to fill out ?
Have you developed instructions for this!! Such a fun idea! Please can I buy the instructions, some of us are not as clever as you!
Hi Jessica, thank you for the compliment -I’m pleased to hear you like the project :) I haven’t had the time to develop any further DIY instructions, unfortunately.
Like your filter. What do you use for filter ? it’s great !!!
Thanks Jeremy, this was done using homemade presets in Camera Raw (PhotoShop), for fast batch processing. Lightroom or Affinity Photo etc. would be just as fine for the job.
it’s not in real time with imagemagick ?. great job !!! :)
Hello ! I am way late to this thread but I think this Is amazing and I love your work! is there any way you still have an electrical layout of this project ? Want to build one for our harry potter party. I will end up attempting my self but with your help I may save a little money and risk of damaged electrical components :)