


How To Bake A Nikon Cake
Dec 13, 2011
Udi Tirosh
Udi Tirosh is an entrepreneur, photography inventor, journalist, educator, and writer based in Israel. With over 25 years of experience in the photo-video industry, Udi has built and sold several photography-related brands. Udi has a double degree in mass media communications and computer science.
Share:

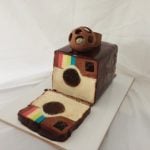
A few weeks ago, the blog took a small detour to the baking realm with camera-shaped cookies. I thought that cookies were not big enough in some cases so here we go with a guide to bake a Nikon cake.
I must say that making this Nikon cake was not trivial, but it was not as hard as I expected, and it seems like everyone with a bit of baking skills can pull this off.
Please note that the cake is of an unnamed model (D4, maybe?). Names will be happily accepted in the comments.
Ingredients

For Cake:
- 1 cup tap water
- 200g margarine
- 1 cup canola oil
- 1.5 cups sugar
- 100g dark chocolate
- 2 spoons cocoa powder
- 2 tablespoons rum extract
- 4 separated eggs (yolks / whites)
- 2 cups flour
- 3 tables spoons baking powder
- Lil bit of salt
For Decorations
- 1 kg white Fondant (you can buy readymade or make some yourself)
- Food coloring gels – you would need at least Red, Yellow and Black
- Silver Coloring
- Powdered Sugar
- Royal Icing
Tools

- Roller
- Knife
- Fondant tools
- 20cm X 28cm backing pan (with cake :) see below)
Step 1 – Bake The Cake
You could probably use any sponge cake, I love this recipe because it is pretty firm and still tastes good. It’s important to use a recipe that does not crumble. (and this one is as firm as a Nikon camera)
1. in a small pot, warm and mix water, margarine, oil, sugar, dark chocolate, and cocoa powder.
2. Let the mixture cool down to room temperature and add yolks (one at a time) and rum extract. (you have to wait till it cools a bit; otherwise, the eggs turn into omelets). Mix well.
3. Take about 3/4 cup of the mixture and put it aside. We are going to use it as glue to piece the cake together.
4. Add flour and backing power, and mix again.
5. Whip the whites with a touch of salt and “fold” into the dark mixture
Step 2 – Prepare The Camera Pieces
This is where we cut the cake into a few solid pieces. Each piece will be part of the finished camera. It is important to be as precise as possible on this one, as the fondant will wrap around the curves of the cake. Clean cake = Smooth camera; Shabby Cake = I really have to hold myself so this will not turn into a camera brand flame war. So, make sure you use a sharp knife.

The big chunk on the left is the camera body
The two circles on the top will form the lens
Just below the lens, you see the grip, and below that, a piece that will later be converted into a prism.
Don’t throw away the scraps; they will be used to make some of the camera’s small elements.
Step 3 – Glue
Carefully place the pieces until you build the camera.
(1) Start with the body. (2) Attach the prism at the back. (3) Then, put the lens plate on top of the body (we made it with some of the scrap cake). (4) Add the grip. (5) And finally, add the lens. The first part is a full-height circle, and the second part is only half as tall.

Now unassemble and redo, but this time, use the leftovers from the chocolate mixture as glue. Be generous with the glue.
Once done, take a sharp knife and smooth and wound any harsh corners.

Yes, I know, the lens is not there yet. We’ll get to it.
Step 4 – Prepare The Sugar
We are going to use fondant to cover the cake. While it is possible to get fondant in all colors, we got 1 kilo of white and colored as needed.
It is almost impossible to make black fondant, we made ours gray by dipping some black gel into the fondant and kneading it repeatedly. The end black finish will be achieved via coloring.
Roll a leaf of gray fondant and get ready to…
Step 5 – Wrap The Cake
Carefully pick up the fondant leaf and wrap it over the cake. Tuck it well all around.

Paint it all black.

Step 6 – Mount The Lens
The lens body is built similarly to the camera body. Using chocolate glue, stack the two circles one on top of another.

Now, cover the lens with glue and wrap it with fondant.

Make a small hole in the fondant and make a circular incision at the edge.

Prepare a small cupola. This cupola will act as the glass in the lens.

Paint the lens black, place the cupola, and paint it with silver coloring.

Flat out a long stretch of fondant and cress it. We will use it for the lens grip.

Wrap the grip around the lens and paint it black.

Step 7 – Add Details
Use the fondant to add all the small details: the shutter release, hot shoe, thumb roller, Nikon red, flash assist, top LCD, selection wheel, and any other detail you think would make your camera operate better.


Add detail on the lens using royal icing.

Step 8 – Mount The Lens
Place two toothpicks inside the cake

Place the lens on the picks

and you are done!

Step 9 – Eat


Udi Tirosh
Udi Tirosh is an entrepreneur, photography inventor, journalist, educator, and writer based in Israel. With over 25 years of experience in the photo-video industry, Udi has built and sold several photography-related brands. Udi has a double degree in mass media communications and computer science.


Join the Discussion
DIYP Comment Policy
Be nice, be on-topic, no personal information or flames.
9 responses to “How To Bake A Nikon Cake”
I don’t know if you figured it out, but I put mine on 180C and for 30 minutes, and it worked out like this.
Fantastic cake! We are making it in two weeks for my sister. What are the baking instructions for the cake (ie how long and at what temp?) Also what is the size of the finished cake?
yay! I finally found a recipe!!!!!!!!1
fantastic
I am in the Unite States so I bake it at what Farenheit temp and for how long please??
Did you use the gel to paint the fondant black or another ingredient for coloring?
I used the jel to try and get the sugar black. Even after a ton of gel went in it was still gray, so I ended up painting the thing using gel, just like you would cover a painting.
hi love the camera cake, just curious, when you say paint black, what do you use to paint black. with black gel paste or no?
Nikon forever! I would love to bake it!
http://www.dariuszkempny.pl/sesja-wizerunkowa