


How to use vanishing point perspective in Photoshop to add graphics to a surface
Oct 12, 2016
John Aldred
John Aldred is a photographer with over 25 years of experience in the portrait and commercial worlds. He is based in Scotland and has been an early adopter – and occasional beta tester – of almost every digital imaging technology in that time. As well as his creative visual work, John uses 3D printing, electronics and programming to create his own photography and filmmaking tools and consults for a number of brands across the industry.
Share:

The actual title for the latest video tutorial by Phlearn is “How to create a Packaging Design Mockup in Photoshop”, but it’s so much more than that. There is no doubt that the ability to create product packaging mockups is valuable. Maybe we’re doing it for ourselves, or maybe it’s for a client. But it’s something many photographers and designers have done at some point or another.
But, the techniques shown in the video go far beyond simply adding logos to a brown box. It can be used to replace signs in streets, for example, or to switch out logos on the side of a vehicle. Perhaps you’re presenting room interior makeover mockups to a client. You can use this technique to hang art on the walls. Or. you can even use it to patch holes in surfaces like potholes in roads.
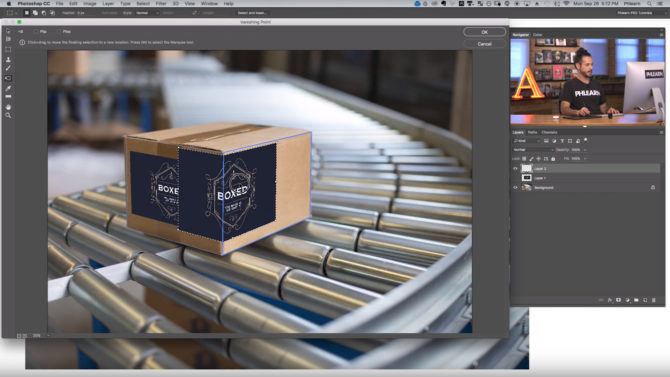
The basic principle is quite simple. You make a new file and create your design as it would appear if you were looking at it head on, then copy it to the clipboard. Then load up the image of the surface you wish to apply it to. In this case, a cardboard box. With the image of the box, you use the Vanishing Point filter to draw out the shape of the surface you wish to cover.

You’ll want to make sure you get your corners perfectly positioned, so that Photoshop can create an accurate perspective. Fortunately, it has a handy grid you can use to check your that lines are running where they’re supposed to.
With the vanishing point filter still open, you paste your design into the image, and then simply drag it around to where it needs to be. Once your mouse moves the image over the boxes you drew out it will automatically snap to align to the “surface”. You’ll also notice that it also distorts to follow the perspective of the box.

Then you just need to scale and adjust it to fit. To cover another surface, you simply extend your existing plane around the corner, then paste in another copy of your design. You can see here, that the design will even wrap around two sides simultaneously.
Wrapping around two sides simultaneously might seem a little strange for something like this. Indeed, it is. Have you ever received a package with a big logo on it that wrapped awkwardly around an edge? No? Me either.
But it can be handy. For example, if you’re doing a street photography scene, and want to add some posters to a wall for a band playing a local club, they often repeat and wrap around walls in the real world. Or if you’re redecorating a room interior and want the wallpaper to appear to wrap inside a corner.
The final trick to sell the effect that the labels are really printed or stuck to the surface is to match the blur of the original photograph. If the back of the box starts to go out of focus, then naturally the label will, too. Aaron solves this problem by using the Tilt-Shift Blur filter. Perhaps not the most obvious blur filter, but it works very effectively.

Whether you need to make a product packaging mockup or not, the Vanishing Point filter can be extremely useful. Knowing how to use it well can save you a lot of hours of work messing around with transform tools and trying to smush things manually.
What other uses have you found for the Vanishing Point filter? Is it a tool you use often? Do you think there are better alternatives to this method? Let us know and show off some examples in the comments.
[via Phlearn]

John Aldred
John Aldred is a photographer with over 25 years of experience in the portrait and commercial worlds. He is based in Scotland and has been an early adopter – and occasional beta tester – of almost every digital imaging technology in that time. As well as his creative visual work, John uses 3D printing, electronics and programming to create his own photography and filmmaking tools and consults for a number of brands across the industry.
Related Posts
 How vanishing points work and how to apply them in photoshop for perfect perspective
 Dell launches Surface Studio-like graphics tablet and a $4,999 8K screen
 Jimmy Nelson shares the challenges of photographing 31 vanishing people groups
 Couple calls out photographer for vanishing with their wedding photos
Join the Discussion
DIYP Comment Policy
Be nice, be on-topic, no personal information or flames.