


The Huion Kamvas Pro 16 (2.5K) is a solid challenge to Wacom’s dominance in the graphics tablet market
Apr 25, 2022
John Aldred
John Aldred is a photographer with over 25 years of experience in the portrait and commercial worlds. He is based in Scotland and has been an early adopter – and occasional beta tester – of almost every digital imaging technology in that time. As well as his creative visual work, John uses 3D printing, electronics and programming to create his own photography and filmmaking tools and consults for a number of brands across the industry.
Share:

Whether we use Windows or a Mac, one thing we pretty much all agree on. If you’re a photographer, a graphics tablet is basically a must-have item in our toolkit for editing our images. They’ve been a staple of the graphics and photography industry for years.
And that’s what we’re going to look at today with the new Huion Kamvas Pro 16 2.5K. This isn’t just your basic tablet, though. This has a built-in 15.8″ IPS display with a 2.5K QHD (2560 x 1440) resolution with an anti-glare surface. It’s also compatible with Windows and Mac, has some basic Linux support and apparently even works with Android devices.
For most of the last 20 years or so, my tablets have been fairly basic. Just a basic non-descript bare lump on my desk. But in the last couple of years, tablets with built-in displays have really increased in quality and ability. They’ve also become more affordable. So, I finally bought a Huion Kamvas 12 last year. I immediately fell in love with being able to draw directly onto a high-resolution screen in Photoshop! What’s more, I haven’t been able to go back to a traditional non-display tablet since getting it.
One of the great things I like about the Kamvas 12 (bear with me, this isn’t a Kamvas 12 review) is the pixel density. It’s 12″ at 1080p resolution or 190PPI. That’s about the same pixel density as a 24″ monitor with a 4K resolution. Or (see? we’re getting there) a ~16″ screen at 2.5K (or 1440p). So when Huion asked if I’d like to check out their new Kamvas Pro 16, I was happy to accept. And my impressions so far are… Well, you’ll have to keep reading to find out.
What’s in the box?
Huion Kamvas Pro 16 tablet displays are quite slender for what they are. However, they do tend to come in rather large boxes filled with extras to help you get the most out of them. This includes a few bits that you may never need but are there “just in case.” In the case of this tablet, that’s a power supply and some cables. When we remove the top from the box, the first thing we see is the tablet itself. It’s covered with a screen protector inside a protective bag.

On lifting this out, we see the screen stand beneath it, along with a big box on the right that contains a power brick along with various USB and other connector cables.

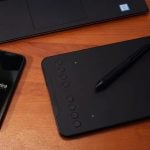
Below the screen stand, we see three more boxes. They contain our pen, the pen stand and a quick start guide, and a cleaning cloth and an artist’s glove.

Let’s start with the pen and its stand. They both appear to be the same as those which came with my Kamvas 12. Upon testing, the pen appears to also work with that tablet, too, so it probably is the same pen. It feels, however, like it runs across the surface of the tablet screen a little smoother with the new one. Still, they both appear to be the same type of nib, too. Perhaps they’ve had a slight material change for their hard nibs.

It has no batteries, so doesn’t require any kind of charging and offers 8192 levels of pressure sensitivity. It also offers tilt recognition for up to a 60° angle in any direction and features two configurable buttons.
There’s also a pen stand that doubles up as a nib holder to keep all your spares organised and secure. There’s a nib removal tool inside it, too. It allows you to easily pull out the old nib when you want to swap in a new one. The Huion Kamvas Pro 16 2.5K comes with five standard hard nibs and five new felt nibs. Note that I didn’t get any of the felt ones with my Kamvas 12.


The cleaning cloth and artist’s glove are both pretty standard at this point. It’s just a standard microfibre cleaning cloth emblazoned with the Huion logo in one corner. The glove stops the side of your hand from getting grease and prints on the screen as it moves across the display.

Inside the big box, we have a USB power adapter (probably not needed when using this on a computer). There are also a USB-C to USB-C cable, a USB-C to USB-A cable, and a USB extension cable and a 3-into-2 cable. There isn’t much to say about these except that which you use will depend on your computer setup or what you choose to plug into the display. We’ll touch on some of the cables later.

And now, the star of the show: the Huion Kamvas Pro 16 tablet!
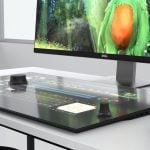
Ok, now for the main event, the Kamvas Pro 16 2.5K itself. The screen portion is 15.8″ and offers a 2.5K (1440p) resolution. The unit itself measures 436.2 x 247.3mm and is around 10mm thick. So while the screen itself is about the same size as your typical 15.6″ laptop, the total area it will require on your desk is a bit bigger. Just bear this in mind.

It’s a 60hz IPS display capable of 2560 x 1440 resolution with a 1200:1 contrast ratio and a 220 nit max brightness. So, it’s not super bright. For comparison, my desktop monitors are 500 nit – but it’s bright enough to see what you’re doing. It’s a fully laminated matte finish screen with anti-glare glass. This also helps with viewability and feels comfortable to sit and stare at for long periods without bothering your eyes. It boasts 145% sRGB coverage with a 178° viewing angle (89° each way both horizontally and vertically).

I think that 145% sRGB is possibly a little misleading, though, and sounds like marketing hype. Perhaps it is capable of displaying 145% as many colours as the total found in the sRGB colour space. However, those colours are not necessarily all within the sRGB colour space. If that makes sense. Essentially, those extra colours it can display aren’t part of the sRGB colour space. So, when you’re working with sRGB those extra colours never get shown. When I calibrated the display using the DataColor Spyder5Elite, it actually said that the colours it is capable of displaying only covered 89% of the SRGB colour space. It wasn’t any better using the SpyderX Elite on the laptop. For comparison, my Huion Kamvas 12 reads as 92% sRGB.
To my eye, it does still look pretty close to my monitors, to be fair. The colours it can display look great! The the bits that are missing are on the extremes that rarely show up in my images. But, you’re still going to want a colour accurate display for final viewing and proofing, just to double-check that the colours are what they’re supposed to be before you send it out to a client.

On the display’s left (if you’re using it as a right-handed person) the Huion Kamvas Pro 16 has 8 programmable buttons. These, like the two buttons on the pen itself, can be configured in the Huion app. You can configure these on a per-app basis. So, if you want different shortcut keys for Photoshop, Illustrator, Blender and whatever else you use, you can configure that.


It has some weight to it, at 1.28kg, which is nice to see in a tablet display. This means that if you’ve got it flat on your desk, it’s not going to start sliding around as you move your hand across it. That’s something I’ve experienced with cheap non-display tablets in the past. It feels very well built and solid – much more so than my Kamvas 12.
Finally, the stand. My Kamvas 12 didn’t come with a stand. It’s an optional extra with that and many other Huion Kamvas models. But the Huion ST200 foldable stand is included with the Kamvas Pro 16 2.5K. This stand is also available separately to use with other Huion tablets and offers six angle adjustments: 14.5, 19.5, 22.5, 37, 41.5 and 45 degrees. This lets you get the most comfortable angle possible for your hand.

I would’ve liked to have seen some more height adjustments on the stand, personally. The screen is going to stay connected to my computer permanently. And when I’m not using it as a tablet, I’m using it as a third monitor. The highest angle on this stand isn’t really anywhere near vertical enough to use as a regular monitor alongside others on your desk. It’s a great set of angles for drawing with. Still, it would be nice if it could get closer to vertical. Say around 75-80° for regular viewing as a monitor.
Setting up
I’m setting up the Huion Kamvas Pro 16 for the first time on my ASUS ZenBook Pro running Windows 10. I have since set this up on my ASUS VivoBook Pro running Windows 11; the setup is essentially the same on both. The first step, before you plug anything in, is to go over to the Huion website. Download the Kamvas Pro 16 2.5K driver software and then install it.
Now that Windows knows what the Kamvas Pro 16 2.5K looks like, it’s time to plug it in. The Type-C USB ports on both my ZenBook Pro and VivoBook Pro support DP Alt Mode and are able to supply a video signal, power and data over a single cable. So, I’m using the single USB-C to USB-C cable that came with the tablet to connect it to the laptop. The other cables we’ll get to in a bit.

With it connected, the operating system detects it. We can then load up the Huion software from its icon in the task tray to bring up the settings. Here we get to choose which display is actually our tablet. This way, when we put our pen to it, it’s controlling the right one. We can also calibrate the screen to ensure that the pen is hitting exactly where we think it is and setup our button shortcuts.
Once you’ve chosen the correct display, calibrating the screen is easy. You just click the “Monitor Calibration” button and a screen gives you a series of points to touch the pen on. Once it’s done, it’s done. Here is where you can also rotate the display to orient it vertically or 180° for left-handed use. Although I’m left-handed, I won’t be doing it, though.

And the reason I won’t be doing it is that when you set it to rotate 180°, it’s only rotating the Huion’s touch interface. You’ll still need to rotate the actual monitor output in your Windows display properties to “Landscape (flipped)” for it to actually be all set up properly. This is a little frustrating if you’re using it in mirror mode, where both displays show the same thing. It’s because setting this will also rotate your main display upside down.
As I often mirror my tablet over to the projector when editing video, I don’t want the projector upside down. I also don’t want to have to keep rotating it back and forth as I turn the projector on and off. If you don’t have some weird setup like me, you just have your one main monitor and you’re a lefty, then make sure to set your displays to extended mode. Don’t use the mirror mode, so that your main monitor is still the right way up.
It would be nice if the option were in the display itself to rotate the orientation rather than relying on the device that’s feeding it the video signal.
Using the tablet
With the setup done, we can just load whatever apps we normally use and start working on the Huion Kamvas Pro 16. I typically only use a pen in Adobe Photoshop for retouching photos. It lets you move the cursor more accurately and smoothly than you can with a mouse. This allows you to draw your masks or dodge and burn layers right where you need them. As I already mentioned, the pen that comes with the Kamvas Pro 16 2.5K looks to be the same one that came with my Kamvas 12. Although, the nib feels much smoother across its surface. And it’s definitely the nib because I feel this same difference between the pens on both tablets.
The new pen also comes with some new nibs, though. Felt nibs, which are hidden inside the pen stand. The felt nibs allow you to get a smother and more tactile feel between the pen and the screen with improved friction control that’s less potentially damaging. Pretty handy if you often like to press down hard. You also get fine control for smoother (and less frustrating) workflow.
Using the pen within Photoshop gives the kind of results I’ve come to expect from Huion after using the Kamvas 12 for so long. However, the larger screen with a similar pixel density is a dream to work on. Typically, when I work with a tablet like this one, I have my monitors set to extended desktop mode. Then, in Photoshop, I have the full-size view of the image on my main display while I zoom in on the tablet. And given the less than perfect colour gamut of the display, this is a great way to work with this tablet so that you can keep a copy of the image up on your more accurate display while you work.
Setting up the Huion Kamvas Pro 16 in Photoshop
You can easily set this up yourself in Photoshop. After loading an image, all you need to do is choose “New window for [your document name] from the Window > Arrange menu. To be clear, this doesn’t create a second copy of your document (as Image > Duplicate would), but just brings up a second window for viewing the same image. Then you simply drag one of them over to your tablet while you keep the other in Photoshop.
Now, you can zoom in and move around. You can look at the fine details on the tablet while seeing the overall picture on the main screen. This is a fantastic way to work! It lets you quickly and easily see the problem areas you still need to work on without having to constantly zoom in and out. It also shows you where you’re wasting your time because you’re working on details nobody will ever see anyway.

Working with it, though, is great. The pen hits accurately and sensitivity for brush control works great. It acknowledges the pen angle the way it’s supposed to when you’re using a brush that takes sensitivity and angle into account, too. Straight lines also draw very straight, which I tested by moving the pen along a metal ruler edge on the display. There was no wobble in the lines at all whether I was zoomed all the way in or zoomed back out.

Not, I’m not the best out there when it comes to drawing art with a pen from scratch. This is why I use a camera. If you were looking for a digital artist’s perspective, you’re reading the wrong review. But I can trace along contours in a photograph and spot areas that I need to touch up or draw masks and outlines. I was able to easily draw where I needed with a level of accuracy that I was very happy with. It’s the same level of accuracy I’ve come to expect from Huion given my experiences with the Kamvas 12.
The stand, which I briefly mentioned earlier, is a nice inclusion in the kit. With the Kamvas 12, not having the stand isn’t so bad. It’s fairly small, I can just hold it on my lap and draw on it as if I’m using an iPad or something. But with a larger and heavier tablet like the Kamvas Pro 16 2.5K, it’s too big to keep it flat on the desk all the time. It’s also a little unwieldy and uncomfortable on your lap. So, having a stand included that I can use at the desk is great.
What about those other cables?
Ok, so there are other cables included in the box besides the USB-C to USB-C cable I’ve already mentioned and used to connect the tablet directly to the laptop.

Let’s start with the 3-into-2 cable. This is for computers that don’t support DP Alt Mode over Type-C USB. So, you need to supply power, data and video signal separately (that’s the “3” part). You’ve got a Type-A USB plug for power (which can come from your computer or the included power adapter). There’s also a Type A USB plug for data (so the computer knows where your pen touched the screen) and a full-size HDMI plug to go into your graphics card. On the other end are two Type-C USB plugs that fit into the two Type-C sockets on the tablet.

The Type-A USB extension cable is for if you’re using the adapter. Huion knows that your plug socket isn’t necessarily near your computer. So, the Type-A plug on the end of the cable might not be long enough. This is why you’ve got an extension allowing you to easily plug the Type-A data plug and the HDMI plug into your computer while letting the other trail off to get power elsewhere.
But what about that Type-A to Type-C cable? What’s that for? Well, that’s for when you want to supply the screen with power and use it to watch a different device. Like, maybe you want to use it with your smartphone. In this configuration, your Type-A to Type-C cable goes from the power jack to the tablet to supply power. Then, the Type-C to Type-C cable goes from the tablet’s other Type-C socket to your phone’s Type-C socket to get the video and data connections.

It should be pointed out that this is not a touchscreen tablet. That is to say, you’re not going to be able to use your fingers to interact with the display the way you can on the phone screen itself. Still, it will interact with the pen. So, you can draw in your graphics apps with the pen just as you would with a stylus on your mobile device using its built-in screen. I should also mention that although you need a power bank or charger to power the Huion tablet when you’ve got it connected to your smartphone. This is because it will charge your smartphone while you’re using it. Well, at least it did with my OnePlus 10 Pro.
I didn’t properly test this feature as I don’t have any Android drawing apps. I just connected it all up to see that it worked and whether or not the Android OS responded to the pen. And it did.
A second (or third) monitor?
The great thing about display tablets over regular tablets is that, even when you’re not using it as an actual tablet, it’s still useful. My Kamvas 12 has been connected to my desktop permanently except for when I want to take it out of the house with a laptop.
When I’m not using it as a tablet, it just stays connected to the computer as a third monitor alongside the two 4K displays. It’s handy for throwing notes on or watching a YouTube video while I work. And when I’m editing videos in DaVinci Resolve, it acts as my full-screen preview window when I don’t want to fire up the projector.
The 1080p screen of the Kamvas 12 is nice. However, the larger 1440p screen of the Kamvas Pro 16 2.5K will be even better as a second or third display on your system.
Conclusions on Huion Kamvas Pro 16
Overall, it’s a well-built tablet with solid pen accuracy and feels great to use. Drawing across it is smooth. The pen is firm and you can feel the tactile nature of the matte display. This is especially noticeable with the new felt nibs. The colour gamut range does leave a little to be desired, especially for a tablet at this price point. Still, it’s not terrible to look at. While one could argue that the display is largely irrelevant on a graphics tablet, if you’re going to completely ignore the display anyway then you might as well save yourself a bunch of money and get one that doesn’t have a screen built in. Like I said, though, to my eye, it’s close enough to my monitors to work with.
It’s a little large to be truly portable, I think. This means it’s unlikely to fit into the laptop slot of whatever backpack, roller case or other camera bag you’re currently using. Also, it’s quite heavy. If you want portable, then I’d look at alternatives. Either the Kamvas Pro 13 2.5K (if your bag has a larger laptop slot) or the Kamvas 12 (if it only barely holds a standard 15.6″ laptop). That being said, The Kamvas Pro 16 2.5K isn’t too unwieldy to travel with if you’re determined enough.
As a desktop tablet that gives you plenty of working space but without being too huge. It’s not much wider than your typical PC keyboard. So, it should fit on many desks just fine and the pen itself works very well. The fact that it can also just sit there acting as an extra monitor when you’re not using it for your creative stuff in Photoshop, Illustrator, Blender or whatever is an added bonus.
While the Kamvas Pro 16 (2.5K) might not be quite perfect, it’s not far off. Other than the colour gamut not quite living up to what was expected, it’s an excellent tablet. It looks like Wacom finally has some serious competition.
The Huion Kamvas Pro 16 (2.5K) is available to buy now for $599 and is shipping now.

John Aldred
John Aldred is a photographer with over 25 years of experience in the portrait and commercial worlds. He is based in Scotland and has been an early adopter – and occasional beta tester – of almost every digital imaging technology in that time. As well as his creative visual work, John uses 3D printing, electronics and programming to create his own photography and filmmaking tools and consults for a number of brands across the industry.


Join the Discussion
DIYP Comment Policy
Be nice, be on-topic, no personal information or flames.
One response to “The Huion Kamvas Pro 16 (2.5K) is a solid challenge to Wacom’s dominance in the graphics tablet market”
Hello, thank you so much for doing this detailed review! I’m still on the fence on choosing this tablet vs the Wacom Cintiq 16, https://pctechtest.com/wacom-cintiq-16-vs-huion-kamvas-pro-16
But your review has definitely confirmed a lot of my thoughts.