


What Are Stops and How They Affect Exposure
Dec 29, 2025
Darlene Lleno
Darlene Lleno brings a unique perspective to DIY Photography as someone who grew up surrounded by camera gear but chose words over lenses. With five years of writing experience, she specializes in photography content that’s both technically informed and genuinely passionate. Growing up with a photographer twin brother meant camera talk was everyday conversation in her household. While he mastered capturing moments, Darlene discovered she preferred being the subject and the storyteller behind the scenes. As a travel enthusiast and mother of two, she understands the importance of preserving life’s precious moments. When not exploring new destinations or writing for DIY Photography, you’ll find her reading or tending to her garden. Her approach to photography writing is refreshingly authentic, she may not be behind the camera, but she knows exactly what it takes to help others capture the shots that matter most.
Share:
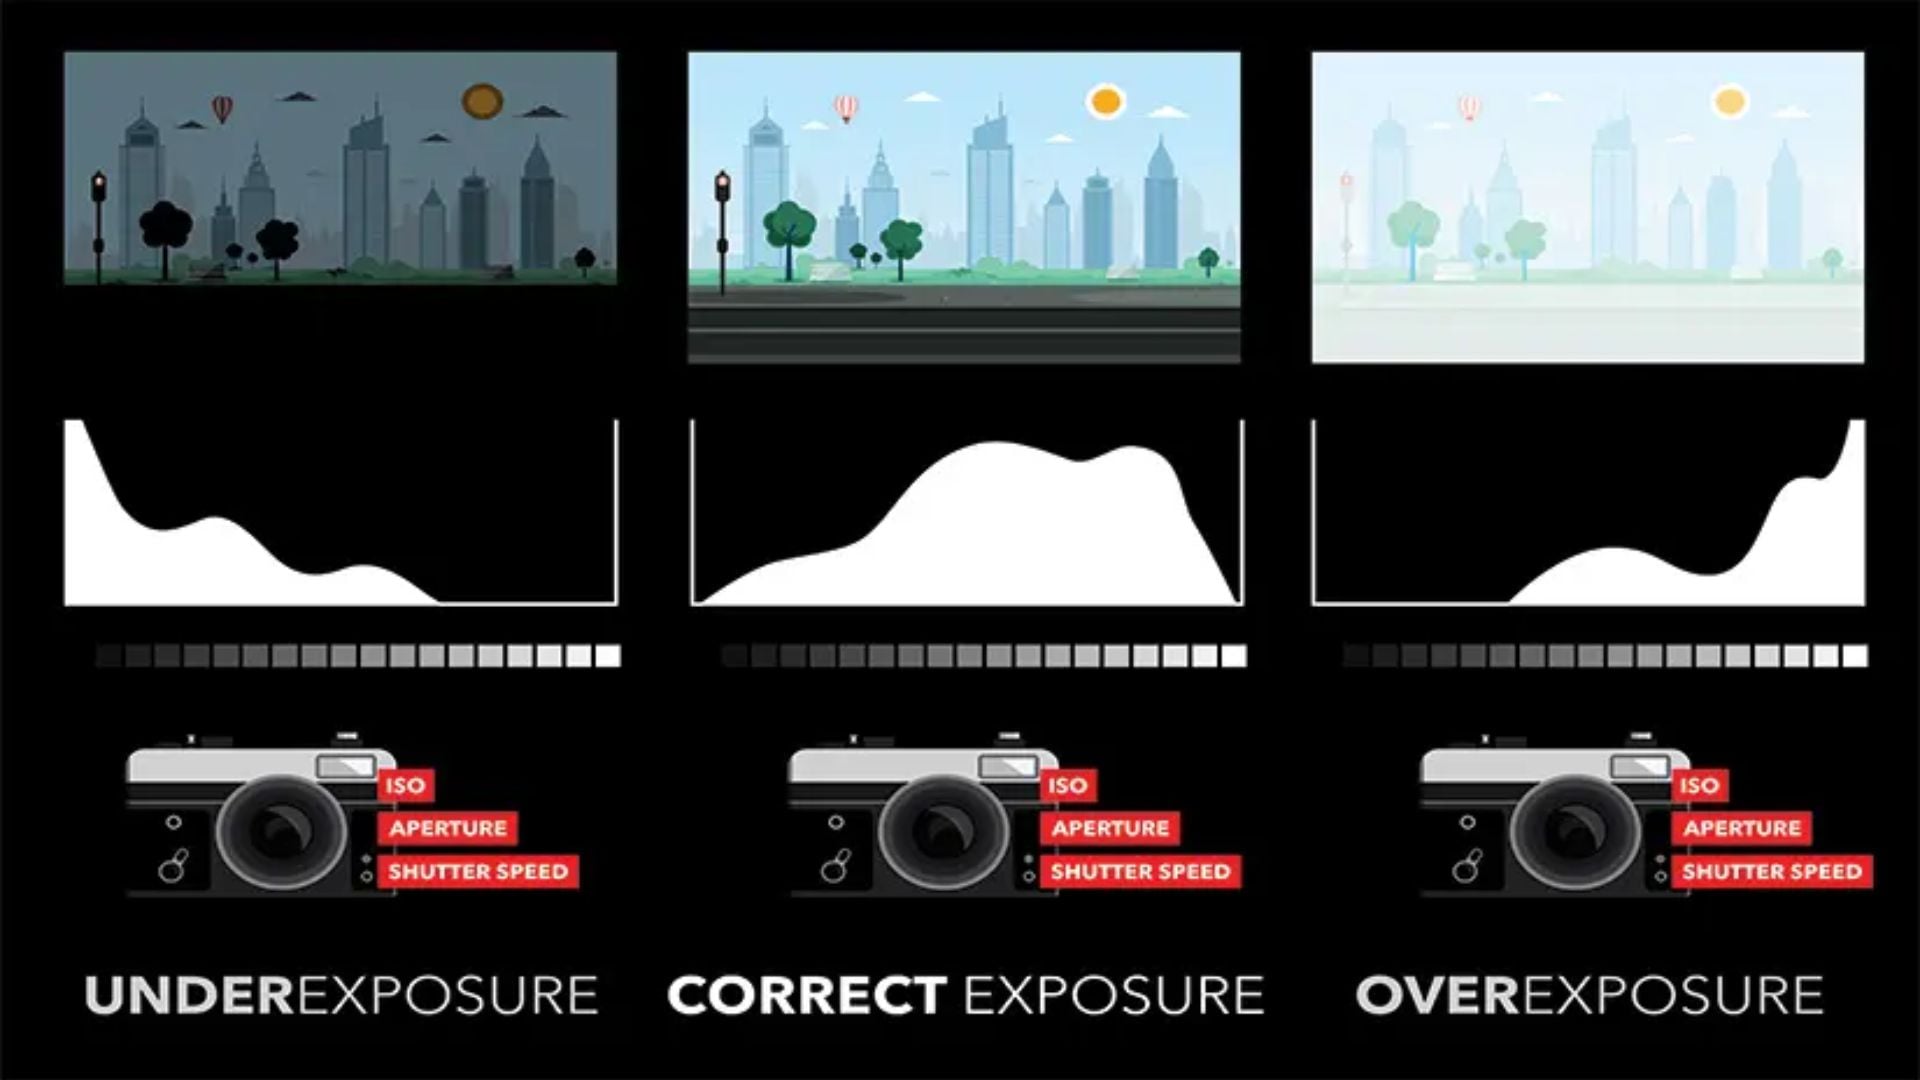
Stopping in exposure sound complicated. But they’re actually pretty simple once you get them. They help you control light in your photos. Every photographer needs to understand this concept.
You adjust your aperture, and your photo goes dark. You slow down your shutter speed, and everything gets too bright. Your ISO changes mess with your whole image. Stops in exposure help you balance all these settings.
What Stops in Exposure Really Mean
A stop represents a specific change in light. One stop up doubles your light. One stop down cuts your light in half.
Here’s an easy way to think about it. Your sensor receives 100 units of light right now. Bump up one stop and you get 200 units. Another stop brings you to 400. Drop down one stop from 100 and you’re at 50.
This pattern works across all three camera settings. Shutter speed, aperture, and ISO all follow this same rule. That’s what makes stops powerful. You can swap settings between these three while keeping exposure the same.
Most cameras let you adjust in thirds of a stop. That gives you precise control. But full stop increments matter for understanding the big picture.
Many filters also use stops to show their strength. An ND filter might reduce light by three stops or six stops. That tells you exactly how much you can slow your shutter speed.
How Aperture Works With Stops
Aperture values look weird at first. The numbers go f/2.8, f/4, f/5.6, f/8, f/11, f/16. Each one represents exactly one stop from the next.
Opening from f/8 to f/5.6 doubles your light. That’s one stop brighter. Going from f/8 to f/11 cuts your light in half. One stop darker.
Common Aperture Values
Here are the full stops in exposure you’ll see most:
- f/1.4, f/2, f/2.8, f/4, f/5.6
- f/8, f/11, f/16, f/22
Some lenses go wider. A fast prime might offer f/1.2 or f/0.95. Specialized macro lenses sometimes stop down to f/32.
Your camera probably offers two settings between each value. These are your third-stop adjustments. Between f/4 and f/5.6, you might see f/4.5 and f/5.0. This helps you fine-tune exposure for perfect shots.
Shutter Speed and Stop Changes
Shutter speed follows an easier pattern. The standard sequence goes 1/8000s, 1/4000s, 1/2000s, 1/1000s, 1/500s, 1/250s, 1/125s. It continues to 1/60s, 1/30s, 1/15s, 1/8s, 1/4s, 1/2s, 1s.
Each jump doubles the time your shutter stays open. That means each step lets in twice as much light. From 1/250s to 1/125s is one stop brighter. From 1/60s to 1/125s is one stop darker.
For longer exposures, the pattern keeps going. Two seconds, four seconds, eight seconds, 16 seconds, 30 seconds. Some cameras offer bulb mode for even longer times.
Why This Matters for Your Photos
Shutter speed affects more than brightness. Faster speeds freeze motion. Slower speeds create blur. When you adjust shutter speed to match aperture changes, you also change how movement looks.
Say you’re shooting a waterfall. You want silky smooth water, so you set your shutter to one second. But that’s too bright at f/8. You could close down to f/16 to balance things. Or add a three-stop ND filter and shoot at f/5.6 for shallow depth of field.
Stops in exposure let you plan these trades before shooting.
ISO Values and Stop Adjustments
ISO settings also work in stops in exposure. The common sequence goes 100, 200, 400, 800, 1600, 3200, 6400, 12800, 25600.
Each doubling represents one stop of increased sensitivity. ISO 400 is one stop brighter than ISO 200. ISO 3200 is two stops brighter than ISO 800.
Modern cameras often start at ISO 50 or 64 for clean files. They might extend up to ISO 51200 or higher for specialized shooting. But those extreme values hurt your image quality.
Balancing All Three Settings
You can juggle all three controls once you understand the stops. You’re shooting indoors at 1/60s, f/2.8, ISO 3200. But you want sharper images throughout your frame.
Close down to f/5.6. That’s two stops less light. You need to compensate somehow. You could slow your shutter to 1/15s. Or boost ISO to 12800. Or split the difference with 1/30s and ISO 6400.
Each choice creates a different look. The stop system lets you weigh your options clearly. This is where understanding stops in exposure really pays off.
Trading Stops Between Different Settings
This is where stops become super practical. You swap adjustments between aperture, shutter speed, and ISO while keeping brightness the same.
Want to freeze faster action? Speed up your shutter by two stops. Now open your aperture by two stops to compensate. The exposure stays balanced, but your image captures motion differently.
Need everything sharp front to back? Close down your aperture by three stops. Then either slow your shutter by three stops or raise ISO by three stops. You could also combine both adjustments.
A Real Example From Sports Photography
You’re photographing a soccer game on an overcast day. Your settings are 1/500s, f/2.8, ISO 800. The exposure looks good. But players still show slight motion blur. You want 1/2000s to freeze the action completely.
From 1/500s to 1/2000s is two stops faster. That cuts your light to one-fourth. Where do you find two stops to compensate?
Opening your aperture won’t help. You’re already wide open at f/2.8. So you raise ISO from 800 to 3200. That’s two stops. Now you’ve maintained the same exposure while getting sharp action shots.
This problem-solving becomes second nature once you think in steps.

Using ND Filters With Stop Calculations
Neutral density filters reduce light entering your lens. Photographers use them for long exposures in bright conditions. They also help shoot at wide apertures in full sun. Filter strength gets measured in stops.
A three-stop ND cuts light to one-eighth. A six-stop filter reduces it to one-64th. A ten-stop ND blocks light to one-1024th of the original amount.
Your scene meters correctly at 1/1000s, f/8, ISO 100. Adding a six-stop ND means you need six more stops of light. You could slow your shutter from 1/1000s to 1/15s. Or you could open up to f/2.8 and slow the shutter to 1/125s.
Making Filter Math Easy
Some photographers struggle with ND filter calculations. The stop system makes it straightforward. Count how many stops your filter blocks. Then add that many stops back through your settings.
Most often, you’ll adjust shutter speed. That’s usually why you’re using the filter. For waterfall photography or motion blur effects, slowing down creates the look you want. The filter just makes it possible in bright light.
How Stops Work in Post-Processing
When you edit photos, the exposure slider typically works in stops. Moving it from 0 to +1 brightens your image by one stop. Sliding to -2 darkens by two stops.
This matches how your camera works. If you underexposed by one stop while shooting, adding one stop in post brings you back. RAW files give you more flexibility here.
You can typically recover about three stops in either direction without severe quality loss. That’s why many photographers deliberately underexpose slightly. You can always brighten a dark image. But recovering blown highlights is nearly impossible.

Bracketing for High Contrast Scenes
Some scenes have too much dynamic range for a single shot. The brightest areas and darkest shadows span more stops than your sensor captures. That’s when photographers use exposure bracketing.
You shoot the same scene at multiple exposures. Usually, they’re separated by one or two stops. Your camera might capture one shot at meter reading. Then one two stops brighter. And one two stops darker. You blend them together in post-processing.
The stop system tells you exactly how far apart to space your shots. Too close together wastes frames. Too far apart might miss the optimal exposure range.
Common Mistakes People Make With Stops
Many beginners confuse f-stops with stops in exposure. An f-stop is specifically an aperture value like f/5.6. A stop is a unit of exposure change. It applies to any setting. You can have a stop of shutter speed change or a stop of ISO adjustment.
Another mistake is thinking bigger numbers always mean more light. With aperture, smaller numbers like f/2.8 actually let in more light than f/16. But with shutter speed and ISO, bigger numbers do mean more light.
Some photographers forget that cameras use third-stop increments by default. When you turn your command dial three clicks, you’ve moved one full stop. Knowing this helps you make quicker adjustments.
Putting Stops to Work in Your Photography
Understanding stops in exposure changes how you approach camera settings. You stop randomly twiddling dials. Instead, you make intentional trades between aperture, shutter speed, and ISO. You know exactly how each change affects your image.
This knowledge speeds up your shooting. As a result, you can adjust settings quickly because you understand the relationships. Consequently, you spend less time checking test shots and more time capturing the moment.
Moreover, the stop system also helps you plan shots in advance. For instance, you can calculate what settings you’ll need before arriving at a location. Therefore, that preparation means you’re ready when the light turns perfect.
According to Cambridge in Colour, mastering exposure fundamentals like stops gives photographers complete creative control. Professional photographers from PetaPixel consistently emphasize that understanding these relationships separates beginners from advanced shooters.
Practice thinking in stops whenever you adjust your camera. Ask yourself what compensation you need when changing one setting. Pretty soon, it becomes automatic. You’ll wonder how you ever managed without understanding this concept.

Darlene Lleno
Darlene Lleno brings a unique perspective to DIY Photography as someone who grew up surrounded by camera gear but chose words over lenses. With five years of writing experience, she specializes in photography content that’s both technically informed and genuinely passionate. Growing up with a photographer twin brother meant camera talk was everyday conversation in her household. While he mastered capturing moments, Darlene discovered she preferred being the subject and the storyteller behind the scenes. As a travel enthusiast and mother of two, she understands the importance of preserving life’s precious moments. When not exploring new destinations or writing for DIY Photography, you’ll find her reading or tending to her garden. Her approach to photography writing is refreshingly authentic, she may not be behind the camera, but she knows exactly what it takes to help others capture the shots that matter most.
Related Posts
 F-Stops vs T-Stops – What are they? and when do you use them?
 Sony stops producing a7 II and a6100 due to supply issues; stops orders for four other cameras
 If you’re struggling to understand stops and exposure, you need to watch this
 Here are 17 light modifiers compared and how they affect your portraits
Join the Discussion
DIYP Comment Policy
Be nice, be on-topic, no personal information or flames.
One response to “What Are Stops and How They Affect Exposure”
Great article; it was super helpful as a refresher for me! Though I did have a question. How does using auto ISO play a rule in getting the proper exposure while in Manual Mode? Obviously you just focus on changing the shutter speed and/or appeture to get correct exposure but just curious. Thanks!