


How To Capture Motion Trails While Freezing Subjects Using Shutter Drag
Nov 23, 2012
Udi Tirosh
Udi Tirosh is an entrepreneur, photography inventor, journalist, educator, and writer based in Israel. With over 25 years of experience in the photo-video industry, Udi has built and sold several photography-related brands. Udi has a double degree in mass media communications and computer science.
Share:
I love how Benjamin Von Wong approaches each of his projects with a loads of creativity and enthusiasm. You just know that he’s always trying something new and in his latest project – The Red Mistress, he proves it yet again! Some of the more outstanding photographs from this project are a combination of capturing frozen motions with a combination of continuous light and strobes.

In the following post Ben shares the motivation and technical steps neede to create this kind of photograph. Check it out after the jump!
Before we go into the technical side of stuff here is a look on the entire shoot
Concept
This shoot was actually a project that I did in association with Suzy Johnston + Associates and Filler Magazine. The point of the project was to create a fashion piece through dance. We wanted to create something that would be cinematic yet retain its sense of fashion.
Ryan Johnston from Filler told us that he would like the piece to be centered around a single iconic red dress and that he really liked the simple theatrical feel. Since I believe that is defined a lot through colours and textures, the idea of creating shots that would incorporate motion blurs capturing the beauty of the texture and colour of the dress seemed perfect. This way, we would have some beautiful stills that would also relate to the motion piece that would feature an iconic red dress.
Defining Motion Blur
Motion blurs are created through a combination of movement and long exposures. Essentially, you are capturing color and light for the duration that your sensor is exposed to light. This gives you three fundamental options: Either you move the light, you move your subjects… or you move your camera.
- Moving your light around when the shutter is open creates streaks… think light painting (interested in learning? click here) Light painting to me has always looked a little cartoony and surreal.
- Moving your subjects around creates nice interesting abstract blurs. If the subjects are humanoid in nature, the movements become irregular and controlled motions like dance appear as beautiful geometrical figures that appear in the middle of a chaotic centre.
- Moving your camera around means that your subject can stand absolutely still and that you, the shooter are in control of the lines that are painted. The results of camera motion is most often a geometrical line of some sort as a slight camera movement has a major impact on your image.
Given that this was a fashion piece and that we still needed to actually see the clothing and dancers, none of these three options were going to work for me. And this is where I introduced the flash!
Flash as you know… well, flashes. Even the slowest flash durations are under 1/300th of a second which means that no matter how long your shutter is open for, light from the flash will always be a nice quick pop.
Using a flash in combination with a long shutter drag means that you’re going to be using two different light sources within a single exposure – one that you see, and one that comes in and only lasts an instance. This means that depending on when your flash goes off, whatever was lit by that flash gets recorded on top of the rest of your image.
Getting a little bit more technical, this means that the exposure generated from flash is affected through aperture and ISO, while the rest of the image, which is coming form continous light, is affected (as usual) by Shutter, aperture and ISO!
Since we were in studio, we had absolute control over both ambient light and studio lighting…. which means that we could really control the exact look we were going for!
In my case I wanted my subjects to be frozen solid with a very clean and dramatic lighting accompanied with motion streaks swirling around my subjects that would showcase the fact that these were dancers in motion. Despite the surreal motion obtained from shutter drag, I still wanted things to look like a photograph.
Setting Up The Shot
Step 1: Set up ambient light to keep background dark.
We had a bunch of warm tungsten stage lights available to us. This meant that we could spread them out evenly over a large surface area without touching the backdrop. We threw in an entire row on the back of our stage and a couple in front to ensure that we’d also get some nice light on our subjects from the front too.
By keeping the beams relatively tight, and angling them downwards, we could ensure that the light wouldn’t bleed too much onto the background.
The lights we had were quite bright so we were able to set my D800E up to shoot at an iso of 50 at an aperture of f5.6. Very nice. This meant that even if my subjects were in motion, I would still be able to keep them in focus if they only moved from left to right.
Step 2: Set up the flashs to light up the foreground
As mentioned earlier, I wanted to have some clean cinematic and dramatic light. I opted for two large directional light sources that would be able to wrap around my dancers without affecting the background –> Extra large gridded softboxes. Flash power was set by matching what I wanted to see frozen.
Tip: When calibrating your flash power to match your camera settings, put your shutter speed up to max sync speed (normally between 1/200th or 1/250th of a second) to make sure the image isn’t affected by the ambient light.
Step 3: Set up your flashes to sync at the end of your exposure
As mentioned earlier, flashes will define at which point your subjects become “frozen” in place in your image. If you’re looking to produce a realistic image, logically the movement trails should happen in the “past” not in the future and as such, you want the trails to follow your subjects, not lead. To achieve this, set your flashes to trigger at the end of your exposure… in camera lingo, that means REAR SYNC FLASH.
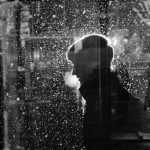
Example of a front curtain flash:

Example of a rear sync flash:

Step 4: Experiment !
Once everything is already set up and ready to go is to shoot, recalibrate, shoot recalibrate and shoot again. If possible, frame larger rather than tighter to make certain that the amazing shot gets some pieces of movement cut off. Since the flash occurs at the end of the exposure, try to slightly overestimate the exposure time for the dancers to complete their movement.
Note: when testing, try to avoid circular movements as they tend to stack up on one another!

Step 5 : Photoshop!
The cool part about motion trails is that you can combine them with other motion trails quite easily in photoshop! If you did a good job exposing your shots with a dark background, placing the resulting images in “screen” blend mode in photoshop will make your job a lot easier! Try it out it’s great fun!
Here are some more photographs fro mthat same shoot


Your Turn!
Like all things, practice makes perfect so get out there and give it a shot on your own and share with us your feedback. If you’re curious to know about the production part of the project and the final images that were shot, check out the post on my blog!
About The Author
Benjamin Von Wong is a photographer based in Montreal, Canada. You can follow his work on his blog, facebook and Youtube channel.
If you like what he does, you can read more of his writing for DIYP.

Udi Tirosh
Udi Tirosh is an entrepreneur, photography inventor, journalist, educator, and writer based in Israel. With over 25 years of experience in the photo-video industry, Udi has built and sold several photography-related brands. Udi has a double degree in mass media communications and computer science.


Join the Discussion
DIYP Comment Policy
Be nice, be on-topic, no personal information or flames.
3 responses to “How To Capture Motion Trails While Freezing Subjects Using Shutter Drag”
Shutter Speed
Aperture
Iso , berapa ?
These photos prove that techonology and skills produce great work. Photography and abstraction are compatible.
Helpful.