


Watch this 10-step guide to shooting “shutter drag” portraits on location
Aug 24, 2021
John Aldred
John Aldred is a photographer with over 25 years of experience in the portrait and commercial worlds. He is based in Scotland and has been an early adopter – and occasional beta tester – of almost every digital imaging technology in that time. As well as his creative visual work, John uses 3D printing, electronics and programming to create his own photography and filmmaking tools and consults for a number of brands across the industry.
Share:
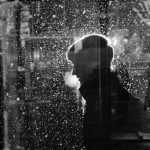
Shooting portraits with slow shutters can be a lot of fun, whether you’re doing them during the day or at night. They’re not that easy to pull off, though, often requiring a lot of practice to get good at. Well, to help get you started, here’s wedding photographer Pye Jirsa with his 10-step guide to how he shoots his environmental shutter drag portraits.
You’ll notice that there are seven whole steps before your subjects actually get in front of the camera. This is because it gets boring for subjects standing in front of the camera waiting for you to take a shot while you fiddle with your camera for five minutes. So, get everything prepared and ready so that when they step in front of it, you can just hit the shutter.
Here’s Pye’s complete 10-step list…
- Choosing Time of day
- Scouting your angle
- Placing your tripod
- Securing your camera
- Use a wide-angle lens
- Finalise composition
- Setting your exposure
- Bring your subjects in
- Use continuous shooting mode
- Verify your images before ending the shoot
While Pye recommends shooting such images at dawn or dusk (golden hour, yo!) due to the lower light levels allowing for an easier long exposure without it getting too long, it is possible to shoot these during the brighter by using a neutral density filter. Of course, if it’s a sunny day, you’ve got the angle of the light to think about. You could also potentially do these at night, too, if you wanted to try a long exposure for the environment and then popping a bit of flash at your subject, but that’s beyond the scope of Pye’s video.
Pye’s list is a great place to get started, though, and really gets you thinking about the shot instead of just blindly pointing your camera at your subjects while they’re stood in potentially uncomfortable conditions.

John Aldred
John Aldred is a photographer with over 25 years of experience in the portrait and commercial worlds. He is based in Scotland and has been an early adopter – and occasional beta tester – of almost every digital imaging technology in that time. As well as his creative visual work, John uses 3D printing, electronics and programming to create his own photography and filmmaking tools and consults for a number of brands across the industry.


Join the Discussion
DIYP Comment Policy
Be nice, be on-topic, no personal information or flames.
2 responses to “Watch this 10-step guide to shooting “shutter drag” portraits on location”
Awesome technique…well taught !!
This is a great method for portraits. Only thing to add: Use a sturdier tripod. The one you have is good but there are better. Also, spikes on beach add greatly to tripod stability. Use an L bracket instead of a ball head tilted at 90 degrees (it is also a beach stability thing). And finally, to make sure you are getting the best detail and stability , use a remote shutter release.