DIY Photography

Your one stop shop for everything photo-video

  • News
  • Inspiration
  • Reviews
  • Tutorials
  • DIY
  • Gear
Search

Submit A Story

Step by step guide for Composite Product Photography

May 31, 2015 by Laya Gerlock 1 Comment

  • Share
  • Tweet
  • Flipboard
  • WhatsApp


feature image composite

Usually, I prefer to get stuff in camera (even if it means light painting my subject). But sometimes Lighting or space limitations will make getting the picture in-camera hard or simply not worth the effort. When such situation strikes go for a composite. If you only have little gear, this technique will also help you get a more professional look in your images.

To demonstrate this point, I used my girlfriends Macbook air and my Fuji Xe-2.

Shooting

The actual shooting depends on how many lights you got and how many layers in Photoshop you are willing to use for the final image; it can take a minimum of 3 images up to 20 or more depending on how you light the product. I prefer moving my lights in different angles just to see the outcome and choose the best option after.

The general idea is to place the camera on a tripod and make sure your product is in a static position – if either the camera of the subject move, this will not work. You can use different techniques for lighting your product but for this shoot, I just used one speedlight with a small softbox combined with an acrylic sheet for the gradient reflections.

Fuji Chosen Shots

Post Production

Step 1: Select the photos that you want. Each photo should have at least one highlight that you are happy with.

Macbook Chosen shots
Step 2: Open photoshop > Click File > Script > Load Files into Stack and select the photos that you chose


step 2 copy
Step 3: Make a background layer. I chose a black solid layer for this project

Step 3 black layer copy
Step 4: Hide all the layers of photos in photoshop

(There are different kinds of techniques to doing this but I do mine this way)

Step 5: Select the first layer and add a Layer Mask.

Step 5 add layer mask

Select your brush and set the color to black. Brush on the parts that you want in your photo.

step 4 layer mask copy

After that, select the layer mask and press CMD+ i to invert the mask.


step 6 brush parts1 copy
To check the photo I invert the mask to see the difference I made

Step 6: Repeat step 5 on the other layers until you get the final image

step 6 brush parts 2 copy
Step 7: I added a gradient on the background black layer for the final image
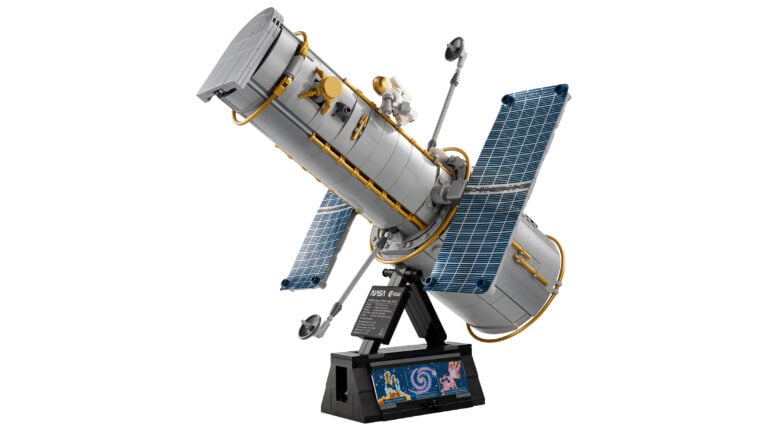
step 7 gradient copy

Final Result:

diyphotography compositecamera final

diyphotography compositelaptopfinal

Wanna try this? show us your results in the comments

FIND THIS INTERESTING? SHARE IT WITH YOUR FRIENDS!

  • Share
  • Tweet
  • Flipboard
  • WhatsApp

Related posts:

A step-by-step guide to using the Waveform Monitor Dancing Decay – a complete step by step composing breakdown A step by step tutorial on building an IKEA beauty dish How I did this pink & red studio shoot: a step-by-step breakdown from planning to post-processing

Filed Under: Tutorials Tagged With: Adobe Photoshop, composite, layering, layers, lighting tutorial, product photography, still life

Laya Gerlock: from diyphotography.net

About Laya Gerlock

Laya Gerlock is a Portrait and Product photographer based in the Philippines. His passion is teaching and sharing his knowledge in Photograpy and has been doing this for 6 years. You can follow his work on his web page, follow him on Flickr and if you happen to come by Cubao, Quezon City (To Manila, Philippines) he gives a great workshop!

« Was Sony’s Site Hacked? Listed DSLR Cameras and Lenses Up To 90% Off
Let Enrique Iglesias Show You Why Grabbing A Drone Out Of Mid Air Is A Really Bad Idea »

Submit A Story

Get our FREE Lighting Book

DIYP lighting book cover

* download requires newsletter signup
DIYPhotography

Recent Comments

Free Resources

Advanced lighting book

Recent Posts

  • Here’s a bullet time video booth you can build yourself
  • Ricoh has discontinued the HD PENTAX-DA 21mm F3.2AL Limited silver lens
  • This “stellar flower” unravels the twilight’s evolution in 360 degrees
  • Strobes vs Continuous LEDs – Which is right for you?
  • Wave goodbye to Apple’s My Photo Stream next month

Udi Tirosh: from diyphotography.netUdi Tirosh is an entrepreneur, photography inventor, journalist, educator, and writer based in Israel. With over 25 years of experience in the photo-video industry, Udi has built and sold several photography-related brands. Udi has a double degree in mass media communications and computer science.

Alex Baker: from diyphotography.netAlex Baker is a portrait and lifestyle driven photographer based in Valencia, Spain. She works on a range of projects from commercial to fine art and has had work featured in publications such as The Daily Mail, Conde Nast Traveller and El Mundo, and has exhibited work across Europe

David Williams: from diyphotography.netDave Williams is an accomplished travel photographer, writer, and best-selling author from the UK. He is also a photography educator and published Aurora expert. Dave has traveled extensively in recent years, capturing stunning images from around the world in a modified van. His work has been featured in various publications and he has worked with notable brands such as Skoda, EE, Boeing, Huawei, Microsoft, BMW, Conde Nast, Electronic Arts, Discovery, BBC, The Guardian, ESPN, NBC, and many others.

John Aldred: from diyphotography.netJohn Aldred is a photographer with over 20 years of experience in the portrait and commercial worlds. He is based in Scotland and has been an early adopter - and occasional beta tester - of almost every digital imaging technology in that time. As well as his creative visual work, John uses 3D printing, electronics and programming to create his own photography and filmmaking tools and consults for a number of brands across the industry.

Dunja Djudjic: from diyphotography.netDunja Djudjic is a multi-talented artist based in Novi Sad, Serbia. With 15 years of experience as a photographer, she specializes in capturing the beauty of nature, travel, and fine art. In addition to her photography, Dunja also expresses her creativity through writing, embroidery, and jewelry making.

Copyright © DIYPhotography 2006 - 2023 | About | Contact | Advertise | Write for DIYP | Full Disclosure | Privacy Policy