


A step by step tutorial on building an IKEA beauty dish
Mar 1, 2016
Anders Millqvist

We love it when our readers get in touch with us to share their stories. This article was contributed to DIYP by a member of our community. If you would like to contribute an article, please contact us here.
Share:

I converted an IKEA lamp to a beauty dish a while ago and I was surprised of the result. I found a description when I was looking for other things and got curious if that really would work. I decided to try and I bought one at a visit to IKEA. But the one I bought was in aluminium finish and not white as the one below.
I did not take any pictures when I was building it as it did not cross my mind that I would publish it on my blog.I think you will understand how i did it from the pictures anyway. First I made a paper template of the size of my Nikon SB-910 (the front) to mark the hole I had to cut. I just marked it with a marker pen and used a Dremel to cut the hole. I later covered the edges of the hole with electrical tape to spare my flash a bit. you can see it on some pictures later on.

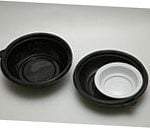
Next step was to drill holes for the threaded rods that hold up the plate that bounces the light back. The template for that was to actually use the plate. The one I used is a simple 100 mm plastic cover for electrical installations.

Threaded rods from the front side.

This is how it looks from the front with the plate mounted on the rods. You will see som small clips on the side of it, but we will get to that later.

I then made a bracket to mount my dish on a tripod and I used aluminium flat bar, easy to bend and stable enough. as you can see I use pop rivets to join the parts together.


I then added a small ball head to give myself som flexibility if I want to turn the flash around and not use the dish.

The first test I did with it really surprised me, those pictures are below.


Then I wanted add the feature to be able to use color filters, preferably gel filters as I happen to have a bunch of them at home. It ended up with this simple solution and you can now see the paper clips I wrote about in the beginning. I know most of you don’t think it is necessary to use filters as it is easy to get many of the effects in PS or other editing software, but I think it gets another dimension to it.

This is how it looks when it is mounted.

The wife still refused ta act as a model so I talked with Slobo the cat and he volunteered for it.

To be real low budget I used an old microphone stand for this.


About The Author
Anders Millqvist is a photographer based in in Lidkoping, Sweden. You can read more of his thoughts on his blog, follow his photoblog, and communicate via G+ and Flickr. This article was also published here and shared with permission.
—
We posted a shorter tutorial for an IKEA beauty dish using the same lamp here, this tutorial vastly expands on it.
We love it when our readers get in touch with us to share their stories. This article was contributed to DIYP by a member of our community. If you would like to contribute an article, please contact us here.


Join the Discussion
DIYP Comment Policy
Be nice, be on-topic, no personal information or flames.
9 responses to “A step by step tutorial on building an IKEA beauty dish”
horrible design, all that bracket work and small deflector makes tthis look very hokey!
Lol….It was a quick work just to test it and the small deflectors works perfect.
So what? paint the bracket black and no client is even going to notice. If they do notice, they’re more likely to be impressed than care that you didn’t spend $500 on in.
When you see the price of a beauty dish @ Aliexpress…
Mine version
https://flickr.com/photos/90128350@N06/sets/72157639319092384
Nice one :-)
Zachary, are you bored?
Eh, not that bored. I’d rather build a ring light
Mine was cheaper and easier to make. :-) Works really well too!
http://thephotophile.blogspot.se/2010/10/diy-beauty-dish-on-cheap.html