


Shooting wedding receptions on film with no flash and no automation
May 6, 2019
Johnny Martyr

We love it when our readers get in touch with us to share their stories. This article was contributed to DIYP by a member of our community. If you would like to contribute an article, please contact us here.
Share:

Say what you will about wedding photography but few other gigs will allow you to drink on the job and party with beautiful people without having to even know a single dance move.

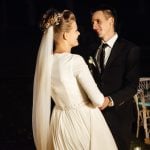
My wife and I are freelance wedding photographers. She shoots digital and I shoot on b&w 35mm film. I use vintage, all manual cameras and lenses and I don’t use flash.
This is a very challenging workflow that I’ve set up for myself but it’s quite rewarding and fun. In particular, my favorite part of a wedding to photograph is the reception.
What I like about the reception is that I no longer have to run around from location to location, constantly selecting different films and different lenses and, best of all, all the bridal party and guests are familiar with me by the reception. They are usually well buzzed on alcohol or just happiness and allow me to shoot candids without interruption or reservation.

I generally like wedding reception photos more than any other images of the day. They display a genuine joy and excitement that is rare in portraits of any genre. I like how backgrounds are mostly dark instead of light as with outdoor portraits. This really emphasizes the people in the images and just sort of flips convention around. I enjoy the out of focus elements at wider apertures. And I enjoy big, pronounced film grain of 3200 ISO 35mm films and high acutance developers. One can certainly reduce grain by shooting medium format, using flash or using a developer that tidies up the grain. But I enjoy the textures and de-emphasis of irrelevant details in a scene. Yet grainy b&w also makes out of focus highlights sparkle with energy.


I wanted to share some of my methods and techniques for achieving, what I think are, great wedding reception portraits in this style. It’s not as easy as it may seem and I’n not totally sure I can even articulate what I do exactly but let’s have a look.
My method starts with Kodak TMAX P3200 or Ilford Delta 3200. For years I just used Delta since P3200 became unavailable. But now that P3200 is back, I can choose which film might be best for a particular situation.


P3200 is a bit more tonal and perhaps not quite as sharp as Delta. I use it when I expect light to be more contrasty. It’s tonality helps gather better context around people since greys don’t disappear as fast. I choose Delta if I’m expecting flatter lighting where I need to help the highlights to pop out of the shadows as much as possible. Both films, I process in Kodak HC110b and boost low levels and/or contrast a bit in Photoshop. Yes, I scan my film as a final result.


Next, a good, low-light lens is critical. A common 35mm or 50mm lens with an aperture wider than f2 is what’s needed for shooting candid portraits in dim light. Any wider, and barrel or perspective distortion is a concern. Any longer, and shutter speed needs to be increased to prevent hand held camera shake. And raising your shutter speed reduces your ability to stop down.
I tend to prefer a 35/1.4 or 50/1.5 to 1.8. I have a Pentax 50/1.2 but not only can focus be tricky to hit, the DoF is often too shallow for portraits. As high a resolving lens as possible is also recommended for use with these high speed films. A softer lens will just turn that big, beautiful grain to mush.

While I adore my 1949 Leitz 50/1.5 Summarit, at full aperture, it’s quite soft so I tend to only use it with higher speed film when I know I can stop to f2 or so. Something like the Voigtlander 50mm 1.5 Nokton is a better choice in my opinion. A Summilux is fantastic but really only if it’s a newer aspherical model. For Nikon, I use either my 35/1.4 AIS, 50/1.4 SC or 50/1.8 AIS. 35mm lenses are fantastic because you can catch a whole scene while having a fast lens and added DoF compared to a 50. Shooting at 1/30th is fun for adding some motion blur to dance scenes.

But I also like to isolate a single person, for which 50 is perfect. I haven’t much liked the Nikkor 50/1.4 AIS at full aperture. It’s as sharp as the earlier SC version with more microcontrast so it appears even sharper. But it just lacks much character to me. The 50/1.8 is a nice compromise between speed and the resolution of an f2 lens so I often go with it.


But what about the body? A good body can make all the difference in terms of your ability to control what you’re doing and seeing. These Leica lenses on an LTM body with its tiny finder or these Nikon lenses on an F3 with it’s atrocious meter display would not end well. What defines a good body?

I use and recommend a Nikon F2sb, Nikon FM2n and Leica M6 TTL .85. What these bodies have in common is a bright, split screens and bright, at-a-glance light meter displays that all measure up to 6400 ISO.
To some degree, the meter doesn’t matter. I find that the vast majority of reception halls can be photographed at 6400 ISO, 1/60th or 1/125th of a second and anywhere from 1.4 to 2.8. (And if they can’t, I have the lights adjusted accordingly.) It wouldn’t be impossible to take some measurements around the dance floor and then just rack your aperture and shutter as necessary without metering and get decent results. When the light is super even, I will just set 60 and 1.4 and just shoot without changing anything. If the light’s a stop or two bright, the latitude of the film will allow me to burn the highlights. Personally, I just like some confirmation while shooting though, even if I only meter a few times. And so a good, accurate, easy-to-read meter is important to me because I don’t want to have to slow down or get distracted by my gear.


More critically perhaps, is the viewfinder. Focusing in 6400 lighting conditions is the most challenging part of my equation. I’d say that focus is the number one problem with my reception photos. Maybe you’re sitting back, looking at my photos and thinking the same thing! The majority of the images that I throw out are either the wrong moment or I completely missed the focus. A bright viewfinder and accurate focus mechanism will not correct every focusing error but it’s a necessary start.

In terms of actually getting shots, I immerse myself in the throng of guests on the dancefloor. I keep an eye on people who are having an awesome time AND are hovering in an area where they have some light on them. I really love it when DJ’s bring flashing lights. While they make exposure tricky, they can create engaging spotlight effects that come and go in different places, on different people, which really varies things up.
It sounds dumb but you really have to be careful not to back up into people or bump into them while they’re dancing or walking. It makes you look unprofessional and it’ll ruin your shots by startling you when you’re concentrating. So I do not keep my eye glued to the viewfinder. It’s also good for people to see your face and vice versa, to maintain that social connection. I never tell anyone to look at me and smile, they just do it on their own. And that doesn’t come without work.


I expose for middle tones, if there are any, and faces with a half stop to stop over exposure. Please don’t ask me to explain much more than this though, I’ll be the first to admit that what I do is the opposite of exact science!

When shooting with a rangefinder, I find it necessary to constantly pre-focus. I stand about five feet away from people I want to shoot and set my lens to that, then just make slight corrections one way or the other as they or I move. If one does not do this, rangefinder focusing can be confusing and you might think you’re focused but really, you’re on the other side of the scale. Just basic optical limits of using a rangefinder. But what’s handy is that the pre-focus habit helps get shots that much faster with my SLR, which I tend to use more if it’s really dim or lighting is really flat.

I look for the height of an emotion; a mouth open at its widest point, a glass lifted to its highest point, etc. Sometimes I rapid fire and get several versions of a moment but this can result in camera shake too so I usually try to wait, finger on the trigger, and nail things in one shot.


I ALWAYS shoot for the moment first, focus second and exposure last. Composition is something that kinda just falls into place while I’m doing those main three things. The moment and people involved often dictate composition and I like to give people plenty of headroom to convey lightness of spirit. Exposure is usually going to be correct within two stops on these dynamic print films anyway. Focus; I’m always pre-focusing so that’s also at least close. But moment. Moment is something that you cannot accept as inaccurate or fix in editing. The moment has to be perfect. It’s the reason you’re shooting in the first place.

My style is to aim for technical accuracy but not to forget to enjoy the chaos. If I take a shot and miss the focus or exposure, or get a little camera shake or motion blur in the image, sometimes this works. These little imperfections express the manual mechanical nature of what I’m doing and culminate with the moment depicted to express excitement and thrill and speed. Some may call this a cop-out for not getting things right in-camera. But I really do mean it, I enjoy and appreciate imperfect, non-automated photography for what it is, and what it is not. And these imperfections are where the humanity is most clearly exhibited and experienced.

Well, I think that’s about all I’ve got! I hope you’ve enjoyed my photos and are perhaps inspired to go shoot a fun wedding reception with some high speed film and a slick, low-light rig. Trust me, you’ll have a blast!
Thanks for reading, happy shooting!
About The Author
Johnny Martyr is a premier East Coast film photographer. After an adventurous 15 year photographic journey he now shoots exclusively on b&w 35mm film that he painstakingly hand-processes & digitizes. Choosing to work with only a select few clients per annum, Martyr’s uncommonly personalized process ensures unsurpassed quality as well as stylish, natural & timeless imagery that will endure for decades. You can check Martyr’s work on his website and Flickr stream. This article was also published here and shared with permission.
Filed Under:
Tagged With:
We love it when our readers get in touch with us to share their stories. This article was contributed to DIYP by a member of our community. If you would like to contribute an article, please contact us here.
Related Posts
 This 17-minute video takes a geeky deep-dive into film camera communication and automation
 35mm film vs. medium format vs. full frame digital: is shooting film really worth it?
 The Film Carrier Mk1 is yet another film holder for “scanning” your film with a digital camera
 Wedding reception flash photography: It’s not scary with these five great tips
Join the Discussion
DIYP Comment Policy
Be nice, be on-topic, no personal information or flames.
27 responses to “Shooting wedding receptions on film with no flash and no automation”
the title should end with “…and no bloody reason whatsoever!”
One “bloody reason” would be so my photos don’t look like everyone else’s’. ;) Thanks for reading though!
What is surprising is that you actually think they don’t… but hey, whatever makes you and your clients happy ;-) In the end, that’s all that matters.
Marios, I am the only shooter with this technique in my area but sure, there are others like me elsewhere. If you know of anyone else, I’d love to see links!
Great photographs – love them!
No way I’d dare! When I remember all those times I’d get a completely blank roll of film from the lab when I was a kid… I’m grateful for digital photography! :D And nowadays I shoot film only for fun.
Great photos though :)
I’m grateful for many different approaches to photography. Sorry to hear about your blank rolls as a kid, maybe time to revisit now that you’ve got some more skills under your belt! Thanks for your comment.
wouldn’t hesitate. as long as I also had a darkroom to do the developing in….
About 4-5 years back I had a bride ask me to shoot a wedding on film and the cost etc.
Ive done it, illford 200 and 800 and a few roles of 1600 years ago
I would, but I’d let someone else develop the negatives!
Lewis , I did that for years until my local labs either went out of business or their quality was no longer acceptable for paid work. Slowly I began doing it myself and much more prefer it. However, most film wedding shooters, particularly on the West Coast, use labs. Thanks for your comment.
There are so few labs left in the UK, it’s expensive and takes ages to get the negs back.
There’s an excellent Lab in Newcastle Upon Tyne, wouldn’t trust anyone else with my film
I did it for years and always have. Film camera with me t a wedding for the really special shots. Sorry but if film is scary to you maybe photography is not your game?
OR….they may just prefer digital….( bit of a sweeping statement there )
Duncan Knifton sweeping overly sarcastic opinions that push buttons is what Facebook comments are for.
Brian Drourr he has a point photography on film teaches you how reserve your shots rather than take a bunch hoping they turn out. It’s why I also have film for concerts sometimes and do everything off auto and work with what I have.
Rebecca Maier film teaches you how reserve your shots rather than take a bunch hoping they turn out.Not all shoot this way.So the same really.I never shoot like a wild man.Only cos i couldn’t be arsed to look through 1,000’s of shots.I got far better ways to use my time :-)
Less chimping more shooting. I say do both.
not for me…….started using film 20+ years ago at weddings….my style has changed a lot and now using a roll ( or two ) would not fit with how I work the receptions now.
Each to their own etc etc
Nice pictures. Thanks
I did crime scenes with film.
Great set of images…
I still do film, and charge more for it; but then I use a Hasselblad with strobes.
I love these! I shoot film, although I’ve never bothered at a wedding as it really wouldn’t match up with the rest of my work. But there’s something special about images on good old fashioned film!
Although, as I only shoot film for me, I’m then typically awful at sending them off to get developed…
Focusing through a medium format viewfinder is far easier, you should give it a shot.