


Shooting Ironman Triathlon Swim Training – Underwater Photography
Share:
I love a photography challenge and underwater photography has a way multiplying complexities.

But like most challenges, it is the preparations that you make before diving in that will help your photography sink or swim (I’m sorry – I couldn’t resist).
In this article, I will take you through a recent underwater photography session I did with three triathletes currently training for the Ironman Triathlon.
Ironman Triathlon Swim Training – Underwater Photography Planning
The first step in planning my underwater photography session with a group of swimming triathletes was to go out and find a group of serious athletes that would be interested in modeling.
The three models I was able to work with all train with a local triathlon club (Saugeen Triathlon Club) and they are all serious about their sport and their training. This was important because I wanted to make sure that the final images looked authentic.
I also wanted to photograph the athletes swimming in open water, not in a pool – so that meant using a location with crystal clear water. Fortunately, I have access to a few locations on Georgian Bay that have both crystal clear water and a nice clean rocky bottom (even if the water is always COLD).

I shoot the bulk of my underwater photography by just holding my breath and swimming with the athletes. But in this case, I wanted to make sure that I had enough time to actively compose my underwater photos of triathlon swim training in action, so for these photos I went with a full scuba diving setup.
I should point out that it is important to be very comfortable underwater before you attempt an underwater photo shoot with dive gear. When your full concentration is on framing your shot while looking up, trying to stay stationary and holding your breath to avoid bubbles in the frame (a scuba diving no-no but necessary for this type of photography), it is very easy to forget that you are underwater and bad things can happen very quickly.

Underwater Photography Gear and Camera Settings
I used a Canon 5D Mk II with a 20mm f/2.8 lens for all of the Ironman triathlon swim training underwater photography in this post – except for the transition stage photos. Those photos were taken with a Nikon D800 with a 50mm f/1.4.
With a flat port underwater housing, the 20mm lens is approximately equivalent to a 28mm lens.

The camera was set to Aperture Priority (A) at f/5.6 with an exposure adjustment of +1 and ISO 400. These setting provided a shutter speed around 1/500th of a second or faster (to freeze the action) and a good exposure in most circumstances (click here for more tips on camera settings and shooting natural light underwater photography).
I use an EWA Marine underwater camera housing (click here for our review of EWA’s underwater camera housings) to keep my camera safe and dry.
Ironman Triathlon Swim Training Underwater Photography Shot List
Because of the complexity of underwater photography and photographing a group of athletes in open water, I only had four photos on my shot list.
The first was a wide angle with the swimmers overhead, the second was a medium shot with the swimmers approaching or leaving the frame, the third was a tight shot of the swimmers in action in shallow water and the last was the swimmers exiting from the swim stage.

Underwater Triathlon Swim Photo 1
For the wide angle shot, my goal was to photograph a silhouette of the triathletes swimming overhead. Knowing the position of the sun, I had the athletes swim in a triangular circuit above my shooting position. In this way, I could shoot back-lit, front-lit and side-lit photographs without having to change positions. As you can see from the sample photos, the location of the swimmers relative to the sun has a big impact on the look of the final image.
Every three laps I surfaced to give the athletes further instruction.


Underwater Triathlon Swim Photo 2
For the next photo on the shot list, we moved into shallower water so that I could get my camera physically closer to my subjects. Moving the camera closer to my subjects and also closer to the surface allowed me to capture more of a natural white balance, as opposed to the blue with a black silhouette of the first series.
We repeated the same procedure with the triathletes swimming a triangular circuit around my shooting position.


Underwater Triathlon Photo 3
For the close up series of underwater swimming triathletes, we moved into water that was only about 8 feet deep and right at the edge of a rocky shoal. For these photos, I really wanted to emphasize a sense of action and speed, so I had the triathletes swim up to me and past – back and forth, approximately perpendicular to the sun.
What I really like about this series of photos are the colors of the rocky shoal that are reflected in the water when I was shooting towards shore, and the completely different look of the blue open water that I got when shooting out towards the deeper water.


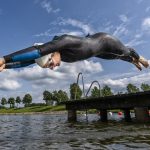
Underwater Triathlon Photo 4
The final photo that I wanted to capture was the action of the triathletes popping up out of the water and racing to shore in the transition stage of a triathlon.
This series of photos is completely different than the rest because my camera is above water. For this series of photos I used two SB-800 strobes set to full power to light the athletes and the water splashes as I shot back towards the sun.


Post Processing for Ironman Triathlon Swim Training Underwater Photography
Post processing is critical to produce professional underwater photography. If you would like to see a video tutorial on my personal underwater photography editing techniques – click here.
One further point that I would like to make about post processing underwater photography is that sometimes you have to work within the limits of optical physics.
For example, in the wide angle photos of the triathletes swimming overhead the light that is hitting my camera’s sensor has traveled through 30 feet of water. At that distance there is very little red or even green spectrum light left by the time the light reaches the camera. That means that no matter what your white balance is set to or what you do in post – your image is going to be mostly blue.
You can solve this problem my physically moving both closer to your subject and closer to the surface, but of course that would change the composition.

In fact, the photo below is a very good example of how water changes the colors of underwater photography. In the foreground you see the red, brown and yellow colors of the rocky bottom – these colors contain a lot of red spectrum light. As you move through the water column, the red spectrum light is filtered out until we are left with just green and blue – you can clearly see the transition in this image. Finally, as light moves further through the water column, we are left with just blue spectrum light.

Finished Photographs
Even though I was only expecting to capture a minimum of four photographs from the entire shoot, I was happy that I was able to capture quite a few more from each setup.
However, there is no escaping that underwater photography is very random and takes a lot of practice before you can reliably produce consistent results.
I was very impressed with how hard the athletes worked to get the shots – they were swimming almost non-stop in freezing cold water for then entire afternoon and didn’t complain once!
Leave a comment below and let us know if you have any questions about underwater sports photography or any of the techniques used.

JP Danko
JP Danko is a commercial photographer based in Toronto, Canada. JP can change a lens mid-rappel, swap a memory card while treading water, or use a camel as a light stand.


Join the Discussion
DIYP Comment Policy
Be nice, be on-topic, no personal information or flames.
2 responses to “Shooting Ironman Triathlon Swim Training – Underwater Photography”
“: Shooting An Ironman Triathlon Swim Training – Underwater Photography – http://t.co/Ofmgp2Vsdx” @jeremycornman
Probably don’t need to keep using “Ironman” – it’s a trademark specific to a brand that puts on a series of triathlons. They are particularly active in protecting their trademark…
You don’t need to use “Ironman” here either (and especially not THE Ironman – there is more than one ironman branded triathlon). There are many many more general triathlons, and swimming training is not specific to any particular race.