


How to shoot super detailed macro photographs with the help of an Arduino and a bunch of LEDs
Apr 13, 2016
John Aldred
John Aldred is a photographer with over 25 years of experience in the portrait and commercial worlds. He is based in Scotland and has been an early adopter – and occasional beta tester – of almost every digital imaging technology in that time. As well as his creative visual work, John uses 3D printing, electronics and programming to create his own photography and filmmaking tools and consults for a number of brands across the industry.
Share:

This is one of those topics that can become extremely complicated very quickly, but if you have a love of macro photography and a passion for electronics, this could be just the project to get you fired up.
Using a process called “Reflectance Transformation Imaging” (RTI), whereby light is studied hitting the surface of an object from multiple angles to produce a sequence of images, we’re suddenly able to see a lot of detail that would otherwise be missed in our normal macro photography.
The process is a fairly simple one to describe. Have your object and camera in a fixed position, and photograph it a whole bunch of times using multiple light sources coming from different angles, in order to determine what direction different parts of the surface are facing.
The resulting images are ran through a piece of software, developed by a number of researchers and hosted by Cultural Heritage Imaging, which recreates the surface based on its normals, allowing us to “relight” our subject in post to enhance the fine detail of the subject.
Actually pulling all the hardware together and implementing it practically is a little more complex, and a post over on Make by optical engineer, physicist and photographer Ted Kinsman wants to tell you how.
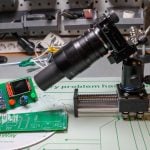
It all starts off using half a sphere, with light sources spread evenly around its surface – in this case, about 50 10mm white LEDs. You’ll want the inside surface of this sphere to be as dark as possible, so as to minimise any surfaces being hit by bounced light, and a hole is also cut in the top, allowing you to poke your lens through to see your subject.

You’ll note that from the outside, each of the LEDs is numbered. This is important, as the Arduino controls both when the camera fires, and which LEDs are lit each time it does so.
This is the key to this process, and as mentioned above, it’s a fairly simply concept to wrap your head around.
- An individual light turns on
- The camera is fired
- The lights all turn off
The software in the Arduino then repeats this process for each of the 50 or so lights spread around the half sphere.
Because the Arduino does not have 50 outputs, you need to create an array. To control the array, the microprocessor communicates with a 16×8 LED array driver board, meaning that you can control many LEDs using less than a handful of wires.
Upon completing the image acquisition cycle, the images are converted to JPG and run through the RTIBuilder software.
This then allows you to see the extra detail often hidden in macro shots using just a single light source, or macro ringflash.
Even if you’re not using it to enhance your macro photography, this process can also help you create realistic textures for 3D modelling software, such as Blender 3D, or to reproduce objects and surfaces for 3D printing, as an enhancement to 3D scanning through photogrammetry.
A much more advanced version of the process was described in great depth during a 2008 Google Tech Talk, where the whole project was scaled up, with the addition of multiple high speed cameras, and a vast array of lights and polarisers, to create full 360 degree footage of moving humans that they could relight and composite in post using real world environment maps and footage.
But if you want to try it at home, you can read the original post with full instructions over on the Make website, as well as download the dome model for 3D printing, and the software sketch for the Arduino.
Am I the only one who gets excited and geeks out on such amazing imaging technology principles? Let us know your thoughts in the comments.

John Aldred
John Aldred is a photographer with over 25 years of experience in the portrait and commercial worlds. He is based in Scotland and has been an early adopter – and occasional beta tester – of almost every digital imaging technology in that time. As well as his creative visual work, John uses 3D printing, electronics and programming to create his own photography and filmmaking tools and consults for a number of brands across the industry.


Join the Discussion
DIYP Comment Policy
Be nice, be on-topic, no personal information or flames.