


Separate Your Flash From Your Camera With A PVC Bracket
Jun 21, 2011
Udi Tirosh
Udi Tirosh is an entrepreneur, photography inventor, journalist, educator, and writer based in Israel. With over 25 years of experience in the photo-video industry, Udi has built and sold several photography-related brands. Udi has a double degree in mass media communications and computer science.
Share:
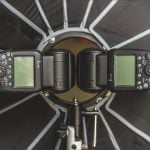
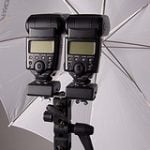
 One of the good things about on-camera flash is that it travels with you. Sure, this on axis light gives a really terrible flat light and red eyes, but it is always with you. you’d most likely get better, more directional light from an off camera flash, but setting this up takes time and space, which You don’t always have.
This is why they invented the flash brackets, and why Jerry Hamby made a PVC version of it. A flash bracket is a contraption that attaches to the camera and creates some distance between the flash and the lens. (Bye, bye red eyes).
When your flash is on a bracket you would need to trigger it and you can do so with a sync cable, a TTL cable or (if your flash supports it) trigger it wirelessly. And before the comments start poring about this, we know that the lens cap is on, this is just for illustration)
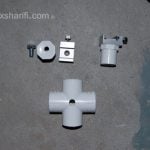
Materials
- 3 ft x 1” or ¾” PVC pipe
- 1 x 45-degree elbow
- 2-3 x 90-degree elbows
- 1 x Cross and/or 1 T
- 1 x end cap
- 1 x flash adapter
- 1 x ½” x ¼” screw
- 1 x 1” screw for camera plate
Tools
- Small saw (table, hand, hack, miter box, etc.)
- Screwdriver
- Drill with bits
Instructions
The first thing that we build will be the camera plate – this part will attach to the bottom of the camera (kinda like a tripod plate).

Start by cutting off a 9 inch section of the PVC pipe. Having a piece longer than you need will allow for cutting at either end and adjusting to you desires.
Mark the pipe with magic marker at six inches.
By far the most difficult part is cutting off the top 1/3 of the nine-inch section back to the 6 inch mark. Those 6 inches of sawed pipe will act as a camera bed – the camera will rest on and be screwed to the level six-inch section.
I used a saber saw on a table utilizing the table fence and guard. The guard should be used when sawing the piece.

I used the 45-degree elbow because my shoulders are broad and my joints old. This allows me to have the handle farther away from the camera and forward of the camera. If you do not need this adaptation then use only the 90-degree joint to the left of the nine-inch PVC piece.
Drill appropriate holes in the nine-inch piece to screw the camera to the handle.

A piece of rubber mat or kitchen scrub pad will serve as a pad between the camera and nine inch PVC.
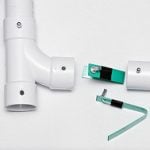
Drill a hole in the end cap and screw the flash adapter to the end cap.

From that point on it is cut and slip into place. The configurations are endless.

This configuration allows for the camera to be in the right hand and the flash a foot to the left and above the lens. This is the configuration I use almost exclusively. It will negate the probability of having flat images.

This configuration allows for getting the camera and flash closer. You only need to move the short PVC piece and the end cap.

This configuration allows for the camera to be on a vertical grip by only moving the end cap from the left to the right of the T or Cross.

It is very easy to attach the vertical grip to the camera and then back onto the flash bracket.
If you want the flash to be more elevated, simply put in a connector and a piece of PVC pipe.
A short piece of PVC pipe and a connector can be used at any point to change the configuration.

And Then Some…
You can use connectors and PVC pieces to add height or distance in any direction at any time.
You can shorten each piece by simply sawing short pieces off until it fits you.
After you find your comfort zone, either glue or peg the pieces into place to avoid the camera slipping out onto the ground.
You can then paint your bracket to match your camera or your eyes or your truck.

Udi Tirosh
Udi Tirosh is an entrepreneur, photography inventor, journalist, educator, and writer based in Israel. With over 25 years of experience in the photo-video industry, Udi has built and sold several photography-related brands. Udi has a double degree in mass media communications and computer science.
Join the Discussion
DIYP Comment Policy
Be nice, be on-topic, no personal information or flames.
One response to “Separate Your Flash From Your Camera With A PVC Bracket”
wow, some people don’t know a joke when it smacks them hard in the face.