


How To Make A Dual Off Camera Flash Bracket For As Little As $30
Dec 14, 2015
Uldis Plinte

We love it when our readers get in touch with us to share their stories. This article was contributed to DIYP by a member of our community. If you would like to contribute an article, please contact us here.
Share:

Studio strobes have plenty of interesting light modifiers, sadly, hot shoe strobes (or OCF – off camera flash) do not fit in those due to the different form factor. But! hot shoe strobes can be adapted to fit studio strobe mounts using appropriate adapter/holder. This configuration allows to use a cheap and light strobes on location without the need to carry big havy strobes and batteries. It also gives access to the many studio light modifiers that are found on the market.
When I acquired a gorgeous Hexadecagon umbrella soft box with a Hensel mount, I already knew that would love to use it also on location with hot shoe strobes.
A bracket for a single OCF is not hard to find, but if you need two strobes (more power and faster cycling time), you are out of luck. Those are hard to come by (we found one) and they are pretty expensive. From those I found, Profoto RFi Speedlight Speedring to be expensive, LumoPro LP739 also not cheap and hard to find in Europe. Therefore, I decided to make my own one.
Here are the supplies I used for my DIY dual OCF holder:
- 2x Camera Holder Flash Bracket (aliexpress.com, 6.51$ each, 13.02$ total)
- 1x Speedring Mount Flange Adapter for Elinchrom Studio Strobe Flash (aliexpress.com, 11.99$)
- 1x metal lathe spigot with metrical thread (local turner, 3$)
- Some screws, nuts (1$)
The Flash Bracket is 27.5 cm long, made of aluminum and can fit two OCFs. In this DIY, each bracket will hold one OCF, the other side of it will be cut off.

The Flash Bracket has non-slip rubber pads and hot shoe adapters (Sweet!)

Elinchrom speedring has the widest diameter of all speedrings (119 mm). This makes it optimal to (tightly) fit two OCF in it. The adapter will use a metal spigot for mounting.

Unscrew the Hensel speedring, place the Elinchrom speedring and mark where to make cutouts. Drill a hole in Elichrom speedring for the spigot.

Attach the spigot to the Elinchrom speedring, screw the Elinchrom speedring into the base.

This specific Bracket was measured for my OCFs (2 x Yongnuo YN600EX-RT), it was bent and cut to needed size, polished and then repainted in mate black color. Mileage may vary with other strobes.
Attention: seven times measure, one time cut. Before bending/cutting process, I put my OCF in the Elinchrom speedring and carefully measured everything – where to bend, where to cut and so on. Aluminum can not be unbent, so take your time measuring.

Drill holes for flash brackets – one hole for each bracket. Screws and nuts for flash bracket mounting.

Fasten the flash brackets .

As I mentioned – one screw per bracket. I also added some epoxy glue for a more stable fit.

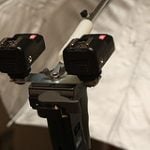
DIY adapter equipped with two OCF (backside).

DIY adapter equipped with two OCF (front side). OCF is a tight fit; there are only a few millimeters between the strobes

DIY adapter equipped with two OCF (side view). OCF can be mowed slightly to the inside or outside.

One more side view (just for fun)

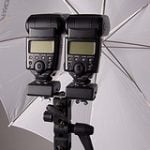
DIY adapter mounted on Hexadecagon umbrella soft box and stand.

DIY adapter mounted on Hexadecagon umbrella soft box and stand with one OCF.

DIY adapter mounted on Hexadecagon umbrella soft box and stand with two OCF.
DIY adapter view inside Hexadecagon umbrella soft box.

Hexadecagon umbrella soft box without OCF and diffuser cloth.

Now I can use my Hexadecagon umbrella soft box with Hensel studio strobe as well as with one or two OCF.
About The Author
Uldis Plinte is a photographer from Latvia. You can follow his awesome 500px stream here.
We love it when our readers get in touch with us to share their stories. This article was contributed to DIYP by a member of our community. If you would like to contribute an article, please contact us here.


Join the Discussion
DIYP Comment Policy
Be nice, be on-topic, no personal information or flames.
2 responses to “How To Make A Dual Off Camera Flash Bracket For As Little As $30”
Just this weekend, I was looking for this. Thanks!
Excellent, clearly written and documented DIY. Thanks