


















How to Resize Images on Phone on iPhone and Android Without Losing Quality
Nov 20, 2025
Darlene Lleno
Darlene Lleno brings a unique perspective to DIY Photography as someone who grew up surrounded by camera gear but chose words over lenses. With five years of writing experience, she specializes in photography content that’s both technically informed and genuinely passionate. Growing up with a photographer twin brother meant camera talk was everyday conversation in her household. While he mastered capturing moments, Darlene discovered she preferred being the subject and the storyteller behind the scenes. As a travel enthusiast and mother of two, she understands the importance of preserving life’s precious moments. When not exploring new destinations or writing for DIY Photography, you’ll find her reading or tending to her garden. Her approach to photography writing is refreshingly authentic, she may not be behind the camera, but she knows exactly what it takes to help others capture the shots that matter most.
Share:
Ever uploaded a photo only to find it’s the wrong size? Whether you need to resize images on phone for Instagram stories, Facebook cover photos, or email attachments, your device already has the tools to fix it.
Both iPhone and Android come with built-in resizing options right in their native photo apps. These work great for quick adjustments and social media posts. For more control, free third-party apps let you set exact pixel dimensions and even use AI to enlarge photos without losing quality.
Print projects especially demand careful attention to dimensions and resolution. Our free print size calculator helps you determine the exact pixel dimensions you need for any print size, so you can resize accurately whether you’re working on your phone or computer.
This guide covers how to resize using your phone’s built-in tools, plus the best free apps that make images bigger without sacrificing sharpness.
How to Resize an Image on iPhone With Photos
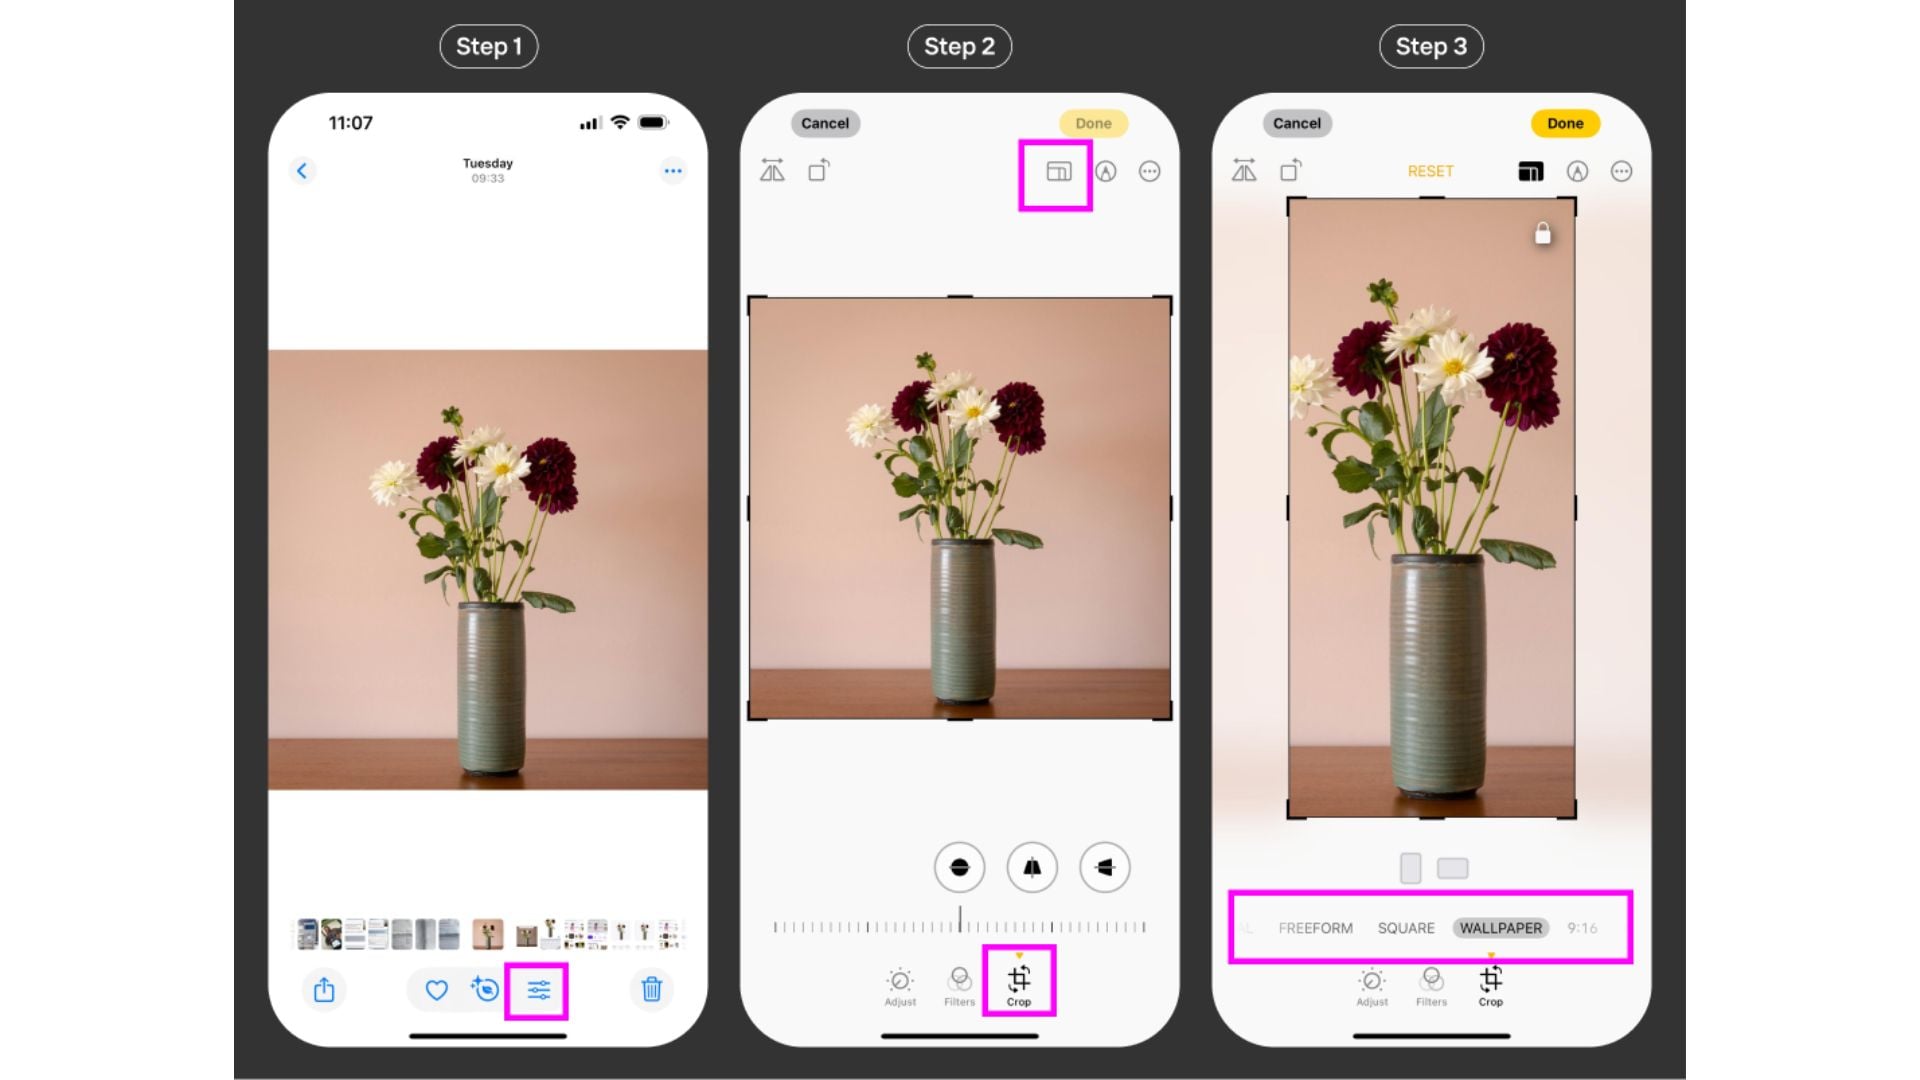
The iPhone Photos has a built-in crop tool that lets you resize images on phone quickly. Here’s how:
Step 1: Open the Photos app and select the image you want to resize.
Step 2: Tap Edit in the top-right corner.
Step 3: Select the Crop & Rotate tool at the bottom.
Step 4: Tap the Aspect Ratio icon (rectangle at the top).
Step 5: Choose a preset ratio or customize the dimensions.
Step 6: Tap Done to save your resized image.
The built-in crop function works fine for basic adjustments. You can quickly change aspect ratios for different platforms. But there’s a catch. You can’t enter exact pixel dimensions, and enlarging photos often results in blurriness.
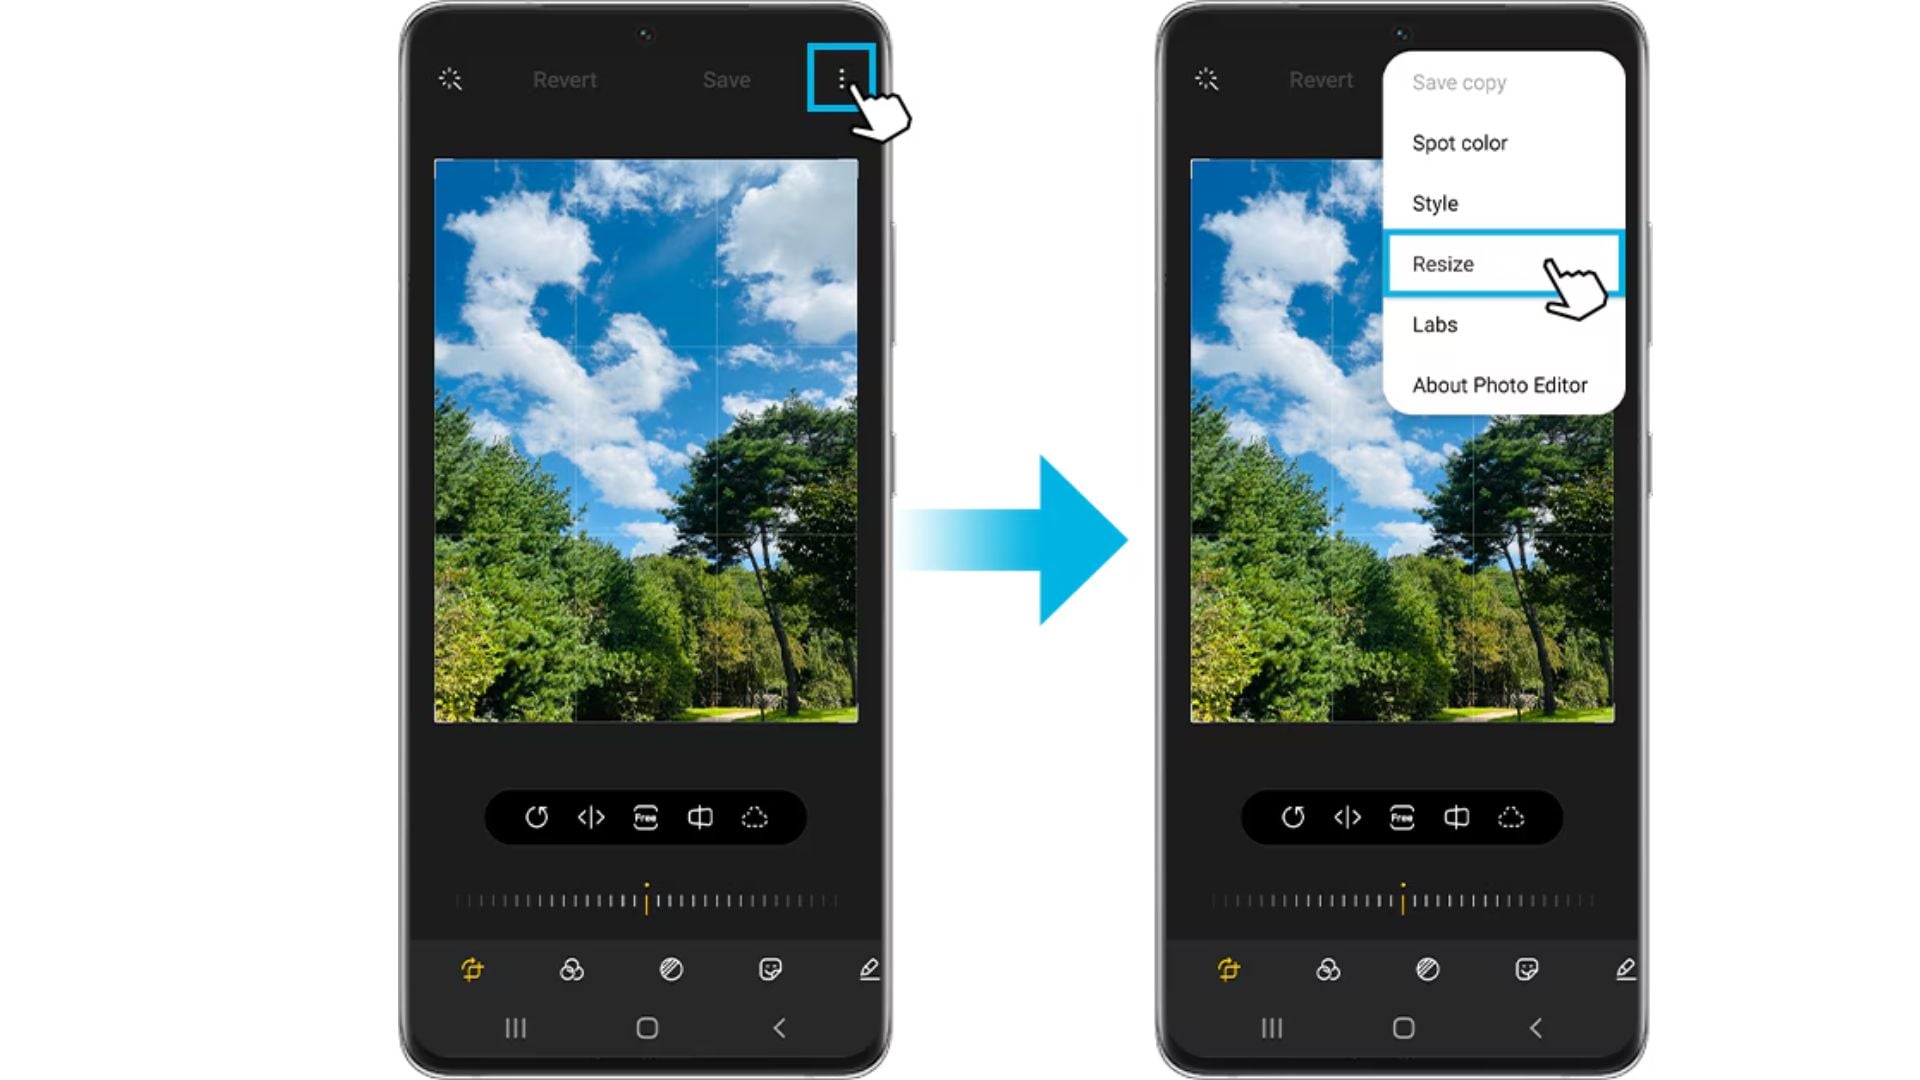
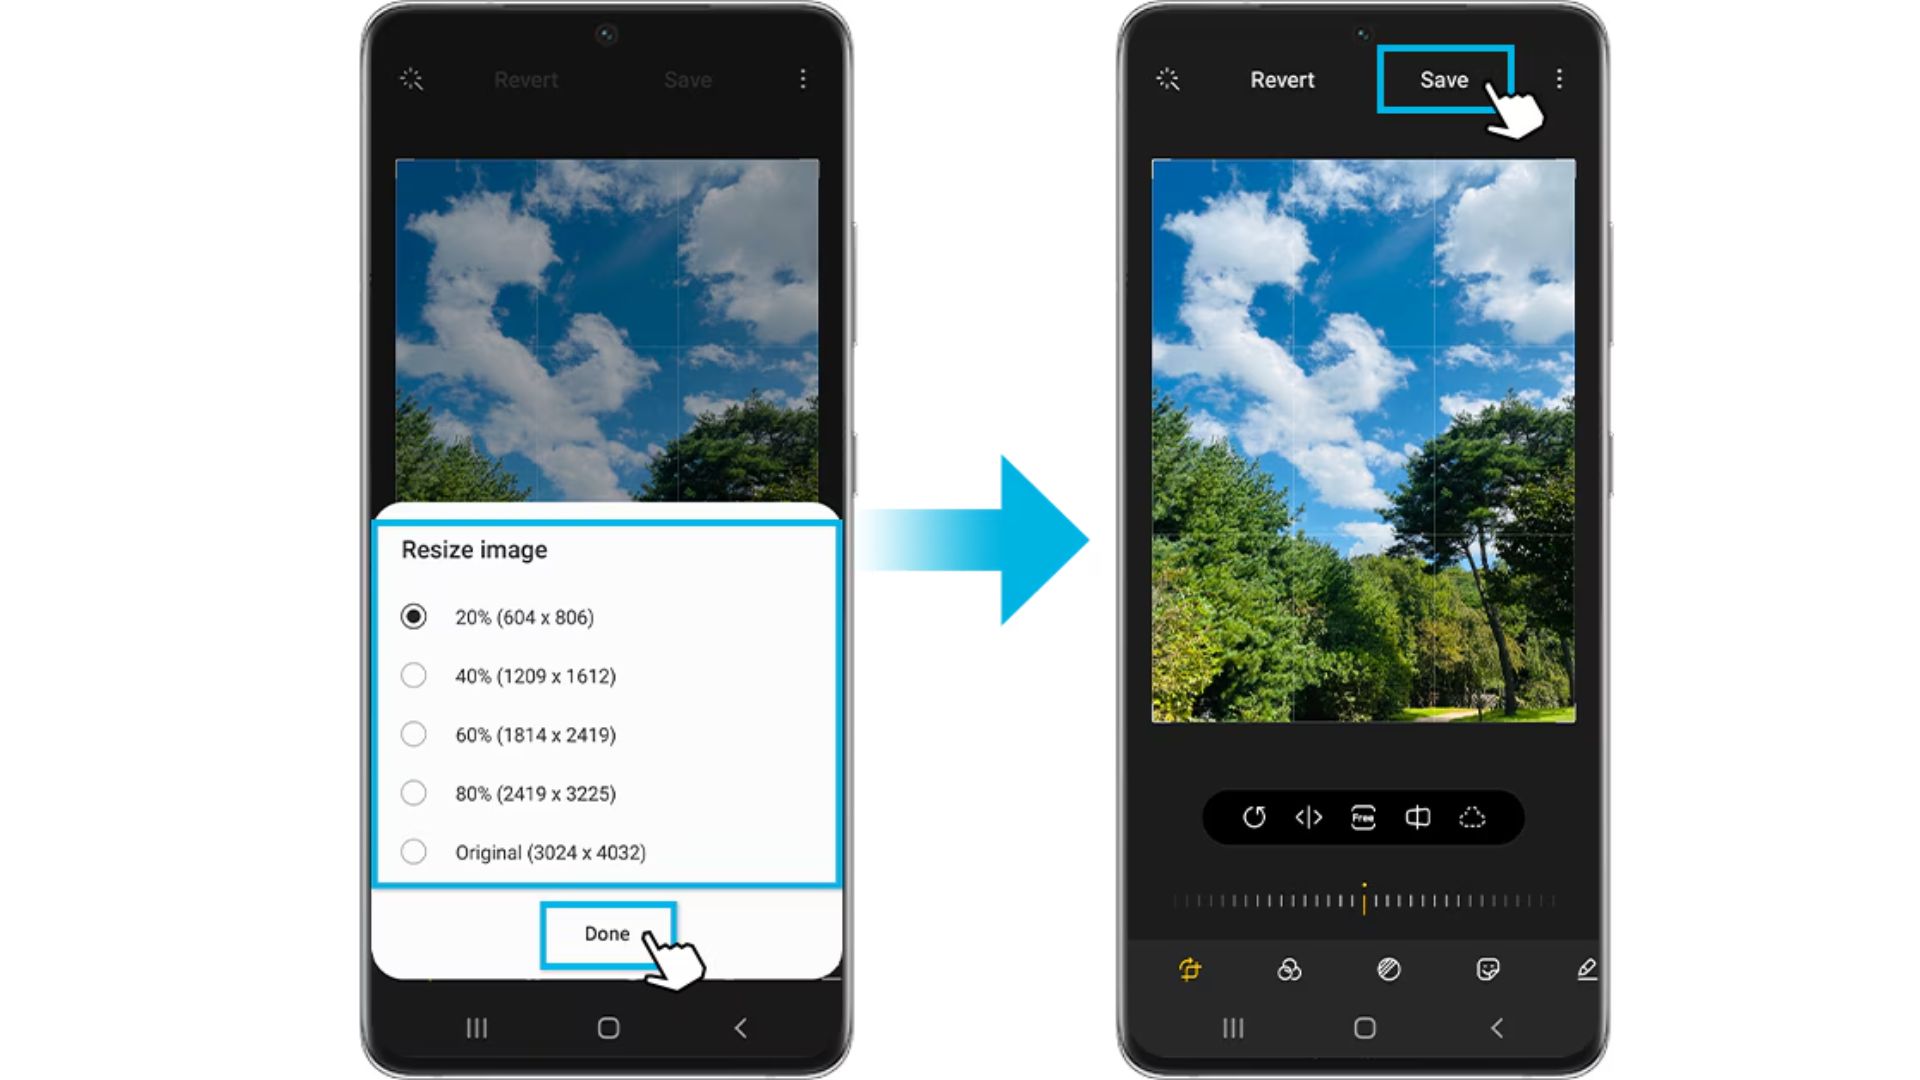
How to Resize Images on Phone With Android Gallery
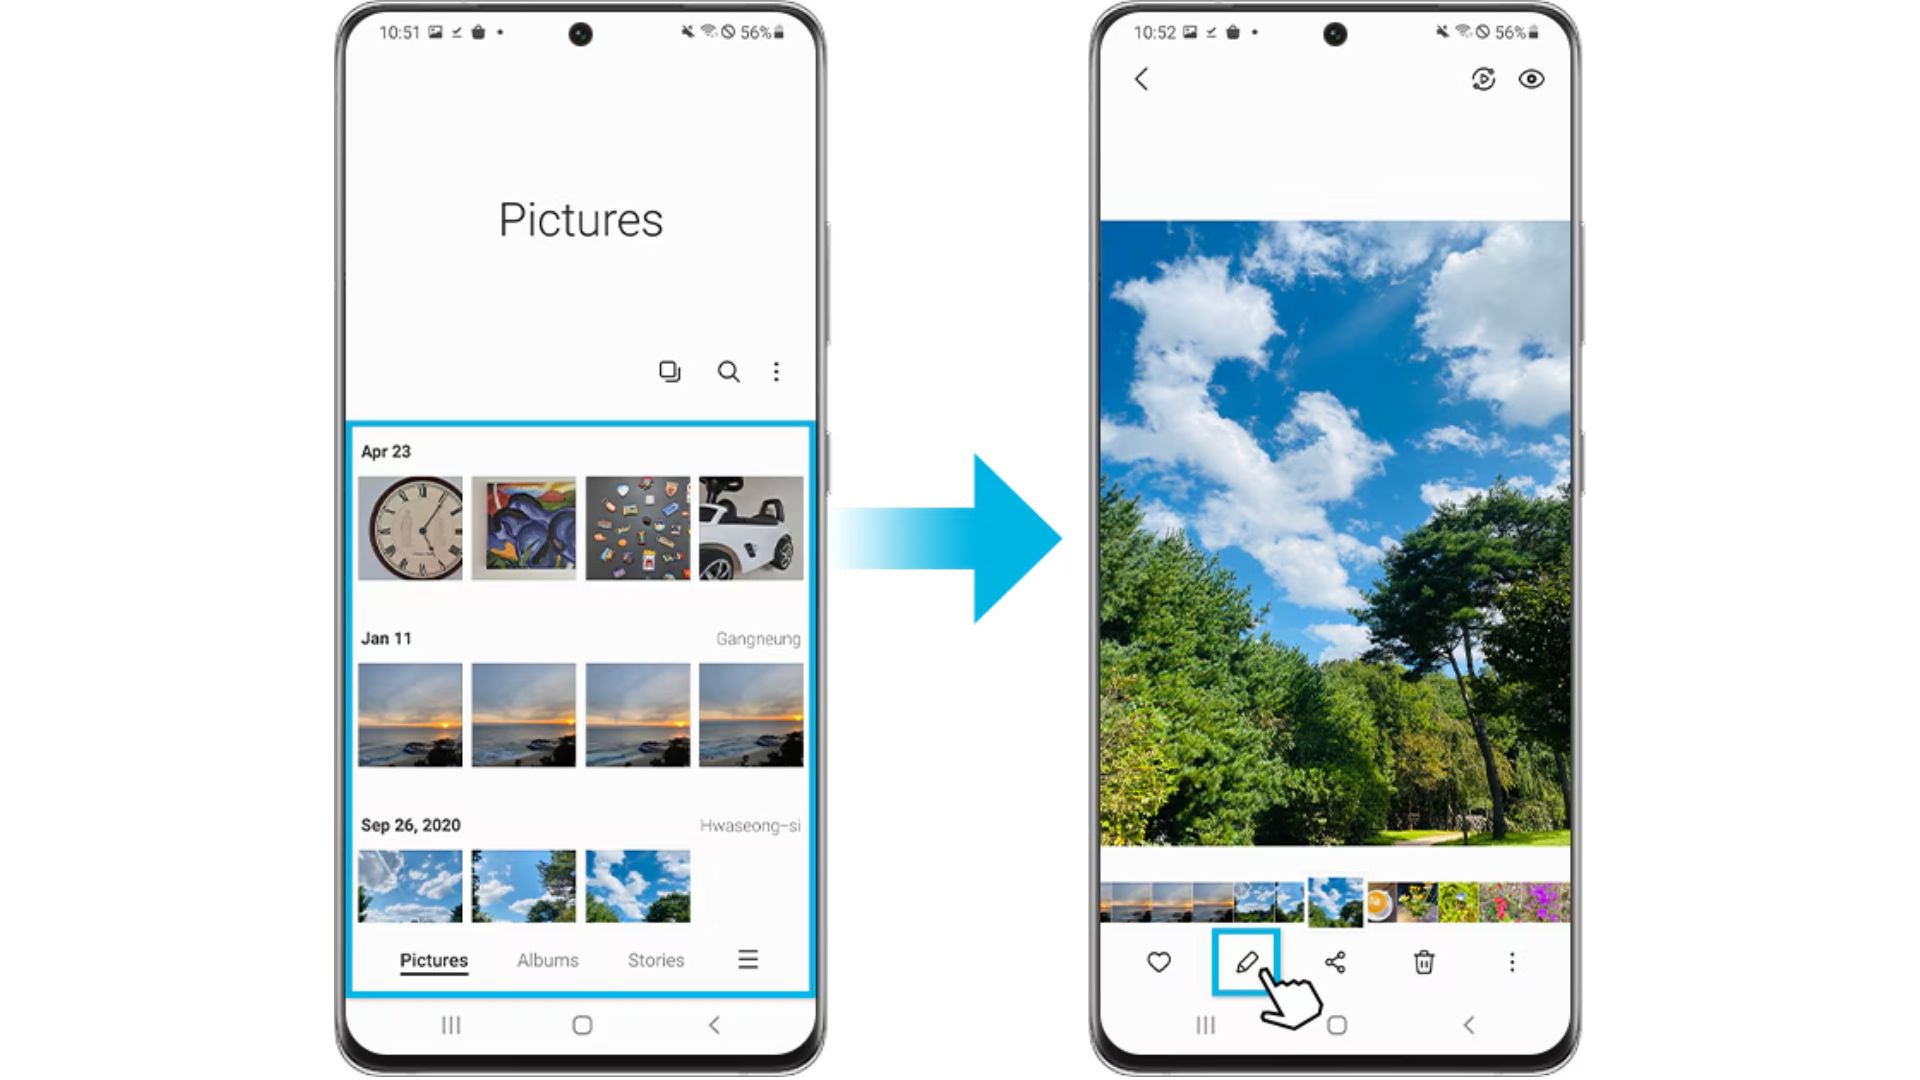
Android users can resize images on phone using the Gallery. Here’s how to get started:
Step 1: Open the Gallery app and select your photo.
Step 2: Tap Edit, then choose Resize or Crop (options may vary by device).
Step 3: Choose a preset size or enter custom dimensions.
Step 4: Save your resized photo.
Android gives you slightly more control than iPhone’s default options. Some devices let you input specific dimensions. Still, making a photo bigger without specialized apps usually means losing detail and sharpness.
Why Do You Need an Image Resizer App?
While iPhone and Android have basic resizing tools, they come with limitations:
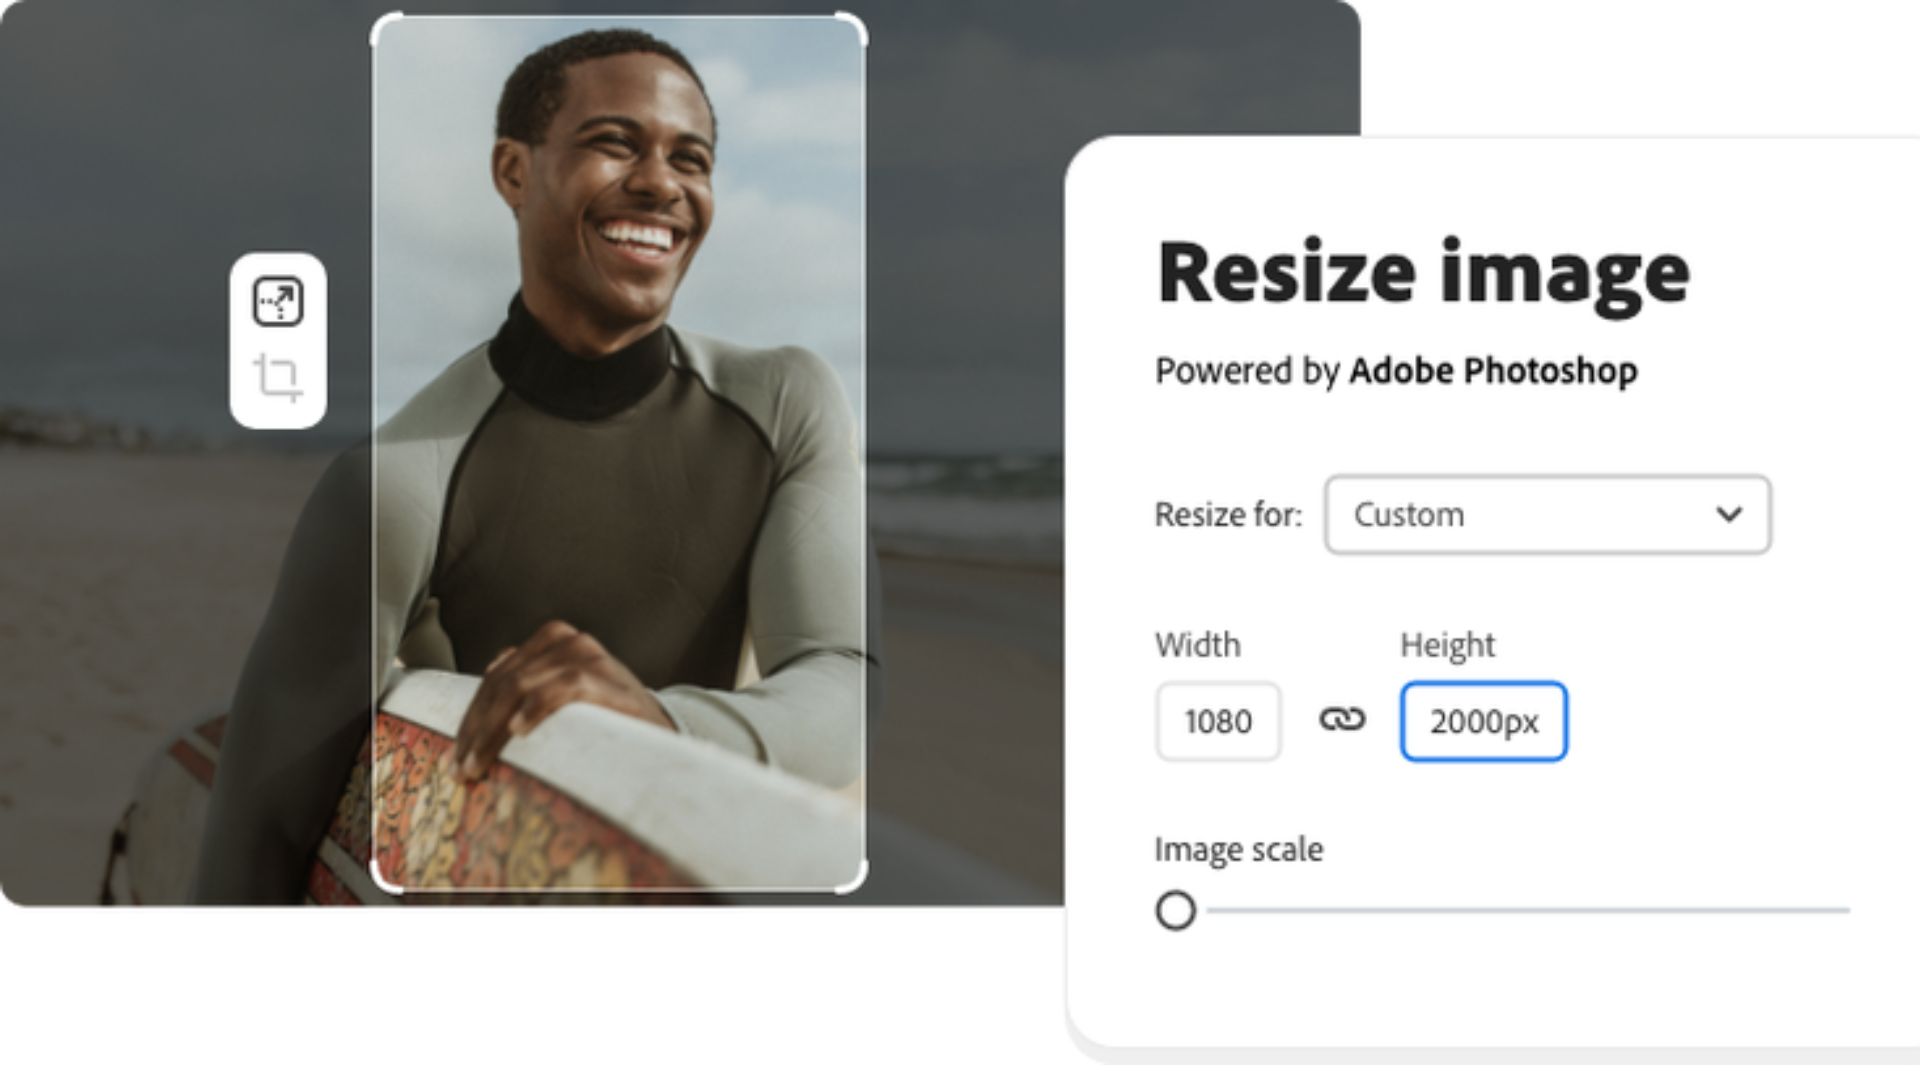
Built-in tools don’t let you enter precise pixel dimensions. This becomes a problem when you need exact sizes for websites, social media templates, or print projects. You end up with images that are close but not quite right.
Making an image bigger often leads to pixelation or blurriness. The native apps don’t have AI enhancement capabilities. They simply stretch pixels, which degrades quality. Photos resized in default apps lose sharpness and detail.
There’s no high-quality enlargement option. Standard phone tools can’t intelligently fill in missing information when you scale up. That’s where an advanced tool like YouCam Makeup’s AI Expand comes in. It not only resizes but also enhances images using AI, ensuring crisp, high-quality results.
How to Resize Images on Phone with a Third-Party App
For a high-quality way to resize images on phone, YouCam Makeup’s AI Expand is the best option. Unlike standard resizing, this AI-powered tool enlarges photos while keeping details sharp and natural.
Follow these steps to resize an image with YouCam Makeup:
Step 1: Download YouCam Makeup from the App Store or Google Play.
Step 2: Open the app and tap ‘Photo Edit’ to upload your image.
Step 3: Select the Expansion feature under the ‘Edit’ tab to resize or make the image bigger without losing quality.
Step 4: Tap on an aspect ratio and let AI intelligently fill in missing details.
Step 5: Tap “✔” to save your resized images to your photo album.
With YouCam Makeup, you can enlarge a photo for Instagram, Facebook, and Pinterest with no pixelation or blurriness. The AI understands image content and generates realistic details when scaling up.
Understanding Image Resolution and Quality
When you resize images on phone, understanding resolution helps maintain quality. Resolution refers to the number of pixels in your image. More pixels mean more detail and sharper results.
Enlarging photos adds pixels where none existed. Basic tools simply duplicate existing pixels, creating a blurry result. AI-powered apps analyze surrounding pixels and generate new ones that match the image content. This preserves sharpness and clarity.
Reducing image size removes pixels. This process is simpler and usually maintains quality better than enlarging. However, resizing down too much can still cause loss of detail. Always keep a backup of your original high-resolution images.
Common Image Sizes for Social Media
Different platforms require different sizes when you resize images on phone. Instagram feed posts work best at 1080×1080 pixels for square images. Stories need 1080×1920 pixels for vertical format. Reels follow the same vertical dimensions as stories.
Facebook cover photos need 820×312 pixels on desktop. Profile pictures should be 170×170 pixels but uploaded at 360×360 pixels for best quality. Post images display at 1200×630 pixels for optimal viewing.
Twitter header images require 1500×500 pixels. Profile photos appear as 400×400 pixels but should be uploaded at 2:1 ratio. LinkedIn banner images need 1584×396 pixels, while profile photos work best at 400×400 pixels.
Pinterest pins perform well with a 2:3 ratio. Standard pins use 1000×1500 pixels. Wider pins at 1000×1000 pixels also work for some content types.
Tips for Maintaining Quality When Resizing
Start with the highest resolution possible. Larger original files give you more flexibility when you need to resize images on phone. You can always make images smaller while maintaining quality. Enlarging small images never produces good results without AI assistance.
Save files in the right format. JPEG works well for photographs and complex images. PNG maintains quality better for graphics with text or solid colors. Avoid resaving JPEG files multiple times, as each save reduces quality.
Use the correct aspect ratio for your platform. Cropping to fit specific dimensions works better than stretching or squashing images. Maintain original proportions when possible to avoid distortion.
Test your resized images before posting. View them at actual size on your target platform. Check for pixelation, blur, or loss of important details. Sometimes a slightly different crop or size works better than your first attempt.
Batch Resizing Multiple Photos
Some apps let you resize images on phone in batches. This saves time when you have multiple photos needing the same dimensions. Look for apps with batch processing features if you regularly post content to social media.
Create presets for your most-used sizes. Many apps let you save custom dimensions. Set up presets for Instagram posts, stories, Facebook covers, and other common formats. This speeds up your workflow significantly.
Organize photos before batch resizing. Group images by final destination. Process all Instagram content together, then Facebook images, and so on. This prevents confusion and reduces mistakes.
Advanced Features in Image Resizer Apps
Modern image resizer apps offer features beyond basic sizing. Background removal lets you isolate subjects from busy backgrounds. This works great for product photography or creating custom graphics.
Filters and adjustments enhance photos while you resize. Apply color corrections, sharpening, or creative effects in one step. Some apps include AI-powered enhancement tools that automatically improve image quality.
Text and graphic overlays add branding or context. Create consistent social media posts with your logo or watermark. Many apps include templates designed for specific platforms.
Master Mobile Image Resizing
Learning to resize images on phone effectively opens up new creative possibilities. The built-in tools on iPhone and Android handle basic tasks, but third-party apps like YouCam Makeup provide professional-level results. AI-powered resizing maintains quality even when enlarging photos significantly.
Understanding resolution, aspect ratios, and platform requirements helps you create optimized content. Start with high-quality originals, choose the right format, and test your results. Batch processing and custom presets streamline your workflow for regular posting.
Whether you’re sharing memories, building a social media presence, or creating professional content, knowing how to resize images on phone efficiently saves time and improves quality. The right tools and techniques make all the difference in how your photos appear online.
See more from DIYPhotography.net on Google
Add DIYPhotography.net as a trusted source. This makes
our stories more likely to appear in your Google Search results.
 Add as a preferred source on Google

Darlene Lleno
Darlene Lleno brings a unique perspective to DIY Photography as someone who grew up surrounded by camera gear but chose words over lenses. With five years of writing experience, she specializes in photography content that’s both technically informed and genuinely passionate. Growing up with a photographer twin brother meant camera talk was everyday conversation in her household. While he mastered capturing moments, Darlene discovered she preferred being the subject and the storyteller behind the scenes. As a travel enthusiast and mother of two, she understands the importance of preserving life’s precious moments. When not exploring new destinations or writing for DIY Photography, you’ll find her reading or tending to her garden. Her approach to photography writing is refreshingly authentic, she may not be behind the camera, but she knows exactly what it takes to help others capture the shots that matter most.



Join the Discussion
DIYP Comment Policy
Be nice, be on-topic, no personal information or flames.