


How to make a DIY triangle LED “ring” light for less than $100
Aug 11, 2017
Dunja Đuđić Kalinin
Dunja Djudjic is a multi-talented artist based in Novi Sad, Serbia. With 15 years of experience as a photographer, she specializes in capturing the beauty of nature, travel, concerts, and fine art. In addition to her photography, Dunja also expresses her creativity through writing, embroidery, and jewelry making.
Share:

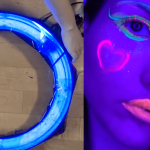
The ring lights are useful when you need even light on the subject’s face and the circular catchlights. We’ve featured several DIY ring lights so far, But Caleb Pike of DSLR Video Shooter decided to make something a bit different.
He made a DIY triangular “ring” light, which produces the same even light on the face, but creates interesting, triangular catchlights. The total cost of the components was around $92 (it could get even less), and he explains the process step by step, so I’m sure everyone could make this in no time.
You will need
- Aluminum LED U Channels x 6
- 90 CRI LED Stripes or 80 CRI LED Stripes
- Box For Electronics
- Red/Black Wire
- Dimmer
- DC Input Jack
- 12v Power Cable
- 12v Battery
- Cable for 12v
- USB Battery
- Adapter for USB
- L Bracket (hardware store)
- Strap wood (or 3/4″ small lumber from hardware store)
- Super glue
- Soldering iron
- Electrical tape
- Power drill
How to make
The light and wires
Start by dividing the aluminum LED channels in three pairs, and glue them together. Add some electrical tape to the ends, so you don’t accidentally solder the LED wires to the channels.

When this is done, apply the LED strips to the channels. Caleb suggests choosing between the 90 CRI LED Stripes or 80 CRI LED Stripes. The first one is closer to daylight, but it’s less bright and a bit more expensive. The second one is cheaper and brighter, so it can also be a great solution for this project.

Once you’ve added the LEDs, attach the ends of each channel to form a triangle. On two ends, glue them to a piece of wood, and on the third end, glue them to the electronics box, which will house the dimmer and some of the wires.

After this, it’s soldering time. You can connect the wires in several ways, as long as you connect all the negatives and all the positives. But this is how Caleb did it:

He also suggests adding some solder to the wires and to the LED strip before you connect them together.
Now, it’s time to wire up the dimmer. Caleb uses one intended for small motors, and it’s fairly easy to connect. You’ll see the DC IN with + and –, which will be the power source for the entire light. There’s also a “motor” end, which you’ll connect to the LED strips. The dimmer has screw terminals, so you can just stick the wires into them and tighten everything down with a screwdriver.


When the dimmer is connected, you’ll have it, along with the DC jack, inside the electronics box. So, drill three holes in the box: one for the jack, one for the dimmer knob and one for the LED wires.

Now, add the wires from LED strips and the DC input to the box. Connect the positive and negative from the input jack with the + and – with the “DC IN” end of the dimmer. Connect the wires from the LED strips to the “motor” end of the dimmer. When it’s all wired up, add the dimmer to the box with the knob outside, fix it, and then close the box.
Base and mounting point
Your light is all wired up and almost ready, and now all you need is the mounting solution. Caleb used a scrap piece of wood and glued it to the bottom side of the triangle. Then he drilled, glued and screwed the L bracket to the wood, and used a ball head and a wing nut to screw the light to the stand. And this is it, time to light it up.


Power
As for the power options, you can use anything that has 12V or at least 2A. Caleb uses the USB battery with the power switch, and the adapter to connect the light to the battery. You can turn it on and off on the battery itself, and use the dimmer to make the light more or less bright.

[DIY Triangle “Ring” LED Light | DSLR Video Shooter]

Dunja Đuđić Kalinin
Dunja Djudjic is a multi-talented artist based in Novi Sad, Serbia. With 15 years of experience as a photographer, she specializes in capturing the beauty of nature, travel, concerts, and fine art. In addition to her photography, Dunja also expresses her creativity through writing, embroidery, and jewelry making.


Join the Discussion
DIYP Comment Policy
Be nice, be on-topic, no personal information or flames.
4 responses to “How to make a DIY triangle LED “ring” light for less than $100”
Hell yeah, I want my portraits looking like they have Predator targeting systems for eyes too! Make sure you get red led lights for that cool Predator authenticity, not the white!
There are those color-changing LED strips, that should do. :D
Brilliant! Why don’t the Predator’s have those!
Yes. Home Depot