


Lightroom Color Grading: Split Toning and Color Wheels for Mood
Nov 10, 2025
Darlene Lleno
Darlene Lleno brings a unique perspective to DIY Photography as someone who grew up surrounded by camera gear but chose words over lenses. With five years of writing experience, she specializes in photography content that’s both technically informed and genuinely passionate. Growing up with a photographer twin brother meant camera talk was everyday conversation in her household. While he mastered capturing moments, Darlene discovered she preferred being the subject and the storyteller behind the scenes. As a travel enthusiast and mother of two, she understands the importance of preserving life’s precious moments. When not exploring new destinations or writing for DIY Photography, you’ll find her reading or tending to her garden. Her approach to photography writing is refreshingly authentic, she may not be behind the camera, but she knows exactly what it takes to help others capture the shots that matter most.
Share:
Lightroom color grading transforms ordinary photos into images with distinct mood and atmosphere. Split toning and color wheels give you precise control over highlights, midtones, and shadows. These tools let you craft specific emotional responses from your viewers.
Most photographers stop after basic exposure and contrast adjustments. They miss the power of color grading to elevate their work. Professional retouchers spend significant time on color grades creating signature looks. They understand how subtle color shifts create cohesive styles and emotional impact.
Learning Lightroom color grading separates your work from generic edits. You’ll develop signature styles that clients recognize instantly. You’ll know exactly which colors to add where for specific moods. Your portfolio will show consistent, intentional looks rather than random adjustments.
How Color Grading Differs from Color Correction
Color correction fixes technical problems in your images first. You adjust white balance to make whites actually white. You fix exposure issues and balance overall tones correctly. This brings your image to a neutral, accurate starting point.
Color grading adds creative flair after correction is complete. You introduce intentional color casts to create mood and atmosphere. You push colors toward specific palettes for artistic effect. This transforms technically correct images into emotionally powerful ones.
The Two-Step Process
Always correct first, then grade second in your workflow. This order matters more than beginners realize when editing. Trying to grade uncorrected images creates unpredictable results. Colors shift weirdly and adjustments fight against existing problems.
Complete your basic exposure adjustments before touching color grading tools. Set proper white balance and overall tone first. Fix any obvious color casts from mixed lighting situations. Get your image neutral and balanced before grading.
Only then should you move to color grading tools. Your creative adjustments build on a solid foundation. This approach gives you predictable, repeatable results across images. You can apply the same grades successfully to multiple photos.
Why Grading Matters
Color grading tells stories beyond your literal subject matter. Warm grades feel nostalgic or comforting to viewers. Cool grades communicate professionalism or isolation depending on context. Split-toned looks add sophistication that flat colors lack completely.
Film stocks provided built-in color grades historically for photographers. Kodak Portra had warm skin tones and muted colors. Fuji Velvia delivered saturated, punchy hues throughout. Digital files need manual grading to achieve these distinctive looks.
Modern audiences expect graded images everywhere they look now. Instagram, movies, advertisements all use heavy color grading consistently. Ungraded photos can look unfinished or amateur by comparison. Subtle grading brings your work up to current visual standards.

Split Toning Fundamentals
Split toning adds different colors to highlights and shadows independently. This creates depth and visual interest that single-color grades lack. The technique originated in darkroom printing and translates beautifully to digital.
Lightroom’s color grading panel replaced the old split toning tool. The new interface provides more control and precision than before. You can now adjust highlights, midtones, and shadows separately. This flexibility enables more sophisticated color treatments overall.
Accessing Color Grading Tools
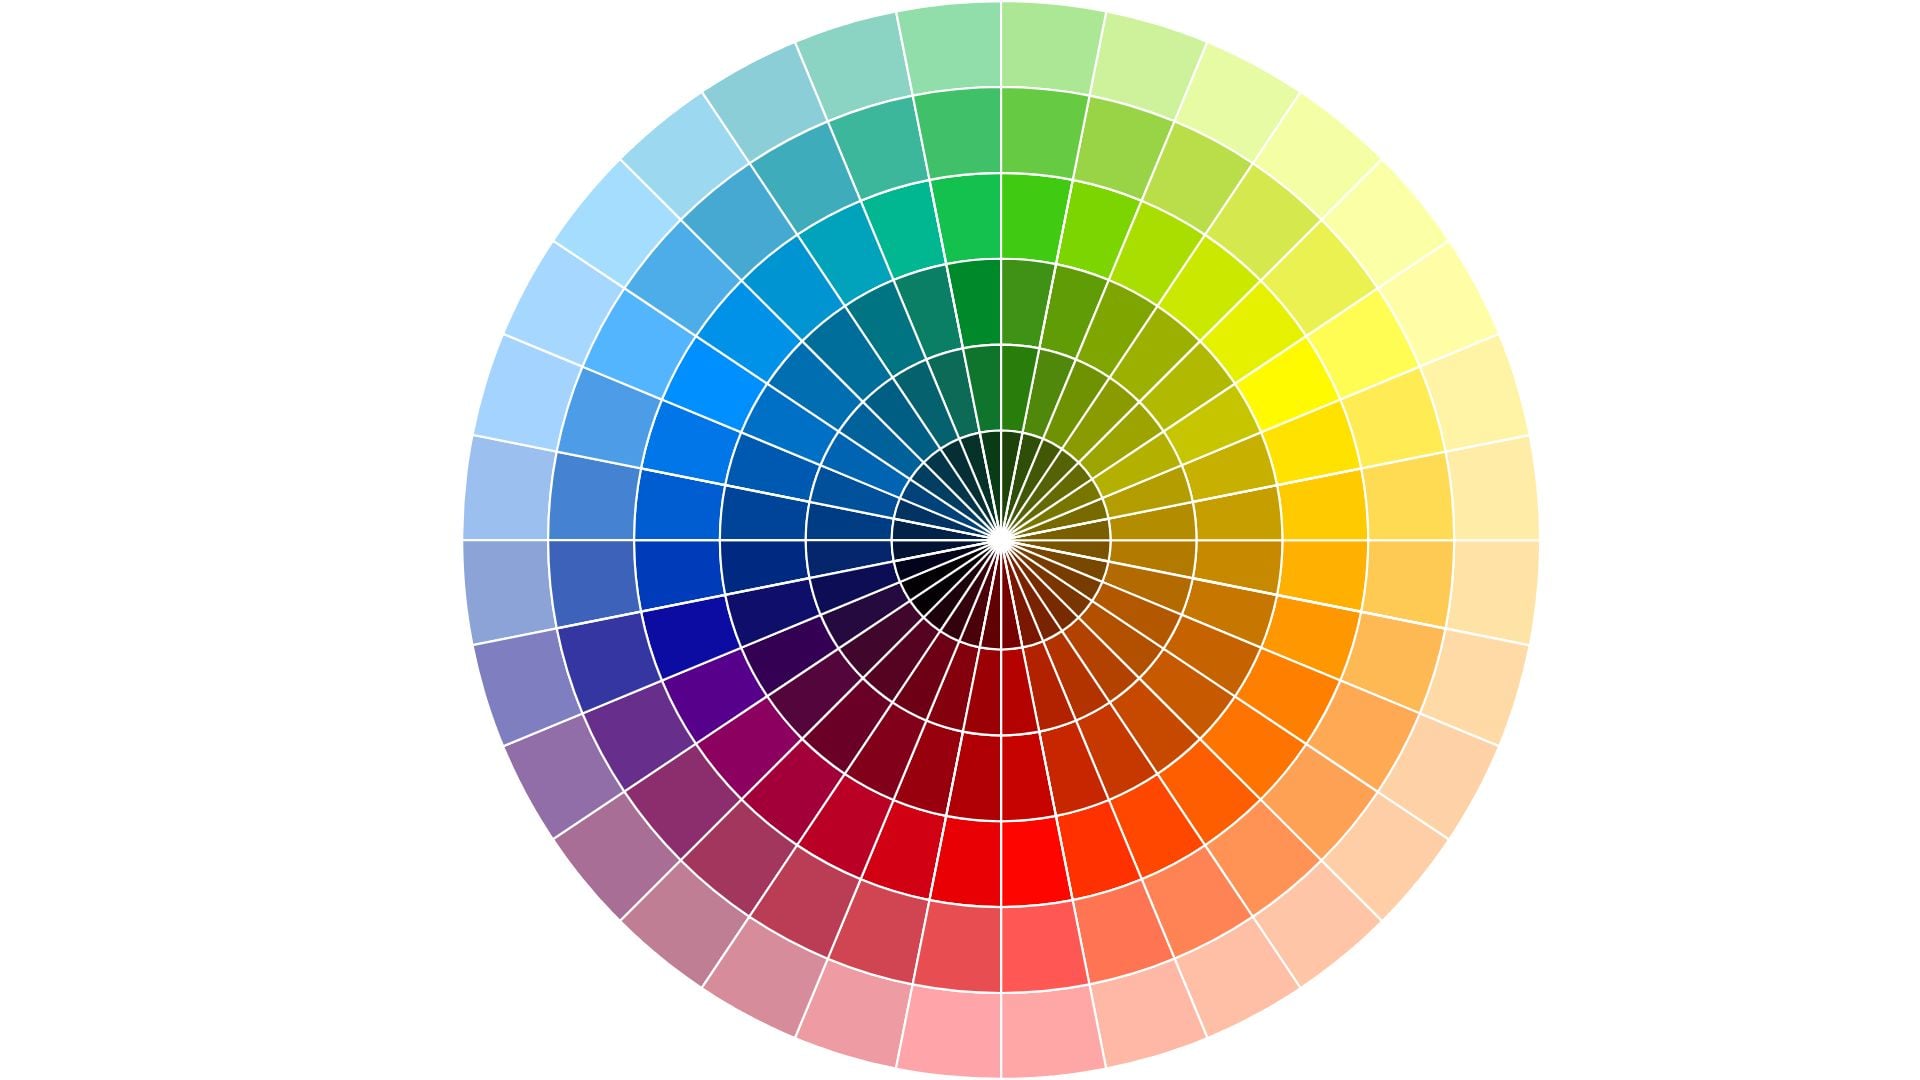
Find the color grading panel in the Develop module. It sits below the tone curve on most layouts. Three color wheels control highlights, midtones, and shadows independently. A fourth wheel adjusts global color across all tones.
Each wheel shows a circular gradient of available hues. Click and drag the center point to add color. The further from center, the stronger the color intensity becomes. Release when you reach your desired strength level.
Sliders below each wheel offer additional control options. Luminance adjusts brightness within that tonal range. Saturation controls color intensity numerically for precision. Blending determines how tones transition between wheels smoothly. These refinements perfect your split toning work.
Classic Split Toning Combinations
Warm highlights with cool shadows creates the most popular split tone. Add orange or yellow to highlights for sunny, positive feelings. Introduce blue or teal to shadows for depth and coolness. This combination works across many photography genres successfully.
Cool highlights with warm shadows reverses the standard approach. Blue highlights feel clean and modern to viewers. Warm shadows add richness without overwhelming the image. This works well for architectural and product photography.
Complementary colors in highlights and shadows create dynamic tension. Orange highlights with blue shadows follow color theory perfectly. Purple highlights with yellow-green shadows feel artistic and bold. These stronger combinations suit creative and editorial work.
Subtle vs Dramatic Split Toning
Subtle split toning improves images without announcing itself obviously. Viewers feel the mood but don’t consciously notice the grade. Keep your adjustments minimal, just 5-10 points from the center. This maintains naturalness while adding polish to your work.
Dramatic split toning makes a bold statement about your vision. Push colors 20-30 points from the center or even more. Increase saturation for maximum impact on viewers. This approach suits fashion, fine art, and editorial projects. The grade becomes part of your artistic signature.
Test your split toning strength by toggling the panel on and off. If the change looks jarring when you turn it on, reduce intensity. Effective grading should feel like an improvement, not a shocking transformation.
Color Wheel Techniques for Mood
The three color wheels (highlights, midtones, shadows) unlock advanced grading possibilities. Each tonal range can receive different color treatments independently. This creates sophisticated, film-like qualities in your images.
Professional colorists think in terms of tonal zones when grading. They grade highlights to feel a certain way emotionally. Midtones get different treatment for skin or main subjects. Shadows receive their own color character completely. This layered approach produces rich, complex results.
Grading Highlights for Impact
Highlights naturally draw viewer attention in any image you create. Color grading highlights affects the overall emotional tone significantly. Warm highlights feel inviting and cheerful to people. Cool highlights communicate clarity or coldness depending on context.
Push highlights toward yellow-orange for golden hour effects. This works beautifully on portrait photography with natural light. Skin tones glow warmly without looking oversaturated or fake. The overall image radiates warmth and comfort naturally.
Add subtle pink or magenta to highlights for romantic looks. This treatment flatters skin tones particularly well across subjects. Wedding photographers use pink-toned highlights frequently for ceremonies. The effect feels soft and dreamy without seeming artificial.
Cool highlights with cyan or light blue create modern, clean aesthetics. Product photography and architectural shots benefit from this approach. The coolness communicates precision and professionalism to viewers. Tech companies and corporate work often prefer cool-graded highlights.
Working with Midtones
Midtones contain most of your image information typically. Skin tones, main subjects, and key details live here. Grade midtones carefully to avoid destroying natural appearance completely.
Keep midtone adjustments more subtle than highlight or shadow grading. Strong midtone colors quickly look unnatural and processed badly. Small shifts have a significant impact because midtones dominate most images.
Warm midtones slightly for flattering skin tone rendering in portraits. Add gentle yellow-orange bias to the midtone wheel. This compensates for typical camera coolness in processing. Subjects look healthy and vibrant without orange skin problems.
Neutral midtones let highlights and shadows do the color work. Keep the midtone wheel centered or barely adjusted. This maintains natural appearance in important areas of your image. Your split-toned highlights and shadows create the mood instead.
Shadow Color for Depth
Shadows offer the most creative freedom in color grading work. Heavy shadow colors rarely look unnatural since shadows already modify perception. Viewers accept colored shadows more easily than colored highlights.
Blue or teal shadows feel cinematic and professional instantly. This combination with warm highlights dominates modern color grading. The approach works across almost any subject matter you shoot. It adds immediate polish and sophistication to images.
Purple shadows create mysterious, moody atmospheres effectively in photos. This treatment suits nighttime scenes and dramatic portraits well. The purple adds richness that pure black shadows lack. Your images gain depth and visual interest naturally.
Green-tinted shadows feel unsettling or sickly intentionally. Use this sparingly for specific creative effects only. Horror and thriller work sometimes employs greenish shadows deliberately. Most other applications should avoid green shadow grading completely.

Creating Consistent Looks with Presets
Developing signature color grades becomes easier with custom presets. Save your favorite grading combinations for instant application later. This ensures consistency across projects and speeds up your workflow.
Lightroom lets you save color grading settings separately from other adjustments. Create presets specifically for color treatments only. Apply them after completing exposure and color correction work. This modular approach offers maximum flexibility across different images.
Building Your Preset Library
Start by grading a single image perfectly first. Get the colors exactly how you want them. Then save just the color grading, split toning, and calibration settings. Name it descriptively so you remember the look later.
Create presets for different moods and genres you shoot. “Warm and Nostalgic,” “Cool and Modern,” “Cinematic Teal-Orange” work well. These named presets become your color vocabulary over time. Apply them as starting points then fine-tune for specific images.
Organize presets into folders by style or use case. Wedding presets in one folder, editorial in another folder. Portrait looks separated from landscape treatments for easy access. Good organization means finding the right preset quickly.
Test your presets on various images before trusting them completely. A preset that works on golden hour portraits might fail on indoor shots. Refine presets until they work reliably across appropriate image types.
Adjusting Presets for Different Images
No preset works perfectly on every image without adjustment. Use presets as starting points requiring refinement after application. The base color grade applies instantly to your photo. Then tweak intensity or specific wheels as needed.
Reduce overall preset strength using the amount slider. This scales back all adjustments proportionally at once. Cut a dramatic preset to 50-70% for subtler results. This saves time versus manually reducing each setting individually.
Shift specific color wheels after applying presets to images. Maybe the shadows need less blue than the preset provides. Perhaps highlights should lean more orange for this shot. These minor adjustments customize the preset for your current image.
Layer multiple subtle presets instead of one strong preset. Apply a gentle warm highlight preset first. Add a separate cool shadow preset on top. This modular approach offers more control than single heavy-handed presets.
Advanced Color Grading Techniques
Mastering basic split toning opens doors to advanced grading methods. These techniques create more sophisticated, professional results in your work. They require more time but deliver distinctly elevated looks.
Professional colorists combine multiple approaches for complex grades. They use color wheels plus HSL adjustments plus calibration together. This layered workflow produces nuanced results impossible with single tools.
HSL Panel Integration
The HSL (Hue, Saturation, Luminance) panel complements color grading beautifully. Color wheels affect tonal ranges in your image. HSL targets specific colors regardless of tone or brightness. Using both creates precise control over everything.
Adjust specific colors after applying your color grade. Shift orange hues warmer for better skin tones. Desaturate blues in backgrounds to emphasize subjects more. These targeted tweaks perfect your overall grade significantly.
Use HSL luminance to guide attention through brightness alone. Darken background greens after color grading is complete. Brighten subject clothing colors to draw eyes. This combines color and tonal attention control effectively.
Saturation adjustments in HSL prevent color grading from oversaturating specific hues. Your teal shadows might make the skies too intense accidentally. Reduce cyan saturation in HSL to compensate for this. The shadows stay graded but skies become more natural.
Camera Calibration for Film Looks
Camera calibration sliders offer another grading dimension entirely. These affect how Lightroom interprets your raw file colors. Adjusting calibration creates film-like color responses in digital files.
Move the blue primary slider toward cyan for popular film looks. This shifts blues greener and creates that recognizable analog feel. Many film emulation presets rely heavily on calibration adjustments.
Red primary adjustments affect skin tones and warm colors significantly. Shift red toward orange for warmer, more flattering portraits. Move it toward magenta for cooler, fashion-editorial looks instead.
Green primary changes affect foliage and environmental tones throughout. Adjust this carefully as green shifts look unnatural quickly. Small moves create subtle differences in how nature renders.
Masking for Selective Grading
Apply different color grades to different parts of your image. Use Lightroom’s masking tools to isolate specific areas. Grade the subject differently than the background for separation. This advanced technique maximizes control over your final look.
Create a subject mask and apply warm color grading. Mask the background separately with cool grading for contrast. This separation adds depth while maintaining cohesive overall color. The technique works brilliantly for portrait work especially.
Grade the sky independently from the landscape below it. Warm golden skies with cooler blue foregrounds create classic sunset looks. Or reverse it for dramatic effect on viewers. Selective grading offers creative freedom beyond global adjustments.
Apply subtle vignette grading through radial masks for focus. Darken and cool edges while keeping centers warm and bright. This focuses attention without obvious darkening that looks forced. The color shift guides eyes naturally through your composition.

Color Grading for Different Genres
Different photography styles benefit from specific color grading approaches. Wedding photography needs different treatments than product shots do. Understanding genre-appropriate grading ensures your work meets viewer expectations.
Study professional work in your genre carefully for lessons. Notice the color treatments industry leaders use consistently. Replicate their grading approaches to learn techniques firsthand. Then develop your own variations on successful formulas.
Portrait and Wedding Color Grading
Portraits typically need flattering, warm-leaning grades for subjects. Slightly warm highlights make skin glow naturally and beautifully. Cool shadows add dimension without harsh contrast problems. Keep midtones fairly neutral for accurate skin tone rendering.
Avoid heavy green or magenta tints in portrait grading. These colors rarely flatter human subjects at all. Stick to orange-blue, yellow-teal, or subtle pink-cyan combinations. These work across different skin tones successfully every time.
Wedding work often favors romantic, dreamy grades for ceremonies. Soft pink or peach highlights feel appropriate for celebrations. Gentle blue or purple shadows add depth without darkness. Keep everything subtle so the emotion shines through clearly.
High-key portraits need gentler color grading than dramatic shots. Too much color in bright, airy images looks harsh. Use minimal split toning with very soft saturation levels. The light, bright mood should dominate over color itself.
Landscape and Nature Grading
Landscape photography allows bolder color grading often than portraits. Dramatic sunset oranges and blue shadows feel natural outdoors. Viewers accept stronger color in nature scenes than portraits.
Enhance existing natural colors rather than inventing new ones. If the sunset was orange, make it more orange. If the water was blue-green, intensify that color. Work with nature’s palette instead of against it.
Seasonal color grading matches viewer expectations for time of year. Autumn scenes should lean warm with orange-yellow tones. Winter landscapes work well with cool blue grading throughout. Spring suits fresh green-yellow treatments. Summer allows vibrant, saturated approaches.
Moody landscape photography benefits from desaturated color grading approaches. Heavy blues or teals in shadows with minimal highlight color. This creates atmospheric, contemplative feelings in viewers. The grade matches the emotional content perfectly.
Product and Commercial Grading
Product photography needs clean, accurate color grading typically. Clients always want their products to look natural and appealing. Subtle grading works better than dramatic artistic treatments usually.
Cool, clean grades communicate quality and precision to buyers. Light blue or cyan tones suggest professionalism clearly. Tech products especially benefit from cool grading approaches. This matches brand messaging around innovation and reliability.
Warm grading works for food, lifestyle, and comfort products. Golden tones trigger appetite and positive associations naturally. Coffee, baked goods, and cozy products suit warm color grades.
Maintain accurate product colors within your grade always. Use selective color adjustments to ensure the product itself stays true. Grade the background and lighting creatively instead. Keep the product recognizable and accurate for clients.
Developing Your Signature Style
Lightroom color grading helps you create recognizable, consistent work. Your color choices become part of your brand identity. Clients hire you partly for your distinctive look over time.
Study your favorite photographers’ color treatments carefully for inspiration. What makes their work instantly recognizable to you? Often it’s consistent color grading choices they make. They’ve found combinations that work and stick with them.
Experiment extensively to find what resonates with you personally. Try different split toning combinations on various images. Test various color wheel positions and intensities. Save combinations you love for later. Delete ones that don’t feel right to you.
Practice color grading regularly on diverse images for improvement. The more you grade, the faster and better you become. You’ll develop intuition for which colors work where. Your editing workflow becomes efficient and confident over time. Eventually, color grading becomes second nature rather than a struggle.

Darlene Lleno
Darlene Lleno brings a unique perspective to DIY Photography as someone who grew up surrounded by camera gear but chose words over lenses. With five years of writing experience, she specializes in photography content that’s both technically informed and genuinely passionate. Growing up with a photographer twin brother meant camera talk was everyday conversation in her household. While he mastered capturing moments, Darlene discovered she preferred being the subject and the storyteller behind the scenes. As a travel enthusiast and mother of two, she understands the importance of preserving life’s precious moments. When not exploring new destinations or writing for DIY Photography, you’ll find her reading or tending to her garden. Her approach to photography writing is refreshingly authentic, she may not be behind the camera, but she knows exactly what it takes to help others capture the shots that matter most.
Related Posts
 Adobe brings a major features to Lightroom CC including tone curve and split toning
 Lightroom for iOS 2.1 adds live filters, point curves and split toning
 Adobe unveils Lightroom 2.0 for Android, complete with RAW shooting/editing, Dehaze and Split Toning
 Lightroom Classic 10.0 released, features new color grading wheels and enhanced speed
Join the Discussion
DIYP Comment Policy
Be nice, be on-topic, no personal information or flames.