


I made my own digital camera using an Arduino, a projector and a photoresistor
Jul 3, 2019
Niklas Roy

We love it when our readers get in touch with us to share their stories. This article was contributed to DIYP by a member of our community. If you would like to contribute an article, please contact us here.
Share:

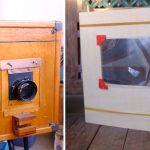
The Flying Pixel Portrait Camera uses a video beamer, a single photoresistor, an Arduino and a PC for taking photos of people’s faces. The beamer ‘scans’ the image by projecting a small white square onto a person’s face inside an otherwise completely dark chamber. While the projected square slowly moves over the entire face, the photoresistor captures the reflected luminosities.
This generates a proportional analog electric signal which is digitized by an Arduino and transmitted to the PC. As the PC also controls the position of the projected square, it can now construct an image based on the different brightness values that it receives, one pixel at a time.
The scanning speed for the pictures which are shown above was rather slow. The speed is limited by the framerate of the projector, as only one pixel can be projected and thus can be captured at a time. All the faces are scanned with 30 pixels / second and since each image is 50 * 50 pixels large, it took 83 seconds to take one photo.

Instead of projecting a white pixel, one can also project a red, a green and a blue pixel one after another. This way, it is possible to scan RGB color images. Of course, a color scan is three times slower than a monochromatic scan – and the resulting image is also a lot more noisy, as a colored pixel is less bright than a white pixel. In fact, the blue channel of the color images that I made is mainly noise and contains almost no usable signal, because the LDR is not very sensitive to blue light.

Technical implementation
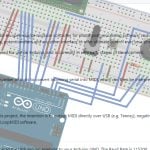
The diagram below shows the hardware setup of this installation. The program running on the computer is written in Processing and you can find it here. The Arduino is flashed with the Firmata firmware. This handy firmware gives direct access to the Arduino-pins via the Processing sketch. This way, the computer can read the analog Voltages from the photoresistor/voltage divider without writing an extra Arduino code.

Inspiration for the project
I have to admit that I didn’t come up with this concept. Some clever minds had the idea for scanning images this way already roughly 100 years ago. The technique is called ‘flying-spot scanning’ and it was used in the early days of mechanical television. I just thought it would be interesting to recreate the setup with today’s technologies. Instead of illuminating faces with an arc light shining through a spinning Nipkow disk, I used a beamer. And instead of transmitting the images to a ‘televisor’ (this is how mechanical TV receivers were called back in the days), I recorded the results of the scans as still images on my computer.

Scanning images with an arc light, a motorized spinning disk with a few holes punched into it and a photocell is quite low tech. However, nowadays it seems much simpler to quickly hook up a beamer to a computer and a photoresistor to an Arduino in order to achieve a similar result. Nevertheless, the results of early mechanical TV scanning were quite stunning and definitely outperformed my setup when it comes to speed: The mechanical image scanners of the 1920s were able to scan several images per second. They could actually transmit moving images – while my camera can only record still images of subjects which don’t move for 1½ minutes.
Background & thanks
I made this experiment during a workshop that I gave at HEAD – the art and design school of Geneva as part of the Master of Arts in Media Design program. The theme of the workshop was “Advanced Selfie Machines” and you can find more results of this workshop here.
Thanks to Alexia Mathieu and the whole team of HEAD for the nice time in Geneva and for inviting me to give this workshop! And thanks to Raphaelle Mueller for the additional photos!
Additional resources
- Photo album [all pictures CC-BY Niklas Roy]
- Photo album [all pictures © HEAD, Genève – Raphaelle Mueller]
- Processing source code
About the Author
Niklas Roy is an installation artist and educator living in Berlin. Through his work, he explores art, science and technology, often in the form of humorous installations and machines. He likes to make as much as possible himself as it produces ideas which inspire his future projects. You can find out more about Niklas and his projects on his website and follow him on Twitter. This article was also published here and shared with permission.
We love it when our readers get in touch with us to share their stories. This article was contributed to DIYP by a member of our community. If you would like to contribute an article, please contact us here.

Join the Discussion
DIYP Comment Policy
Be nice, be on-topic, no personal information or flames.
One response to “I made my own digital camera using an Arduino, a projector and a photoresistor”
I think they’re 55+ years late to the party..